はじめに
BLE Micro Proを使って作成した自作キーボードをvial対応させようと奮闘した時のメモです。
今回vial対応させる自作キーボードはこちら。
この時名前は決めていませんでしたが「Monolith43」という名前で設定していこうと思います。キーが43個あって、蓋をした姿がモノリス感あるので。このキーボードのこだわりについては以下にまとめています。
ちなみにBLE Micro ProのVial対応は最近のことの様です。ありがたや🙏
Vialのソフトウェアはここからダウンロードできます。
新しいブートローダー、アプリケーションに更新
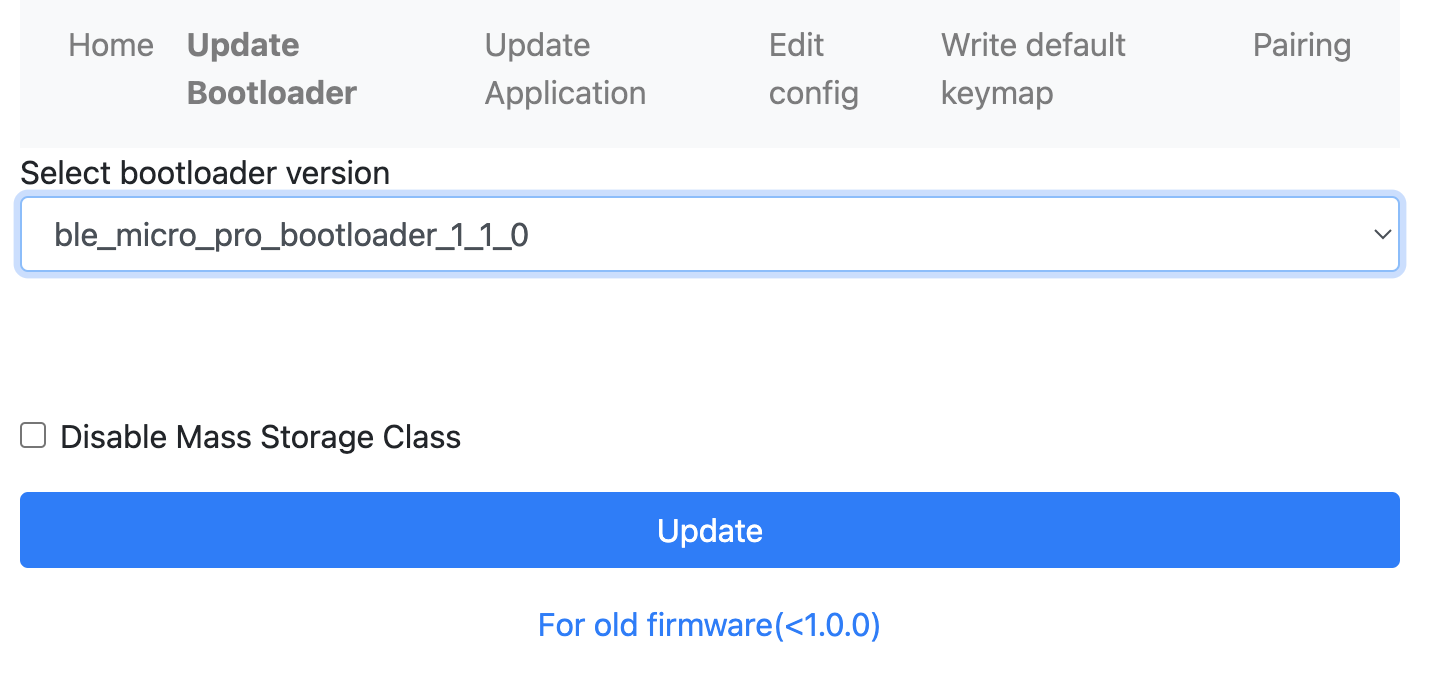
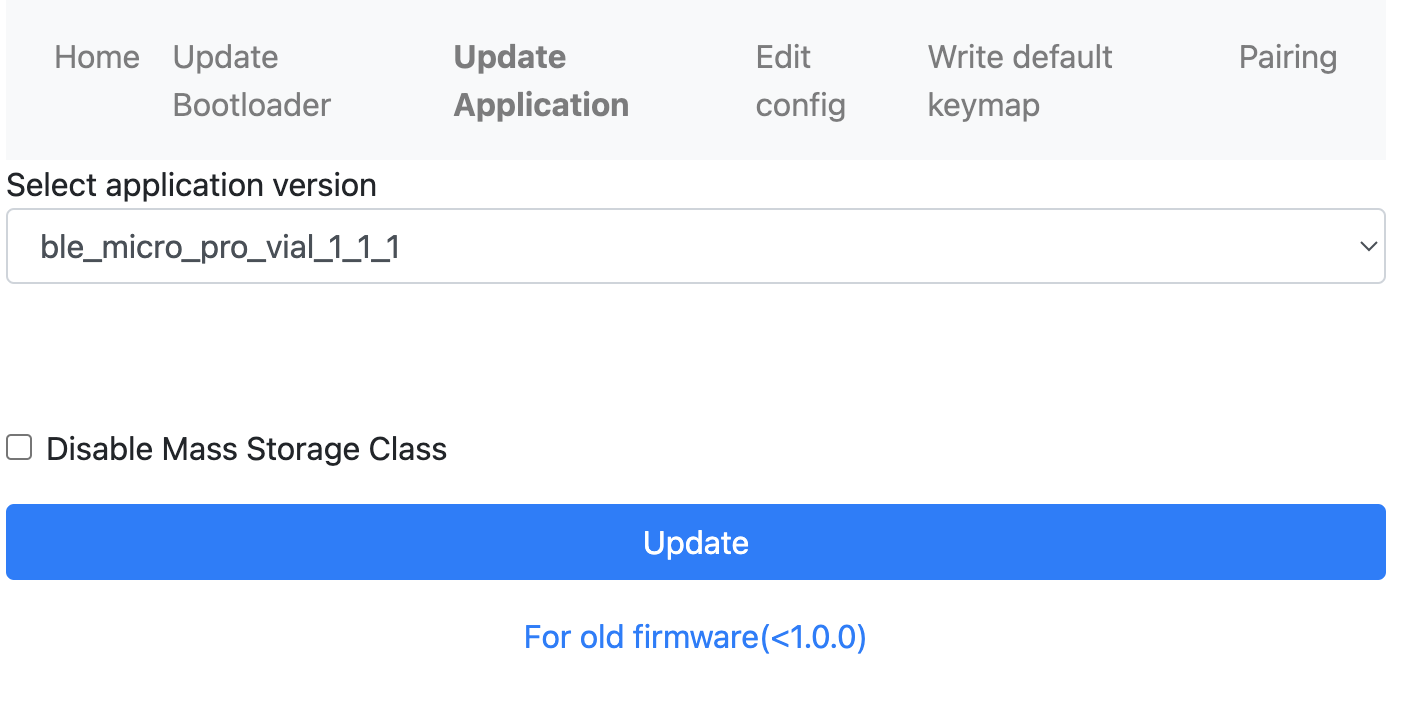
WebConfiguratorを使ってブートローダーを「1_1_0」に、アプリケーションを「1_1_1」にアップデートします。
ブートローダーの画面
アプリケーションの画面
マトリックスの設定を書き込むためにconfig.binを作る
BMPのver0.xのときはconfig.jsnを編集して上書き保存すれば、ピン配置を修正できたけど、v1.x以降はconfig.binを作る必要がある模様。config.binを作るにはqmkで利用するinfo.jsonを作成して、以下のgeneratorを使って生成する必要がある。
Monolith43のために以下のinfo.jsonを作成した。元々登録されているDaily Craft KeyboardさんのOwl8のinfo.jsonを参考に作成。
{
	"keyboard_name": "Monolith43",
	"keyboard_folder": "notitle/Monolith43",
	"keymaps": {},
	"layouts": {
		"LAYOUT": {
			"layout": [
				{ "x": 0, "y": 0, "matrix": [ 0, 0 ] },
				{ "x": 1, "y": 0, "matrix": [ 0, 1 ] },
				{ "x": 2, "y": 0, "matrix": [ 0, 2 ] },
				{ "x": 3, "y": 0, "matrix": [ 0, 3 ] },
				{ "x": 4, "y": 0, "matrix": [ 0, 4 ] },
				{ "x": 7, "y": 0, "matrix": [ 0, 5 ] },
				{ "x": 8, "y": 0, "matrix": [ 0, 6 ] },
				{ "x": 9, "y": 0, "matrix": [ 0, 7 ] },
				{ "x": 10, "y": 0, "matrix": [ 0, 8 ] },
				{ "x": 11, "y": 0, "matrix": [ 0, 9 ] },
				{ "x": 0, "y": 1, "matrix": [ 1, 0 ] },
				{ "x": 1, "y": 1, "matrix": [ 1, 1 ] },
				{ "x": 2, "y": 1, "matrix": [ 1, 2 ] },
				{ "x": 3, "y": 1, "matrix": [ 1, 3 ] },
				{ "x": 4, "y": 1, "matrix": [ 1, 4 ] },
				{ "x": 7, "y": 1, "matrix": [ 1, 5 ] },
				{ "x": 8, "y": 1, "matrix": [ 1, 6 ] },
				{ "x": 9, "y": 1, "matrix": [ 1, 7 ] },
				{ "x": 10, "y": 1, "matrix": [ 1, 8 ] },
				{ "x": 11, "y": 1, "matrix": [ 1, 9 ] },
				{ "x": 0, "y": 2, "matrix": [ 2, 0 ] },
				{ "x": 1, "y": 2, "matrix": [ 2, 1 ] },
				{ "x": 2, "y": 2, "matrix": [ 2, 2 ] },
				{ "x": 3, "y": 2, "matrix": [ 2, 3 ] },
				{ "x": 4, "y": 2, "matrix": [ 2, 4 ] },
				{ "x": 7, "y": 2, "matrix": [ 2, 5 ] },
				{ "x": 8, "y": 2, "matrix": [ 2, 6 ] },
				{ "x": 9, "y": 2, "matrix": [ 2, 7 ] },
				{ "x": 10, "y": 2, "matrix": [ 2, 8 ] },
				{ "x": 11, "y": 2, "matrix": [ 2, 9 ] },
				{ "x": 0, "y": 3, "matrix": [ 3, 0 ] },
				{ "x": 1, "y": 3, "matrix": [ 3, 1 ] },
				{ "x": 2, "y": 3, "matrix": [ 3, 2 ] },
				{ "x": 3, "y": 3, "matrix": [ 3, 3 ] },
				{ "x": 4, "y": 3, "matrix": [ 3, 4 ] },
				{ "x": 7, "y": 3, "matrix": [ 3, 5 ] },
				{ "x": 8, "y": 3, "matrix": [ 3, 6 ] },
				{ "x": 9, "y": 3, "matrix": [ 3, 7 ] },
				{ "x": 10, "y": 3, "matrix": [ 3, 8 ] },
				{ "x": 11, "y": 3, "matrix": [ 3, 9 ] },
				{ "x": 5, "y": 3, "matrix": [ 4, 0 ] },
				{ "x": 5.5, "y": 2, "matrix": [ 4, 1 ] },
				{ "x": 6, "y": 3, "matrix": [ 4, 2 ] }
			],
			"c_macro": false,
			"json_layout": true
		}
	},
	"parse_errors": [],
	"parse_warnings": [],
	"maintainer": "notitle",
	"manufacturer": "notitle",
	"url": "",
	"usb": {
		"vid": "0xfeed",
		"pid": "0x3060",
		"device_version": "0.0.1"
	},
	"processor": "atmega32u4",
	"bootloader": "atmel-dfu",
	"matrix_pins": {
    "cols": [
        "F4",
        "F5",
        "F6",
        "F7",
        "B1",
        "D1",
        "D0",
        "D4",
        "C6",
        "D7"
    ],
    "rows": [
        "B3",
        "B2",
        "B6",
        "B4",
        "B5",
    ]
	},
	"processor_type": "avr",
	"platform": "unknown",
	"platform_key": "avr",
	"protocol": "LUFA",
	"bootmagic": {
		"enabled": true
	},
	"mouse_key": {
		"enabled": true
	},
	"config_h_features": {
		"bootmagic": true,
		"mousekey": true,
		"extrakey": true,
		"console": false,
		"command": false,
		"nkro": false,
		"backlight": false,
		"rgblight": false,
		"audio": false,
		"encoder": true
	},
	"features": {
		"bootmagic": true,
		"mousekey": true,
		"extrakey": true,
		"console": false,
		"command": false,
		"nkro": false,
		"backlight": false,
		"rgblight": false,
		"audio": false,
		"encoder": true
	},
	"qmk": {
		"locking": {
			"enabled": true,
			"resync": true
		}
	},
	"matrix_size": {
		"cols": 10,
		"rows": 5
	}
}
ところどころ分かってはいないけどピン配列については以下の画像をもとに設定。1枚目と2枚目は左右反転しているので注意。
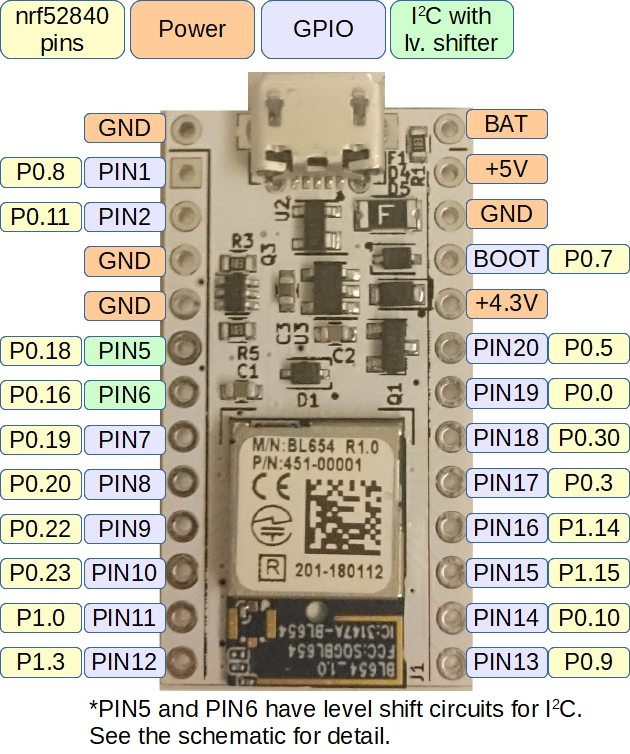
https://sekigon-gonnoc.github.io/BLE-Micro-Pro/#/edit_config_file

https://zenn.dev/yukiito/articles/8c803f6f01ace5
config.binの書き込み
生成したconfig.binを入れて再起動(ケーブルの抜き差し)をしたところ、なぜかブートローダーモードで起動...webconfiguratorでブートローダーを再インストールしたところMonolith43として起動してくれた。わからん。
でもちゃんとVialにレイアウトが反映されてて感動!
info.jsonに関するメモ
Layoutで指定するxとyはvialで表示される時の位置に反映される
トラブル対応
いくつかハマったポイントを時系列にまとめます。
なぜか押せないキーがあった
VialのMatrix testerでは押せてるのに、キーボードとして入力はできない状態。a,s,d,f,g,h,j,kが全滅。他にも入力できないキーが多数。
ケーブルを差し直したら治った
この辺はほんと謎。何もしてないのに治った。。。
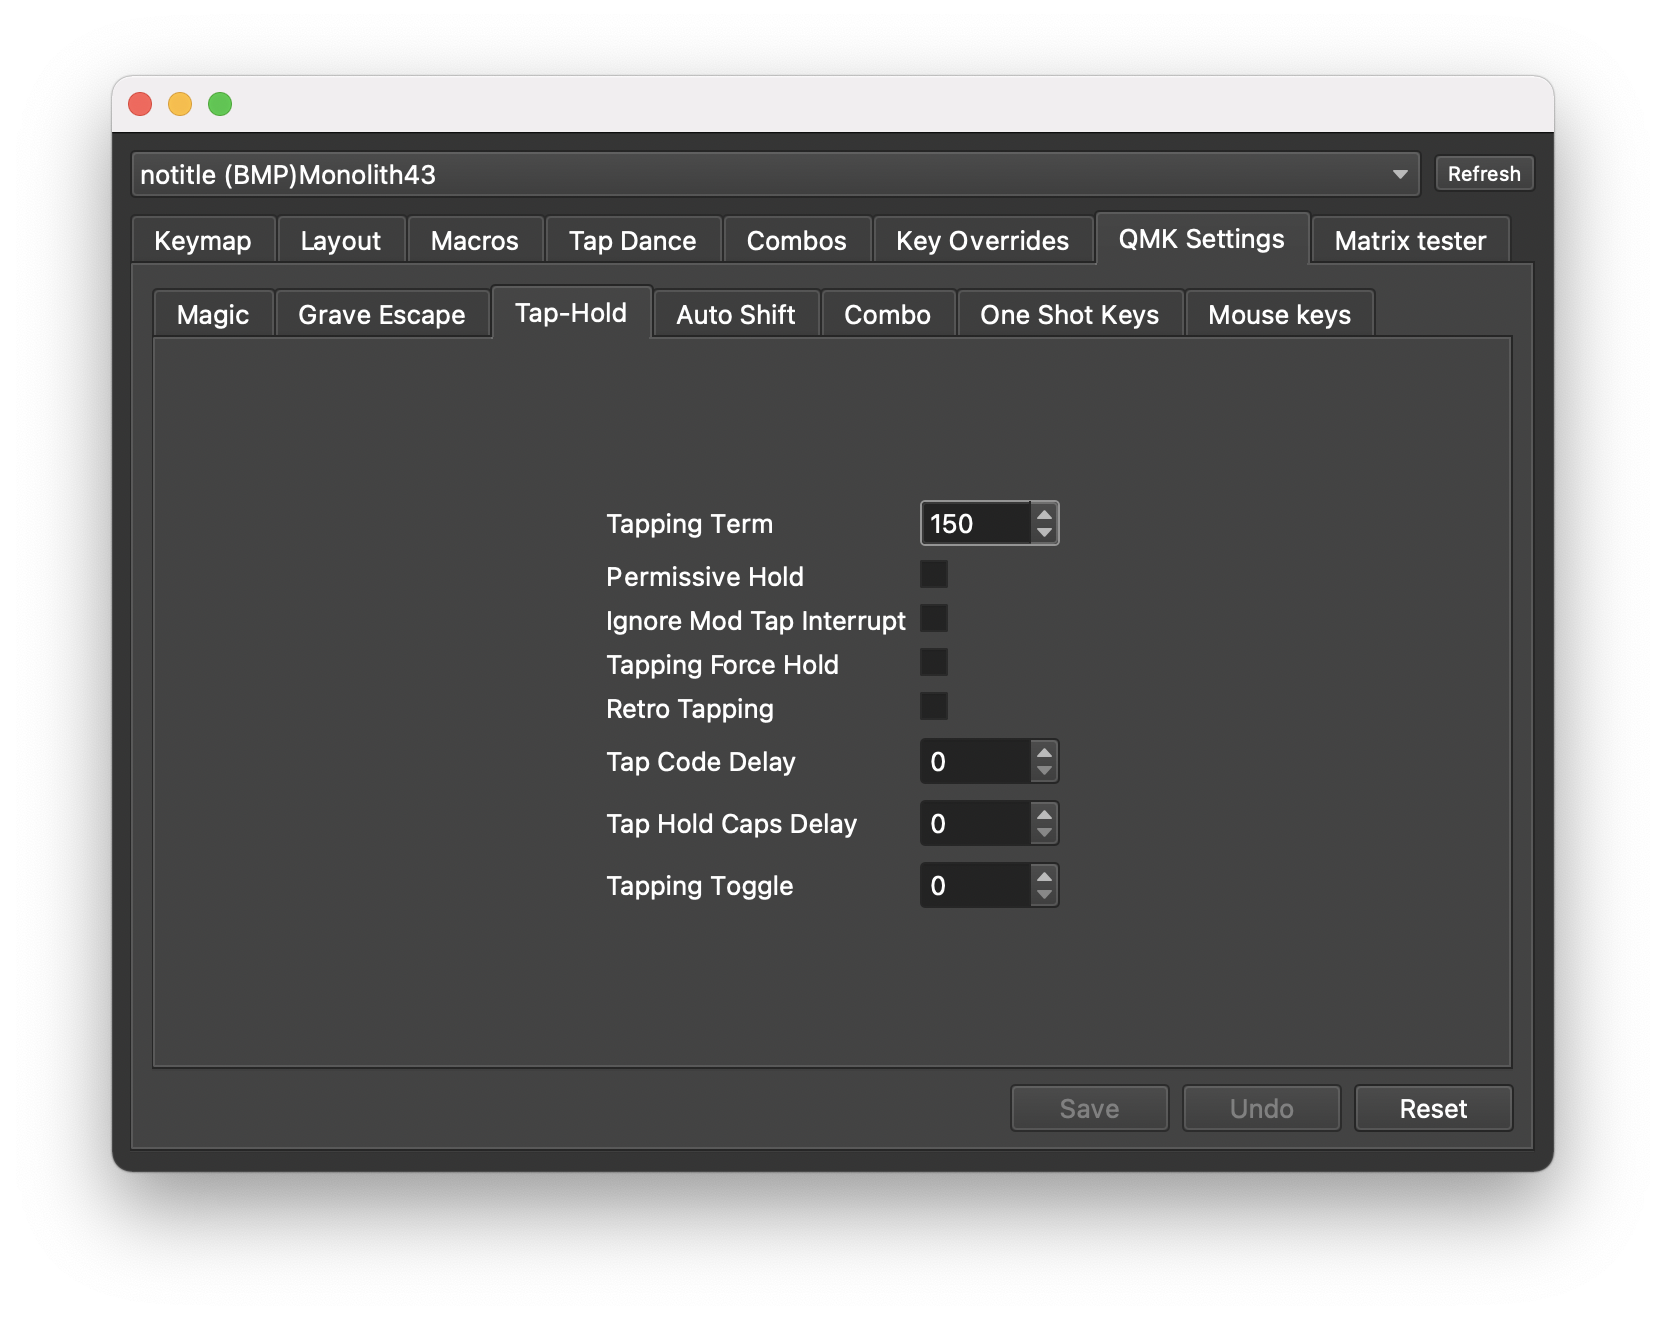
LTのタップが効かない。
以下の通り設定しているLTが思う様に動かない。長押しでレイヤー切り替えはできるけど、タップしてもスペースやエンター、「ー」が入力されない。
Tapping Termの設定で直った
QMK SettingsのTap-Holdの設定でTapping Termが0になっていたのが原因みたい。とりあえず150にしてみたら動いた。5000にしても思った通りの動きをしてるので、どれくらいの数値がちょうど良いのかはよくわからない。
BMPのカスタムキーが設定できない
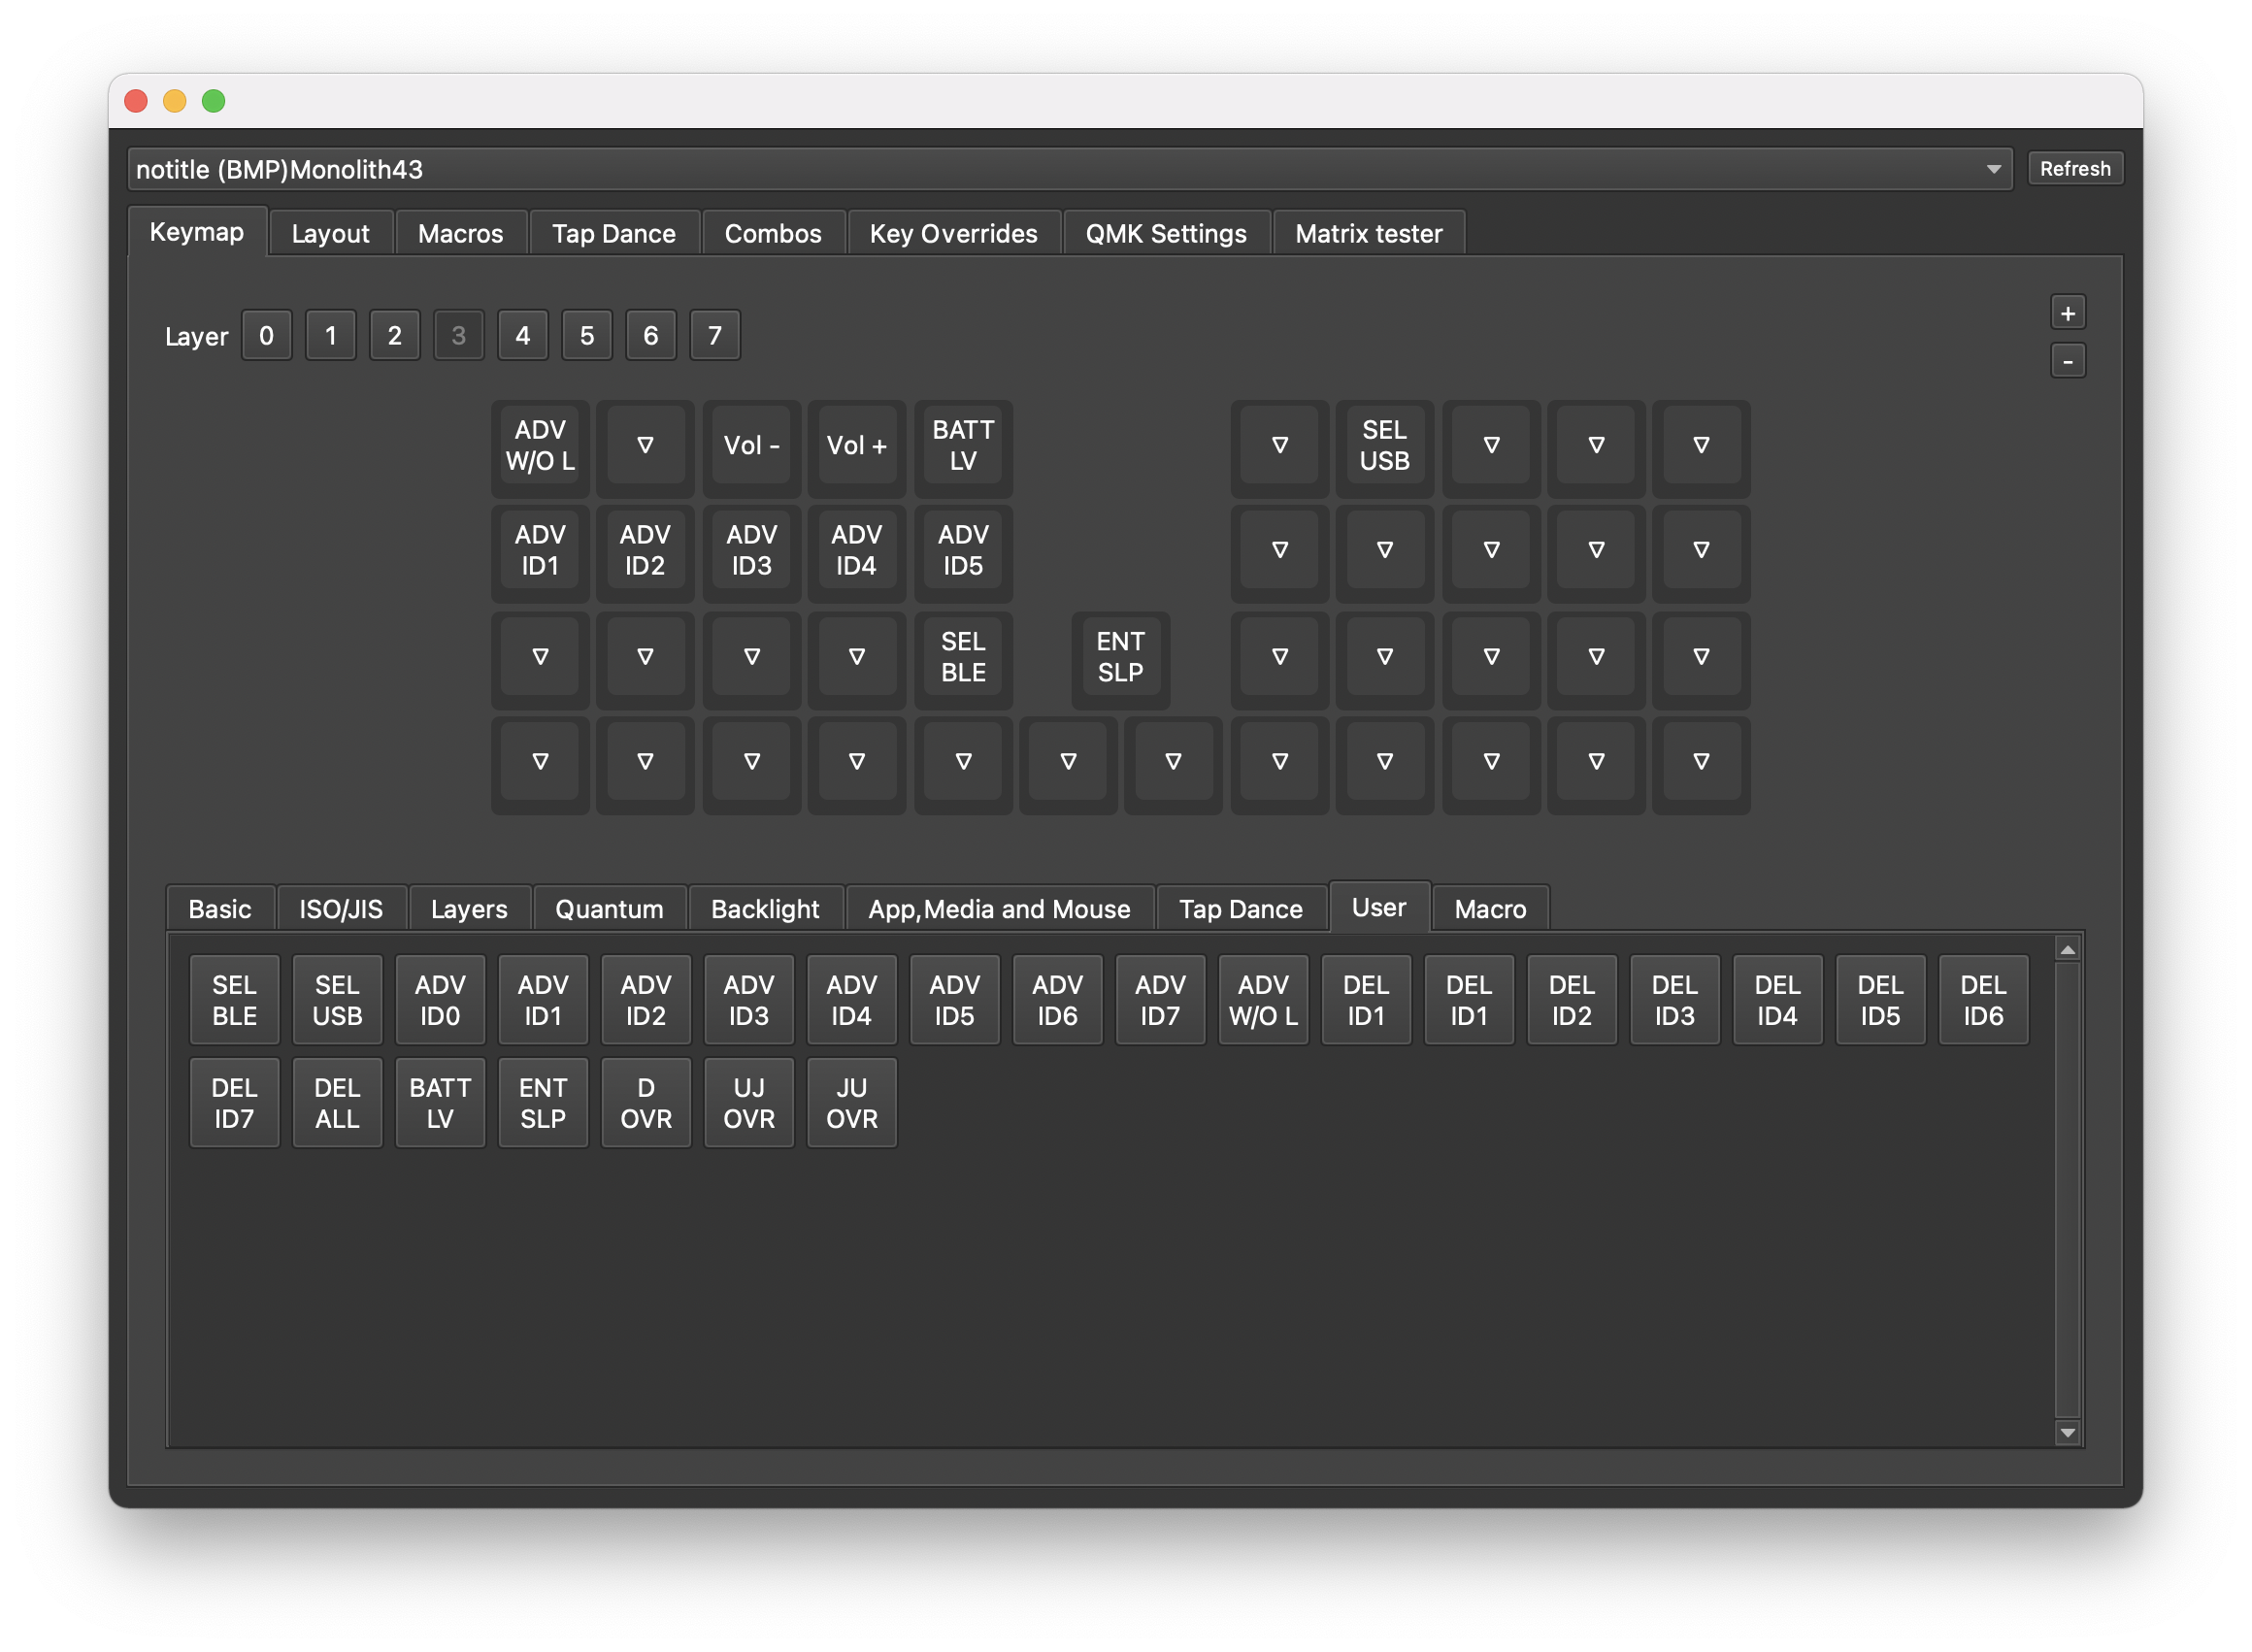
以下にあるAVD_ID1などが設定できなかった。何か間違ったのか...

https://sekigon-gonnoc.github.io/BLE-Micro-Pro/#/getting_started
VIALJSON.BINの中身をみたらわかった
VIALJSON.BINを解凍して中身を見てみたところcutomKeycodesの設定がことなっていた。主な違いは以下の通り。
| Webサイト記載のキーコード | 本当のキーコード | 機能 |
|---|---|---|
| AD_WO_L | 変化なし | ホストの接続、スレーブの探索を開始する。新しいデバイスとペアリングできる |
| ADV_IDn | ADVn | n番目にペアリングしたデバイスと接続しようとする |
| SEL_USB | 変化なし | USB接続を経由して送信する |
| SEL_BLE | 変化なし | BLE接続を経由して送信する |
| BATT_LV | BATT | バッテリーの電圧を表示する(文字列が自動で入力されます) |
| ENT_SLP | 変化なし | スリープモードに入る |
ちなみにVIALJSON.BINの中身のcustomKeycodesは以下の通り。
{
    "customKeycodes": [
        {
            "name": "SEL_BLE",
            "title": "Output report from BLE",
            "shortName": "SEL\nBLE"
        },
        {
            "name": "SEL_USB",
            "title": "Output report from USB",
            "shortName": "SEL\nUSB"
        },
        {
            "name": "ADV0",
            "title": "Start advertise to ID0",
            "shortName": "ADV\nID0"
        },
        {
            "name": "ADV1",
            "title": "Start advertise to ID1",
            "shortName": "ADV\nID1"
        },
        {
            "name": "ADV2",
            "title": "Start advertise to ID2",
            "shortName": "ADV\nID2"
        },
        {
            "name": "ADV3",
            "title": "Start advertise to ID3",
            "shortName": "ADV\nID3"
        },
        {
            "name": "ADV4",
            "title": "Start advertise to ID4",
            "shortName": "ADV\nID4"
        },
        {
            "name": "ADV5",
            "title": "Start advertise to ID5",
            "shortName": "ADV\nID5"
        },
        {
            "name": "ADV6",
            "title": "Start advertise to ID6",
            "shortName": "ADV\nID6"
        },
        {
            "name": "ADV7",
            "title": "Start advertise to ID7",
            "shortName": "ADV\nID7"
        },
        {
            "name": "AD_WO_L",
            "title": "Start advertise without whitelist (Pair new device)",
            "shortName": "ADV\nW/O L"
        },
        {
            "name": "DEL0",
            "title": "Delete pairing info ID1",
            "shortName": "DEL\nID1"
        },
        {
            "name": "DEL1",
            "title": "Delete pairing info ID1",
            "shortName": "DEL\nID1"
        },
        {
            "name": "DEL2",
            "title": "Delete pairing info ID2",
            "shortName": "DEL\nID2"
        },
        {
            "name": "DEL3",
            "title": "Delete pairing info ID3",
            "shortName": "DEL\nID3"
        },
        {
            "name": "DEL4",
            "title": "Delete pairing info ID4",
            "shortName": "DEL\nID4"
        },
        {
            "name": "DEL5",
            "title": "Delete pairing info ID5",
            "shortName": "DEL\nID5"
        },
        {
            "name": "DEL6",
            "title": "Delete pairing info ID6",
            "shortName": "DEL\nID6"
        },
        {
            "name": "DEL7",
            "title": "Delete pairing info ID7",
            "shortName": "DEL\nID7"
        },
        {
            "name": "DEL_ALL",
            "title": "Delete all pairing info",
            "shortName": "DEL\nALL"
        },
        {
            "name": "BATT",
            "title": "Print battery info",
            "shortName": "BATT\nLV"
        },
        {
            "name": "ENT_SLP",
            "title": "Enter deep sleep mode",
            "shortName": "ENT\nSLP"
        },
        {
            "name": "DISABLE_KEY_OS_OVERRIDE",
            "title": "Disable key overrides for JP/US OS",
            "shortName": "D\nOVR"
        },
        {
            "name": "ENABLE_US_KEY_ON_JP_OS_OVERRIDE",
            "title": "Enable US keyboard on JP OS override",
            "shortName": "UJ\nOVR"
        },
        {
            "name": "ENABLE_JP_KEY_ON_US_OS_OVERRIDE",
            "title": "Enable JP keyboard on US OS override",
            "shortName": "JU\nOVR"
        }
    ]
}
そもそもVialのUserタブから設定できた(追記@2024.1.2 19:51)
BMPの開発者であるせきごんさんからVialのUserタブから設定できることを教えていただきました!
今確認したら確かにUserタブにカスタムキーが出てきていました。なぜ気づかなかったのか...!!これを使えば設定も楽ちんですね。
おわりに
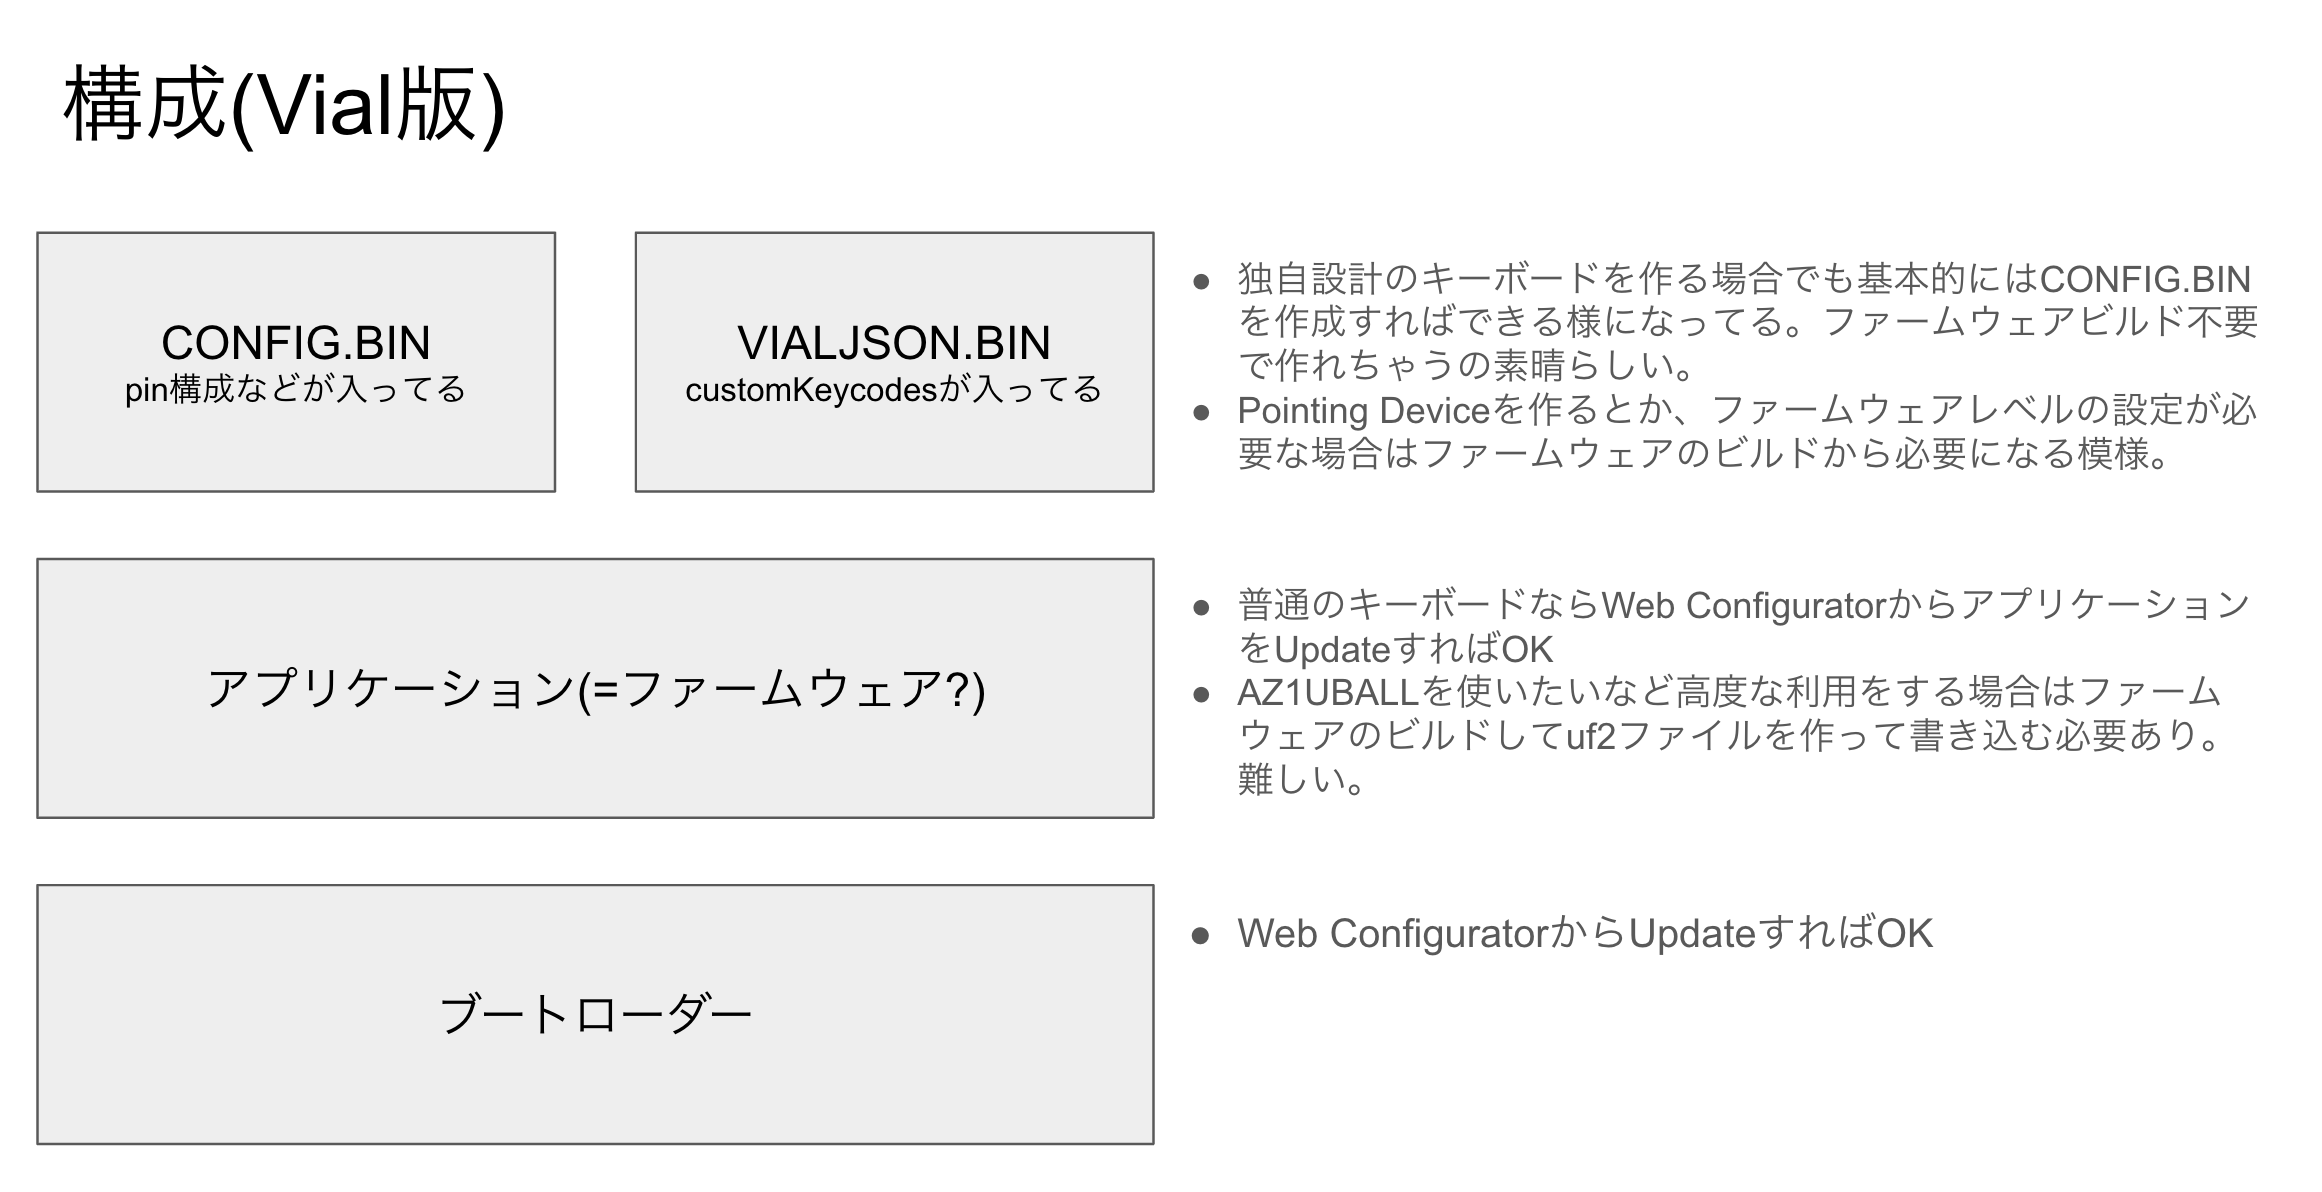
なんとかvial対応できました。よかったよかった。BMP自体の構成要素がわからずどこから手をつけていいのかも分かっていなかったけど、基本的には以下の様な構成だと思う。たぶん。ちがうかもだけど。
