はじめに
ruby-dnnで、Pix2pixを使って、建物の画像変換をやってみます。
コード全文はhttps://github.com/unagiootoro/facade-pix2pixにあります。
Pix2pix
Pix2pixを知らない人向けに大雑把に解説します。
Pix2pixは、主に画像変換に使われるディープラーニングのモデルです。
Pix2pixの最大の特徴は、くっきりとした画像を生成できるというところにあります。
通常の画像変換では、生成した画像が本物の画像にどれぐらい近いかをピクセル値で判断しますが、Pix2pixでは、生成した画像がどれくらい本物の画像に近いかを判断する基準を自動で学習してくれます。ピクセル値の差異は、くっきりした画像より、ぼやけた画像のほうが少なくなります。そのため、ピクセル値に依存しない学習を行うことで、くっきりとした画像が生成できるようになります。1
使用ライブラリ/バージョンなど
Ruby ... v2.6.5
ruby-dnn ... v1.1.3
Numo::NArray ... v0.9.1.5
Numo::Linalg ... v0.1.4
rubyzip ... v2.2.0
ソースコード
ruby-dnnでPix2pixを学習させるコードの大雑把な解説です。
とりあえず動かしてみたい方は、「学習結果の確認」まで飛ばしてください。
データセットの読み込み
facade_dataset.rb
ruby-dnnのdownloaderを使用して、Facadeデータセットをダウンロードします。
やってる処理は以下の通りです。
- Facadeデータセットをダウンロードして解凍する。
- ダウンロードしたデータを読み込み、64 * 64のサイズに縮小する。
require "zip"
require "dnn/image"

module DNN
  module Facade
    FACADE_URL = "http://cmp.felk.cvut.cz/~tylecr1/facade/"
    BASE_DIR_NAME = "CMP_facade_DB_base"
    EXTENDED_DIR_NAME = "CMP_facade_DB_extended"
    BASE_PATH = "#{DOWNLOADS_PATH}/downloads/#{BASE_DIR_NAME}"
    EXTENDED_PATH = "#{DOWNLOADS_PATH}/downloads/#{EXTENDED_DIR_NAME}"

    def self.downloads
      unless Dir.exist?(BASE_PATH)
        zip_file_name = "#{BASE_DIR_NAME}.zip"
        Downloader.download("#{FACADE_URL}/#{zip_file_name}")
        zip_decompression(BASE_PATH)
        File.unlink("#{DOWNLOADS_PATH}/downloads/#{zip_file_name}")
      end
      unless Dir.exist?(EXTENDED_PATH)
        zip_file_name = "#{EXTENDED_DIR_NAME}.zip"
        Downloader.download("#{FACADE_URL}/#{zip_file_name}")
        zip_decompression(EXTENDED_PATH)
        File.unlink("#{DOWNLOADS_PATH}/downloads/#{zip_file_name}")
      end
    end

    def self.zip_decompression(zip_path)
      Zip::File.open("#{zip_path}.zip") do |zip|
        zip.each do |entry|
          zip.extract(entry, "#{zip_path}/#{entry.name}") { true }
        end
      end
    end

    def self.load_images(dir_path)
      downloads
      in_imgs = []
      out_imgs = []
      Dir["#{dir_path}/*.png"].each do |fpath|
        img = DNN::Image.read(fpath)
        img = DNN::Image.resize(img, 64, 64)
        in_imgs << img
      end
      Dir["#{dir_path}/*.jpg"].each do |fpath|
        img = DNN::Image.read(fpath)
        img = DNN::Image.resize(img, 64, 64)
        out_imgs << img
      end
      [in_imgs, out_imgs]
    end

    def self.load_train
      load_images("#{BASE_PATH}/base")
    end

    def self.load_test
      load_images("#{EXTENDED_PATH}/extended")
    end
  end
end
train.rb より抜粋
ダウンロードしたデータは、load_datasetで読み込めるようにします。
このとき、画像データを-1 ~ 1の範囲に正規化します。
def load_dataset
  x, y = DNN::Facade.load_train
  x = Numo::SFloat.cast(x)
  y = Numo::SFloat.cast(y)
  x = (x / 127.5) - 1
  y = (y / 127.5) - 1
  [x, y]
end
モデル定義
dcgan.rb
画像を入力として受け取るDCGANモデルを定義します。各クラスの役割は、以下の通りです。
Generator: 入力画像から変換先の画像を生成します。
Discriminator: 入力画像とGeneratorが生成した画像のセットを受け取り、それらの組み合わせが本物か生成された画像かを判断できるように学習させるためのモデルです。
DCGAN: Discriminatorを騙せるような画像を生成できるようにGeneratorを学習させるためのモデルです。
長いので折りたたんでいます
include DNN::Models
include DNN::Layers

class Generator < Model
  def initialize(input_shape)
    super()
    @input_shape = input_shape
    @l1 = Conv2D.new(32, 4, padding: true)
    @l2 = Conv2D.new(32, 4, strides: 2, padding: true)
    @l3 = Conv2D.new(64, 4, padding: true)
    @l4 = Conv2D.new(64, 4, strides: 2, padding: true)
    @l5 = Conv2D.new(128, 4, padding: true)
    @l6 = Conv2DTranspose.new(64, 4, strides: 2, padding: true)
    @l7 = Conv2D.new(64, 4, padding: true)
    @l8 = Conv2DTranspose.new(32, 4, strides: 2, padding: true)
    @l9 = Conv2D.new(32, 4, padding: true)
    @l10 = Conv2D.new(32, 4, padding: true)
    @l11 = Conv2D.new(3, 4, padding: true)
    @bn1 = BatchNormalization.new
    @bn2 = BatchNormalization.new
    @bn3 = BatchNormalization.new
    @bn4 = BatchNormalization.new
    @bn5 = BatchNormalization.new
    @bn6 = BatchNormalization.new
    @bn7 = BatchNormalization.new
    @bn8 = BatchNormalization.new
    @bn9 = BatchNormalization.new
  end

  def forward(x)
    input = InputLayer.new(@input_shape).(x)
    x = @l1.(input)
    x = @bn1.(x)
    h1 = ReLU.(x)

    x = @l2.(h1)
    x = @bn2.(x)
    x = ReLU.(x)

    x = @l3.(x)
    x = @bn3.(x)
    h2 = ReLU.(x)

    x = @l4.(x)
    x = @bn4.(x)
    x = ReLU.(x)

    x = @l5.(x)
    x = @bn5.(x)
    x = ReLU.(x)

    x = @l6.(x)
    x = @bn6.(x)
    x = ReLU.(x)

    x = @l7.(x)
    x = @bn7.(x)
    x = ReLU.(x)
    x = Concatenate.(x, h2, axis: 3)

    x = @l8.(x)
    x = @bn8.(x)
    x = ReLU.(x)

    x = @l9.(x)
    x = @bn9.(x)
    x = ReLU.(x)
    x = Concatenate.(x, h1, axis: 3)

    x = @l10.(x)
    x = ReLU.(x)

    x = @l11.(x)
    x = Tanh.(x)
    x
  end
end

class Discriminator < Model
  def initialize(gen_input_shape, gen_output_shape)
    super()
    @gen_input_shape = gen_input_shape
    @gen_output_shape = gen_output_shape
    @l1_1 = Conv2D.new(32, 4, padding: true)
    @l1_2 = Conv2D.new(32, 4, padding: true)
    @l2 = Conv2D.new(32, 4, strides: 2, padding: true)
    @l3 = Conv2D.new(32, 4, padding: true)
    @l4 = Conv2D.new(64, 4, strides: 2, padding: true)
    @l5 = Conv2D.new(64, 4, padding: true)
    @l6 = Dense.new(1024)
    @l7 = Dense.new(1)
    @bn1 = BatchNormalization.new
    @bn2 = BatchNormalization.new
    @bn3 = BatchNormalization.new
    @bn4 = BatchNormalization.new
    @bn5 = BatchNormalization.new
    @bn6 = BatchNormalization.new
  end

  def forward(inputs)
    input, images = *inputs
    x = InputLayer.new(@gen_input_shape).(input)
    x = @l1_1.(x)
    x = @bn1.(x)
    x1 = LeakyReLU.(x, 0.2)

    x = InputLayer.new(@gen_output_shape).(images)
    x = @l1_2.(x)
    x = @bn2.(x)
    x2 = LeakyReLU.(x, 0.2)

    x = Concatenate.(x1, x2)
    x = @l2.(x)
    x = @bn3.(x)
    x = LeakyReLU.(x, 0.2)

    x = @l3.(x)
    x = @bn4.(x)
    x = LeakyReLU.(x, 0.2)

    x = @l4.(x)
    x = @bn5.(x)
    x = LeakyReLU.(x, 0.2)

    x = @l5.(x)
    x = @bn6.(x)
    x = LeakyReLU.(x, 0.2)

    x = Flatten.(x)
    x = @l6.(x)
    x = LeakyReLU.(x, 0.2)

    x = @l7.(x)
    x
  end

  def enable_training
    trainable_layers.each do |layer|
      layer.trainable = true
    end
  end

  def disable_training
    trainable_layers.each do |layer|
      layer.trainable = false
    end
  end
end

class DCGAN < Model
  attr_reader :gen
  attr_reader :dis

  def initialize(gen, dis)
    super()
    @gen = gen
    @dis = dis
  end

  def forward(input)
    images = @gen.(input)
    @dis.disable_training
    out = @dis.([input, images])
    [images, out]
  end
end
モデルの作成
train.rb より抜粋
Generator、Discriminator、DCGANのそれぞれのモデルを作成します。
最適化には、Discriminator、DCGANともにAdamを使用しています。
損失関数は、DiscriminatorにはSigmoidCrossEntropyを適用し、DCGANには、出力画像に対する損失関数としてMeanAbsoluteErrorを、画像の真偽判定に対する損失関数としてSigmoidCrossEntropyを10:1の割合で設定しています。
gen = Generator.new([64, 64, 3])
dis = Discriminator.new([64, 64, 3], [64, 64, 3])
dcgan = DCGAN.new(gen, dis)
dis.setup(Adam.new(alpha: 0.00001, beta1: 0.1), SigmoidCrossEntropy.new)
dcgan.setup(Adam.new(alpha: 0.0002, beta1: 0.5),
            [MeanAbsoluteError.new, SigmoidCrossEntropy.new], loss_weights: [10, 1])
モデルの学習
train.rb より抜粋
学習部分のコードになります。
- load_datasetでFacadeデータセットを読み込む。
- gen.predict(x_in)で、画像を生成する。
- dis.train_on_batch([x_in, x_out], y_real)とdis.train_on_batch([x_in, images], y_fake)で、生成した画像と本物の画像を判断できるようにDiscriminatorを学習させる。
- dcgan.train_on_batch(x_in, [x_out, y_real])で、Discriminatorを騙せるようにGeneratorを学習させる。
x_in, x_out = load_dataset

iter1 = DNN::Iterator.new(x_in, x_out)
iter2 = DNN::Iterator.new(x_in, x_out)
num_batchs = x_in.shape[0] / batch_size
(initial_epoch..epochs).each do |epoch|
  num_batchs.times do |index|
    x_in, x_out = iter1.next_batch(batch_size)

    images = gen.predict(x_in)
    y_real = Numo::SFloat.ones(batch_size, 1)
    y_fake = Numo::SFloat.zeros(batch_size, 1)
    dis.enable_training
    dis_loss = dis.train_on_batch([x_in, x_out], y_real)
    dis_loss += dis.train_on_batch([x_in, images], y_fake)

    x_in, x_out = iter2.next_batch(batch_size)
    dcgan_loss = dcgan.train_on_batch(x_in, [x_out, y_real])

    puts "epoch: #{epoch}, index: #{index}, dis_loss: #{dis_loss}, dcgan_loss: #{dcgan_loss}"
  end
  iter1.reset
  iter2.reset
  dcgan.save("trained/dcgan_model_epoch#{epoch}.marshal") if epoch % 50 == 0
end
学習結果の確認
さあ、学習の準備が整ったので早速学習開始...と行きたいところですが、ruby-dnnはまだGPUに
対応していないので、学習しようとすると1日以上かかります。そのため、今回はすぐに試せるよう、
学習済みの重みを用意しました。
■学習済みの重みを使用する場合。
$ ruby imgen.rb
■一から学習する場合。(1日以上かかります)
$ ruby train.rb
$ ruby make_data.rb
$ ruby imgen.rb
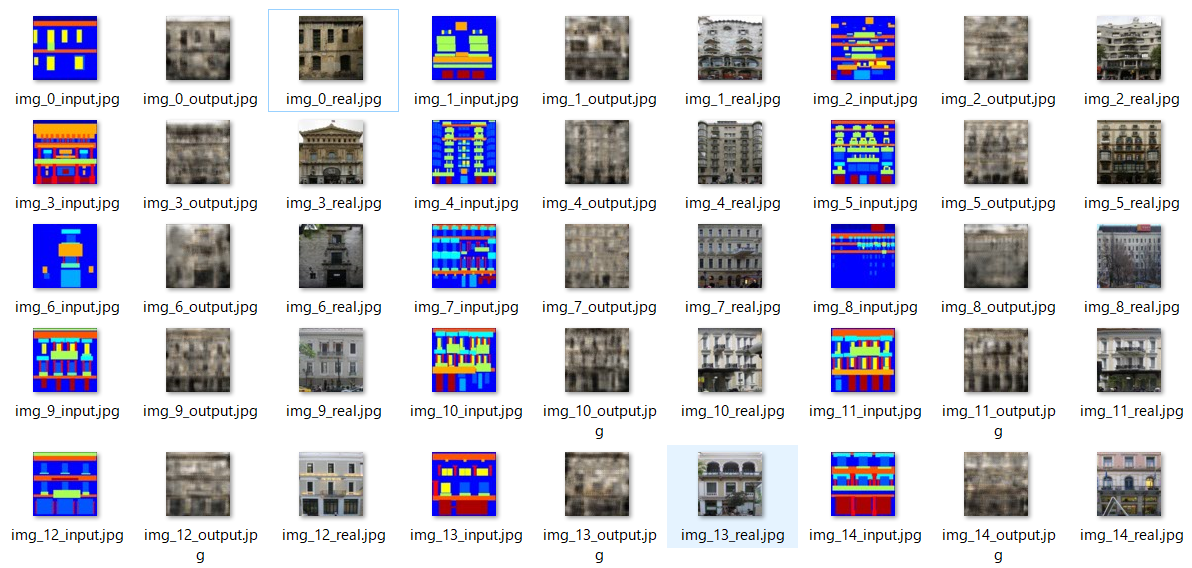
実行結果
inputが入力画像、outputが出力画像、realが本物の画像です。
モデルが小さいので細かいところは再現できていないですが、雰囲気を掴むのには成功してそうですね。
おわりに
いかがだったでしょうか。ディープラーニングというと、どうしてもPythonのイメージが強いですが、Rubyでも意外とできるってことが伝わってくれれば嬉しく思います。
-
実際には、Pix2pixでは、ピクセル値による平均絶対誤差とDiscriminatorによる画像の真偽判定の両方を損失関数として使用しています。 ↩