Titaniumプロジェクトを新規作成する際に、自分で用意したテンプレートプロジェクトを使う方法を調べたら、若干わかりにくかったので、まとめておきます。
はじめに
Alloyベースのプロジェクトを作る際、自分のブログにも書いているのですが、JadeとStylusを使えるようにalloy.jmkを使って設定しています。
その場合、新しくAlloyプロジェクトを作成しようとした場合、
-
$ titanium createでプロジェクトを作成 -
$ alloy newでAlloyを適用 - alloy.jmkをコピってきて、styleを.tssから.stylにコンバートして、viewを.xmlから.jadeにコンバートして...
という手順が必要になります。
これを毎回実行するのが面倒だなーと思っていたところ、titanium createのオプションに--templateオプションがあることに気づきました。
このオプションを使用してテンプレートからプロジェクトを作成すると、titanium create時に指定したアプリのIDや名前などのオプションも反映しつつ、自分用の設定が反映されたプロジェクトを作ることができます。
これは良いと思って使ってみたのですが、テンプレートとなるプロジェクトの作り方にクセがあったので、その辺りをまとめてみました。
デフォルトのテンプレートの構造
テンプレートとしてどこまで設定することができるのかを調べるために、まずはデフォルトのテンプレートを調べてみました。
標準のアプリ用のテンプレートプロジェクトは以下の場所にあります。
※SDK 3.3.0.GAの場合。 <titanium_sdk_folder> はtitanium sdkコマンドで確認できます。
<titanium_sdk_folder>/mobilesdk/osx/3.3.0.GA/templates/app/<template_name>
通常、何もテンプレートを指定せずに$ titanium createした場合は、上記フォルダ内にある default というテンプレートが使われるようです。
以下は、その default テンプレートに含まれるtiapp.xmlの中身です。
<?xml version="1.0" encoding="UTF-8"?>
<ti:app xmlns:ti="http://ti.appcelerator.org">
    <id>__PROJECT_ID__</id>
    <name>__PROJECT_NAME__</name>
    <version>__PROJECT_VERSION__</version>
    <publisher>not specified</publisher>
    <url>not specified</url>
    <description></description>
    <copyright>not specified</copyright>
    <icon>appicon.png</icon>
    <fullscreen>false</fullscreen>
    <navbar-hidden>false</navbar-hidden>
    <analytics>true</analytics>
    <guid></guid>
    <property name="ti.ui.defaultunit">dp</property>
    <ios>
        <plist>
            <dict>
                <key>UISupportedInterfaceOrientations~iphone</key>
                <array>
                    <string>UIInterfaceOrientationPortrait</string>
                </array>
                <key>UISupportedInterfaceOrientations~ipad</key>
                <array>
                    <string>UIInterfaceOrientationPortrait</string>
                    <string>UIInterfaceOrientationPortraitUpsideDown</string>
                    <string>UIInterfaceOrientationLandscapeLeft</string>
                    <string>UIInterfaceOrientationLandscapeRight</string>
                </array>
                <key>UIRequiresPersistentWiFi</key>
                <false/>
                <key>UIPrerenderedIcon</key>
                <false/>
                <key>UIStatusBarHidden</key>
                <false/>
                <key>UIStatusBarStyle</key>
                <string>UIStatusBarStyleDefault</string>
            </dict>
        </plist>
    </ios>
    <android xmlns:android="http://schemas.android.com/apk/res/android">
    </android>
    <mobileweb>
        <precache>
        </precache>
        <splash>
            <enabled>true</enabled>
            <inline-css-images>true</inline-css-images>
        </splash>
        <theme>default</theme>
    </mobileweb>
    <modules>
    </modules>
</ti:app>
これを見ると、以下の箇所がプロジェクト生成時に書き換えられているようです。
| 変数 | 意味 |
|---|---|
| _PROJECT_ID_ | --id で指定するプロジェクトIDが反映されます |
| _PROJECT_NAME_ | --name で指定するプロジェクト名が反映されます |
| _PROJECT_VERSION_ | 今のところ1.0固定のようです |
また、<deployment-targets>や<sdk-version>なども、titanium createのオプションに応じて書き換えてくれるようです。
これを参考に、オレオレテンプレートを作ってみました。
オレオレテンプレートの作り方
作りたいもの
今回は自分用に、デフォルトのものに加えて以下の様な要素を組み込んだものを作ってみました。
- tiapp.xmlの初期値の変更、AndroidManifest.xml用の設定を追記したもの
- Jade/Stylus用の設定をしたalloy.jmkを含む、Alloyベースのプロジェクト
基本となるプロジェクトを生成
上記の通り、Alloyベースのプロジェクトが一発で作りたいので、titanium createを実行後、alloy newも実行しておきます。
$ titanium create --type app --platforms android,ios --name my_alloy_template
$ alloy new my_alloy_template/
tiapp.xmlの書き換え
生成されたものをベースに以下の箇所を変更しました。
- <id> の値を _PROJECT_ID_ に変更
- <name> の値を _PROJECT_NAME_ に変更
- <version> の値を _PROJECT_VERSION_ に変更
- <analytics> の値を false に変更
- <guid> の値をブランクに
- <android>部分にAndroidManifest.xmlに設定したい項目を追記
以下、細かい点の説明です。
<analytics> の値を false に変更
Appceleratorが提供するTitanium Analyticsの機能をON/OFFする設定です。
デフォルトはON(true)になっていますが、以下の記事にもある通り、とりあえず基本はOFF(false)にしています。
Titanium MobileではAnalyticsを切っておきましょう | Selfkleptomaniac
GUIDをブランクに
アプリを一意に識別するためのGUID部分は空にしておくことで、プロジェクト生成時に新しいものを付与してくれるようです。
AndroidManifest.xml用設定のテンプレートを追記
<manifest>に、アプリ用のバージョン情報やSDKのバージョンなどを設定しています。
オレオレテンプレート用のtiapp.xml
出来上がったtiapp.xmlは以下のようなものです。
<?xml version="1.0" encoding="UTF-8"?>
<ti:app xmlns:ti="http://ti.appcelerator.org">
  <id>__PROJECT_ID__</id>
  <name>__PROJECT_NAME__</name>
  <version>__PROJECT_VERSION__</version>
  <publisher>not specified</publisher>
  <url>not specified</url>
  <description></description>
  <copyright>not specified</copyright>
  <icon>appicon.png</icon>
  <fullscreen>false</fullscreen>
  <navbar-hidden>false</navbar-hidden>
  <analytics>false</analytics>
  <guid></guid>
  <property name="ti.ui.defaultunit" type="string">dp</property>
  <ios>
    <plist>
      <dict>
        <key>UISupportedInterfaceOrientations~iphone</key>
        <array>
          <string>UIInterfaceOrientationPortrait</string>
        </array>
        <key>UISupportedInterfaceOrientations~ipad</key>
        <array>
          <string>UIInterfaceOrientationPortrait</string>
          <string>UIInterfaceOrientationPortraitUpsideDown</string>
          <string>UIInterfaceOrientationLandscapeLeft</string>
          <string>UIInterfaceOrientationLandscapeRight</string>
        </array>
        <key>UIRequiresPersistentWiFi</key>
        <false/>
        <key>UIPrerenderedIcon</key>
        <false/>
        <key>UIStatusBarHidden</key>
        <false/>
        <key>UIStatusBarStyle</key>
        <string>UIStatusBarStyleDefault</string>
      </dict>
    </plist>
  </ios>
  <android xmlns:android="http://schemas.android.com/apk/res/android">
    <manifest xmlns:android="http://schemas.android.com/apk/res/android"
              android:versionCode="1" android:versionName="0.0.1"
              android:installLocation="preferExternal">
      <uses-sdk android:minSdkVersion="10" android:targetSdkVersion="14"/>
    </manifest>
  </android>
  <mobileweb>
    <precache>
    </precache>
    <splash>
      <enabled>true</enabled>
      <inline-css-images>true</inline-css-images>
    </splash>
    <theme>default</theme>
  </mobileweb>
  <modules>
  </modules>
  <deployment-targets>
    <target device="android">true</target>
    <target device="blackberry">false</target>
    <target device="ipad">true</target>
    <target device="iphone">true</target>
    <target device="mobileweb">false</target>
  </deployment-targets>
  <sdk-version>3.3.0.GA</sdk-version>
  <plugins>
    <plugin version="1.0">ti.alloy</plugin>
  </plugins>
</ti:app>
Alloy周りのテンプレート
titanium createした時に Resources フォルダ内にできるapp.jsなども不要なので削除しつつ、自分がAlloyプロジェクトを始めるときに設定するものを用意しておきます。
alloy.jmkの追加、初期view/styleをJade/Stylusのものに変更
- alloy.jmkは、以前この記事で作ったものを
app/alloy.jmkにコピー。 - app/view 内の index.xml の内容をJadeフォーマットに書き換え、index.jade として用意
- app/style 内の index.tss の内容をStylusフォーマットに書き換え、index.styl として用意
テンプレート用のフォルダ構造
さて、ベースとなるプロジェクトはできましたが、テンプレートとして使うためにはもう一手間必要になります。
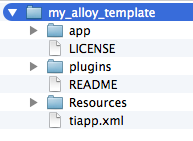
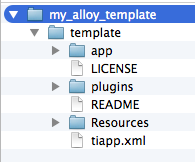
そのままのフォルダ構成では認識されないため、プロジェクトのルートの直下に template フォルダを作成し、その中に必要なファイルを全て移動しておきます。
具体的には、このようなフォルダ構造のものを
以下のような構造にしておきます。
テンプレートの使い方
テンプレートを指定してプロジェクトを作成するには、titanium createに--templateオプションを付けて実行します。
$ titanium create --template <name or folder or zip or zip url>
その際、--templateに付与できるパラメータの形式として、以下の4種類があります。
- テンプレート名
- テンプレートのフォルダへのパス
- テンプレートをZIP圧縮したファイルへのパス
- テンプレートをZIP圧縮したファイルへのURL
以下、それぞれの方法を説明します。
1. テンプレート名を指定(SDKフォルダに配置)
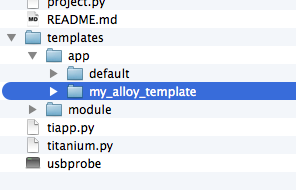
デフォルトのテンプレートが配置されているSDKの templates/app フォルダに、用意したテンプレートを入れておきます。
これで、
$ titanium create --template my_alloy_template
を指定することで、そのテンプレートを使うことができます。
template name には、テンプレートプロジェクトのフォルダ名を指定します。
2. テンプレートのフォルダへのパスを指定
テンプレートの動作確認をするには、この方法が良いかもしれません。
自PCの任意の場所に配置したテンプレートのフォルダへのパスを指定します。
例えば、~/work/my_alloy_template にテンプレートがある場合は、
$ titanium create --template ~/work/my_alloy_template
とします。
3. テンプレートをZIP圧縮したファイルへのパス
2.の方法に似ていますが、テンプレートをZIP圧縮したファイルでも使えます。
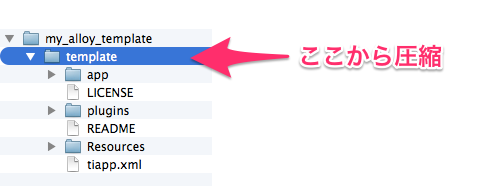
そのときの注意点としては、作成したプロジェクトのルートフォルダを圧縮するのではなく、templateフォルダをルートとして圧縮する、という点にあります。
プロジェクトが以下のような構造の場合は、
ここから圧縮します。
使い方は、作成したZIPファイルが ~/work/my_alloy_template.zip にある場合は、
$ titanium create --template ~/work/my_alloy_template.zip
とします。
4. テンプレートをZIP圧縮したファイルへのURL
3.で作成した形式のZIPファイルをインターネット上に公開しておくことで、そのURLを指定して使うこともできます。
例えば、アップロードされているZIPファイルのURLが http://www.example.com/my_alloy_template.zip の場合は、
$ titanium create --template http://www.example.com/my_alloy_template.zip
と実行することで、直接リモートからダウンロードして利用できます。
(番外編)GitHubで公開したリポジトリを使う
リモートのZIPファイルも指定できるということで、リポジトリをZIP形式でダウンロードできるGitHubにアップしておけば、バージョン管理もできるし良いのでは、と思いつきました。
というわけで、アップ。
が、結論から言うと、GitHubの Download ZIP でダウンロードしたZIPファイルは、そのままではテンプレートとして使えませんでした。
原因は、 Download ZIP でダウンロードできるZIPファイルは、最上位に リポジトリ名+ブランチ名 という名前のフォルダが作成されてしまい、TitaniumのテンプレートZIPファイルの構造に合わないためでした。
というわけで、GitHubでテンプレートを管理する場合は、git cloneしてから、そのフォルダを指定してtitanium create --templateを実行する、という方法になりそうです。
$ git clone https://github.com/umi-uyura/my_alloy_template
$ titanium create --template ./my_alloy_template
もしくは、予めリポジトリ内にZIP圧縮したものを含めておいて、そのRAWファイルのURLを使う、という手でしょうか。
毎回圧縮しておくのが一手間ですけど。
$ titanium create --template https://github.com/umi-uyura/my_alloy_template/raw/master/my_alloy_template.zip
感想
ZIPファイルの構造がGitHubからのDownload ZIPの構造に対応してくれると、普通にZIPファイルを作る観点でも、より便利に使えそうな気がしますね。
頻繁にある作業ではありませんが、プロジェクトを新規作成した際の初期設定などは一手間かかったり、ものによっては忘れたりしてしまいがちなので、テンプレートという再利用しやすい形で管理できるのは良いかなーと思いました。


