なにすんの
わけあってメーラーをOutlookにしなくてはいけなくなりました。
返信時のToやCCに入っている『うまさき <umauma@xxxxx.co.jp>』のような宛先を『umauma@xxxxx.co.jp』で相手に送りたいのです。
前使っていたメーラーではできたんですよ。ええ。
100%設定方法を忘れて調べなおすので、ここに記録残しちゃおうというわけです![]()
調べた感じだとマクロ使えば行ける![]()
開発タブを表示しましょー
Outlook 2010の環境で作業しています。
-
上の方で右クリックし、"リボンのユーザー設定"を表示します。
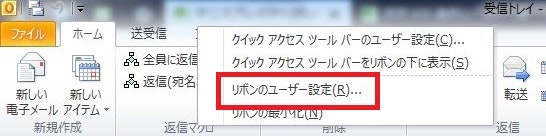
-
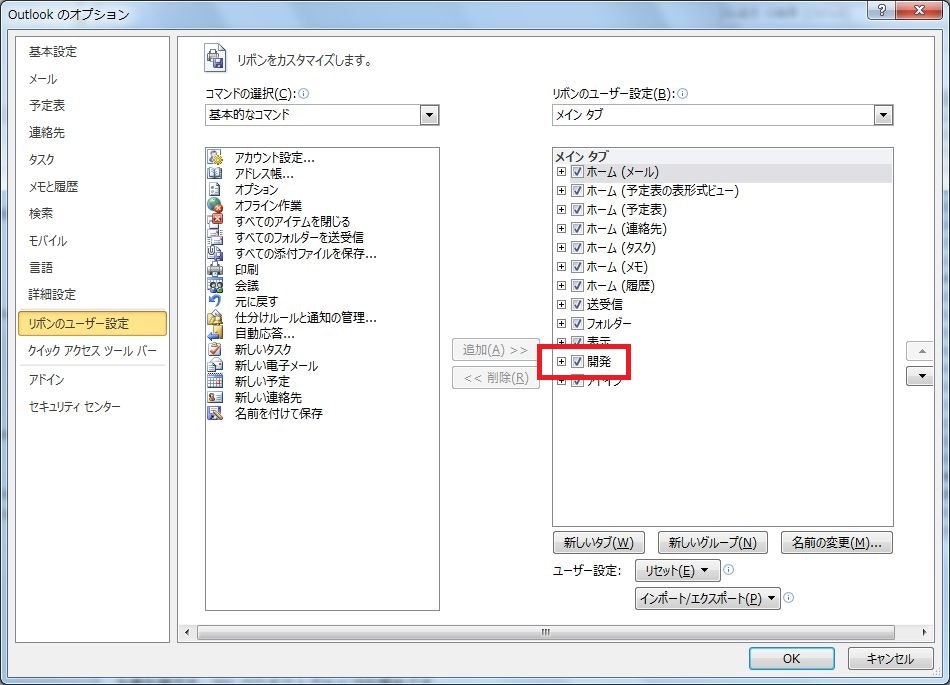
そして"開発"にチェックを付けて"OK"で完了です。
イージーイージー。
マクロ作りましょー
-
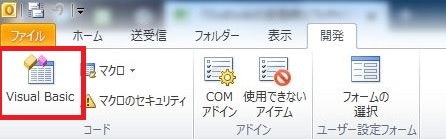
開発タブからマクロエディタを開きます。
-
ThisOutlookSessionを選択してマクロを書きます。
マクロの内容はわかりません。
パッと見で怪しそうなところがなければ使っており、パクって繋げて完成です。
Public Sub ReplyFromWithNoDisplayName()
    Dim objReply As MailItem
    Dim cRecips As Integer
    Dim colAddress() As String
    Dim colType() As Integer
    Dim objRecip As Recipient
    Dim objNewRecip As Recipient
    Dim i As Integer
    '
    Set objReply = ActiveInspector.CurrentItem.Reply()
    cRecips = objReply.Recipients.Count
    ReDim colAddress(cRecips) As String
    ReDim colType(cRecips) As Integer
    For i = cRecips To 1 Step -1
        Set objRecip = objReply.Recipients.Item(i)
        colAddress(i) = objRecip.Address
        colType(i) = objRecip.Type
        objReply.Recipients.Remove i
    Next
    '
    For i = 1 To cRecips
        Set objNewRecip = objReply.Recipients.Add(colAddress(i))
        objNewRecip.Type = colType(i)
        objNewRecip.Resolve
    Next
    objReply.Display
End Sub

Public Sub ReplyAllWithNoDisplayName()
    Dim objReply As MailItem
    Dim cRecips As Integer
    Dim colAddress() As String
    Dim colType() As Integer
    Dim objRecip As Recipient
    Dim objNewRecip As Recipient
    Dim i As Integer
    '
    Set objReply = ActiveInspector.CurrentItem.ReplyAll()
    cRecips = objReply.Recipients.Count
    ReDim colAddress(cRecips) As String
    ReDim colType(cRecips) As Integer
    For i = cRecips To 1 Step -1
        Set objRecip = objReply.Recipients.Item(i)
        colAddress(i) = objRecip.Address
        colType(i) = objRecip.Type
        objReply.Recipients.Remove i
    Next
    '
    For i = 1 To cRecips
        Set objNewRecip = objReply.Recipients.Add(colAddress(i))
        objNewRecip.Type = colType(i)
        objNewRecip.Resolve
    Next
    objReply.Display
End Sub

Public Sub ReplyFromListWithNoDisplayName()
    Dim objReply As MailItem
    Dim cRecips As Integer
    Dim colAddress() As String
    Dim colType() As Integer
    Dim objRecip As Recipient
    Dim objNewRecip As Recipient
    Dim i As Integer
    '
    Set objReply = ActiveExplorer.Selection.Item(1).Reply()
    cRecips = objReply.Recipients.Count
    ReDim colAddress(cRecips) As String
    ReDim colType(cRecips) As Integer
    For i = cRecips To 1 Step -1
        Set objRecip = objReply.Recipients.Item(i)
        colAddress(i) = objRecip.Address
        colType(i) = objRecip.Type
        objReply.Recipients.Remove i
    Next
    '
    For i = 1 To cRecips
        Set objNewRecip = objReply.Recipients.Add(colAddress(i))
        objNewRecip.Type = colType(i)
        objNewRecip.Resolve
    Next
    objReply.Display
End Sub

Public Sub ReplyAllListWithNoDisplayName()
    Dim objReply As MailItem
    Dim cRecips As Integer
    Dim colAddress() As String
    Dim colType() As Integer
    Dim objRecip As Recipient
    Dim objNewRecip As Recipient
    Dim i As Integer
    '
    Set objReply = ActiveExplorer.Selection.Item(1).ReplyAll()
    cRecips = objReply.Recipients.Count
    ReDim colAddress(cRecips) As String
    ReDim colType(cRecips) As Integer
    For i = cRecips To 1 Step -1
        Set objRecip = objReply.Recipients.Item(i)
        colAddress(i) = objRecip.Address
        colType(i) = objRecip.Type
        objReply.Recipients.Remove i
    Next
    '
    For i = 1 To cRecips
        Set objNewRecip = objReply.Recipients.Add(colAddress(i))
        objNewRecip.Type = colType(i)
        objNewRecip.Resolve
    Next
    objReply.Display
End Sub

Private Sub Application_ItemContextMenuDisplay(ByVal oCommandBar As Office.CommandBar, ByVal oSelection As Selection)
    If oSelection.Count > 0 Then
        Dim objPopup As CommandBarPopup
        Dim objButton1 As CommandBarButton
        Dim objButton2 As CommandBarButton
        ' 親メニュー
        Set objPopup = oCommandBar.Controls.Add(msoControlPopup, , , , True)
        objPopup.Caption = "返信マクロ"
        ' サブメニュー 1
        Set objButton2 = objPopup.Controls.Add(msoControlButton, , , , True)
        With objButton2
            .Style = msoButtonIconAndCaption
            .Caption = "全員に返信(宛名なし)"
            .FaceId = 1100
            .OnAction = "Project1.ThisOutlookSession.ReplyAllListWithNoDisplayName"
        End With
        ' サブメニュー 2
        Set objButton1 = objPopup.Controls.Add(msoControlButton, , , , True)
        With objButton1
            .Style = msoButtonIconAndCaption
            .Caption = "返信(宛名なし)"
            .FaceId = 1100
            .OnAction = "Project1.ThisOutlookSession.ReplyFromListWithNoDisplayName"
        End With
    End If
End Sub
リボンに追加しましょー
-
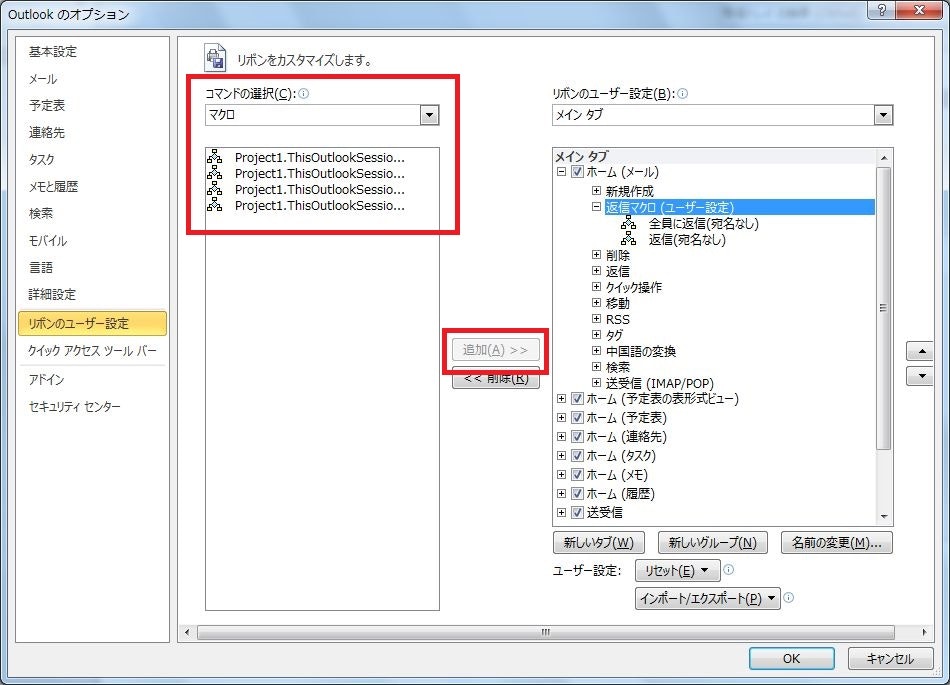
初めと同じように上の方で右クリックし、"リボンのユーザー設定"を表示します。
メール一覧、メールを開いた画面の両方で作業します。
-
マクロを選択し、必要なものを追加して"OK"で完了です。
※追加すればマクロ名を把握できます
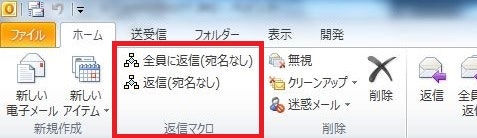
- ReplyFromWithNoDisplayName:開いたメールウィンドウのFrom返信用
- ReplyAllWithNoDisplayName:開いたメールウィンドウの全てに返信用
- ReplyFromListWithNoDisplayName:メール一覧の選択メールでFromだけに返信用
- ReplyAllListWithNoDisplayName:メール一覧の選択メールで全てに返信用
これらのことを行えばリボンには・・・
マクロを追加すればメール一覧の右クリックには・・・
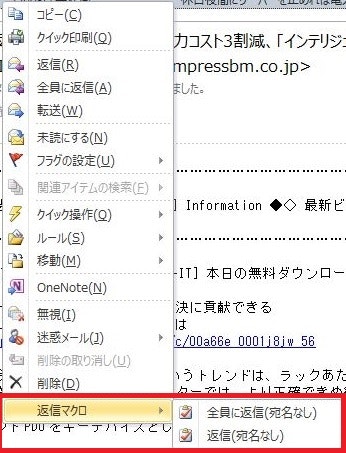
っと表示されます![]()