はじめに
日曜工作でWeb上に3Dモデルを取り込んだりしたときの覚え書きです。
ふと「マイクラのスキンとか使えたらいいな~」と思ったので、作ってみました。
完成品
環境
OSはWindows11、プロジェクトはNode.js + vite + Three.jsをつかって構築してます。
Blockbenchでモデル作成、VSCodeでコーディングしてます。
やりかた
スキンをglTF形式に変換する
まずはWeb上でスキンを扱うために、glTF形式というものに変換します。
聞きなれない形式ですが、glTF(GL Transmission Format) とは3Dモデルのファイル形式のひとつで、主にWebブラウザ上で動作するコンテンツを作る際に用いられるフォーマットらしいです。
一度OBJファイルで試してみたんですが、手順的にこちらのほうがより簡単で扱いやすかったので採用しました。
今回はBlockbenchというツールを使って変換します。
早い話がMinecraft用のデザイン・モデリングツールですね。凝ったテクスチャなんかはこれを使って書くことが多いです。
開いたら「Minecraft Skin」を選択します。
「新規モデル」を選択。
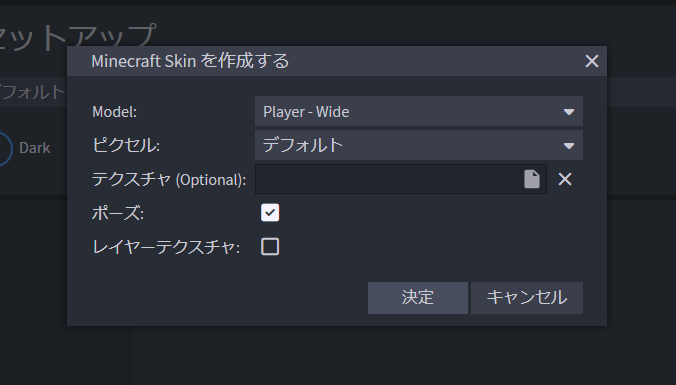
そしたらこのような画面が出てきます。
各選択肢については以下の通り。
- Model
- テクスチャ(スキン)の形式です。今回は上2つのうちどれかになります
実はマイクラスキンには二種類あり、肩幅4マスのWideと、肩幅3マスのSlimがあります。
ここはスキンによって違うので、スキンに合ったフォーマットを選択してください参考までに、デフォルトスキンであるSteveはWide、AlexはSlimです
- ピクセル
- 解像度です。今回はデフォルトを選択。
- テクスチャ
- ここに今回使用するスキンの画像ファイルを選択します。
- ポーズ
- スキンにポーズをつけたい場合はチェック。
- レイヤーテクスチャ
- これはよくわかりません。なくても大丈夫かも。
入力したら「決定」をクリック。
そしたらこんな感じで、オーバーレイが剥げた状態のスキンがロードされます。

このままだとかわいくないので、右下から非表示になっているレイヤーを表示させます。
右下の左から二番目のアイコンをクリックすると、非表示になっているレイヤーを表示させます

できました。かわいい。
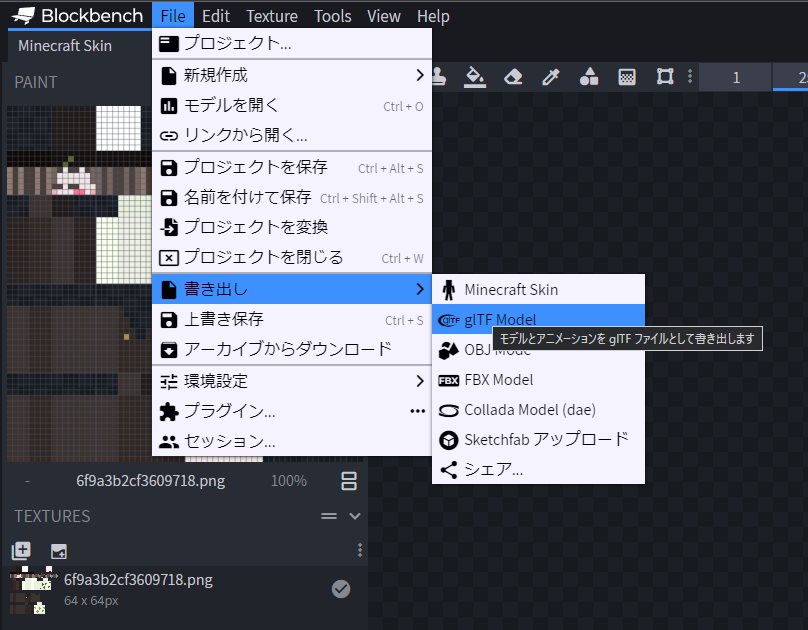
そしたら、これをgiTF形式でエクスポートしていきます。
右上の「File」から「書き出し」、「glTF Model」を選択。

そしたらこんな感じのポップアップが出ます。
特に変える部分はないので「決定」。

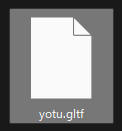
これは後で使うので、ひとまず安置。
プロジェクトを初期化する
まずは適当な場所にプロジェクトフォルダを作りましょう。名前は何でもいいです

これで準備OK。
また、ここからはNode.jsでライブラリの管理をしていきます。
環境構築がまだの場合は先に済ませておきましょう↓
package.jsonを作る
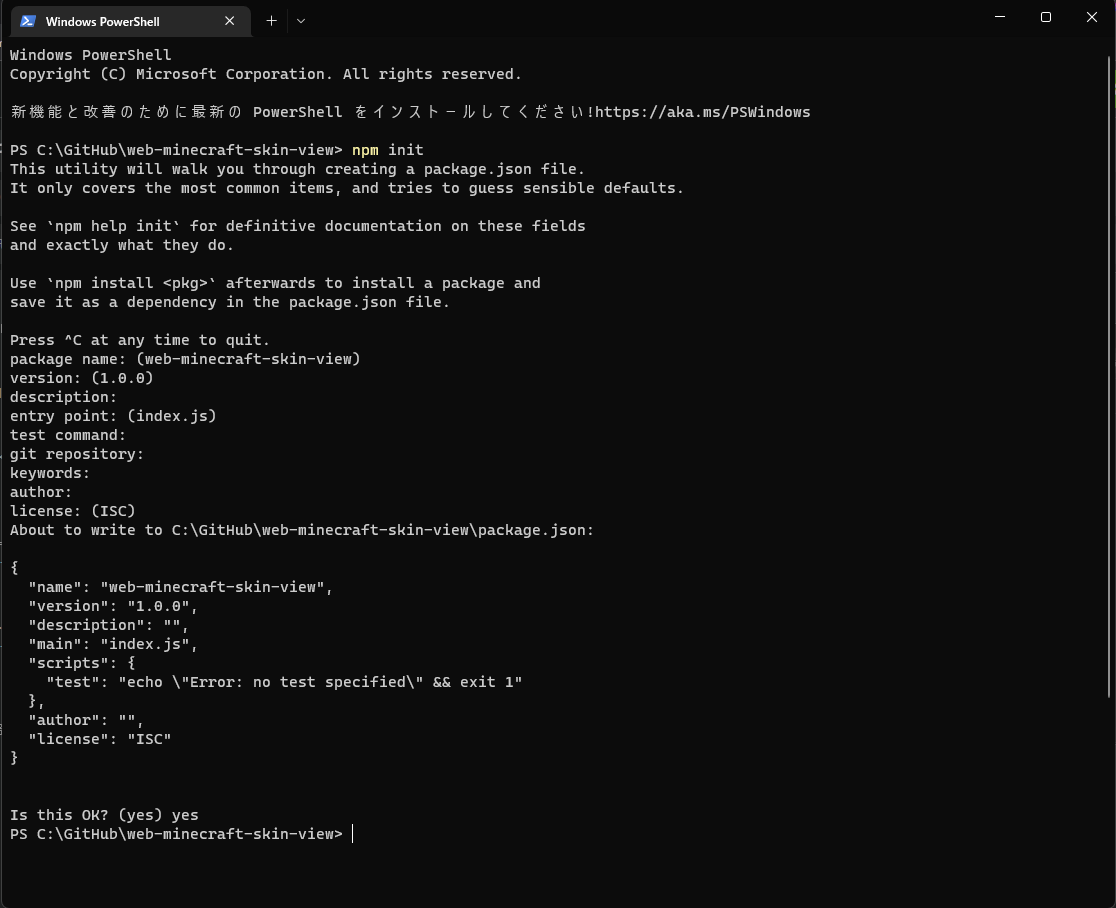
プロジェクトフォルダでnpm initします。
いろいろ聞かれますが、特に変える部分もないので全部EnterでOK。

プロジェクトフォルダにpackage.jsonができてたらOK。

vite, Three.jsを導入
必要なライブラリをそろえていきます。
$ npm i -g npm
$ npm i vite
$ npm i three
Three.jsの準備
そしたらコーディングしていきます。
コンソールからcode .を叩いてVSCodeを起動。

index.htmlとscript/index.jsを作ります。

index.htmlはこんな感じ。
<!DOCTYPE html>
<html lang="ja">
<head>
  <meta charset="UTF-8">
  <meta name="viewport" content="width=device-width, initial-scale=1.0">
  <title>test</title>
</head>
<body>
  <!-- index.jsの呼び出し -->
  <script type="module" src="script/index.js"></script>
</body>
</html>
そしたらindex.jsのほうをいじっていきます。
Three.jsをインポートして...
import * as THREE from 'three';
シーン、カメラ、レンダラーを追加して...
// シーンを作成
const scene = new THREE.Scene();

// カメラを作成
const camera = new THREE.PerspectiveCamera(
  75,
  window.innerWidth / window.innerHeight,
  0.1,
  1000
);
camera.position.z = 1;  // ちょっとずらしておく(重なり回避)

// レンダラーを作成
const renderer = new THREE.WebGLRenderer();
renderer.setSize(window.innerWidth, window.innerHeight);
renderer.setClearColor(0xbaf9ff, 1);
document.body.appendChild(renderer.domElement);
陰影をいい感じにしてくれる自然光を追加して...
// 自然光を追加
const light = new THREE.AmbientLight(0xffffff, 1);
scene.add(light);
最後に、再帰的な描画関数を作成してレンダリングさせます
// オブジェクトを描画
function animate() {
  requestAnimationFrame(animate);
  renderer.render(scene, camera);
}
animate();
これでひとまず基本的なThree.jsの準備はOK。
import * as THREE from 'three';


// シーンを作成
const scene = new THREE.Scene();

// カメラを作成
const camera = new THREE.PerspectiveCamera(
  75,
  window.innerWidth / window.innerHeight,
  0.1,
  1000
);
camera.position.z = 1;

// レンダラーを作成
const renderer = new THREE.WebGLRenderer();
renderer.setSize(window.innerWidth, window.innerHeight);
renderer.setClearColor(0xbaf9ff, 1);
document.body.appendChild(renderer.domElement);

// 自然光を追加
const light = new THREE.AmbientLight(0xffffff, 1);
scene.add(light);

// オブジェクトを描画
function animate() {
  requestAnimationFrame(animate);
  renderer.render(scene, camera);
}
animate();
このままだといまいちよくわからないので、試しに立方体でも浮かせてみましょう。
描画関数の前に以下のコードを追加します。
// 立方体を作成
const geometry = new THREE.BoxGeometry(0.2, 0.2, 0.2);
const material = new THREE.MeshNormalMaterial();
const cube = new THREE.Mesh(geometry, material);
cube.rotation.x = Math.PI / 4;
cube.rotation.y = Math.PI / 4;
scene.add(cube);
全体像はこんな感じ。
import * as THREE from 'three';


// シーンを作成
const scene = new THREE.Scene();

// カメラを作成
const camera = new THREE.PerspectiveCamera(
  75,
  window.innerWidth / window.innerHeight,
  0.1,
  1000
);
camera.position.z = 1;

// レンダラーを作成
const renderer = new THREE.WebGLRenderer();
renderer.setSize(window.innerWidth, window.innerHeight);
renderer.setClearColor(0xbaf9ff, 1);
document.body.appendChild(renderer.domElement);

// 自然光を追加
const light = new THREE.AmbientLight(0xffffff, 1);
scene.add(light);

// 立方体を作成
const geometry = new THREE.BoxGeometry(0.2, 0.2, 0.2);
const material = new THREE.MeshNormalMaterial();
const cube = new THREE.Mesh(geometry, material);
cube.rotation.x = Math.PI / 4;
cube.rotation.y = Math.PI / 4;
scene.add(cube);

// オブジェクトを描画
function animate() {
  requestAnimationFrame(animate);
  renderer.render(scene, camera);
}
animate();
そしたらデバッグしてみます。
コンソールを開いてnpx viteします。

そしたら「localhost:5173でWebページ開いたやで!」という感じのメッセージが来るので、実際にWebブラウザで見てみると...
おー。いい感じに表示されてますね。
スキンを描画する
まずはプロジェクトフォルダにglTFファイルを持ってきます。
今回はassetsフォルダの中にでも入れておきましょう。

そしたら表示していきます。
Three.jsでglTF形式のファイルを扱う場合はGLTFLoaderを使うっぽいです。
まずはインポート。
import { GLTFLoader } from 'three/examples/jsm/loaders/GLTFLoader.js';
使うときはインスタンスを生成します。
const loader = new GLTFLoader();
で、読みこむときはloader.load()を使うっぽいです。
ドキュメントには以下の通り。
.load ( url : String, onLoad : Function, onProgress : Function, onError : Function ) : undefined
ざっくり説明すると、
| 引数名 | 説明 |
|---|---|
| url | glTFファイルの場所を示すurl。 |
| onLoad | ファイルの読み込みが終わった後に呼び出す関数。 |
| onProgress(任意) | ファイル読み込み中に呼び出される関数。 |
| onError(任意) | エラーが発生したときに呼び出される関数。 |
って感じです。順番がややこいので注意。
という感じで、以下のように実装してみました。
loader.load('../assets/model.gltf',
  function (gltf) {
    gltf.scene.scale.set(0.3, 0.3, 0.3);
    gltf.scene.rotation.y = 150 * (MATH.PI / 180);
    gltf.scene.position.y -= 0.5;
    scene.add(gltf.scene);
});
これをindex.jsに組み込んで、全文はこんな感じ。
import * as THREE from 'three';
import { GLTFLoader } from 'three/examples/jsm/loaders/GLTFLoader.js';

// シーンを作成
const scene = new THREE.Scene();

// カメラを作成
const camera = new THREE.PerspectiveCamera(
  75,
  window.innerWidth / window.innerHeight,
  0.1,
  1000
);
camera.position.z = 1;

// レンダラーを作成
const renderer = new THREE.WebGLRenderer();
renderer.setSize(window.innerWidth, window.innerHeight);
renderer.setClearColor(0xbaf9ff, 1);
document.body.appendChild(renderer.domElement);

// 自然光を追加
const light = new THREE.AmbientLight(0xffffff, 1);
scene.add(light);

// スキンを描画
const loader = new GLTFLoader();
loader.load('../assets/model.gltf',
  function (gltf) {
    gltf.scene.scale.set(0.3, 0.3, 0.3);
    gltf.scene.rotation.y = 150 * (Math.PI / 180);
    gltf.scene.position.y -= 0.5;
    scene.add(gltf.scene);
  });

// オブジェクトを描画
function animate() {
  requestAnimationFrame(animate);
  renderer.render(scene, camera);
}
animate();
お~!
いい感じに表示されました。
おわりに
軽い気持ちで触れたThree.jsでしたが、案外いい感じに使えてよかったです。学び。
ポートフォリオサイトとかにも使えそう。


