webアプリの重要機能の一つであるログイン認証管理を簡単に導入するgemです。
カスタマイズも色々できるようで、便利そうだ!でも、調べると使いこなすまで難しそう。。
自分の理解を深めるためにも、何回かに分けてまとめてみることにしました。
コマンドだけでいい方はこちら
早くdeviseいれたいねん! ① -- 入門手順で導入してみる --
環境
- Ruby 2.3.3
- Rails 4.1.16
- Windows 8 64bit
① gemを導入する
新規プロジェクトを作成します。(お好きな名前で、私はdeviseにしました)
$ rails new devise
プロジェクトが作成されたら
Gemfileを開き、記載されているgemの最後に追記します。
Gemfile
gem 'rails', '4.1.16'
gem 'sqlite3'
gem 'sass-rails', '~> 4.0.3'
gem 'uglifier', '>= 1.3.0'
gem 'coffee-rails', '~> 4.0.0'
gem 'jquery-rails'
gem 'turbolinks'
gem 'jbuilder', '~> 2.0'
gem 'sdoc', '~> 0.4.0',          group: :doc
gem 'tzinfo-data', platforms: [:mingw, :mswin, :x64_mingw]  #Win 32bitなら :x64_mingwは不要。
gem 'bcrypt-ruby', '~> 3.0.0'          # ←いれないとcannot load such file -- bcrypt_extが発生します。

# ↓↓↓以下を追記します↓↓↓
gem 'devise'
gemをインストールします。
$ bundle install
② deviseをインストールする
以下、コマンドを実行する。
$ rails g devise:install
      create  config/initializers/devise.rb
      create  config/locales/devise.en.yml
===============================================================================


Some setup you must do manually if you haven't yet:

  1. Ensure you have defined default url options in your environments files. Here
     is an example of default_url_options appropriate for a development environment
     in config/environments/development.rb:

       config.action_mailer.default_url_options = { host: 'localhost', port: 3000 }

     In production, :host should be set to the actual host of your application.

  2. Ensure you have defined root_url to *something* in your config/routes.rb.
     For example:

       root to: "home#index"

  3. Ensure you have flash messages in app/views/layouts/application.html.erb.
     For example:

       <p class="notice"><%= notice %></p>
       <p class="alert"><%= alert %></p>

  4. You can copy Devise views (for customization) to your app by running:

       rails g devise:views

===============================================================================
③ deviseでモデルを作成する
次に、使用するモデルを作成する。
$ rails g devise User
      invoke  active_record
      create    db/migrate/20170304053003_devise_create_users.rb
      create    app/models/user.rb
      invoke    test_unit
      create      test/models/user_test.rb
      create      test/fixtures/users.yml
      insert    app/models/user.rb
       route  devise_for :users
モデルが作成されたら、migrateを実行します。
$ rake db:migrate
== 20170304053003 DeviseCreateUsers: migrating ================================
-- create_table(:users)
   -> 0.0061s
-- add_index(:users, :email, {:unique=>true})
   -> 0.0012s
-- add_index(:users, :reset_password_token, {:unique=>true})
   -> 0.0009s
== 20170304053003 DeviseCreateUsers: migrated (0.0093s) =======================
モデル、コントローラー、ビューは標準搭載されてます。
一度、確認のためにサーバー起動して動くか確認してみましょう。
$ rails s
ブラウザで以下URLにアクセスする。( わたしの場合はローカルサーバーです )
http://localhost:3000/users/sign_up
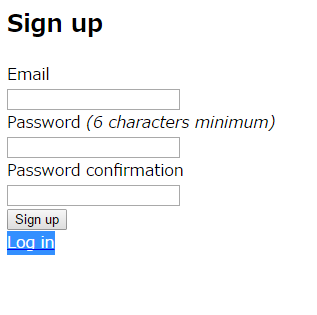
このような画面が表示されれば問題ありません。
ただ、今のままサインアップしても作成されました等の通知やアラームはでません。
挙動確認するために、最低限のビューを作成しましょう。
④ ビューを作成する
コントローラーを作成します。
$ rails g controller home index
次はapplication.erbに以下を追記します。
- 挙動確認用のリンク
- 通知やアラート機能
application.html.erb.
<!DOCTYPE html>
<html>
<head>
  <title>Devise</title>
  <%= stylesheet_link_tag    'application', media: 'all', 'data-turbolinks-track' => true %>
  <%= javascript_include_tag 'application', 'data-turbolinks-track' => true %>
  <%= csrf_meta_tags %>
</head>
<body>

  <!-- ↓↓↓これを追記↓↓↓ -->

  <p class="notice"><%= notice %></p>
  <p class="alert"><%= alert %></p>

  <% if user_signed_in? %>
    ログインユーザー: <%= current_user.email %>
    <%= link_to 'アカウント変更', edit_user_registration_path %>
    <%= link_to "ログアウト", destroy_user_session_path %>
  <% else %>
    <%= link_to "TOP画面", root_path %>
    <%= link_to "新規作成", new_user_registration_path %>
    <%= link_to "ログイン", new_user_session_path %>
  <% end %>

  <!-- ここまで -->

  <%= yield %>

</body>
</html>
⑤ ルートを作成する
root to: "home#index" をroutesに設定する。
補足)devise_for :usersはモデル作成時に自動で追加されます。
routes.rb
Rails.application.routes.draw do

  devise_for :users
  root to: "home#index"

end
⑥ 完成!!
サーバーを起動して~
$ rails s
ブラウザで以下URLにアクセスする。( わたしの場合はローカルサーバーです )
http://locakhost:3000
以下画面がでたら完成!
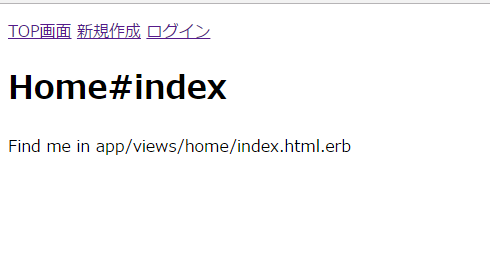
色々と動作確認してみてください。
実際、実用で使うにはカスマイズが必要と思います。
勉強しながらカスマイズもまとめていきます