はじめに
GLSLを触り始めるとやっぱりやりたくなりますよね。Curl Noise。
残念なことにWebGLではまだCompute Shaderは対応されてない状況です。(WebGL2.0から対応するらしい)
ですが、Three.jsにはGPUComputationRendererというものございまして、誰でも簡単に粉を飛ばせます。
また、今回はCurl Noiseの説明というよりかはThree.jsでGPUComputationRendererを使ってGPGPUをすることについて解説します。
実装の大まかな説明
Curl Noiseのようなパーティクルは少なくとも1万くらいのパーティクルを出すことが多いですが、普通にThree.jsでオブジェクトを生成、位置の更新を行うと非常に重い、というか生成すらままならないかもしれません。
そこで、GLSLの出番です。
1万個のオブジェクトを生成するのは大変ですが、1万頂点くらいの3Dモデル1つなら今時のPC、スマホならだいたい余裕で動作すると思います。
そこでこれから実装するパーティクルは、一つのオブジェクトの頂点座標をGLSLでいじいじするという考え方です。
ただ、GLSLでは、頂点座標を更新してもその座標を保存しておくことができません。
Curl NoiseはSimplex Noiseで得たノイズを随時足していくため、前フレームの頂点座標が必要となります。
では、どうするかというと、GLSLで計算した値はテクスチャに保存してしまうのです。
テクスチャとはマジでテクスチャです。画像です。
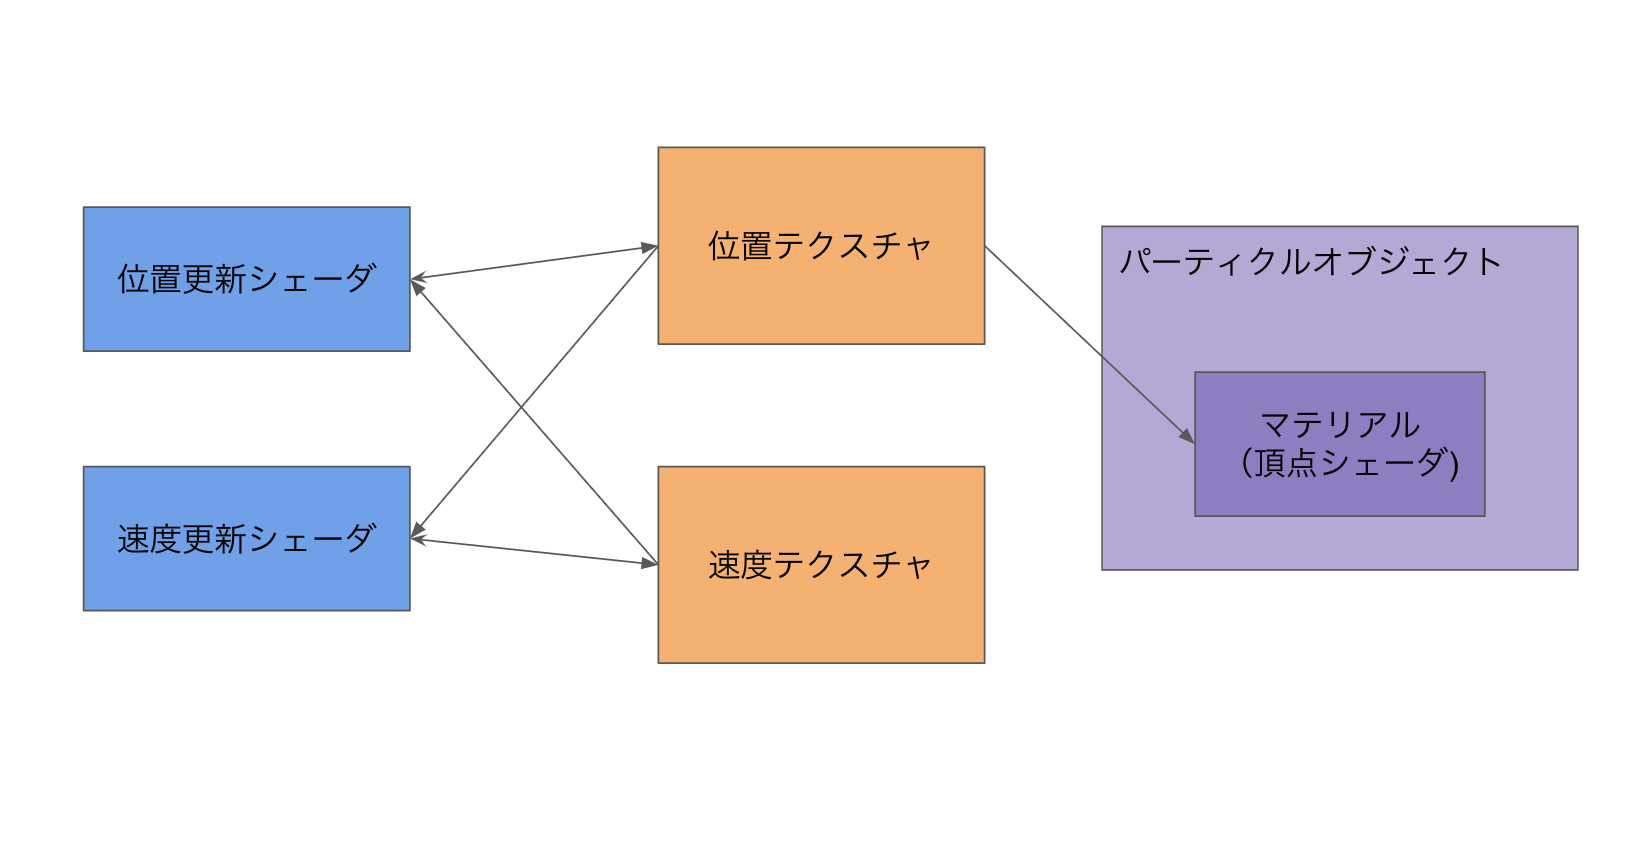
よって実装の大まかな流れとしては
- 位置、速度を保存するテクスチャを作成
- 各テクスチャを制御するシェーダーの作成
- パーティクルオブジェクトの作成、テクスチャを渡す
こんなかんじですかね。
準備
GPUComputationRendererをゲットします。自分はローカルに保存したものをWebpackで読み込ませました。
import GPUComputationRenderer from '../../plugins/GPUComputationRenderer';
実装
では実装を解説していきます。
1.計算結果保存のためのテクスチャ作成
this.comTexs = {
    position:{
        texture: null,
        uniforms: null,
    },
    velocity:{
        texture: null,
        uniforms: null,
    },
}
コンストラクタ内でcomputeRendererでのテクスチャとuniforms変数の対応づけがわかりやすいように連想配列でまとめておきます。
initComputeRenderer(){
        //computeRendererの初期化
        this.computeRenderer = new GPUComputationRenderer(this.computeTextureWidth,this.computeTextureWidth,this.renderer);

        //テクスチャを作成
        let initPositionTex = this.computeRenderer.createTexture();
        let initVelocityTex = this.computeRenderer.createTexture();

        //各テクスチャを初期化
        this.initPosition(initPositionTex);
        this.initVelocity(initVelocityTex);

        //computeRendererに各テクスチャとそれに対応するシェーダーを登録する
        this.comTexs.position.texture = this.computeRenderer.addVariable("texturePosition",comShaderPosition,initPositionTex);
        this.comTexs.velocity.texture = this.computeRenderer.addVariable("textureVelocity",comShaderVelocity,initVelocityTex);

        //uniformを登録
        this.computeRenderer.setVariableDependencies( this.comTexs.position.texture, [ this.comTexs.position.texture, this.comTexs.velocity.texture] );
        this.comTexs.position.uniforms = this.comTexs.position.texture.material.uniforms;
        this.comTexs.position.uniforms.time =  { type:"v3", value : this.time};

        this.computeRenderer.setVariableDependencies( this.comTexs.velocity.texture, [ this.comTexs.position.texture, this.comTexs.velocity.texture] );
        this.comTexs.velocity.uniforms = this.comTexs.velocity.texture.material.uniforms;

        this.computeRenderer.init();
    }
    initPosition(tex){
        var texArray = tex.image.data;
        let range = new THREE.Vector3(1,1,1);
        for(var i = 0; i < texArray.length; i +=4){
            texArray[i + 0] = Math.random() * range.x - range.x / 2;
            texArray[i + 1] = Math.random() * range.y - range.y / 2;
            texArray[i + 2] = Math.random() * range.z - range.z / 2;
            texArray[i + 3] = 0.0;
        }
    }

    initVelocity(tex){
        var texArray = tex.image.data;
        for(var i = 0; i < texArray.length; i +=4){
            texArray[i + 0] = Math.random() * 20 - 10;
            texArray[i + 1] = Math.random() * 20 - 10;
            texArray[i + 2] = Math.random() * 20 - 10;
            texArray[i + 3] = 0;
        }
    }
テクスチャを作ったりシェーダーに送るuniform変数を定義しています。
computeRendererの初期化の時にテクスチャのサイズを指定していますが、計算できるパーティクルの数はこのテクスチャのサイズとなります。
なので1万出したかったら、
var computeRenderer = new GPUComputationRenderer(100,100,renderer);
みたいなかんじです。
uniform変数の定義はThree.jsのShader Materialと一緒ですね。シェーダーの取り込み方は後述します。
(timeというuniform変数を定義してますが、サンプル用に作っただけで実際は使っていません。)
また、この中で重要なポイントなのが以下の2箇所箇所です。
this.computeRenderer.setVariableDependencies( this.comTexs.position.texture, [ this.comTexs.position.texture, this.comTexs.velocity.texture] );

this.computeRenderer.setVariableDependencies( this.comTexs.velocity.texture, [ this.comTexs.position.texture, this.comTexs.velocity.texture] );
これ、何しているかというとcomputeRendererの中のテクスチャを他のshaderにuniformで参照できるようにしています。
this.computeRenderer.setVariableDependencies( 対象のテクスチャ, [ 送るテクスチャたち ] );
こんな文法ですね。
ただよく見てみると、送るテクスチャの中に対象のテクスチャ自身も入っています。
なんとこれ、シェーダーが前フレームで書き出した自身のテクスチャをそのまま参照できちゃうんですよ...。
生WebGLだとこれができないので非常に嬉しいです。
2.テクスチャを制御するシェーダーの作成
そんでもってシェーダーを書きます。
void main() {
    vec2 uv = gl_FragCoord.xy / resolution.xy;

    vec3 pos = texture2D( texturePosition, uv ).xyz;
    vec3 vel = texture2D( textureVelocity, uv ).xyz;

    pos += vel * 0.01;

    gl_FragColor = vec4(pos,1.0);
}
位置を更新するシェーダーです。テクスチャは1ピクセルにR,G,B,Aの4つのチャンネルがあるので、格納できるデータの個数も4つです。
今回はRチャンネルにX軸、GチャンネルにY軸、BチャンネルにZ軸を格納しました。Aチャンネルは使ってません。
処理としては速度テクスチャがuniformで送られてきているのでそれを読み取って前フレームの座標に足しているだけです。
フラグメントシェーダーと同じくgl_FragColorにデータを格納します。
vec3 snoise3D(vec3 pos){
    float weight = 0.5;
    float x = snoise(pos * weight + 61.0) ;
    float y = snoise(pos * weight + 236.0);
    float z = snoise(pos * weight + 0.0);

    return vec3(x,y,z);
}

vec3 snoiseDelta(vec3 pos){
    float dlt = 0.0001;
    vec3 a = snoise3D(pos);
    vec3 b = snoise3D(vec3(pos.x + dlt,pos.y + dlt,pos.z + dlt));
    vec3 dt = vec3(a.x - b.x,a.y - b.y,a.z - b.z) / dlt;
    return dt;
}

void main() {
    vec2 uv = gl_FragCoord.xy / resolution.xy;

    vec3 pos = texture2D( texturePosition, uv ).xyz;
    vec3 vel = texture2D( textureVelocity, uv ).xyz;
    float idParticle = uv.y * resolution.x + uv.x;

    vel = vel + snoiseDelta(pos * 3.0) * 0.1;
    vel *= 0.92;

    gl_FragColor = vec4( vel.xyz, 1.0 );
}
速度を更新するシェーダーです。snoise関数はStefan Gustavsonさんのwebgl-noiseを使用させていただきました。
作成したシェーダーはshader-loaderを使えば簡単に取り込めます。
import comShaderPosition from './shaders/computePosition.glsl';
import comShaderVelocity from './shaders/computeVelocity.glsl';
3. パーティクルオブジェクトの作成
最後にThree.jsでパーティクルとなるオブジェクトを作成します。
createParticleObj(){
        let geo = new THREE.BufferGeometry();

        //ジオメトリ初期化用の配列
        var pArray = new Float32Array(this.numParticle * 3);
        for(var i = 0; i < pArray.length; i++){
            pArray[i] = 0;
        }

        //テクスチャ参照用のuvを取得
        var uv = new Float32Array(this.numParticle * 2);
        var p = 0;
        for(var i = 0;i < this.computeTextureWidth; i ++){
            for(var j = 0;j < this.computeTextureWidth; j ++){
                uv[p++] = i / ( this.computeTextureWidth - 1);
                uv[p++] = j / ( this.computeTextureWidth - 1);
            }
        }
        geo.addAttribute('position', new THREE.BufferAttribute( pArray, 3 ) );
        geo.addAttribute('uv', new THREE.BufferAttribute( uv, 2 ) );

        this.uni = {
            texturePosition : {value: null},
            cameraConstant: { value: 4.0},
            color:{ value: this.color},
        }

        let mat = new THREE.ShaderMaterial({
            uniforms: this.uni,
            vertexShader: vert,
            fragmentShader: frag,
            transparent: true,
        });

        this.obj = new THREE.Points(geo,mat);
        this.obj.matrixAutoUpdate = false;
        this.obj.updateMatrix();
    }
uniform変数で位置を記録したテクスチャを渡せるようにしておきます。また、位置テクスチャのどのピクセルを参照するかを表すuvをattributeで持たせておきます。
uniform sampler2D texturePosition;

uniform vec3 color;
varying vec4 vColor;

void main() {
    vec4 posTemp = texture2D( texturePosition, uv );
    vec3 pos = posTemp.xyz;

    vColor = vec4(color,1.0);

    vec4 mvPosition = modelViewMatrix * vec4( pos + position, 1.0 );

    gl_PointSize = 2.0;
    gl_Position = projectionMatrix * mvPosition;
}
varying vec4 vColor;
void main() {
    gl_FragColor = vColor;
}
パーティクルオブジェクトのシェーダーです。位置テクスチャを読んで足しているだけですね。
最後にcomputeRendererを走らせ、パーティクルオブジェクトに送るテクスチャを更新すれば完成です!
update(){
        this.time += this.clock.getDelta();

        //computeRendererを走らせる
        this.computeRenderer.compute();

        //パーティクルオブジェクトに送るテクスチャを更新
        this.uni.texturePosition.value = this.computeRenderer.getCurrentRenderTarget(this.comTexs.position.texture).texture;
    }
最後に
GPUComputationRendereを使えば簡単にThree.jsでGPGPUができました。
データをテクスチャに保存するのは最初はとっつきにくいですが、一回組んでしまえばいろんなことに使えます。
WebGL2.0ではTransform Feedbackが使えるようになり、わざわざこんなことしなくてもよくなるらしいです。たのしみですね!
GPUをフル活用してヌルサクなWebGL表現、追求していきたいですね!!
