はじめに
Azure PipelinesでiOSアプリのCI/CDを実現します。
Travis CIやCircle CI、Bitriseの記事はよく見かけるのですが、Pipelinesの記事はあまり見かけないのが寂しいです。。
前回は署名なしで単体テストを実行するジョブを構築しました。
今回はそれに加え、署名してAppCenterへデプロイするまでのジョブを構築します。
環境
Xcode:10.1 (10B61)
Swift:4.2.1
Carthage:0.32.0
CocoaPods:1.7.0.beta.1
Pipelinesでジョブの作成
前回と同様なので省略します。
ジョブの詳細([Tasks]タブ)
前回との差分のみ記載します。
- Pipeline > Name
{プロジェクト名}-iOS-Deploy-AppCenter
タスクの詳細
前回との差分のみ記載します。
不要なジョブの削除
前回削除した以下のタスクは使うので削除しません。
Install an Apple certificate
Install an Apple provisioning profile
Copy Files to: …
Publish Artifact: drop
Deploy */.ipa to Visual Studio App Center
以下のタスクのみ削除します。
Test with Visual Studio App Center
∵今回はUIテストを実施しないため
タスクの入れ替え
今回はテストとビルドでタスクを入れ替えません。
∵テストに失敗したらビルドしないようにしたいため
タスクの追加・編集
前回との差分のみ記載します。
Install an Apple certificate
署名に必要な証明書をインストールするタスクです。
以下の項目を編集します。
- Certificate (P12)
ギアのアイコンをクリック→.p12ファイルをアップロード - Enabled
OFF→ON - Run this task
Custom conditions→Only when all previous tasks have succeeded

.p12ファイルのパスワードは[Variables]タブの「P12password」に入力します。

Install an Apple provisioning profile
署名に必要なプロビジョニングプロファイルをインストールするタスクです。
以下の項目を編集します。
- Provisioning profile
ギアのアイコンをクリック→.mobileprovisionファイルをアップロード - Enabled
OFF→ON - Run this task
Custom conditions→Only when all previous tasks have succeeded

例ではAdHoc版のプロビジョニングプロファイルを使っています。
Xcode test
Xcodeでテストを実行するタスクです。
前回と異なる項目のみ記載します。
- Signing style
Project defaultsのまま
Do not code signでもOK
Xcode build
Xcodeでビルドするタスクです。
前回と異なる項目のみ記載します。
- Signing style
常に手動署名にしないとエラーになります 。
(回避策を知っている方がいたらご教授お願いします)
Xcodeの署名設定(製品ターゲット > Automatically manage signing)によって選択肢を変えます。
Do not code sign→Project defaults(OFFの場合)
→Manual signing(ONの場合) - Signing identity(「Manual signing」のみ)
空欄→$(APPLE_CERTIFICATE_SIGNING_IDENTITY) - Provisioning profile UUID(「Manual signing」のみ)
空欄→$(APPLE_PROV_PROFILE_UUID) - Create app package
OFF→ON - Export options
Automaticのまま
失敗する場合は「Plist」を選択し、以下のような.plistファイルをリポジトリに作成します。
<?xml version="1.0" encoding="UTF-8"?>
<!DOCTYPE plist PUBLIC "-//Apple//DTD PLIST 1.0//EN" "http://www.apple.com/DTDs/PropertyList-1.0.dtd">
<plist version="1.0">
<dict>
    <key>method</key>
    <string>{enterpriseなど}</string>
    <key>provisioningProfiles</key>
    <dict>
        <key>{Bundle Identifier}</key>
        <string>{Provisioning Profile名}</string>
    </dict>
</dict>
</plist>
- Export options plist(Export optionsが「Plist」の場合のみ)
作成した.plistファイルを指定します。 - Destination platform
Defaultのまま

以下のようにCocoaPodsで管理しているライブラリでエラーが発生する場合、Podfileにおまじないを追加することで回避できます。
** BUILD FAILED **


❌  error: GoogleUtilities does not support provisioning profiles. GoogleUtilities does not support provisioning profiles, but provisioning profile {プロビジョニングプロファイル名} has been manually specified. Set the provisioning profile value to "Automatic" in the build settings editor. (in target 'GoogleUtilities')


❌  error: FirebaseCore does not support provisioning profiles. FirebaseCore does not support provisioning profiles, but provisioning profile {プロビジョニングプロファイル名} has been manually specified. Set the provisioning profile value to "Automatic" in the build settings editor. (in target 'FirebaseCore')


❌  error: nanopb does not support provisioning profiles. nanopb does not support provisioning profiles, but provisioning profile {プロビジョニングプロファイル名} has been manually specified. Set the provisioning profile value to "Automatic" in the build settings editor. (in target 'nanopb')


❌  error: Pods-{プロジェクト名} does not support provisioning profiles. Pods-{プロジェクト名} does not support provisioning profiles, but provisioning profile {プロビジョニングプロファイル名} has been manually specified. Set the provisioning profile value to "Automatic" in the build settings editor. (in target 'Pods-{プロジェクト名}')


## [error]Error: /usr/bin/xcodebuild failed with return code: 65
## [section]Finishing: Xcode build
post_install do |installer|
  installer.pods_project.build_configurations.each do |config|
    # CI/CD環境でビルドエラーを防ぐためのおまじない
    # 参考:https://github.com/fastlane/fastlane/issues/10543
    #   :https://github.com/fastlane/fastlane/issues/12557
    config.build_settings['PROVISIONING_PROFILE_SPECIFIER'] = ''
    config.build_settings['CODE_SIGNING_REQUIRED'] = 'NO'
    config.build_settings['CODE_SIGNING_ALLOWED'] = 'NO'
  end
end
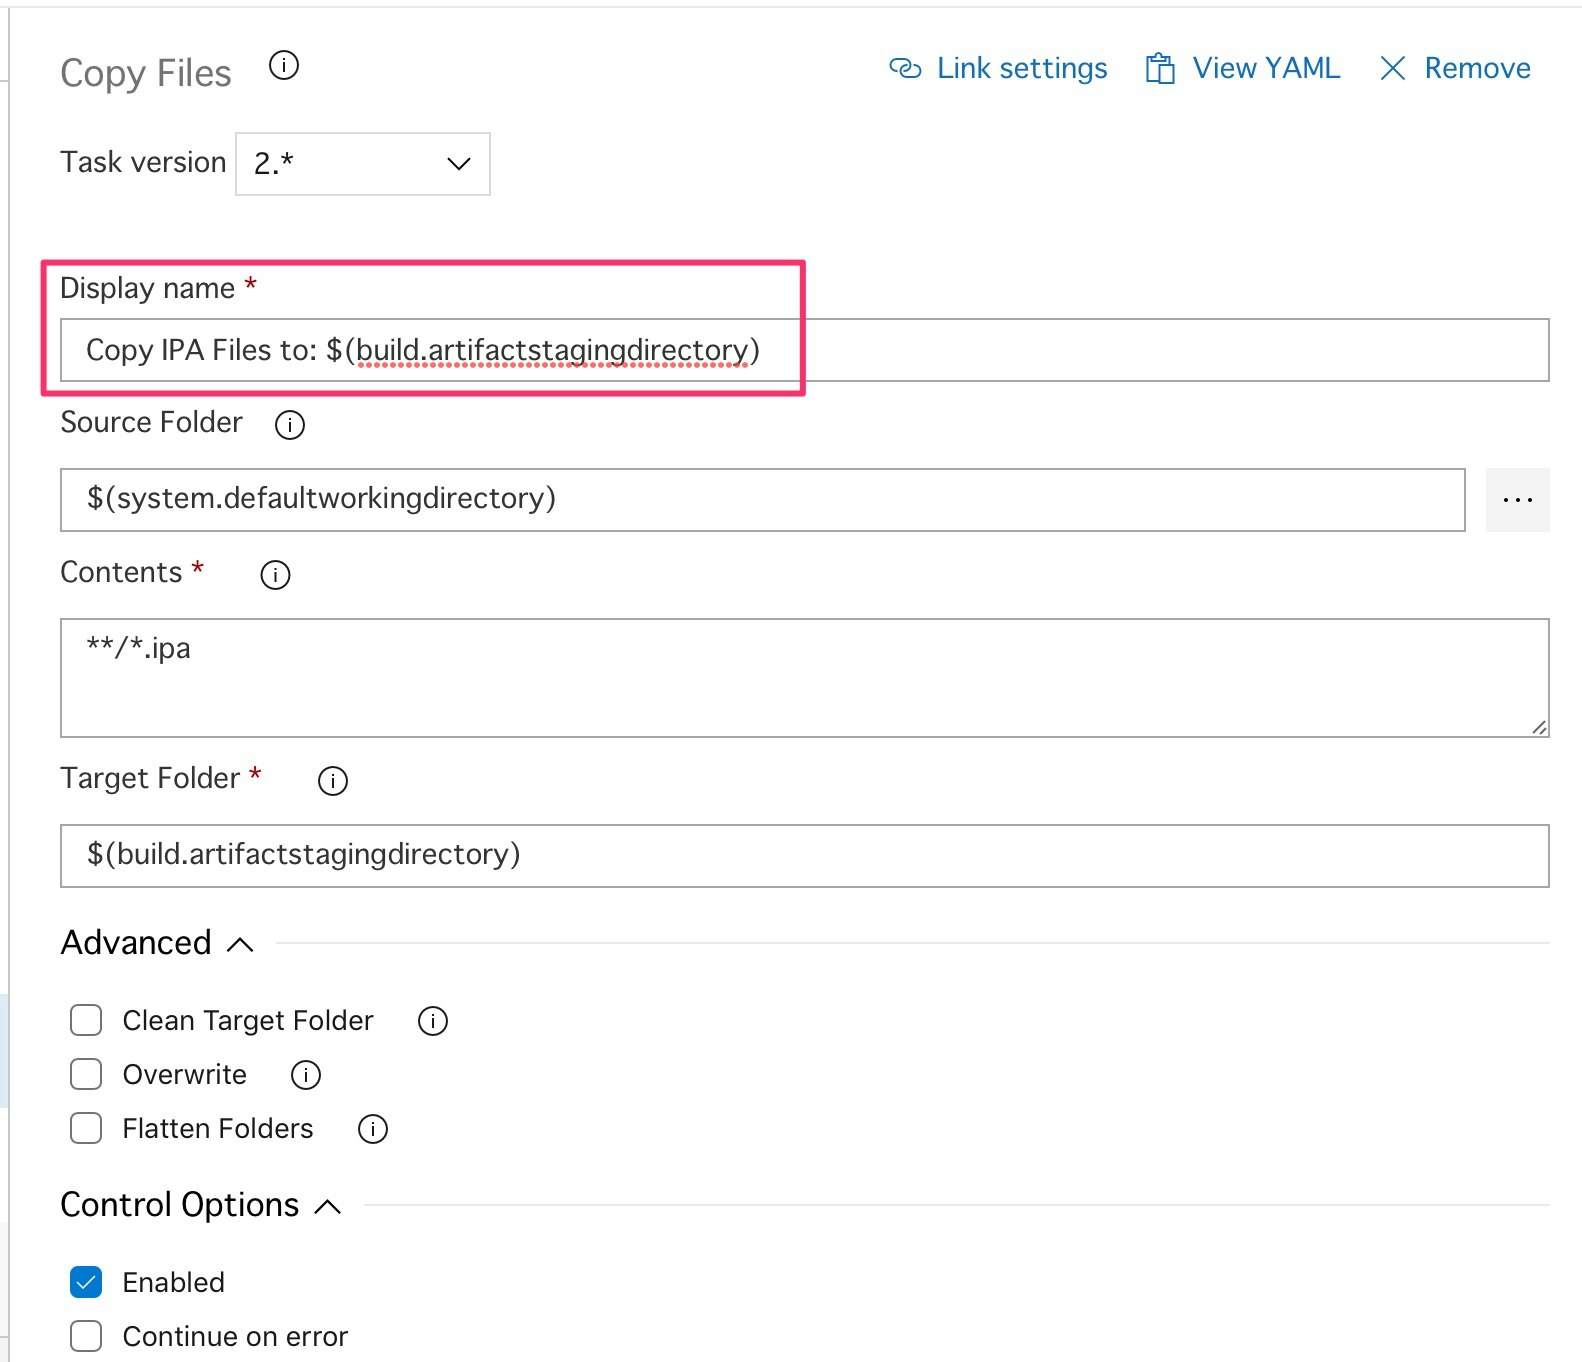
Copy Files(任意)
ファイルをコピーするタスクです。
ここではビルドした.ipaファイルをアーティファクト(後述)のステージングフォルダにコピーします。
以下の項目を編集します。
- Display name(任意)
Copy Files to: $(build.artifactstagingdirectory)→Copy IPA Files to: $(build.artifactstagingdirectory)
Publish Build Artifacts(任意)
指定したフォルダをダウンロードできるようにする(アーティファクトをビルドして発行する)タスクです。
ここではステージングフォルダにコピーしたファイルを「Artifact name」で指定したフォルダ名でアーティファクト化します。
後ほど使いたいファイルが存在する場合に実行します。
以下の項目を編集します。
- Run this task
Custom conditions→Only when all previous tasks have succeeded

App Center Distribute
バイナリファイルをApp Centerへ配布するタスクです。
ここではビルドした.ipaファイルをApp Centerにデプロイします。
以下の項目を編集します。
- App Center connection
「AppCenter」を選択します。 - App slug
AppCenterのURLを確認し、https://appcenter.ms/users/{username}/apps/{app_identifier}の{}で括られている部分を取り出して{username}/{app_identifier}の形式で入力します。 - Create release notes
「Enter Release Notes」を選択します。 - Release Notes
リリースノートの内容を記載します。ここではテストアプリ用に様々な情報を載せます。
- Environment:AdHoc
- Configuration:$(Configuration)
- Certificate:$(APPLE_CERTIFICATE_SIGNING_IDENTITY)
- Provisioning Profile:$(APPLE_PROV_PROFILE_UUID)
- Branch:$(Build.SourceBranchName)
- Last Commit ID:$(Build.SourceVersion)
- Last Commit Comment:$(Build.SourceVersionMessage)
- Release Note:$(ReleaseNote) - Distribution Group ID
特定のグループに配布したい場合に指定します。ここでは空欄とします。 - Enabled
OFF→ON - Run this task
Custom conditions→Only when all previous tasks have succeeded


ジョブの完成形
こちらがジョブの完成形です。

パイプラインの実行(手動)
[queue]ボタンをクリックすることでパイプラインを手動で実行します。
$(ReleaseNote) は自分で作成した変数であり、実行時に指定できるようにしています。

App Centerへのデプロイ結果
パイプラインの実行に成功すると、App Centerへデプロイされます。

おわりに
これで「ソースをプッシュ→単体テスト→ビルド→デプロイ」を自動化できました!
あとはUIテストを実行したり、Gitのブランチやタグを自動で切るようにしたりすれば完璧です。