「Azure PipelinesのYAMLでAndroidアプリのCI/CD環境を構築する」は3部構成です。
記事を順番に読み進めると、Azure PipelinesでAndroidアプリのCI/CD環境が構築できるようになります。
- 第一部:CI環境の構築 ←イマココ
- 第二部:App Center配布パイプラインの構築
- 第三部:Google Play Console配布パイプラインの構築(未投稿)
はじめに
Azure Pipelinesを使い、Androidアプリのビルドと単体テスト、静的解析を行うCIを構築します。
本記事で説明しないこと
- Azure Pipelinesの概要や基本的な操作方法
私が以前書いた記事 が参考になると思います
設定ファイルの構成
Azure PipelinesのYAMLでiOSアプリのCI環境を構築する方法 と同様なので省略します。
各項目の紹介
各項目を上から順に紹介します。
name
Azure PipelinesのYAMLでiOSアプリのCI環境を構築する方法 と同様なので説明は省略します。
trigger
Azure PipelinesのYAMLでiOSアプリのCI環境を構築する方法 と同様なので説明は省略します。
設定のみ紹介します。
trigger:
  batch: true
  branches:
    include:
    - main
    - develop
  paths:
    exclude:
    - docs
    - README.md
    - LICENSE
schedules
Azure PipelinesのYAMLでiOSアプリのCI環境を構築する方法 と同様なので省略します。
設定のみ紹介します。
schedules:
- cron: "0 15 * * *"
  displayName: Daily midnight build
  branches:
    include:
    - main
    - develop
  always: true
variables
今回は使っていないので省略します。
jobs
今回はジョブを4つ用意しており、順番に紹介します。
ビルドタイプとプロダクトフレーバーは以下の想定です。
環境によって読み替えてください。
- ビルドタイプ:
debug - プロダクトフレーバー:
develop
build
ビルドを実行するジョブです。
GitHub ActionsでAndroidアプリのCIを構築する方法 とほぼ同様なので、全体図のみ紹介します。
- job: build
  pool:
    vmImage: 'ubuntu-latest'

  steps:
  # JDKのセットアップ
  - task: JavaToolInstaller@0
    inputs:
      versionSpec: '11'
      jdkArchitectureOption: 'x64'
      jdkSourceOption: 'PreInstalled'

  # 依存関係の出力
  - script: ./gradlew androidDependencies
    displayName: Displays the Android dependencies of the project

  # コンパイル
  - script: ./gradlew assembleDebug
    displayName: Run Compile
test
単体テストを実行するジョブです。
build ジョブと同様、詳細は省略します。
- job: test
  pool:
    vmImage: 'ubuntu-latest'

  steps:
  # JDKのセットアップ
  - task: JavaToolInstaller@0
    inputs:
      versionSpec: '11'
      jdkArchitectureOption: 'x64'
      jdkSourceOption: 'PreInstalled'

  # テスト
  - script: ./gradlew testDevelopDebugUnitTest
    displayName: Test with Gradle

  # アーティファクトのステージングへコピー
  - task: CopyFiles@2
    inputs:
      Contents: |
        **/build/reports/tests/**/*
        **/build/reports/test-results/**/*
      TargetFolder: '$(Build.ArtifactStagingDirectory)'
    condition: succeededOrFailed()

  # アーティファクトへアップロード
  - task: PublishBuildArtifacts@1
    inputs:
      pathtoPublish: '$(Build.ArtifactStagingDirectory)'
      artifactName: 'drop'
      publishLocation: 'Container'
    condition: succeededOrFailed()

  # コードカバレッジの取得
  - script: ./gradlew jacocoDevelopDebugTestReport
    displayName: Get code coverage

  # コードカバレッジのアップロード
  - task: PublishCodeCoverageResults@1
    inputs:
      codeCoverageTool: 'jacoco'
      summaryFileLocation: '$(System.DefaultWorkingDirectory)/**/build/reports/jacoco/jacoco.xml'
      reportDirectory: '$(System.DefaultWorkingDirectory)/**/build/reports/jacoco/html'
      failIfCoverageEmpty: true
コードカバレッジの確認
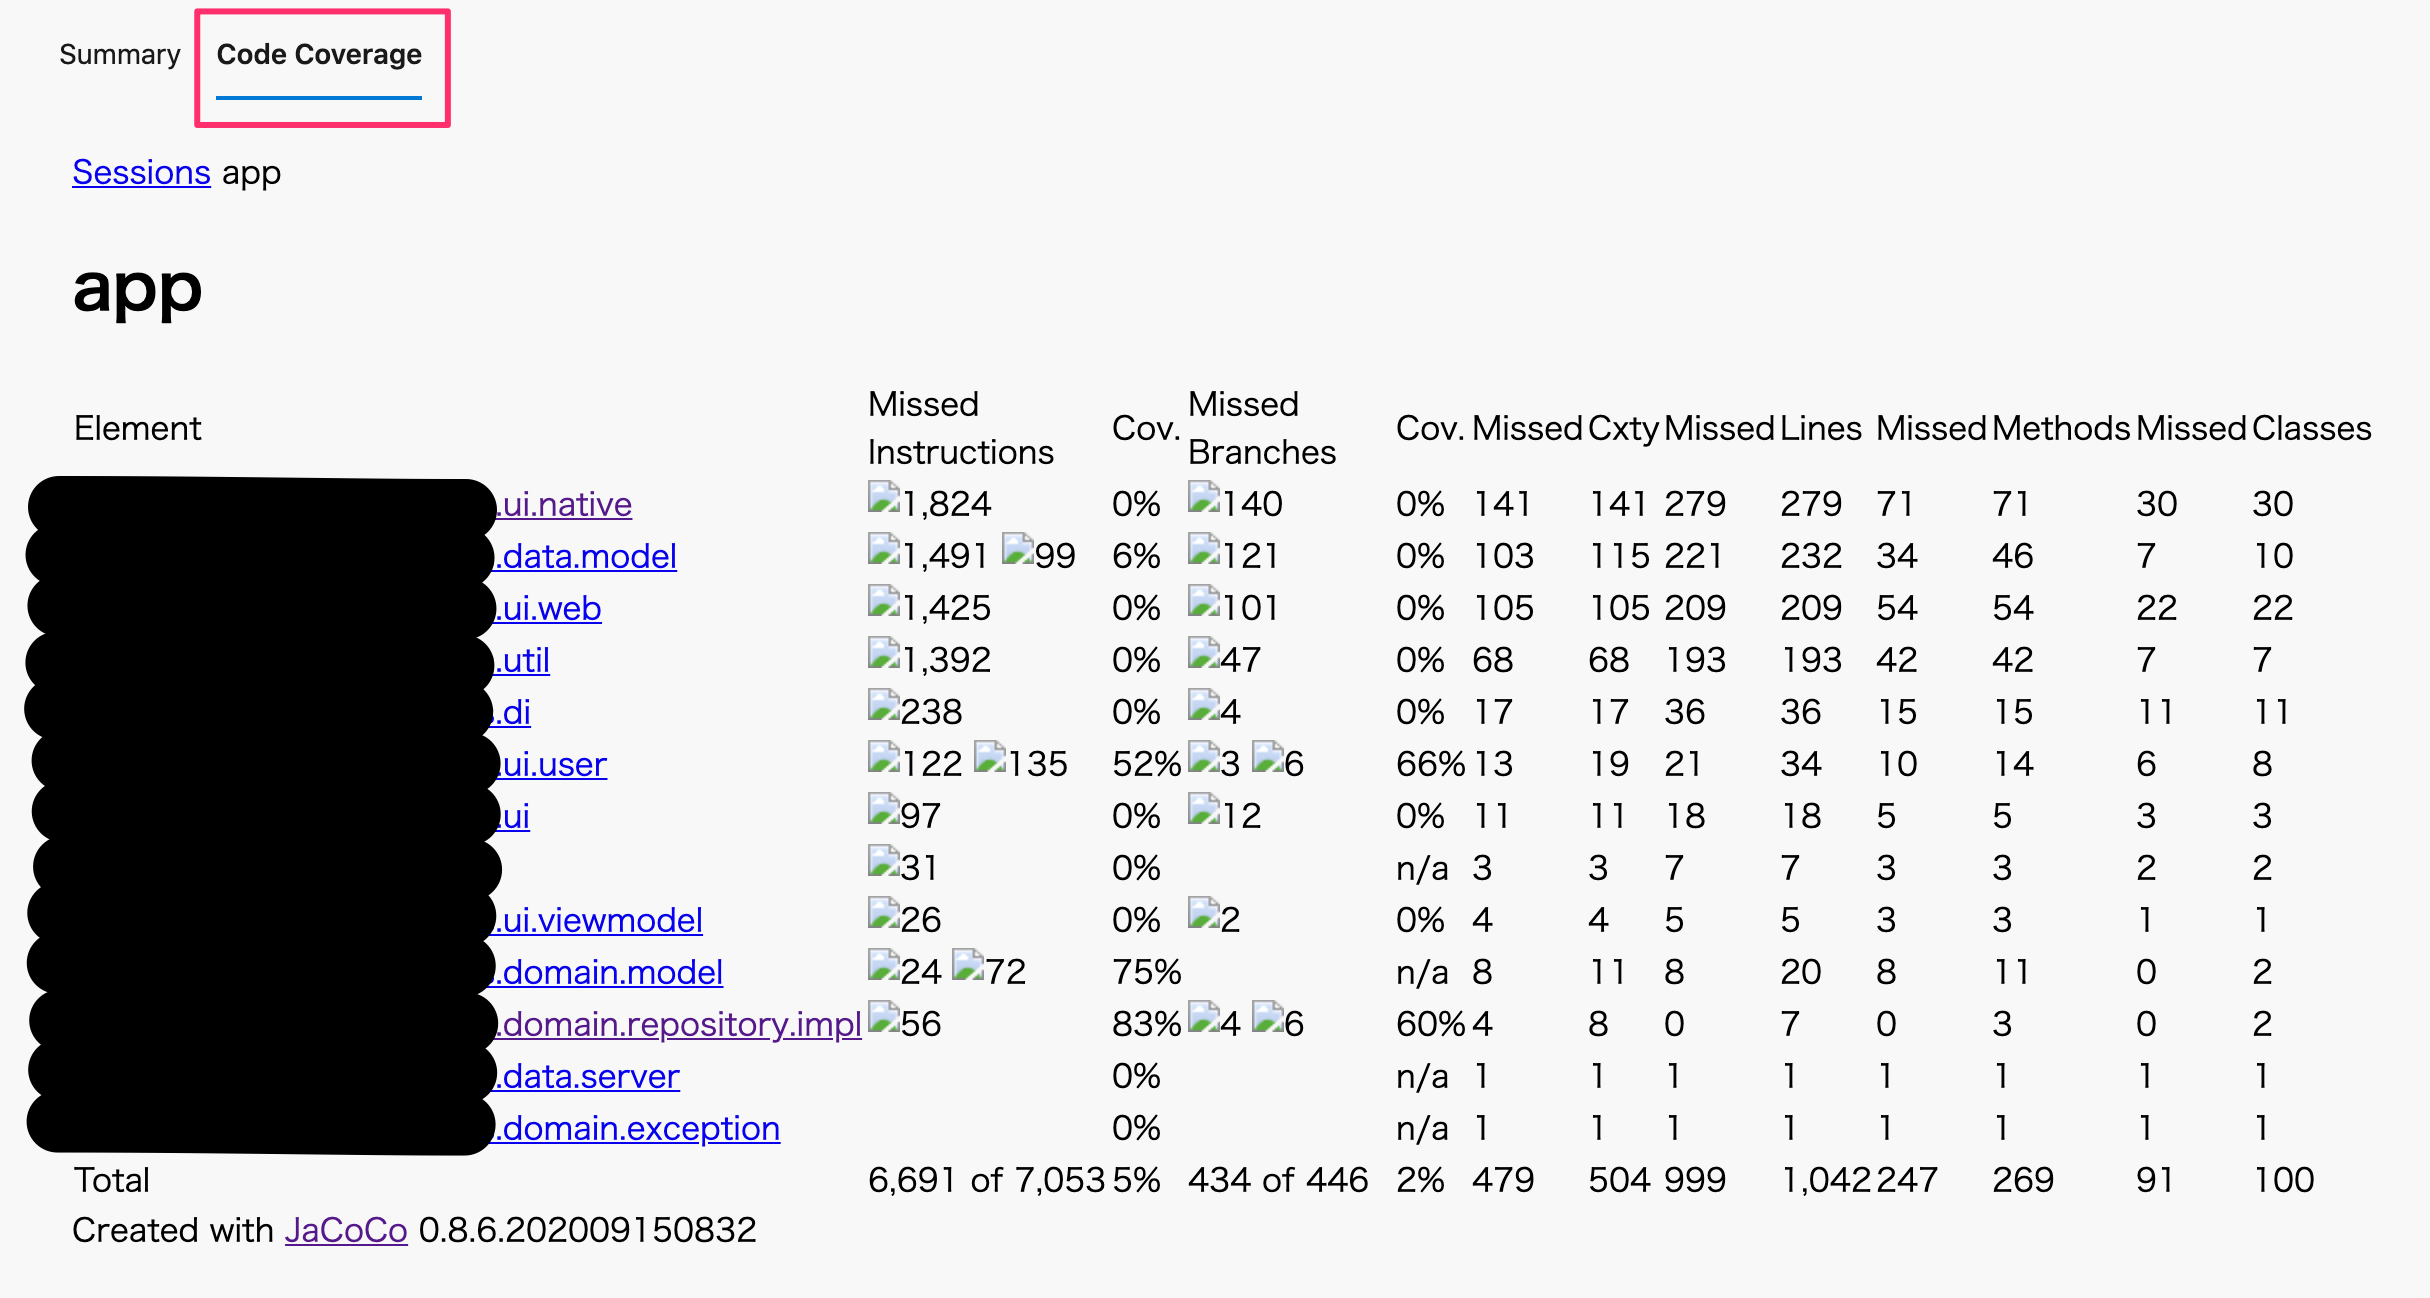
「コードカバレッジのアップロード」タスクに成功すると、CIの結果に[Code Coverage]タブが追加され、コードカバレッジを確認できます。

画像が表示されないのはセキュリティの理由だそうです。
Base64変換すれば表示できるとのことですが、そこまではやっていません。
reportDirectory: を指定しないとCIの結果からコードカバレッジを確認できないので注意です。

注意
- JDKは11を使用している
- 8を使いたい場合は
versionSpecで8を指定する
- 8を使いたい場合は
-
jacocoDevelopDebugTestReportタスクは自作- 別記事で説明する予定
- テスト結果は成否にかかわらず確認したいため、アーティファクトのアップロードタスクで
condition: succeededOrFailed()を指定している- 「アーティファクトへアップロード」タスクは「アーティファクトのステージングへコピー」タスクが成功した場合のみ実行したいが、かんたんには実現できなさそう
参考: https://twitter.com/the_uhooi/status/1366216298540146693?s=20
- 「アーティファクトへアップロード」タスクは「アーティファクトのステージングへコピー」タスクが成功した場合のみ実行したいが、かんたんには実現できなさそう
lint
Android Lintを使って静的解析するジョブです。
GitHub ActionsでAndroidアプリのCIを構築する方法 とほぼ同様なので、全体図のみ紹介します。
- job: lint
  pool:
    vmImage: 'ubuntu-latest'

  steps:
  # 静的解析
  - script: ./gradlew lint
    displayName: Run Inspection

  # アーティファクトのステージングへコピー
  - task: CopyFiles@2
    inputs:
      Contents: |
        **/build/reports/lint-results.html
        **/build/reports/lint-results.xml
      TargetFolder: '$(Build.ArtifactStagingDirectory)'
    condition: succeededOrFailed()

  # アーティファクトへアップロード
  - task: PublishBuildArtifacts@1
    inputs:
      pathtoPublish: '$(Build.ArtifactStagingDirectory)'
      artifactName: 'drop'
      publishLocation: 'Container'
    condition: succeededOrFailed()
Android Lintの結果は静的解析の成否にかかわらず確認したいため、アーティファクトのアップロードタスクで condition: succeededOrFailed() を指定しています。
detekt
detektを使って静的解析するジョブです。
GitHub ActionsでAndroidアプリのCIを構築する方法 とほぼ同様なので、全体図のみ紹介します。
- job: detekt
  pool:
    vmImage: 'ubuntu-latest'

  steps:
  # 静的解析
  - script: ./gradlew detekt
    displayName: Lint with detekt

  # アーティファクトのステージングへコピー
  - task: CopyFiles@2
    inputs:
      Contents: |
        **/build/reports/detekt/**/*
      TargetFolder: '$(Build.ArtifactStagingDirectory)'
    condition: failed()

  # アーティファクトへアップロード
  - task: PublishBuildArtifacts@1
    inputs:
      pathtoPublish: '$(Build.ArtifactStagingDirectory)'
      artifactName: 'drop'
      publishLocation: 'Container'
    condition: failed()
失敗時のみ結果を詳細に確認したいため、アーティファクトのアップロードタスクで condition: failed() を指定しています。
設定ファイルの全体図
最後に設定ファイルの全体図を載せます。
name: $(SourceBranchName)_$(Date:yyyyMMdd)$(Rev:.r)

trigger:
  batch: true
  branches:
    include:
    - main
    - develop
  paths:
    exclude:
    - docs
    - README.md
    - LICENSE

schedules:
- cron: "0 15 * * *"
  displayName: Daily midnight build
  branches:
    include:
    - main
    - develop
  always: true

jobs:
- job: build
  pool:
    vmImage: 'ubuntu-latest'

  steps:
  # JDKのセットアップ
  - task: JavaToolInstaller@0
    inputs:
      versionSpec: '11'
      jdkArchitectureOption: 'x64'
      jdkSourceOption: 'PreInstalled'

  # 依存関係の出力
  - script: ./gradlew androidDependencies
    displayName: Displays the Android dependencies of the project

  # コンパイル
  - script: ./gradlew assembleDebug
    displayName: Run Compile

- job: test
  pool:
    vmImage: 'ubuntu-latest'

  steps:
  # JDKのセットアップ
  - task: JavaToolInstaller@0
    inputs:
      versionSpec: '11'
      jdkArchitectureOption: 'x64'
      jdkSourceOption: 'PreInstalled'

  # テスト
  - script: ./gradlew testDevelopDebugUnitTest
    displayName: Test with Gradle

  # アーティファクトのステージングへコピー
  - task: CopyFiles@2
    inputs:
      Contents: |
        **/build/reports/tests/**/*
        **/build/reports/test-results/**/*
      TargetFolder: '$(Build.ArtifactStagingDirectory)'
    condition: succeededOrFailed()

  # アーティファクトへアップロード
  - task: PublishBuildArtifacts@1
    inputs:
      pathtoPublish: '$(Build.ArtifactStagingDirectory)'
      artifactName: 'drop'
      publishLocation: 'Container'
    condition: succeededOrFailed()

  # コードカバレッジの取得
  - script: ./gradlew jacocoDevelopDebugTestReport
    displayName: Get code coverage

  # コードカバレッジのアップロード
  - task: PublishCodeCoverageResults@1
    inputs:
      codeCoverageTool: 'jacoco'
      summaryFileLocation: '$(System.DefaultWorkingDirectory)/**/build/reports/jacoco/jacoco.xml'
      reportDirectory: '$(System.DefaultWorkingDirectory)/**/build/reports/jacoco/html'
      failIfCoverageEmpty: true

- job: lint
  pool:
    vmImage: 'ubuntu-latest'

  steps:
  # 静的解析
  - script: ./gradlew lint
    displayName: Run Inspection

  # アーティファクトのステージングへコピー
  - task: CopyFiles@2
    inputs:
      Contents: |
        **/build/reports/lint-results.html
        **/build/reports/lint-results.xml
      TargetFolder: '$(Build.ArtifactStagingDirectory)'
    condition: succeededOrFailed()

  # アーティファクトへアップロード
  - task: PublishBuildArtifacts@1
    inputs:
      pathtoPublish: '$(Build.ArtifactStagingDirectory)'
      artifactName: 'drop'
      publishLocation: 'Container'
    condition: succeededOrFailed()

- job: detekt
  pool:
    vmImage: 'ubuntu-latest'

  steps:
  # 静的解析
  - script: ./gradlew detekt
    displayName: Lint with detekt

  # アーティファクトのステージングへコピー
  - task: CopyFiles@2
    inputs:
      Contents: |
        **/build/reports/detekt/**/*
      TargetFolder: '$(Build.ArtifactStagingDirectory)'
    condition: failed()

  # アーティファクトへアップロード
  - task: PublishBuildArtifacts@1
    inputs:
      pathtoPublish: '$(Build.ArtifactStagingDirectory)'
      artifactName: 'drop'
      publishLocation: 'Container'
    condition: failed()
シンプルなYAMLファイルなので、慣れれば読みやすいと思います。
おまけ: PR時にCIを回す
Azure PipelinesのYAMLでiOSアプリのCI環境を構築する方法 と同様なので省略します。
他にやりたいこと
実現できていないことを備忘録として残します。
- キャッシュの取得
- [Test]タブの追加
- [Code Coverage]タブで画像の表示
おわりに
Azure PipelinesのYAMLで基本的なAndroidアプリのCIを回すことができました!
キャッシュが取れていなかったりと改善点もありますが、参考になれば幸いです。
参考リンク
- Expressions - Azure Pipelines | Microsoft Docs
- Conditions - Azure Pipelines | Microsoft Docs
- Java Tool Installer task - Azure Pipelines | Microsoft Docs
- Publish Code Coverage Results task - Azure Pipelines | Microsoft Docs
- コマンドラインからのテスト | Android デベロッパー | Android Developers
- lint チェックでコードを改善する | Android デベロッパー | Android Developers
- Continue Azure Pipeline on failed task - Stack Overflow