#はじめに
ESP8266(ESP-WROOM-02)は、Espressifという会社が製造するArduinoで開発ができるWi-Fiモジュールです。ここの秋月電子で私は買いました。本当はArduino開発が公式ではなく、Espressif自身が独自の開発用のプラットフォームとAPIを提供しているのですが、なんかこっちの方がメジャーになってますね。
今回はこのWi-FiつきArduinoのESP8266と、Arduinoとの相性抜群のProcessingを使ってIoTまがいな何かをやってみようかなと思います。
#ESP8266についてもう少し
EESP8266の性能をまとめました
| CPU | Tensilica L106 (Tensilica) |
| 最大動作周波数 | 80Mz |
| 内蔵フラッシュメモリ | 4Mバイト |
| 内蔵SRAM | 80Kバイト |
| シリアル通信機能 | I2C, UART, SPI, I2S, IR, SDIO |
| A-D変換器 | 10ビット×1ch |
| Wi-Fiプロトコル | IEEE802.11 b/g/n |
| 電源電圧 | 3.0V~3.6V |
最近ではESP32と呼ばれるモノの方が人気になっていますが、あっちは電力消費の問題があります。このESP8266には無いというわけではありませんが、こっちのほうが幾分ましです。また、ESP8266の方が当然値段が安いです。まあ、性能はESP32がダントツ上ですけど。
まあでもESP8266には、アクセスポイントを立てる機能とかESP8266自身をサーバー化させるAPIとか、ESP32には無い機能も実はあるので、どちらが優れているかは一概には言えないかなあと思います。
また、先ほどの秋月律子のリンク先でこのモジュールを購入した場合、そのままでは使えません。下の図のように回路を組む必要があります。
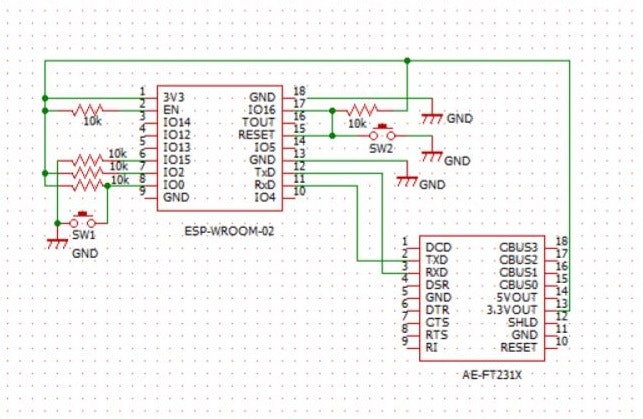
SW1は書き込みスイッチ、SW2はリセットスイッチです。プログラムを書き込む際は、SW1を押しながらSW2を押し、先にSW2を離してSW1を離すといった操作が必要です。
また、Arduinoの開発環境には最初からESP8266のボード情報が備わっているわけではないので、ここのGitHubからデータを持ってくる必要があります。しかし方法はそこまで複雑でもありません。
http://arduino.esp8266.com/stable/package_esp8266com_index.json
上記のものをArduinoIDEの環境設定のURLを貼る項目に貼るだけです。あとはボードマネージャーでインストールするだけで使えるようになります。
#ProcessingでTCPサーバを立てる
Processingはグラフィック系に特化した開発環境です。Arduinoと似たような書き方でプログラミングできます(まあ本当は、ArduinoがProcessingに似たような書き方という方が正しいのかもしれませんが。時系列的に)。ProcessingはArduinoとの相性が良くて、USB通信を使った方法の文献があちこちにのってるかとおもいます。ただ、意外と知られてないのですがProcessingにはTCP/IPが使えるライブラリが実は標準で備わっています。
以下は、TCPで送られてきた数字の文字列をグラフにプロットするプログラムです。この「import processing.net.*」って部分がTCPやUDPを使うために必要な宣言です。このプログラムは、いろんなサイトのプログラムからひっぱってきてフォークしたものですが、通信だけでなくSaveFileの機能を追加してます(マウスクリックでTXTファイルという形で値を保存します)。変数portを相手側と合わせれば通信が容易にできました。
import processing.net.*;

int port = 10002;
boolean myServerRunning = true;
Server myServer;
int xPos = 1; // horizontal position of the graph
int xband = 5;
//Variables to draw a continuous line.
int lastxPos=1;
int lastheight=0;
String lastinString = "";
//save file
PrintWriter output;
void setup () {
  // set the window size:
  size(600, 400);
  textFont(createFont("SanSerif", 16));
  myServer = new Server(this, port); // Starts a myServer on port 10002
  output = createWriter("datalog.txt");
  background(0);      // set inital background:
  text("DATA:", 450, 50);
}

void mousePressed()
{
  output.flush(); // Write the remaining data
  println("save done");
}

void draw() {
  if (myServerRunning == true) {
    Client thisClient = myServer.available();
    if (thisClient != null) {
      if (thisClient.available() > 0) {
        String inString = thisClient.readString();
        if (inString != null) {
          inString = trim(inString); // trim off whitespaces.
          output.println(inString + "\t");
          float inByte = float(inString); // convert to a number.
          inByte = map(inByte, 0, 1023, 0, height); //map to the screen height.
          //Drawing a line from Last inByte to the new one.
          stroke(127,34,255); //stroke color
          strokeWeight(4); //stroke wider
          line(lastxPos, lastheight, xPos, height - inByte);
          fill(0);
          stroke(0);
          rect(495, 30, 100, 30);
          fill(255);
          text(inString, 500, 50);
          lastinString = inString;
          lastxPos= xPos;
          lastheight= int(height-inByte);
          // at the edge of the window, go back to the beginning:
          if (xPos >= width) {
            xPos = 0;
            lastxPos= 0;
            background(0);  //Clear the screen.
            text("DATA:", 450, 50);
          }
          else {
            // increment the horizontal position:
            xPos += xband;
          }
        }
      }
    }
  }
}
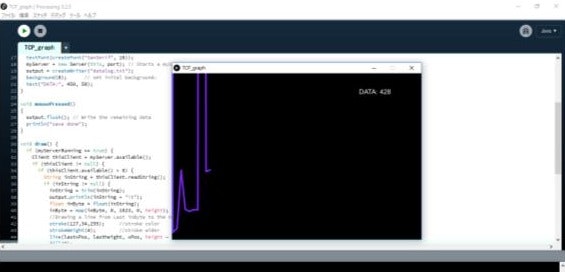
実行結果はこんな感じです。
#ESP8266で何かを送る
以下のスケッチは本当に適当な乱数をサーバーに送るだけのものです。
//This sketch sends a message to a TCP server
#include <ESP8266WiFi.h>
#include <WiFiClient.h>
/* Set these to your desired credentials. */
const char *ssid = "yourssid";
const char *password = "yourpass";
WiFiClient client;
const uint16_t port = 10002;
const char * host = "192.168.4.2"; // ip or dns
void setup() {
  delay(10);
  WiFi.softAP(ssid, password);
  while(!client.connect(host, port)) {
    delay(500);
  }
}

void loop() {
  client.println(String(random(1000)%1023));
  delay(500);
}
少し変わった部分として、ESP8266自身にアクセスポイントを立てています。ssidとpasswordを好きに変えるとSSIDとパスワードが変化します。また、こうするとESP8266には192.168.4.1というIPデフォルトで与えられます。つまりそこにPCにアクセスするとPCには192.168.4.2が与えられのでESP8266はそこを目がけてデータを投げているわけです。
今度はこのスケッチをいじってセンサデータを飛ばすものを作ってみたいですね。