自分が現在作成しているアプリの調査の一環で、Konva.jsのVue.jsのためのライブラリ vue-konva について少し調べた。その中で、テキストを囲んだブロックのカスタムエレメントの作成法とそれをドラッグ&ドロップする方法がわかったので紹介。
カスタムエレメントの作成方法
単一ファイルコンポーネントによる書き方を紹介。こちらを参考にした。ちなみに、v-label要素にdraggable: trueを指定することで、ドラッグできるようにしている。
CustomBlock.vue
<template>
  <v-label :config="labelConfig">
    <v-tag :config="tagConfig" />
    <v-text :config="textConfig" :text-label="textLabel"/>
  </v-label>
</template>

<script>
  export default {
    name: "CustomBlock",

    data: function () {
      return {
        labelConfig: {
          x: 170,
          y: 75,
          opacity: 0.75,
          draggable: true
        },
        tagConfig: {
          stroke: '#555',
          strokeWidth: 5,
          fill: '#ddd',
          lineJoin: 'round',
          shadowColor: 'black',
          shadowBlur: 10,
          shadowOffset: 10,
          shadowOpacity: 0.5,
          cornerRadius: 10,
        },
        textConfig: {
          text: this.textLabel,
          fontSize: 20,
          fontWeight: 'bold',
          padding: 10,
          stroke: 'black',
          strokeWidth: 1,
        },
      }
    },

    props: {
      textLabel: {
        type: String,
        default: ''
      },
    },

  }
</script>
キャンバスとの組み合わせ方
先ほどのカスタムエレメントをKonvaのキャンバス上で使う方法は以下の通り。イベント設定など、ドラッグ&ドロップのより高度な設定方法は、こちらのページを参考にするとよい。
Konva.vue
<template>
  <v-stage
      id="canvas"
      ref="stage"
      :config="configKonva"
  >
    <v-layer ref="layer">
      <CustomBlock
          :text-label="text"
      />
    </v-layer>
  </v-stage>
</template>

<script>

  import Vue from 'vue';
  import VueKonva from 'vue-konva';
  import CustomBlock from './atoms/CustomBlock'

  Vue.use(VueKonva);

  const width = window.innerWidth;
  const height = window.innerHeight;

  export default {
    name: "Konva",
    components: {CustomBlock},
    data() {
      return {
        configKonva: {
          width: width,
          height: height
        },
        text: "TEST"
      };
    },
  };

</script>

<style scoped>
  #canvas {
    width: 800px;
    height: 800px;
  }
</style>
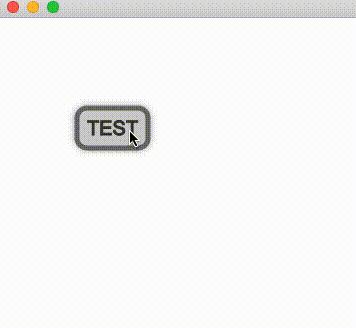
最終的な動作は下のようになる。