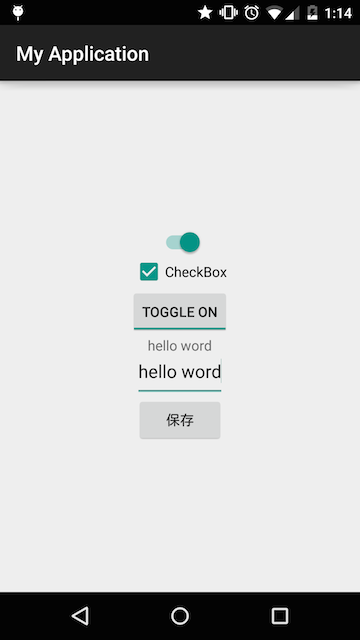
設定画面の構築が捗る記事になります!
こんな画面の設定を1つにまとめ保存して扱いやすくしようという話しです。
スイッチやチェックボックスやトーグルボタンやテキスト 等々が設定画面がまとまってあったりしますよね。

Gsonというライブラリを使って、PreferenceにObjectが保存出来るので一通り書いてみたら以外と綺麗に分かりやすくかけてびっくりしてます。
設定画面でよくあるPreferenceの使い方
・Preferenceから値を取り出すラッパークラスなどを使って対応する
・配列やListなどが保存出来ないので1つずつ値を保存する
以下の様なコードを書いたり見かけたりする。
int status = PrefUtil.getStatus("status_key");
String statusText = PrefUtil.getStatusText("status_text");

// viewの操作をしたり設定を切り替えたりする
if(status == 1){
}else{
}
PrefUtilというのがよくあるラッパークラスです。渡した文字列でPreferenceから値を取り出す的なやつですね。
設定がいくつもになってくると、ラッパークラスのstaticメソッドを何回も呼んで、保存する時もPrefUtil.save("status_key",1)とかやって分かりにくい事があったり。。。
Preferenceに配列やListが保存出来ないのでこうやるしか無かったりします。
PreferenceにObjectを保存するにはどうする?
まずSharedPreferenceにObjectが保存出来ないかを調べて見たら、普通に出来てた。
結構前に配列を保存するとかいう記事投稿してたよ!
・GsonというライブラリでObjectをJSON文字列にし、文字列として保存
・復元の際は、JSON文字列を取り出してObjectに変換
の流れです。
Qiita記事やEffective AndroidやBlogにも出てきてました。
難しそうだなと思ったんですが、一瞬でした。
保存時は、以下の様になります。
SharedPreferences prefs = PreferenceManager.getDefaultSharedPreferences(context);
Gson gson = new Gson();
// objectをjson文字列へ変換
String jsonInstanceString = gson.toJson(instance);
// 変換後の文字列をputStringで保存
pref.edit().putString("PREF_KYE",jsonInstanceString).apply();
これでオブジェクトが文字列として保存されました。
取得時は、以下の様になります。
SharedPreferences prefs = PreferenceManager.getDefaultSharedPreferences(context);
Gson gson = new Gson();
// 保存されているjson文字列を取得
String userSettingString = prefs.getString("PREF_KYE", "");
// json文字列を 「UserSettingクラス」のインスタンスに変換
instance = gson.fromJson(userSettingString, UserSetting.class);
保存したオブジェクトを取得出来ました!
実際に設定画面構築で使うパターンを考えてみた
Gsonというライブラリを使用します。
バージョン等は調べてあげてね!
compile 'com.google.code.gson:gson:2.3.1'
まずUserSettingクラスを定義
これが設定画面すべての設定項目の値を保持しておくインスタンスになります。
このオブジェクトをPreferenceに突っ込みます。
Preferenceから値を取り出したり、保存したりするのもこのクラスで行います。
import com.google.gson.Gson;

// ユーザーの設定を保存しておくUserSettingクラス
// 1つの設定画面の情報を1つのオブジェクトで考える 拡張しやすくGood!
public class UserSetting {
    public boolean switch1;
    public boolean checkbox;
    public boolean toggleButton;
    public boolean radioButton;
    public String text1;
    // Preferenceのkeyは1つだけなので混乱ない
    private static final String USER_SETTING_PREF_KEY="USER_SETTING";

    // 保存情報取得メソッド
    public static UserSetting getInstance(Context context) {
        SharedPreferences prefs = PreferenceManager.getDefaultSharedPreferences(context);
        Gson gson = new Gson();
        String userSettingString = prefs.getString(USER_SETTING_PREF_KEY, "");

        UserSetting instance;
        // 保存したオブジェクトを取得
        if( !TextUtils.isEmpty(userSettingString)) {
            instance = gson.fromJson(userSettingString, UserSetting.class);
        }else {
            // 何も保存されてない 初期時点 この時はデフォルト値を入れて上げる
            instance = getDefaultInstance();
        }
        return instance;
    }

    // デフォルト値の入ったオブジェクトを返す
    public static UserSetting getDefaultInstance(){
        UserSetting instance = new UserSetting();
        instance.switch1 = false;
        instance.checkbox = false;
        instance.toggleButton = false;
        instance.radioButton = false;
        instance.text1 = "hello world";
        return instance;
    }

    // 状態保存メソッド
    public void saveInstance(Context context){
        SharedPreferences prefs = PreferenceManager.getDefaultSharedPreferences(context);
        Gson gson = new Gson();
        // 現在のインスタンスの状態を保存
        prefs.edit().putString(USER_SETTING_PREF_KEY, gson.toJson(this)).apply();
    }
}
これで準備完了!
あとはActivityから呼び出して実際に使ってみた
面倒だったのでUserSettingのメンバー変数をパブリックにしてます。
public class MainActivity extends ActionBarActivity {
    // ユーザーが設定する値を保持するオブジェクト
    private UserSetting userSetting;
    private Switch switch1;
    private CheckBox checkBox;
    private ToggleButton toggleButton;
    private TextView text;
    private EditText editText;

    @Override
    protected void onCreate(Bundle savedInstanceState) {
        super.onCreate(savedInstanceState);
        setContentView(R.layout.activity_main);

        switch1 = (Switch)findViewById(R.id.switch1);
        checkBox = (CheckBox)findViewById(R.id.checkbox);
        toggleButton = (ToggleButton) findViewById(R.id.toggleButton);
        text = (TextView)findViewById(R.id.text1);
        editText = (EditText)findViewById(R.id.editText);

        // Preferenceからオブジェクトを取得
        userSetting = UserSetting.getInstance(getApplicationContext());

        // ↑で取得したオブジェクトからUI状態を復元
        // ここポイント
        switch1.setChecked(userSetting.switch1);
        checkBox.setChecked(userSetting.checkbox);
        toggleButton.setChecked(userSetting.toggleButton);
        text.setText(userSetting.text1);

        // あとはリスナーを登録して、コールバックでuserSettingインスタンスの中身を書き換える
        // Switch
        switch1.setOnCheckedChangeListener(new CompoundButton.OnCheckedChangeListener() {
            @Override
            public void onCheckedChanged(CompoundButton buttonView, boolean isChecked) {
                userSetting.switch1 = isChecked;
            }
        });
        // CheckBox
        checkBox.setOnCheckedChangeListener(new CompoundButton.OnCheckedChangeListener() {
            @Override
            public void onCheckedChanged(CompoundButton buttonView, boolean isChecked) {
                userSetting.checkbox = isChecked;
            }
        });
        // ToggleButton
        toggleButton.setOnCheckedChangeListener(new CompoundButton.OnCheckedChangeListener() {
            @Override
            public void onCheckedChanged(CompoundButton buttonView, boolean isChecked) {
                userSetting.toggleButton = isChecked;
            }
        });

        // 設定保存ボタン
        findViewById(R.id.saveButton).setOnClickListener(new View.OnClickListener() {
            @Override
            public void onClick(View v) {
                // エディットテキストの値も保存
                String editString = editText.getText().toString();
                userSetting.text1 = editString;

                // saveInstanceメソッドを呼ぶと今のインスタンスの状態が保存される!
                // 設定が変わった時に呼ぶとかでも使える
                userSetting.saveInstance(getApplicationContext());
                text.setText(editString);
            }
        });
    }
}
一応XMLを貼っておきます。
<LinearLayout xmlns:android="http://schemas.android.com/apk/res/android"
    xmlns:tools="http://schemas.android.com/tools"
    android:layout_width="match_parent"
    android:layout_height="match_parent"
    android:layout_gravity="center"
    tools:context=".MainActivity"
    android:gravity="center"
    android:orientation="vertical">
    <Switch
        android:id="@+id/switch1"
        android:layout_width="wrap_content"
        android:layout_height="wrap_content"
        android:checked="true"
        android:textOff="2"
        android:textOn="1" />
    <CheckBox
        android:id="@+id/checkbox"
        android:text="CheckBox"
        android:layout_width="wrap_content"
        android:layout_height="wrap_content" />
    <ToggleButton
        android:id="@+id/toggleButton"
        android:textOn="Toggle On"
        android:textOff="Toggle Off"
        android:layout_width="wrap_content"
        android:layout_height="wrap_content" />
    <TextView
        android:id="@+id/text1"
        android:layout_width="wrap_content"
        android:layout_height="wrap_content"
        android:text="default text"
        android:textSize="14sp"/>
    <EditText
        android:id="@+id/editText"
        android:layout_width="wrap_content"
        android:layout_height="wrap_content" />
    <Button
        android:id="@+id/saveButton"
        android:layout_width="wrap_content"
        android:layout_height="wrap_content"
        android:text="保存"/>
</LinearLayout>
こんな感じで値を設定画面という括りで保存してみました。
実際に動かして確かめたので問題ないと思います。
・UserSettingクラスのメンバー変数に新たに値を追加すればすぐに拡張出来る
・どの値がどの設定画面にあるのかすぐ分かる
・沢山のPreferencsのKEYを定義せずに済むので事故を防ぐ
・saveInstanceメソッドを呼べば今の状態が保存されるので、一々引数渡す必要がない