やりたいこと
Reactを使ったフロント側と、バックエンドとの連携処理を最低限動かし、Herokuで公開するまでをメモします。
千里の道も一歩から。
全体イメージ
ローカルでの全体イメージは以下です。
Reactはフロントエンドのフレームワークなので、サーバサイドのバックエンド処理は別物として分離してしまったほうが分かりやすそうです。

手順
前提
以下ができていることを前提にします。
- Node.jsがローカルにインストールされていること
- GithubとHerokuのアカウントを持っていること
- gitがローカルにインストールされていること
- Heroku CLIがローカルにインストールされていること
Githubリポジトリ準備
Githubにフロント用、バック用の空リポジトリを作っておきます。

以降、リポジトリ名やフォルダ名は自分用に読み替えてください。
バックエンド作成
バックエンドのNode.jsアプリを作っていきます。
# フォルダ準備
cd ~/git
mkdir nodejs-template-back
cd nodejs-template-back/

# 初期化 色々聞かれるが全部EnterでOK
npm init

# expressをインストール
npm install -s express
package.jsonが生成されますが、少し記載が足りないので修正しておきます。
enginesでのnode.jsバージョン指定、scripts:startで起動時のスクリプト指定を追加しています。
{
  "name": "nodejs-template-back",
  "version": "1.0.0",
  "engines": {
    "node": "12.x"
  },
  "description": "",
  "main": "index.js",
  "scripts": {
    "start": "node index.js",
    "test": "echo \"Error: no test specified\" && exit 1"
  },
  "author": "",
  "license": "ISC",
  "dependencies": {
    "express": "^4.17.1"
  }
}
直下にソースを用意します。GETしかない単純なREST APIです。
データは、最終的にはDBから取ったりすることになると思いますが、今時点では定数を返すだけです。
また、フロントとバックのURLが異なるので、フロントのjavascriptからAPIを呼べるようにCORS設定を入れています。
const express = require('express');
const app = express();

// CORS設定。異なるURLからでも呼び出せるようにする
app.use(function(req, res, next) {
   res.header("Access-Control-Allow-Origin", "*");
   res.header(
     "Access-Control-Allow-Headers",
     "Origin, X-Requested-With, Content-Type, Accept"
   );
   next();
 });

 // jsonを使えるようにする
 app.use(express.json());

// サーバ起動
const port = process.env.PORT || 5001;
app.listen(port, () => console.log(`Listening on port ${port}...`));

// DBの代わり
const user = { id: 1, name: 'Taro'};

// GET /api/user
app.get('/api/user', (req, res) => {
   res.send(user);
});
他、いくつか必要なファイルを作っておきます。
・モジュールをgitに登録しないための.gitignoreファイル
/node_modules
・Herokuの設定ファイル。これを作っておかないと後でheroku経由で実行したときにWarningが出ます
web: npm start
ここまでできたらGithubに登録しておきます。
cd ~/git/nodejs-template-back
git init
git add .
git commit -m "first commit"
git remote add origin https://github.com/【アカウント名】/nodejs-template-back.git
git push -u origin master
フロントエンド作成
続いてフロントエンドを作っていきます。
# Reactアプリを作成。少し時間がかかる
cd ~/git
npx create-react-app nodejs-template-front
cd nodejs-template-front
package.jsonを確認し、もしreact-scriptsのバージョンが3.3.0だった場合、3.2.0に落としておきます。
3.3.1以降であればこの手順は不要(なはず)です
参考:create-react-appで作ったアプリがhttpsだと動かない
cat package.json
npm install react-scripts@3.2.0
生成されたソースを改造し、バックエンドのAPIを呼び出すようにしてみます。
import React from 'react';
import logo from './logo.svg';
import './App.css';

// 修正1: コンストラクタを作りたいので、関数コンポーネントからクラスに修正
class App extends React.Component {
//function App() {

  // 修正2: コンストラクタを追加
  constructor(props){
    super(props);
    this.state = {};
    // バックエンドのAPIを呼び出し、this.state.nameに結果を保管.
    // 呼び出し先はローカルとサーバ上で可変にしたいので環境変数からとる
    fetch(process.env.REACT_APP_BACKEND_URL + "/api/user")
      .then(response => response.json())
      .then(json =>  this.setState({name : json.name}));
  }

// 修正3: renderメソッドにする
  render(){
    return (
      <div className="App">
        <header className="App-header">
          <img src={logo} className="App-logo" alt="logo" />
           {/* 修正4: API呼び出し結果を反映 */}
          <p>
            Hi, {this.state.name}. Edit <code>src/App.js</code> and save to reload.
          </p>
          <a
            className="App-link"
            href="https://reactjs.org"
            target="_blank"
            rel="noopener noreferrer"
          >
          Learn React
          </a>
        </header>
      </div>
    );
  }
}

export default App;
バックエンドAPIの呼び出し先は可変にしたいので、ローカル用の値を環境変数にセットしておきます。
.envというファイルを作成し、その中に書いておくことで、上記ソースのようにprocess.env.環境変数名 で呼び出せます。
「REACT_APP_」で始まる環境変数名にしておく必要があるので注意です。
REACT_APP_BACKEND_URL=http://localhost:5001
他、バック同様にHeroku用の必要ファイルを作っておきます。
web: npm start
Githubに登録します。
cd ~/git/nodejs-template-front
git init
git add .
git commit -m "first commit"
git remote add origin https://github.com/【アカウント名】/nodejs-template-front.git
git push -u origin master
Herokuアプリ準備
Herokuにフロント用、バック用の空アプリを作っておきます。画面からNew -> Create new app で作るだけです。

それぞれGithubと連携させます。また、一度Manual deployをしておきます。
参考:heroku 初級編 - GitHub から deploy してみよう -
また、ローカルのリポジトリはこの時点でGithubとしか紐づいていないので、Herokuとも関連付けておきます。
# バック
cd ~/git/nodejs-template-back/
heroku git:remote -a nodejs-template-back
# 確認
git remote -v
   heroku  https://git.heroku.com/nodejs-template-back.git (fetch)    // 追加された
   heroku  https://git.heroku.com/nodejs-template-back.git (push)     // 追加された
   origin  https://github.com/uemuram/nodejs-template-back.git (fetch)
   origin  https://github.com/uemuram/nodejs-template-back.git (push)

# フロント
cd ~/git/nodejs-template-front/
heroku git:remote -a nodejs-template-front
# 確認
git remote -v
   heroku  https://git.heroku.com/nodejs-template-front.git (fetch)   // 追加された
   heroku  https://git.heroku.com/nodejs-template-front.git (push)    // 追加された
   origin  https://github.com/uemuram/nodejs-template-front.git (fetch)
   origin  https://github.com/uemuram/nodejs-template-front.git (push)
フロント用に、バックエンドのURLをHeroku側の環境変数に設定します。Heroku上で動かすときは、.envではなくこちらで設定した環境変数が使われます。
# 設定
heroku config:set REACT_APP_BACKEND_URL=https://nodejs-template-back.herokuapp.com
# 確認
heroku config
   REACT_APP_BACKEND_URL: https://nodejs-template-back.herokuapp.com  // 設定された
動作確認(ローカル)
フロント、バックをそれぞれ起動してみます。
バックはフロントとポートを変えるために、明示的にポートを指定しています。
# バック
cd ~/git/nodejs-template-back/
heroku local -p 5001

# フロント
cd ~/git/nodejs-template-front/
heroku local
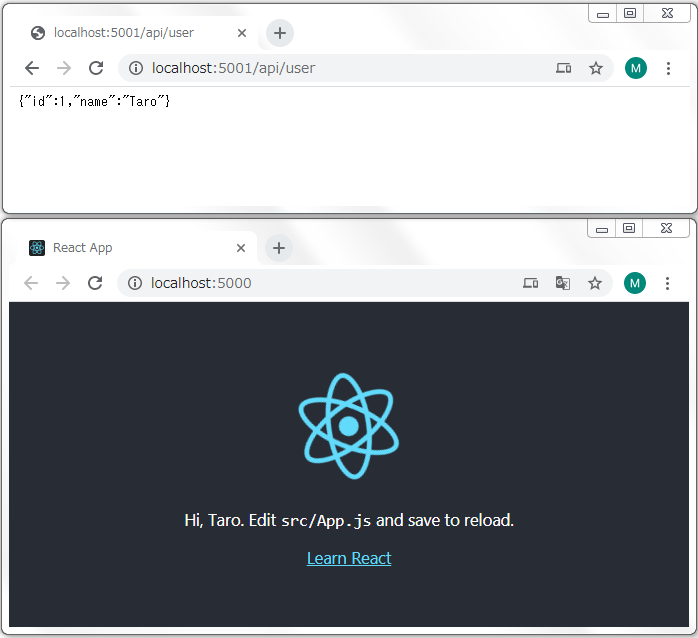
それぞれ以下のURLで確認できます。
フロント側で、バックのAPIの呼び出し結果(name)が表示できていることがわかります。
動作確認(Heroku)
続いてHeroku側の確認です。
# バック
cd ~/git/nodejs-template-back/
heroku open

# フロント
cd ~/git/nodejs-template-front/
heroku open
Heroku上のバックAPIを呼び出せていることがわかります。
最後に
最低限動くところまでを作ることができました。ソースは以下に置いています。
https://github.com/uemuram/nodejs-template-back
https://github.com/uemuram/nodejs-template-front
DB処理やAPIの認証、各種ライブラリはここから追加していきます。

