概要
今回は、UnityとMeta Quest2を使ってハンドトラッキングをやってみた内容の後半です!
記事内容としては下記になります。
- 開発手順
- ビルド・MetaQuest2での確認方法
前半の記事はこちらからご覧ください!
ちなみに前半と後半の記事を見ながら進めていただくことで、下記のようなものを作ることができます。

それでは早速始めていきましょう!
動作環境
前半記事に書いた内容と同じですが、再度記載しておきます。
- Unity 2021.3.8f1
- Oculus XR Plugin:3.0.2
- Oculus Integration:42.0
- XR Plugin Management:4.2.1
作業内容
1. シーンを自分で構築してみる
下記の添付画像内に作業内容を記載していますが、それぞれ説明していきます。
最低限これだけ設定していれば、実行した際にちゃんとハンドトラッキングできるようになるはずです!

- Scene作成時に自動生成されているCameraをHierarchyから削除し、OVRCameraRigを追加する。
- OVRHandPrefabを下記の階層に設置する。
- Hierarchy > OVRCameraRig > TrackingSpace > LeftHandAnchor
- Hierarchy > OVRCameraRig > TrackingSpace > RightHandAnchor
- OVRHandPrefabのデフォルト設定は左手になっているため、RightHandAnchor下に設置したOVRHandPrefabを選択し、inspectorから3箇所「Hand Right」に変更する。
- Hand Type
- Skeleton Type
- Mesh Type
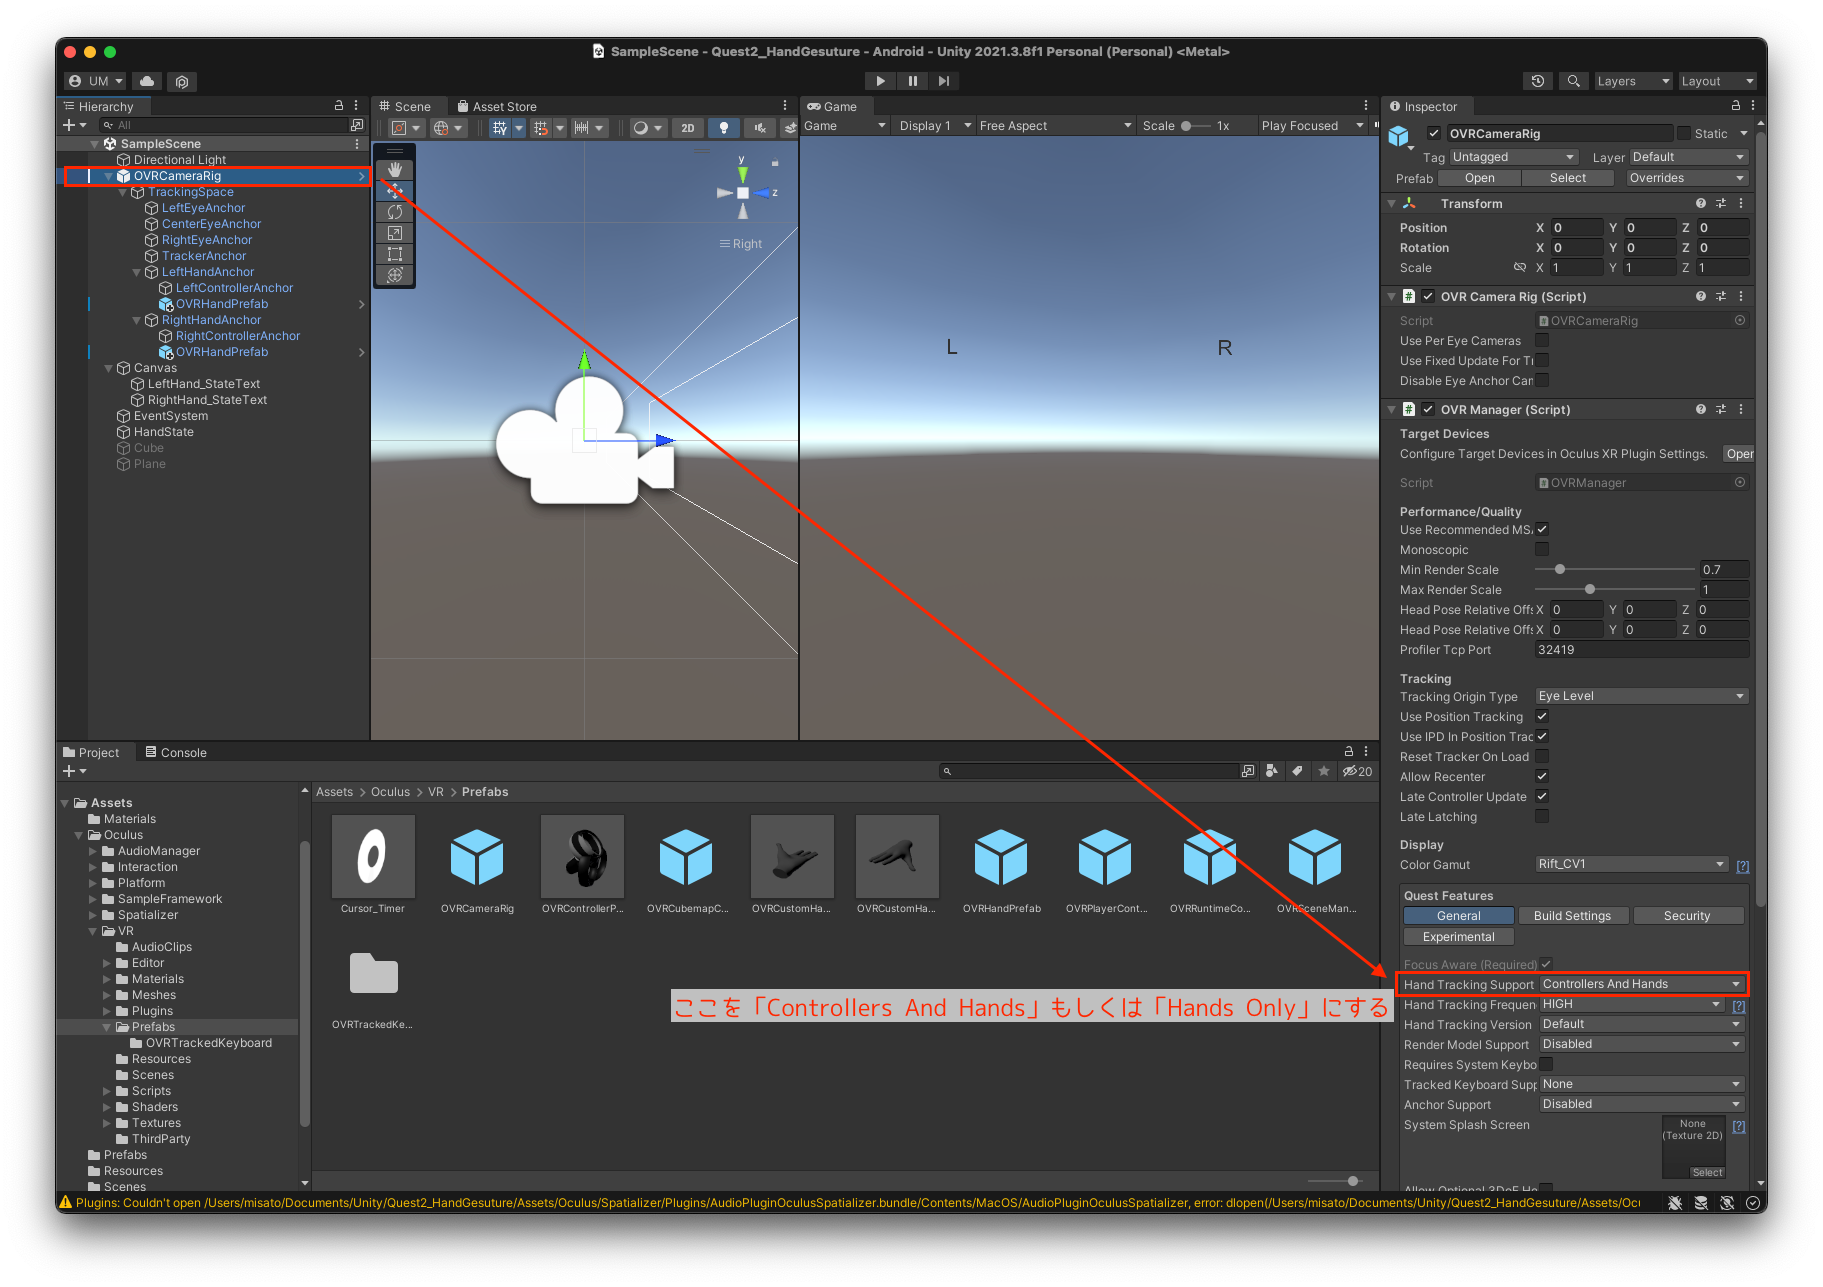
- OVRCameraRigを選択し、inspector内のHand Tracking Supportを「Controllers And Hands」もしくは「Hands Only」に変更する
2. テキストを表示させて情報を見れるようにする
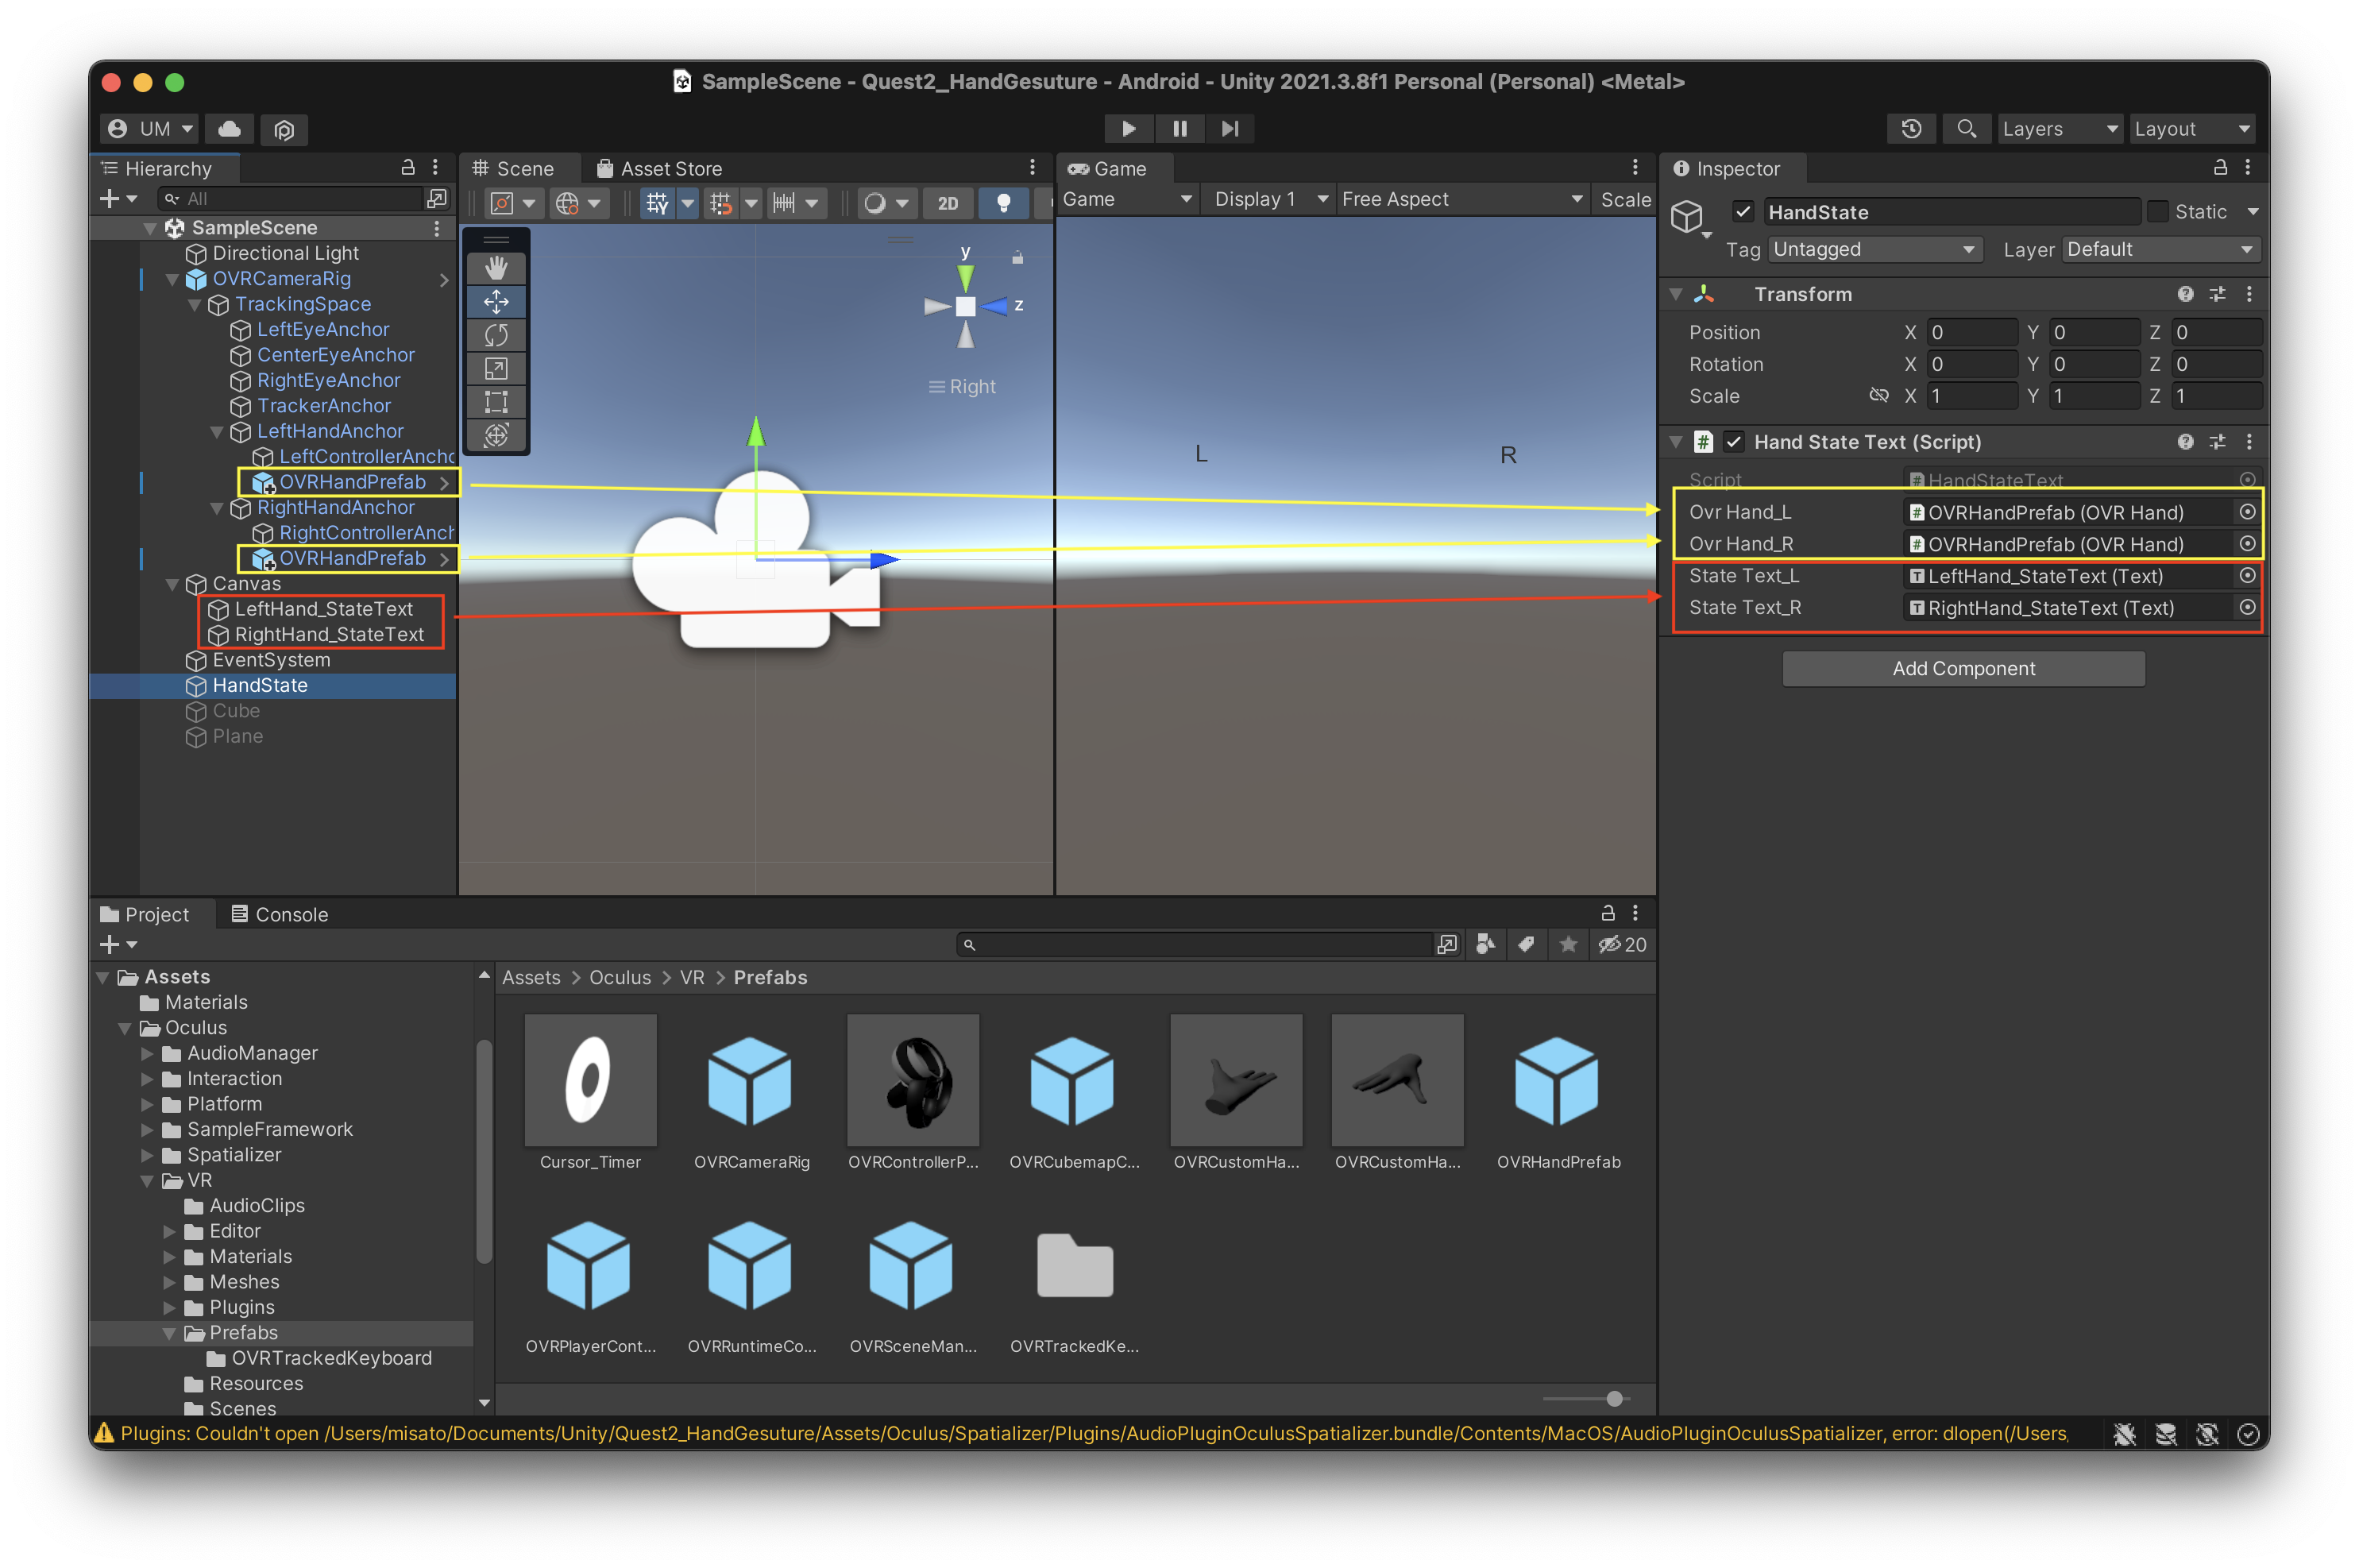
- 空のGameObjectを用意し、そこに下記のサンプルコードを書いたスクリプトをアタッチする
サンプルコード
using System.Collections;
using System.Collections.Generic;
using Oculus.Interaction.Input;
using UnityEngine;
using UnityEngine.UI;

public class HandStateText : MonoBehaviour
{
    [SerializeField]
    OVRHand ovrHand_L, ovrHand_R;

    public Text stateText_L;
    public Text stateText_R;

    // Start is called before the first frame update
    void Start()
    {

    }

    // Update is called once per frame
    void Update()
    {
        if (!ovrHand_L.IsTracked)
        {
            stateText_L.text = "左手 : 認識なし";

        }
        else {
            if (ovrHand_L.GetFingerIsPinching(OVRHand.HandFinger.Index) &&
        ovrHand_L.GetFingerIsPinching(OVRHand.HandFinger.Thumb))
            {
                stateText_L.text = "左手 : つまんでる";
            }
            else {
                stateText_L.text = "左手 : 離した";
            }
        }


        if (!ovrHand_R.IsTracked)
        {
            stateText_R.text = "右手 : 認識なし";

        }
        else
        {
            if (ovrHand_R.GetFingerIsPinching(OVRHand.HandFinger.Index) &&
        ovrHand_R.GetFingerIsPinching(OVRHand.HandFinger.Thumb))
            {
                stateText_R.text = "右手 : つまんでる";
            }
            else
            {
                stateText_R.text = "右手 : 離した";
            }
        }

    }
}
- 右手・左手のOVRHandPrefabをそれぞれアタッチする
- 情報を表示させるため、右手用・左手用のテキストを作成し、同じくアタッチする
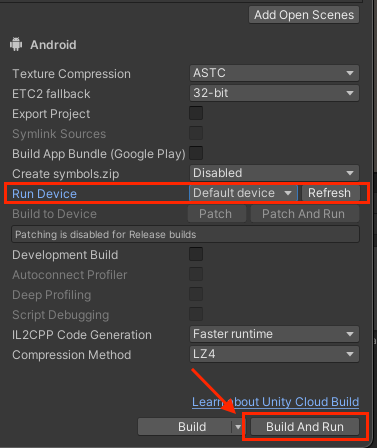
3. 実機確認を行なう
先ほどの手順で作成したシーンをビルドして、Meta Quest2へapkを送り、実行します。
直接PCとMeta Quest2を接続し、Build Settings を開いて「Run Device」の「Refresh」を押してから、接続したデバイス名を選択してあげて「Build And Run」を選択してください。
ビルド完了後、Meta Quest2を覗いてみて冒頭に紹介したように、
手がちゃんと認識されている、人差し指と親指をくっつける・離すとテキストで表示される状態になれば完成です!