はじめに
最近話題になっているChatGPT APIを使ってUnityからAPIを叩き、動かす方法をご紹介します。
今回は、自分だけのAIキャラクター「ヒナタちゃん」を設定して会話するところまでをやってみました!
注意点
Unityで開発を始める前に下記の2つの作業も行う必要があるため、そちらも合わせてご紹介します。
- OpenAIのアカウント取得
- APIキーの取得
参考記事
今回、ChatGPTを使用する際に参考にさせていただいた資料は下記です。
ありがとうございます!
制作したもの
今回私が制作したものはこちらになります!
ヒナタちゃんもちゃんと存在させたかったので、
- ユーザーがテキストを投げるまでは待機中モーション
- テキストを送信してAPIから回答が返ってくるまでは考え中モーション
を表示するようにしてみました。
また、ヒナタちゃんとの会話内容も見れるようにScrollView内にやりとりの内容を表示できるようにしました。
(画質があまり良くないかもしれませんがご了承ください(´・ω・`))

開発環境
- Unityバージョン : 2021.3.8f1
作業内容
1. OpenAIに登録する
-
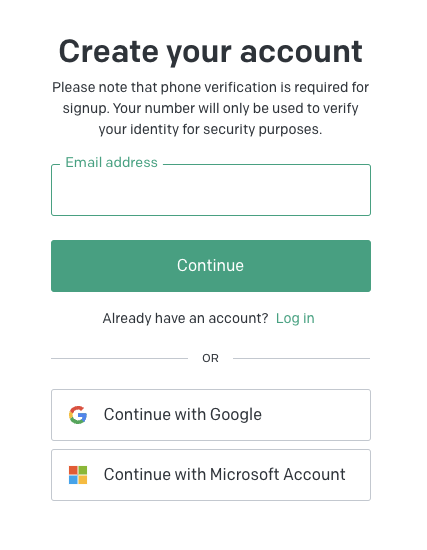
OpenAIのサイトにアクセスし、「Get started」をクリックしてアカウントを登録する。

-
アカウントを作成する画面が表示されるので、どれかを選択する。
2. APIキーを取得する
3. Unityで開発する
ここからUnityで実際に開発を進めていきます。
基本的には参考にさせていただいたサイトに記載されている内容と同じですが、一部修正している箇所もあります。
※ AIキャラクター・会話内容の表示関係については説明を省きます。
▼ ChatGPT APIとやりとりするクラス (ConnectionChatGPT.cs)
using System;
using System.Collections.Generic;
using System.Text;
using Cysharp.Threading.Tasks;
using UnityEngine;
using UnityEngine.Networking;

public class ConnectionChatGPT
{
    //APIキー
    private readonly string _apiKey;
    //会話履歴を保持するリスト
    private readonly List<ChatGPTMessageModel> _messageList = new List<ChatGPTMessageModel>();

    public ConnectionChatGPT(string apiKey,string settingText)
    {
        _apiKey = apiKey;
        //AIの応答のプロンプトを記録
        _messageList.Add(
            new ChatGPTMessageModel() { role = "system", content = settingText});
    }

    public async UniTask<ChatGPTResponseModel> RequestAsync(string userMessage)
    {
        //文章生成AIのAPIのエンドポイントを設定
        var apiUrl = "https://api.openai.com/v1/chat/completions";

        //ユーザーからのメッセージを記録
        _messageList.Add(new ChatGPTMessageModel { role = "user", content = userMessage });

        //OpenAIのAPIリクエストに必要なヘッダー情報を設定
        var headers = new Dictionary<string, string>
            {
                {"Authorization", "Bearer " + _apiKey},
                {"Content-type", "application/json"}
            };


        //利用するモデルやトークン上限、プロンプトをオプションに設定
        var options = new RequestModel()
        {
            model = "gpt-3.5-turbo",
            messages = _messageList,
            max_tokens = 200,
            top_p = 1
        };
        var jsonOptions = JsonUtility.ToJson(options);

        //HTTP(POST)の情報を設定
        using UnityWebRequest request = new UnityWebRequest(apiUrl, "POST")
        {
            uploadHandler = new UploadHandlerRaw(Encoding.UTF8.GetBytes(jsonOptions)),
            downloadHandler = new DownloadHandlerBuffer()
        };

        //HTTPヘッダーを設定
        foreach (var header in headers)
        {
            request.SetRequestHeader(header.Key, header.Value);
        }

        //ここでリクエスト送信
        await request.SendWebRequest();


        //エラーの時
        if (request.result == UnityWebRequest.Result.ConnectionError ||
           request.result == UnityWebRequest.Result.ProtocolError)
        {
            Debug.LogError(request.error);
            throw new Exception();
        }
        else
        {
            var responseString = request.downloadHandler.text;
            var responseObject = JsonUtility.FromJson<ChatGPTResponseModel>(responseString);
            _messageList.Add(responseObject.choices[0].message);

            // _messageListには今までのやりとりが追加されていくため、常に一つ前のやり取りのみ保持しておくようにする
            // _messageList[0]には、AIキャラの設定をしているプロンプトが入っている
            if (_messageList.Count > 3)
            {
                _messageList.RemoveRange(1,2);
            }
            return responseObject;
        }
    }
}
▼ モデルクラス (Models.cs)
using System;
using System.Collections.Generic;
using UnityEngine;

//ChatGPT APIのmessageに含まれる要素
[Serializable]
public class ChatGPTMessageModel
{
    public string role;
    public string content;
}

//ChatGPT APIにRequestを送るためのJSON用クラス
//modelとmessagesについては必須項目
[Serializable]
public class RequestModel
{
    public string model;
    public List<ChatGPTMessageModel> messages;
    public int max_tokens;
    public int top_p;

}

//ChatGPT APIからのResponseを受け取るためのクラス
//ChatGPTからのResponse例は下記に記載
[Serializable]
public class ChatGPTResponseModel
{
    public string id;
    public string @object;
    public int created;
    public Choice[] choices;
    public Usage usage;

    [Serializable]
    public class Choice
    {
        public int index;
        public ChatGPTMessageModel message;
        public string finish_reason;
    }

    [Serializable]
    public class Usage
    {
        public int prompt_tokens;
        public int completion_tokens;
        public int total_tokens;
    }
}


//ChatGPTからのResponse例
/*
{
  "id": "chatcmpl-123",
  "object": "chat.completion",
  "created": 1677652288,
  "choices": [{
    "index": 0,
    "message": {
      "role": "assistant",
      "content": "\n\nHello there, how may I assist you today?",
    },
    "finish_reason": "stop"
  }],
  "usage": {
    "prompt_tokens": 9,
    "completion_tokens": 12,
    "total_tokens": 21
  }
}
*/
▼ 使用方法
    /// <summary>
    /// テキスト送信ボタン押下
    /// </summary>
    public void OnTap()
    {
        _ = SendButtonAsync();
    }

    // -------

    /// <summary>
    /// 送信ボタン押下後の処理
    /// _openAIApiKey : APIキー
    /// _nowSettingText : AIの設定を記述しているプロンプト
    /// _requestText : ユーザーが入力したテキスト
    /// </summary>
    async Task SendButtonAsync()
    {
        var connection = new ConnectionChatGPT(_openAIApiKey, _nowSettingText);
        // returnChatGPTTextにはModels.csで定義したChatGPTResponseModelの形で入っているので、ここから情報を取得して使用することができます。
        var returnChatGPTText = await connection.RequestAsync(_requestText);
    }
最後に
今回初めてChatGPTを使ってみたのですが、まだまだ活用方法もたくさんありそうだし、これからも引き続き学習していきたいなと思います。
ちなみにヒナタちゃんの設定をどうしようか迷い、一旦関西弁を喋らせてみようとした結果、ちゃんと関西弁でしゃべれる女の子が誕生しました!
(自分の推しキャラを生成するのもそう遠くないかもしれません、頑張ろうと思います。)


