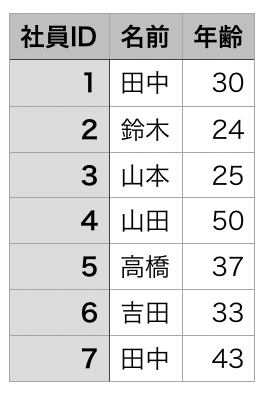
対象ファイルデータ
今回は、サンプルとして簡単に以下を用意しました。
CSVファイル
テキストファイル
この2つのデータを結合して以下のようなexcelファイルを作成しようと思います。

はじめに
今回はChromeの拡張サービスである「Colaboratory」を使用してPythonのコードを記述していきます。
Google Driveから「新規 → その他 → アプリを追加」からインストールしてください。(Chromeで検索してもインストールできます)
全体コード
import csv
import openpyxl
import datetime
from google.colab import drive

start = datetime.datetime.now()
print('処理開始')
print(start)

drive.mount('/content/drive')

OUTPUT_FILE_NAME = "/content/drive/My Drive/sample/file/sample.xlsx"

csvFile = open("/content/drive/My Drive/sample/file/sample.csv", "r", encoding="utf-8", errors="", newline="" )
csvData = csv.DictReader(csvFile)

headerList = []
with open('/content/drive/My Drive/sample/file/sample.csv', 'r') as fileData:
  reader = csv.reader(fileData)
  headerList = reader.__next__()  # ヘッダーの読み込み
csvHeaderLength = len(headerList)

departmentDict = {}
positionDict = {}
with open('/content/drive/My Drive/sample/file/sample.txt', mode='rt', encoding='utf-8') as f:
  for index, line in enumerate(f.read().splitlines()):
    splitData = line.split("\t")
    if index == 0:
      for headerIndex, name in enumerate(splitData):
        if headerIndex != 0:
          headerList.append(name)
    else:
      departmentDict[splitData[0]] = splitData[1]
      positionDict[splitData[0]] = splitData[2]

# ブック作成
workbook = openpyxl.Workbook()
# 先頭シート取得
worksheet = workbook.worksheets[0]

# データ出力
for index, header in enumerate(headerList) :
  # ヘッダー追加
  worksheet.cell(1, index + 1, header)

for index, row in enumerate(csvData):
  for columnIndex in range(csvHeaderLength) :
    worksheet.cell(index + 2, columnIndex + 1, row[headerList[columnIndex]])

  if row["社員ID"] in departmentDict.keys():
    worksheet.cell(index + 2, csvHeaderLength + 1, departmentDict[row["社員ID"]])
  else:
    worksheet.cell(index + 2, csvHeaderLength + 1, 'データなし')

  if row["社員ID"] in positionDict.keys():
    worksheet.cell(index + 2, csvHeaderLength + 2, positionDict[row["社員ID"]])
  else:
    worksheet.cell(index + 2, csvHeaderLength + 2, 'データなし')

# 保存
workbook.save(OUTPUT_FILE_NAME)

end = datetime.datetime.now()
print('処理完了')
print(end)
print(end - start)
以下で各コード、手順について解説していきます。
インポート
import csv
import openpyxl
from google.colab import drive
まずは必要なライブラリをインストールします。
Google Drive, Colaboratoryを使用する場合、ドライブのマウントが必要なのでgoogle.clabからdriveもインポートしておきます。
ドライブのマウント
drive.mount('/content/drive')
Google Drive, Colaboratoryを使用する場合、ドライブのマウントを行います。
作成するファイル名の定義
OUTPUT_FILE_NAME = "/content/drive/My Drive/sample/file/sample.xlsx"
作成するファイル名を配置したいディレクトリーから定義します。
CSVファイルの読み込み
csvFile = open("/content/drive/My Drive/sample/file/sample.csv", "r", encoding="utf-8", errors="", newline="" )
csvData = csv.DictReader(csvFile)
CSVファイルを開きcsvDataに辞書型で定義します。
ヘッダーの取得
headerList = []
with open('/content/drive/My Drive/sample/file/sample.csv', 'r') as fileData:
  reader = csv.reader(fileData)
  headerList = reader.__next__()  # ヘッダーの読み込み

csvHeaderLength = len(headerList)
CSVファイルのヘッダーをheaderListに格納し、CSVファイルののヘッダーの数を変数に格納しておきます。
テキストファイルの読み込み
departmentDict = {}
positionDict = {}

with open('/content/drive/My Drive/sample/file/sample.txt', mode='rt', encoding='utf-8') as f:
  for line in f.read().splitlines():
    splitData = line.split("\t")

    if index == 0:
      for headerIndex, name in enumerate(splitData):
        if headerIndex != 0:
          headerList.append(name)
    else:
      departmentDict[splitData[0]] = splitData[1]
      positionDict[splitData[0]] = splitData[2]
↓
with open('/content/drive/My Drive/sample/file/sample.txt', mode='rt', encoding='utf-8') as f:
こちらでテキストファイルを読み込み
for line in f.read().splitlines():
行ごとに分割します。
splitData = line.split("\t")
行ごとに分割したデータを\tタブで更に分割し、
if index == 0:
  for headerIndex, name in enumerate(splitData):
    if headerIndex != 0:
      headerList.append(name)
    else:
      departmentDict[splitData[0]] = splitData[1]
      positionDict[splitData[0]] = splitData[2]
1行目はヘッダーなのでid以外をheaderListに追加し、
2行目以降は部署、役職のそれぞれの辞書にkey=idでデータを定義します。
ワークブックの作成
workbook = openpyxl.Workbook()
worksheet = workbook.worksheets[0]
Excelのワークブックを作成し、先頭のシートを取得します。
今回は使用しませんが、workbook.create_sheet()で2シート目以降を作成することができます。
データ出力
for index, header in enumerate(headerList) :
  worksheet.cell(1, index + 1, header)

for index, row in enumerate(csvData):
  for columnIndex in range(csvHeaderLength) :
    worksheet.cell(index + 2, columnIndex + 1, row[headerList[columnIndex]])

  if row["社員ID"] in departmentDict.keys():
    worksheet.cell(index + 2, 4, departmentDict[row["社員ID"]])
  else:
    worksheet.cell(index + 2, 4, 'データなし')

  if row["社員ID"] in positionDict.keys():
    worksheet.cell(index + 2, 5, positionDict[row["社員ID"]])
  else:
    worksheet.cell(index + 2, 5, 'データなし')
↓
for index, header in enumerate(headerList) :
  worksheet.cell(1, index + 1, header)
まず、headerListを用いてヘッダーを出力します。
worksheet.cell(行, 列, 値)で該当のセルにデータを出力することができます。
for index, row in enumerate(csvData):
  for columnIndex in range(csvHeaderLength) :
    worksheet.cell(index + 2, columnIndex + 1, row[headerList[columnIndex]])
csvDataを出力していきます。
ヘッダーの数に合わせてそれぞれrow[headerList[columnIndex]]でヘッダー名をkeyに、該当の値を出力しています。
if row["社員ID"] in departmentDict.keys():
  worksheet.cell(index + 2, csvHeaderLength + 1, departmentDict[row["社員ID"]])
else:
  worksheet.cell(index + 2, csvHeaderLength + 1, 'データなし')

if row["社員ID"] in positionDict.keys():
  worksheet.cell(index + 2, csvHeaderLength + 2, positionDict[row["社員ID"]])
else:
  worksheet.cell(index + 2, csvHeaderLength + 2, 'データなし')
csvDataの社員IDがテキストファイルから作成した辞書に定義されていればその値を出力します。
今回はあえてデータがない社員も作ったので、データがない場合はデータなしと出力しておくようにしておきます。
ワークブックの保存
workbook.save(OUTPUT_FILE_NAME)
最後にワークブックを保存すると、最初に定義したディレクトリにExcelファイルが作成されます。
最後に
今回は社内共有用を兼ねて簡単なサンプルでの解説となりましたが、応用していくことで業務の効率化、ヒューマンエラーの防止につながるので積極的に自動化していきましょう。

