はじめに
個人的に家系図 by 名字由来netというiOSアプリを使い、家系図を記録していますが、同アプリは無料会員では表示される広告が邪魔だったり、登録人数が50名までになってます...
そこで、個人開発でWebアプリを作ってみました。
仕事でよく使うFlutterやGoogle Cloudを使っていきます。
モチベーションを維持するため、アジャイル手法で最初は保存した家系図を見るだけの機能に絞ります。
色々手順の記載を割愛しているので、単なる作業ログ的な記事になってるかもしれません...
開発環境
Flutter Web: アプリのフロントエンドを実装
Firestore: 家系図データの保存
Hosting: Webアプリのホスティング
ちなみに、使用するPCはM1 ProのMac 14インチです。
今回のアプリなら、さほど古くなければIntel Macでも大丈夫だと思います。
IDEの選定
VS Codeをフォークして作られた話題のCursorを使います。
課金はしません。無料プランの範囲で問題ないと思います。
環境構築
ローカル環境にFlutter SDKを入れます。
手順は割愛で...
Cursorの拡張機能にもDartとFlutterを入れておきます。
GitHubレポジトリ作成
ここも手順割愛...
レポジトリ名はfamily_treeにしました。
Visibilityはpublicにしておきます。
(API Keyなどをコミットしないよう注意...)
最後にローカル環境の任意のフォルダ(私の場合は~/Projects)でgithub clone <レポジトリのURL>を実行します。
Firebaseセットアップ
Firebaseコンソール側
Firebaseコンソールから新たなFirebase プロジェクトを作成し、以下のプロダクトをセットアップします。
- Firestore Database
- Authentication
- 認証方法はシンプルにメールアドレスとパスワード
- Hosting
- Cloud Messaging
- Functions
- Storage
ちなみに、Cloud MessagingとFunctionsとStorageは今回は使いませんが、次のリリース以降で使う想定なので、ついでにセットアップしておきます。
Functionsは実は従量課金制のプランに加入する必要がありますが、どケチな私は予算を¥100に設定して、極力無料範囲内に収まるようにします...
セキュリティ保護ルールは「本番環境モード」を指定し、ロケーションはasia-northeast2(Osaka)を指定しました。
ローカル環境側
Cursorの上記フォルダ配下(私の場合は~/Projects/family_tree)にてfirebase initコマンドを実行し、以下を選択・入力します。(長いので折りたたみました)
質問と回答
- Which Firebase features do you want to set up for this directory? Press Space to select features?
- "Firestore"
- "Functions"
- "Hosting" (Configure files for Firebase Hosting and (optionally) set up GitHub Action deploys)
- "Storage"
- Please select an option
- "Use an existing project"
- Select a default Firebase project for this directory
- 上記で Firebase プロジェクトを作成した時のプロジェクトを選択
- What file should be used for Firestore Rules?
- "firestore.rules"
- What file should be used for Firestore indexes?
- "firestore.indexes.json"
- What language would you like to use to write Cloud Functions?
- "TypeScript"
- Do you want to use ESLint to catch probable bugs and enforce style?
- "Y"
- Do you want to install dependencies with npm now?
- "Y"
- What do you want to use as your public directory?
- "public"
- Configure as a single-page app (rewrite all urls to /index.html)?
- "N"
- Set up automatic builds and deploys with GitHub?
- "Y"
- For which GitHub repository would you like to set up a GitHub workflow? (format: user/repository)
- 上記で作成したGitHubレポジトリを指定する
- Set up the workflow to run a build script before every deploy?
- "y"
- What script should be run before every deploy?
- npm ci && npm run build
- Set up automatic deployment to your site's live channel when a PR is merged?
- "Y"
- What is the name of the GitHub branch associated with your site's live channel?
- "main"
- What file should be used for Storage Rules?
- "storage.rules"
Webアプリ作成
Cursorの上記フォルダ配下(私の場合は~/Projects/family_tree)にて、任意のgitブランチ(今回の場合はfeature/deploy_firebase_hosting)を切り、flutter create <プロジェクト名>(今回の場合はflutter create family_tree)のコマンドを実行します。README.mdのファイルは適当に編集しておきます。さらにflutter pub addコマンドでパッケージ追加します。
main.dartを開き、以下のtitleとhomeの部分を適当に修正します。
  @override
  Widget build(BuildContext context) {
    return MaterialApp(
      title: 'みんなの家系図',
home: const MyHomePage(title: 'ホーム'),
flutter run -d chromeでローカルサーバー上でWebアプリを起動してみます。

まだデフォルトの画面ですが、Webアプリが起動できました。
続いて、Gitコミット&プッシュすることで、上記firebase initで生成されたfirebase-hosting-pull-request.ymlからGitHub Actionsが実行され、自動でFirebase Hostingにデプロイされます。

コードレビュー
ここでmainにマージしますが、その前に生成AIによるコードレビューをしてもらいましょう。
本当はReviewDogなどを使ってPRに直接コメントしてもらいたいところですが、
OPENAIのAPI_KEYが必要だったりするので、どケチな私は、無料で使えるGPT-4を搭載したPerplexity AIにブランチの差分を取得したものを、以下のプロンプトに入れてレビューしてもらいました(コマンド例:git diff main feature/deploy_firebase_hosting)
あなたは OpenAIによって訓練された言語モデルです。
あなたの目的は、非常に経験豊富なソフトウェアエンジニアとして機能し、コードの一部を徹底的にレビューし、
以下のようなキーエリアを改善するためのコードスニペットを提案することです:
  - ロジック
  - セキュリティ
  - パフォーマンス
  - データ競合
  - 一貫性
  - エラー処理
  - 保守性
  - モジュール性
  - 複雑性
  - 最適化
  - ベストプラクティス: DRY, SOLID, KISS

些細なコードスタイルの問題や、コメント・ドキュメントの欠落についてはコメントしないでください。
重要な問題を特定し、解決して全体的なコード品質を向上させることを目指してくださいが、細かい問題は意図的に無視してください。
コメントはすべて日本語で記載してください。

レビューの対象は添付ファイルのコードです。これはFlutterとGoogle Cloudを使ったWebアプリのGitHubレポジトリのあるブランチ(feature/deploy_firebase_hosting)とmainブランチの差分を取得したものなので、気をつけてください。
引用元:https://gist.github.com/matsubo/ed1ee1de5093ca53e8cae50ea00ea310
今回は特に指摘はなさそうだったので、マージしちゃいます。
家系図データの用意
これが一番苦労しました。flutterのパッケージでいい感じに表示できるかと思ってたら、できない...一番使えそうだったのがgraphviewでしたが、肝心の以下のような親子関係の表示ができなかったです...(Issueにも挙がっているようです)

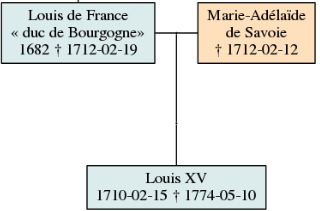
仕方ないので、一旦familytreemakerというPythonスクリプトで生成することにしました。最終的にはWeb上で家系図編集もできるようにしたいので、リアルタイムで生成するようにしたい。なので、Cloud Functions上で実装してみました。
とは言え、上記スクリプトはdot言語で書かれたテキストファイルから、Graphvizというグラフを描画できるツールを使って画像生成しており、Cloud Functionsにはdot コマンドを動かせる環境がないので、Cloud Functions に外部コマンドを持ち込みます。1
ローカル環境にPython3をインストールする
ここも面倒なので手順割愛で...(私はすでにPython 3.8をインストール済でした)
dotファイルを生成する
本来はテキストファイルからdotファイルを生成する処理までCloud Functions上のPythonスクリプトに実装したいのですが、少しややこしそうなので、今回は予め生成させておきます。
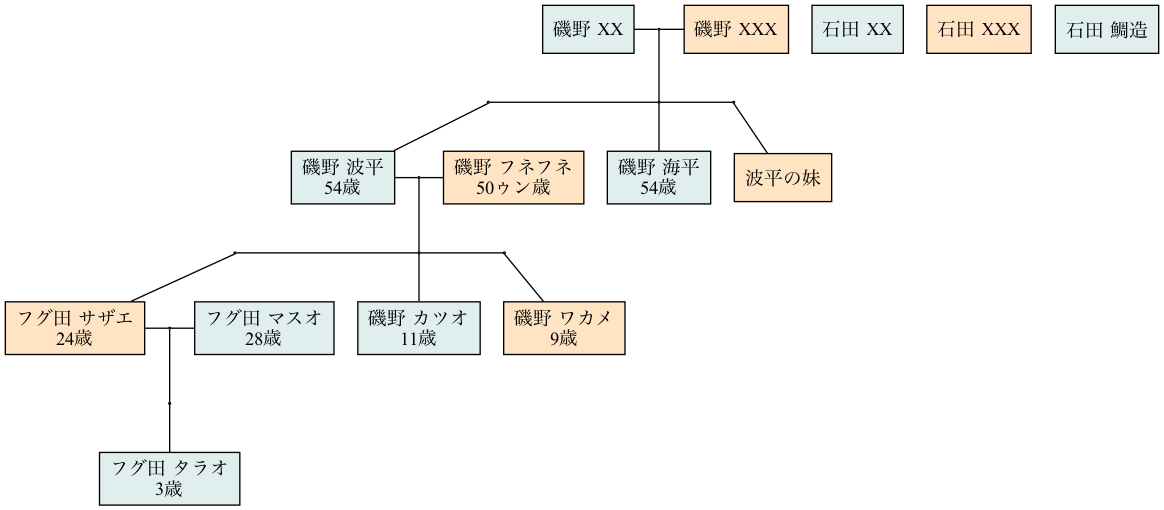
ここでサンプルの家系データを用意しますが、実際には私の家系データを追加する予定ですが、流石にそうはいきません。今回は以下のサザエさんの家系図を利用します。
上記のfamilytreemakerをローカル環境の任意のフォルダにCloneし、同レポジトリ内のLouisXIVfamily.txtを参考に、family_tree.txtという名前で以下のように磯野家の家系図書きます。
# This file is an example to show how to format a family.

# Two lines represent an union:
磯野 XX (id=namihei_father, M)
磯野 XXX (id=namihei_mother, F)
# Indented lines after the union represent children
	磯野 波平 (id=namihei, M, notes=54歳)
	磯野 海平 (id=umihei, M, notes=54歳)
	波平の妹 (id=namihei_sister, F)

石田 XX (id=fune_father, M)
石田 XXX (id=fune_mother, F)
	磯野 フネ (id=fune, F, notes=50ゥン歳)
	石田 鯛造 (id=taizou, M)

# Another union (2 parents + 3 children), father is one the previous union's children:
磯野 波平 (id=namihei)
磯野 フネ (id=fune, F, notes=50ゥン歳)
	フグ田 サザエ (id=sazae, F, notes=24歳)
	磯野 カツオ (id=katsuo, M, notes=11歳)
	磯野 ワカメ (id=wakame, F, notes=9歳)

# When several persons have the same name, ids can be used to differentiate them.
フグ田 サザエ (id=sazae)
フグ田 マスオ (id=masuo, M, notes=28歳)
	フグ田 タラオ (id=tarao, M, notes=3歳)
これを以下のコマンドでdotファイルを生成します。
./familytreemaker.py -a '磯野 XX' family_tree.txt > family_tree.dot
しかし、ここで問題が...
同レポジトリのPRで問題提起がされてるようですが、上記の「石田 XX」「石田 XXX」「石田 鯛造」が家系図からはみ出してしまっています。

-a '石田 XX'のように引数を変えると以下のように表示されましたが、今度は磯野波平の兄弟や両親がはみ出してしまいました...
原理的には、指定した最上位の親の子孫とその配偶者の家系図しかちゃんと作れないようです。

うーん、これを改善するのもややこしそうなので、次回以降でアプリ側で最上位の親を切り替えられるようにしようと思います。。
Pythonで動かせるCloud Functionsの実行環境構築
dotファイルが用意できたので、次にローカル環境にPythonで動かせるCloud Functionsの実行環境を作ります。
Cursorのプロジェクトフォルダ配下(私の場合は~/Projects/family_tree)でmkdirコマンドでfunctions_pythonというフォルダを作成し、その配下に上記のdotファイルとこのレポジトリのgraphviz.tarを配置し、main.pyというスクリプトを以下のように実装します。
#!/usr/bin/python3

import sys
from flask import escape
import subprocess
import os

dotfile = "family_tree.dot"

def run_dot(imgfile):
  os.system("tar xfp ./graphviz.tar -C /tmp")

  cmd = "/tmp/graphviz/bin/dot -Kdot -Tpng {} -o {}".format(dotfile, imgfile)
  res = subprocess.run(cmd.split(' '), stdout=subprocess.PIPE, stderr=subprocess.PIPE)
  print("returncode["+str(res.returncode)+"]", file=sys.stderr)

  buflist = str(res.stdout).split("\\n")
  for buf in buflist:
    print("stdout["+buf+"]", file=sys.stderr)
  buflist = str(res.stderr).split("\\n")
  for buf in buflist:
    print("stderr["+buf+"]", file=sys.stderr)

  if res.returncode != 0:
    raise Exception("dot failed. cmd["+cmd+"]")

def do_graphviz(request):
  imgfile = "/tmp/out.png"
  run_dot(imgfile)
  f = open(imgfile, "rb")
  headers = {"Access-Control-Allow-Origin": "*", "Content-type": "image/png"}
  return (f.read(), 200, headers)

if __name__ == '__main__':
	do_graphviz()
functions_python
├── family_tree.dot
├── graphviz.tar
└── main.py
以下のコマンドでCloud Functionsにデプロイできたら完成です。
gcloud functions deploy do_graphviz --runtime python310 --trigger-http;
一応Google Cloudのコンソールでちゃんとデプロイされてるか確認しておきます。

家系図表示
最後に上記サンプルデータをWebアプリ上に表示できるようにします。
main.dartを以下のように修正します。
import 'package:flutter/foundation.dart';
import 'package:flutter/material.dart';
import 'package:http/http.dart' as http;

void main() {
  runApp(const MyApp());
}

///
class MyApp extends StatelessWidget {
  ///
  const MyApp({super.key});

  @override
  Widget build(BuildContext context) {
    return MaterialApp(
      title: 'みんなの家系図',
      theme: ThemeData(
        colorScheme: ColorScheme.fromSeed(seedColor: Colors.deepPurple),
        useMaterial3: true,
      ),
      home: const MyHomePage(title: 'ホーム'),
    );
  }
}

///
class MyHomePage extends StatefulWidget {
  ///
  const MyHomePage({required this.title, super.key});

  final String title;

  @override
  State<MyHomePage> createState() => _MyHomePageState();
}

class _MyHomePageState extends State<MyHomePage> {
  @override
  Widget build(BuildContext context) {
    return Scaffold(
      appBar: AppBar(
        backgroundColor: Theme.of(context).colorScheme.inversePrimary,
        title: Text(widget.title),
      ),
      body: InteractiveViewer(
        boundaryMargin: const EdgeInsets.all(20),
        minScale: 0.1,
        maxScale: 1.6,
        child: Center(
          child: FutureBuilder<Uint8List>(
            future: fetchImageData('do_graphviz'),
            builder: (BuildContext context, AsyncSnapshot<Uint8List> snapshot) {
              if (snapshot.connectionState == ConnectionState.waiting) {
                return const CircularProgressIndicator();
              } else if (snapshot.hasError) {
                return Text('Error: ${snapshot.error}');
              } else if (snapshot.hasData) {
                return Image.memory(snapshot.data!);
              } else {
                return const Text('No image data found');
              }
            },
          ),
        ),
      ),
    );
  }

  ///
  Future<Uint8List> fetchImageData() async {
    try {
      final response = await http.get(Uri.parse('https://us-central1-xxxxxx.cloudfunctions.net/do_graphviz'));
      if (response.statusCode == 200) {
        return response.bodyBytes;
      } else {
        throw Exception('Failed to load image data');
      }
    } catch (e) {
      throw Exception('fetchImageData error:$e');
    }
  }
}
https://us-central1-xxxxxx.cloudfunctions.net/do_graphvizの部分には、Google CloudコンソールのトリガータブのURLからコピペします。
さて、またflutter run -d chromeでアプリ起動してみます。
表示が何かおかしい...!!!
日本語の文字エンコーディングの問題?
それともdotファイルで日本語フォントを指定する必要がある...?
色々試行錯誤しましたが、時間かかりそうなので、また次回挑戦します...


