はじめに
皆さんおはこんばにちは。
エンジニア歴1年目、現場未経験の弱小自称 Web エンジニアです。
本記事では、題名通りの処理の流れについてのみ記載していきます。
プロジェクトの作成方法や単語の意味(axios、JPA、… )などわからない事がありましたら
今回はこちらの記事を参考におおまかなシステムを構築しているので
下記のリンクからご参照ください↓↓↓
SpringBoot+Vue.js+ElementUI+Firebaseでマスタ管理アプリ入門
やりたいこと
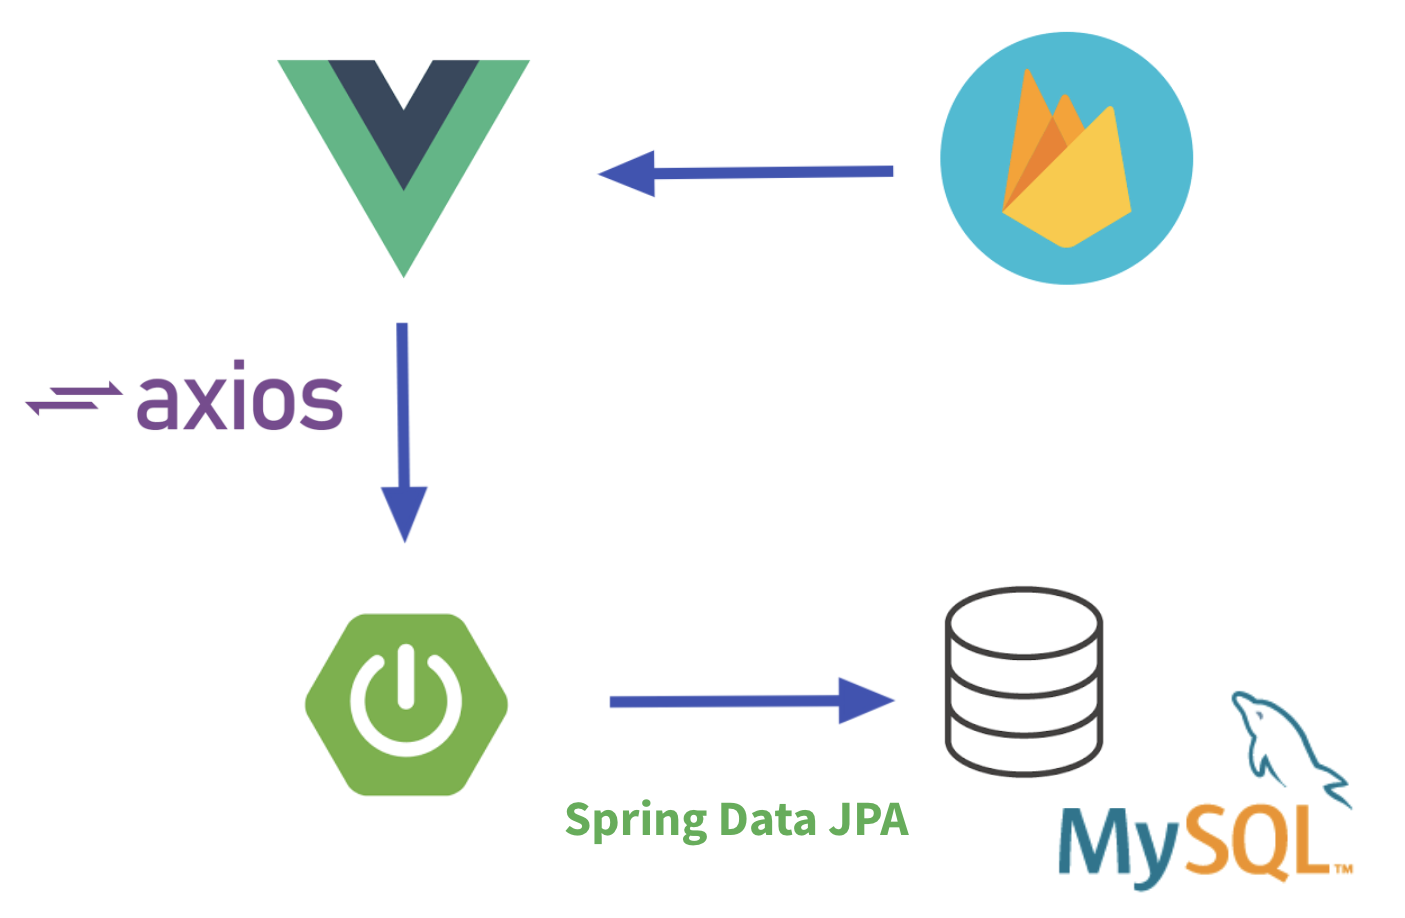
処理の流れ:
① Firebase にあるログインユーザー ID(uid)を Vue で取得する。
② axios を用いて uid を含んだユーザー情報を SpringBoot のREST API に POST する。
③ MySQL で作ったユーザーのテーブルに、その情報を INSERT する。

ログイン認証は Firebase + Vue で行いたい。
ユーザーのテーブルは他のテーブルと結合させる予定なので、MySQL側でも作っておきたい。
それらのワガママを実現させるために、上記の方法を選択しました。
Firebase から uid を取得
今回は Firebase のメール / パスワード認証を用いて
ログイン認証を行っています。
ログイン済みのユーザーが入力した情報と共に uid をサーバーに送信したいので
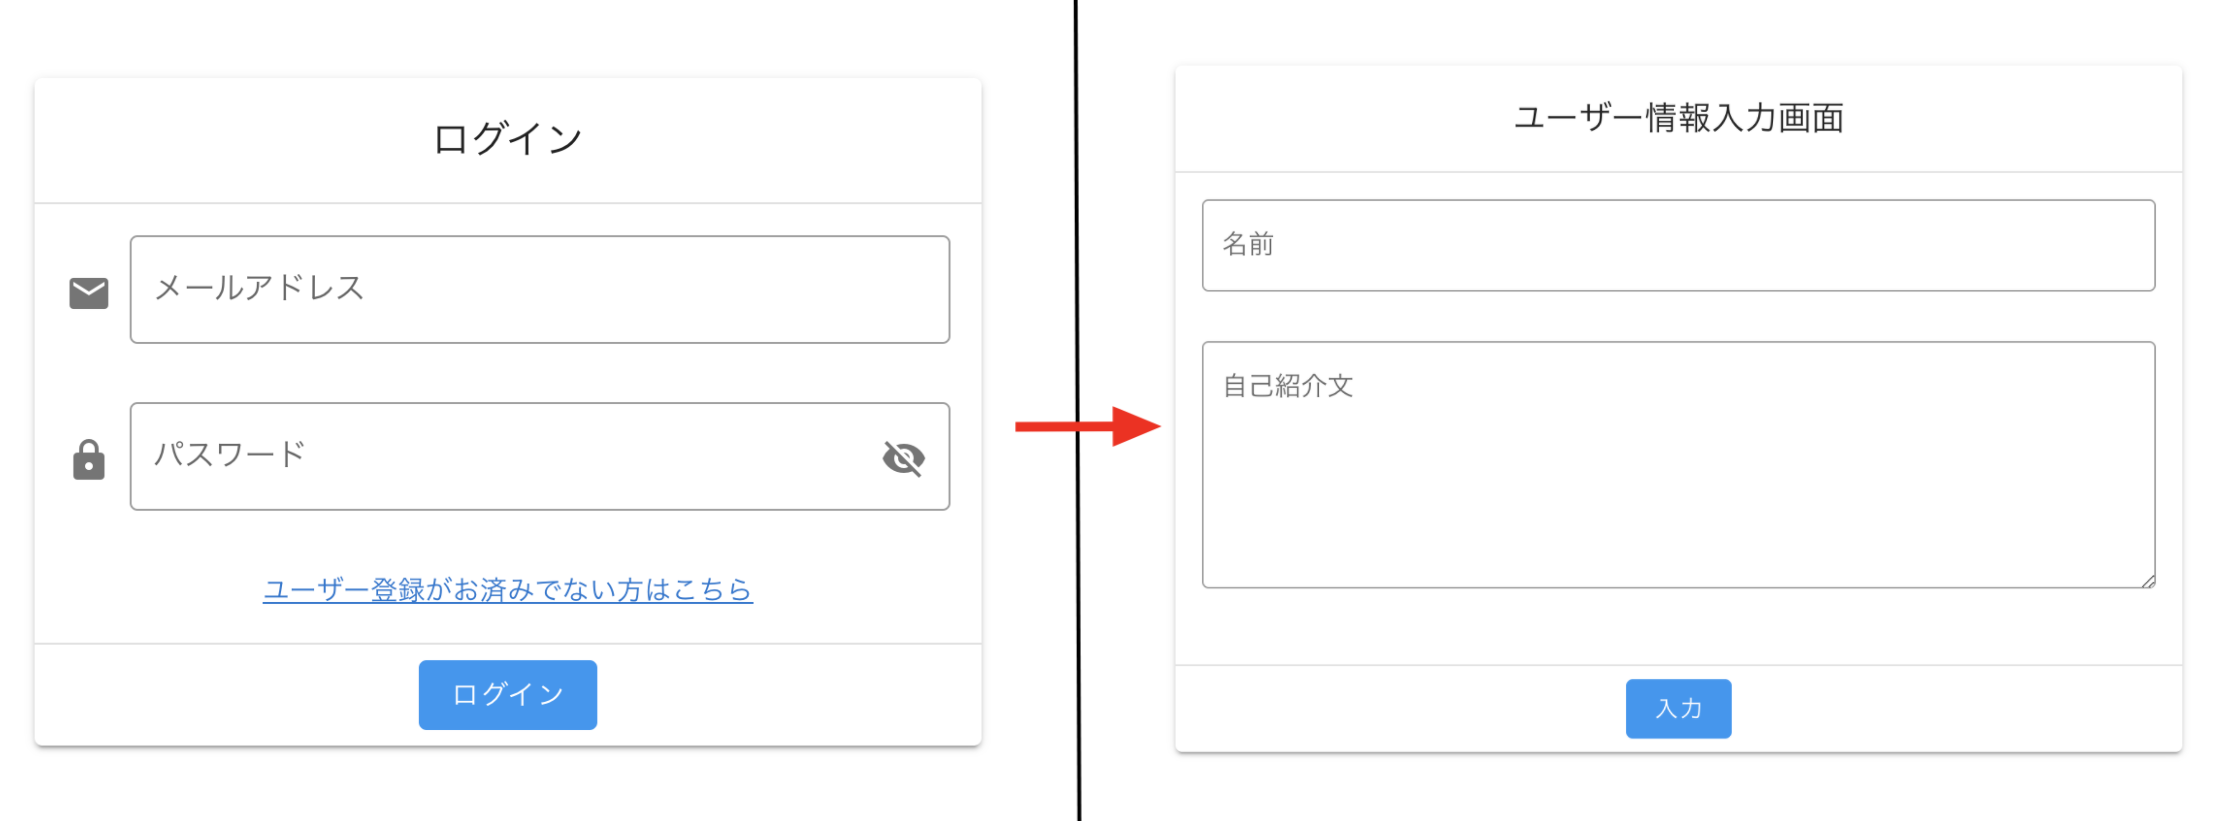
ログイン画面を構築する View の後に遷移する View(今回だとユーザー情報入力画面)で
uid を取得する処理を書いていきます。
※ UI ライブラリは Vuetify を使用。
. . .

<v-text-field
    type="text"
    label="名前"
    v-model="userRequest.name"
    outlined
></v-text-field>
<v-textarea
    type="text"
    label="自己紹介文"
    v-model="userRequest.profile"
    outlined
></v-textarea>

. . .

<v-btn dark depressed @click="onSubmit" color="info">入力</v-btn>

. . .

<script>
import firebase from 'firebase'

export default {
    data() {
        return {
            userRequest: {
                name: undefined,
                profile: undefined,
                firebaseId: undefined,
            },
        }
    },

    methods: {
        onSubmit: async function () {
            await firebase.auth().onAuthStateChanged((user) => {
                this.userRequest.firebaseId = user.uid
            })
        }
    },
}
</script>
firebase.auth().onAuthStateChanged(user => /* ... */)を用いて現在ログインしているユーザーのデータを取得し、自前で定義した userRequest オブジェクトの変数に uid を代入しています。
axios で POST する
サーバーサイドの REST API にデータを追加する処理にaxiosを使用します。
<script>
import firebase from 'firebase'
import axios from 'axios' //axiosをインポート

export default {
    data() {
        return {
            userRequest: {
                name: undefined,
                profile: undefined,
                firebaseId: undefined,
            },
        }
    },

    methods: {
        onSubmit: async function () {
            await firebase.auth().onAuthStateChanged((user) => {
                this.userRequest.firebaseId = user.uid
                axios.post('http://localhost:8080/addUser', this.userRequest) //userRequestオブジェクトをPOST
            })
        }
    },
}
</script>
Spring Data JPA によるマッピング
Vue 側でデータを追加する処理を終えたので
サーバーサイドの処理を書いていきます。
MySQL 側で作ったテーブルと Java のクラスのマッピングを行うために
Spring Data JPAを使用しています。
Entity
package com.example.jpamysql.domain;

import javax.persistence.Column;
import javax.persistence.Entity;
import javax.persistence.GeneratedValue;
import javax.persistence.GenerationType;
import javax.persistence.Id;
import javax.persistence.Table;

import lombok.Getter;
import lombok.Setter;

@Entity
@Getter
@Setter
@Table(name = "users")
public class UserEntity {

    /** 自動採番ID */
    @Id
    @GeneratedValue(strategy = GenerationType.IDENTITY)
    private Long id;

    /** 名前 */
    @Column(name = "name", columnDefinition = "VARCHAR(45)")
    private String name;

    /** 自己紹介文 */
    @Column(name = "profile", columnDefinition = "VARCHAR(45)")
    private String profile;

    /** Firebase の uid */
    @Column(name = "firebase_id", columnDefinition = "VARCHAR(45)")
    private String firebaseId;
}
Firebase の uid は文字列になっているので、String 型で受け取ります。
Repository
package com.example.jpamysql.repository;

import com.example.jpamysql.domain.UserEntity;

import org.springframework.data.jpa.repository.JpaRepository;
import org.springframework.stereotype.Repository;

@Repository
public interface UserRepository extends JpaRepository<UserEntity, Long> {

}
Service
package com.example.jpamysql.service;

import com.example.jpamysql.domain.UserEntity;
import com.example.jpamysql.repository.UserRepository;

import org.springframework.stereotype.Service;

import lombok.RequiredArgsConstructor;

@Service
@RequiredArgsConstructor
public class UserService {

    private final UserRepository userRepository;

    public void save (UserEntity user) {
        userRepository.save(user);
    }
}
RestController
Vue から送られてきたデータを受け取るためのクラスを先に定義しておきます。
Entity クラスで受け取っても問題なく処理されますが、保守性を高めるためです。
package com.example.jpamysql.request;

import lombok.Getter;
import lombok.Setter;

@Getter
@Setter
public class UserRequest {

    private String name;
    private String profile;
    private String firebaseId;
}
package com.example.jpamysql.controller;

import com.example.jpamysql.domain.UserEntity;
import com.example.jpamysql.request.UserRequest;
import com.example.jpamysql.service.UserService;

import org.springframework.web.bind.annotation.RequestBody;
import org.springframework.web.bind.annotation.RequestMapping;
import org.springframework.web.bind.annotation.RequestMethod;
import org.springframework.web.bind.annotation.RestController;

import lombok.RequiredArgsConstructor;

@RestController
@RequiredArgsConstructor
public class UserRestController {

    private final UserService userService;

    @RequestMapping(value = "/addUser", method = RequestMethod.POST)
    public void addUser(@RequestBody UserRequest userRequest) {
        UserEntity user = new UserEntity();
        user.setName(userRequest.getName());
        user.setProfile(userRequest.getProfile());
        user.setFirebaseId(userRequest.getFirebaseId());
        userService.save(user);
    }
}
YAML
接続情報の定義も忘れずに。
spring:
  datasource:
    url: jdbc:mysql://localhost:3306/jpa_db?serverTimezone=JST
    username: qiita
    password: qiita
    driver-class-name: com.mysql.cj.jdbc.Driver
これで Enitity クラスに対応するテーブルを MySQL 側で作っていれば無事に INSERT されるはず。
まとめ
- `firebase.auth().onAuthStateChanged(user => /* ... */)`を使用すればログインユーザーのデータを取得できる
- axios でデータを送信する場合は、**フロント側の変数名とサーバー側の変数名を一致させておく**必要がある
- Firebase の uid は文字列なので、Java 側では **String 型で受け取る**必要がある (てっきり Spring プロジェクトに`Firebase Admin SDK`なんかを追加して、Firebase 独自のオブジェクトで受け取らなきゃいけないのかと思ったけど、その必要はなかった!!)
