まえがき
サーバー上で動作するipython kernel(またはjupyter notebook)にクライアントマシン上のターミナル(またはブラウザ)から接続するためのハウツー記事です。
前提
- Virtualboxインストール済み
- vagrantインストール済み
- python動作可能なOSイメージ取得済み
- 仮想マシン上でpython, ipython, jupyter notebook関連インストール済み
環境
()内は本記事で実際に使用したOS, アプリケーション名です。
| 種別 | 構成 | ipythonに接続するとき使うもの | jupyter notebookに接続するとき使うもの |
|---|---|---|---|
| サーバー | 仮想マシン(Virtualbox+vagrant) | ipython kernel | jupyter notebook |
| クライアント | 実マシン(Ubuntu 16.04) | ターミナル(Gnome Terminal) | ブラウザ(Firefox57.0.4 64bit) |
表記の注意
サーバー上の操作とクライアント上の操作を区別しやすくするため、PS1の表記をそれぞれ
- サーバー:[vagrant]%
- クライアント:[cliant]$
としました。
ssh接続してjupyter console(ipython)を立ち上げる
vagrant sshしたり仮想マシンを表示したウィンドウ上でターミナル立ち上げるなどしてipython kernelを実行します。
ipython kernelはipython --helpに書いてあるように
kernel
    Start a kernel without an attached frontend.
  フロントエンドアプリケーションなしにipythonカーネルを実行するコマンドです。
[vagrant]% ipython kernel  # ipython起動

NOTE: When using the `ipython kernel` entry point, Ctrl-C will not work.

To exit, you will have to explicitly quit this process, by either sending
"quit" from a client, or using Ctrl-\ in UNIX-like environments.

To read more about this, see https://github.com/ipython/ipython/issues/2049


To connect another client to this kernel, use:
    --existing kernel-4232.json
一番下の行が重要です。「kernelに接続するには --existing kernel-4232.jsonを使って下さい」とあります。
リモート上のipython kernelに接続するには
[cliant]$ jupyter console --existing [kernel情報の書かれたJSONファイルパス] --ssh <ホスト名>
と打ち込みますが、まず、"kernel情報の書かれたJSONファイル"が必要です。
JSONファイルの確認
jupyter --runtime-dirというコマンド表示されるパスにJSONファイルが作成されていることを確認して下さい。
[vagrant]%  jupyter --runtime-dir
/run/user/998/jupyter
こうするとipython kernelを立ち上げたサーバー上の"/run/user/{UID}/jupyter/ "というパスにJSONファイルが作成されます。({user uid}は特別に指定していなければ1000とか9百番台くらいの数字だと思います。)
JSONファイルにはポート番号やipアドレスなど、リモートのkernelへ接続するのに必要な情報が含まれています。
[vagrant]%  ls /run/user/998/jupyter/
kernel-4232.json
[vagrant]%  cat /run/user/998/jupyter/kernel-4232.json
{
  "shell_port": 37393,
  "iopub_port": 34411,
  "stdin_port": 44867,
  "control_port": 42805,
  "hb_port": 37427,
  "ip": "127.0.0.1",
  "key": "132a7ffd-2f3f9cb12201448d4358b5df",
  "transport": "tcp",
  "signature_scheme": "hmac-sha256",
  "kernel_name": ""
}
なお、kernel-****.jsonの数字は起動したipython kernelのPIDが充てられます。
リモート上でqtcconsoleを立ち上げると、ホスト・リモート共用のqtconsoleが立ち上がります。
名前空間が共有されるので、意図しない変数の書き換えや操作に気をつけましょう。
[vagrant]% jupyter qtconsole # qtconsole起動
qtconsoleを立ち上げた時はJSONファイル名は表示されずにリモート上にqtconsoleが現れます。JSONファイル名はPIDを調べる[vagrant]% ps aux | grep ipythonか、[vagrant]% ls /run/user/{UID}/jupyter/などして調べましょう。
sshを使って仮想マシンに接続できるようにする
続いてクライアント上でリモートの仮想マシンにsshコマンドでssh接続を行ったり、scpでセキュアコピーを行ったりする設定をします。
バーチャルマシンを動かしているディレクトリ上で、vagrant ssh-configコマンドを打つと、vagrant sshコマンドでssh接続するための情報を見ることができます。そこで
[cliant]$ vagrant ssh-config --host 192.168.22.33 >> ~/.ssh/config
としてconfigファイルにssh設定を保存します。
これで
[cliant]$ ssh 192.168.22.33
[cliant]$ vagrant ssh
が同じ意味になりました。
sshするときはこの情報が使われます。
[cliant]$ cat ~/.ssh/config
Host 192.168.22.33
  HostName 127.0.0.1
  User vagrant
  Port 2222
  UserKnownHostsFile /dev/null
  StrictHostKeyChecking xxxxxx
  PasswordAuthentication xxxxxx
  IdentityFile /home/u1and0/.vagrant.d/insecure_private_key
  IdentitiesOnly yes
  LogLevel FATAL
適当なIPアドレス192.168.22.33を与えましたが、適当なホストネーム(たとえばvagrantとする)を与えればconfigファイルの1行目が
Host vagrantとなって$ ssh vagrantと$ vagrant sshが同じ意味になります。(むしろややこしい)ややこしいけれども仮想マシンを立ち上げているディレクトリ以外の場所でも
ssh vagrantとかssh 192.168.22.33で接続できるのでメリットはあります。
configファイルに設定を保存することでsshだけでなくscpとかも使えるようになります。
[cliant]$ scp 192.168.22.33:/run/user/998/jupyter/kernel-3701.json ./
上のコマンドでは仮想マシン上のjupyterカーネルの設定ファイルkernel-3701.jsonをクライアント上の現在ディレクトリにコピーをします。
ssh接続してjupyter console(ipythonの親戚)立ち上げる
[cliant]$ jupyter console --existing ./kernel-3701.json --ssh 192.168.22.33
でipython shellのような見た目のjupyter consoleがクライアント上のshellで立ち上がります。
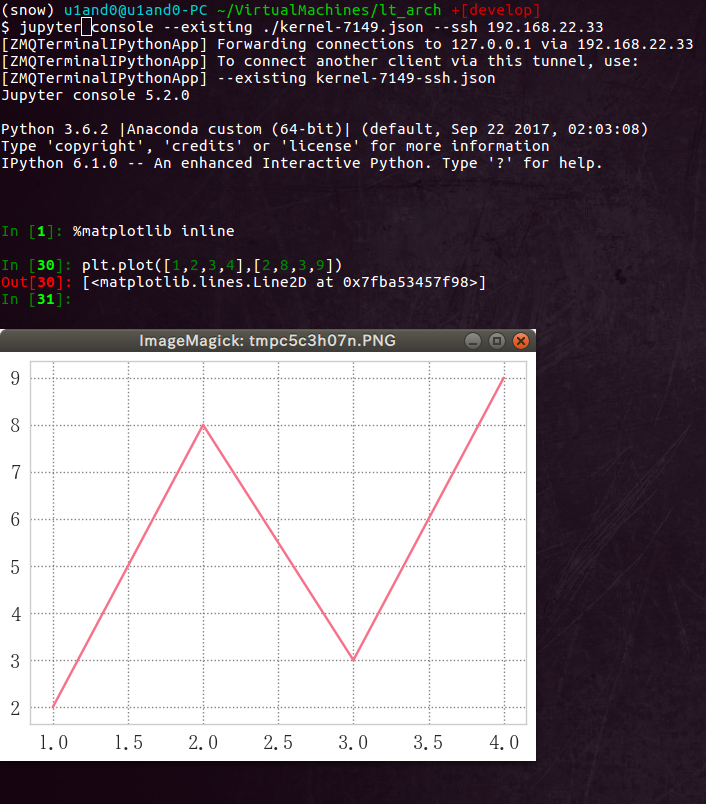
ipythonを呼ぼうとするとエラーが出るので、代わりにjupyter consoleを呼びましょう。
[cliant]$ ipython --existing ./kernel-7149.json --ssh 192.168.22.33
...
[TerminalIPythonApp] CRITICAL | Bad config encountered during initialization:
[TerminalIPythonApp] CRITICAL | Unrecognized flag: '--existing'
>> 2018年9月、anaconda環境をアップデートしたら?ssh接続のリモートホスト上でjupyter consoleが立ち上がりませんでした。代わりにipythonを起動するとipythonが立ち上がりました。アプデでjupyter consoleとipythonが統合されたのでしょうか。(未確認)


## core.dumpエラー
`~/.ipython/profile_default/startup/`スクリプトに

```python
get_ipython().magic('matplotlib inline')
get_ipython().magic('matplotlib auto')
といった書き込みを入れたスクリプトを入れていたので立ち上がりかけたconsoleが落ちる現象がありました。
ssh接続したシェルでipythonやjupyter consoleを打ち込まず、kernel-.jsonをコピーして、jupyter console --ssh 192.168.22.33 --existing kernel-<PID>.jsonを打ち込みましょう。
立ち上がったのを見てからget_ipython().magic('matplotlib inline')(マジックコマンドを使うなら%matplotlib inline)を入力したほうが良いのでしょう。
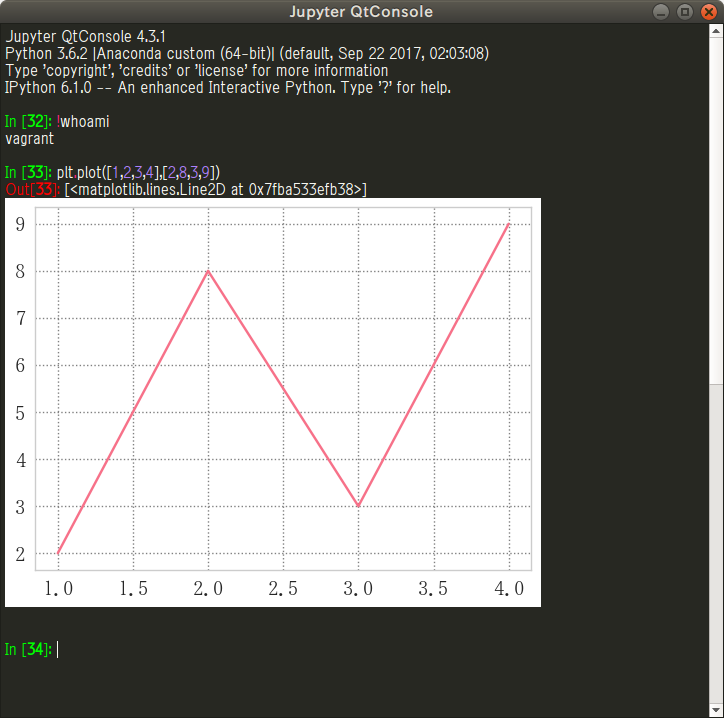
ssh接続してjupyter qtconsole立ち上げる
[cliant]$ jupyter qtconsole --existing ./kernel-4640.json --ssh 192.168.22.33
でクライアント上でjupyter qtconsoleが立ち上がります。

ホスト上のshellに現れるメッセージ
プロットもできますし、!whoamiと打ち込んでホスト名を聞くとちゃんとvagrant上で実行されているjupyterであることがわかります。
jupyter notebook立ち上げてssh接続する
ホスト側の作業1
ポートを開く
Vagrantfileを編集してjupyter notebook用のポートを開きます。
[cliant]$ vi Vagrantfile
Vagrant.configure("2") do |config|
 config.vm.network "forwarded_port", guest: 8887, host: 8887
end
ゲスト側の作業1
コンフィグファイルの作成
jupyter notebookの設定をいじるための設定ファイルを作成します。
[vagrant]% jupyter notebook --generate-config
デフォルトでは~/.jupyterというディレクトリ下にファイルが生成されます。
jupyter_notebook_config.pyの設定
c.NotebookApp.ip = '*'  # いずれのipアドレスからでも接続可能
c.NotebookApp.open_browser = False  # jupyter notebook開いたと同時にブラウザを開かない
c.NotebookApp.port = 8887  # デフォルト値は8888
パスワード作成(設定しなくても開けるがセキュリティ的に危険)
jsonファイルにパスワードのキーが書き込まれる
[vagrant]% jupyter notebook password
Enter password:  ****
Verify password: ****
[NotebookPasswordApp] Wrote hashed password to /Users/you/.jupyter/jupyter_notebook_config.json
ホスト側の作業2
ホストのブラウザのアドレス欄にhttp://localhost:8887とうちこむとパスワード打ち込めと現れるので、さっき設定したパスワードを打ち込みます。
まとめ
- サーバーでipython kernelなどを起動する
[vagrant]% ipython kernel
-
作られたjsonファイルをクライアントにコピーする
- scp使う、またはコピペでクライアントの適当な場所にファイル作って貼り付ける
[cliant]$ scp [ホスト名]:/run/user/[user_id]/jupyter/kernel-[kernel PID].json [コピー先] -
ホスト上でjupyterなどを立ち上げる際にオプションでjsonファイルの指定とssh接続先ホスト名を入力する
-
[cliant]$ jupyter console --existing ./kernel-[kernel PID].json --ssh [ホスト名] -
[cliant]$ jupyter qtconsole --existing ./kernel-[kernel PID].json --ssh [ホスト名] - クライアントのブラウザのアドレス欄に
http://localhost:8887
-
参考
- Cookbook: Connecting to a remote kernel via ssh
- The Qt Console for Jupyter
- VagrantインスタンスにSSHでログインする
- Running a notebook server: パスワード生成
- Jupyterをサーバ上で起動する: jupyter_config.pyの設定
- Jupyter Notebookの設定をする:jupyter_config.pyの設定
- ポートフォワードによるネットワーク構成について: Vagrantfile上でVirtualboxのポート設定