今回はEC2(Amazon Linux2)でオープンソースの監視アプリケーションのZabbixをお試し構築していきます。サーバにSNMPを設定する要件があり、動作確認のためSNMPを受けられる環境が必要になりましたので、さくっと検証できる環境を作っていきたいと思います。
そもそもZabbixってなに?って方はこちら
今回のゴール
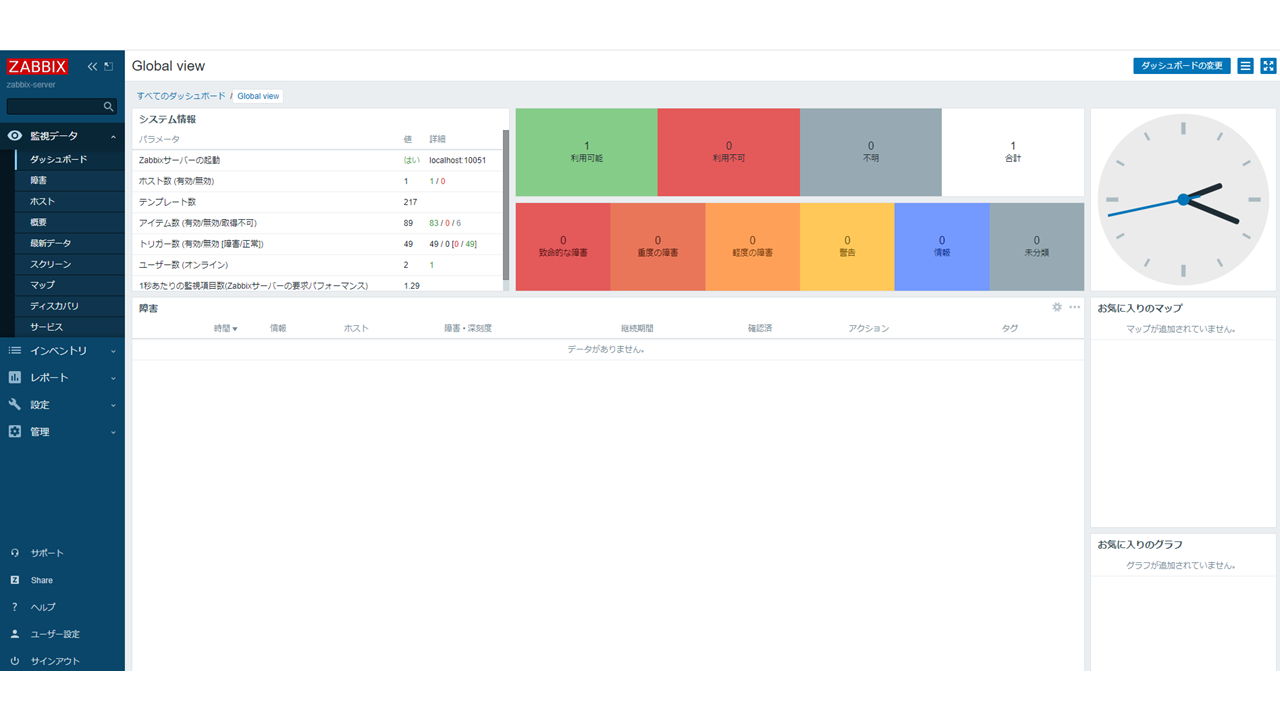
Zabbixの管理コンソール画面(GUI)にWebブラウザーでログインできる状態する。
具体的には以下の画像のような状態になるところまでやっていきます。
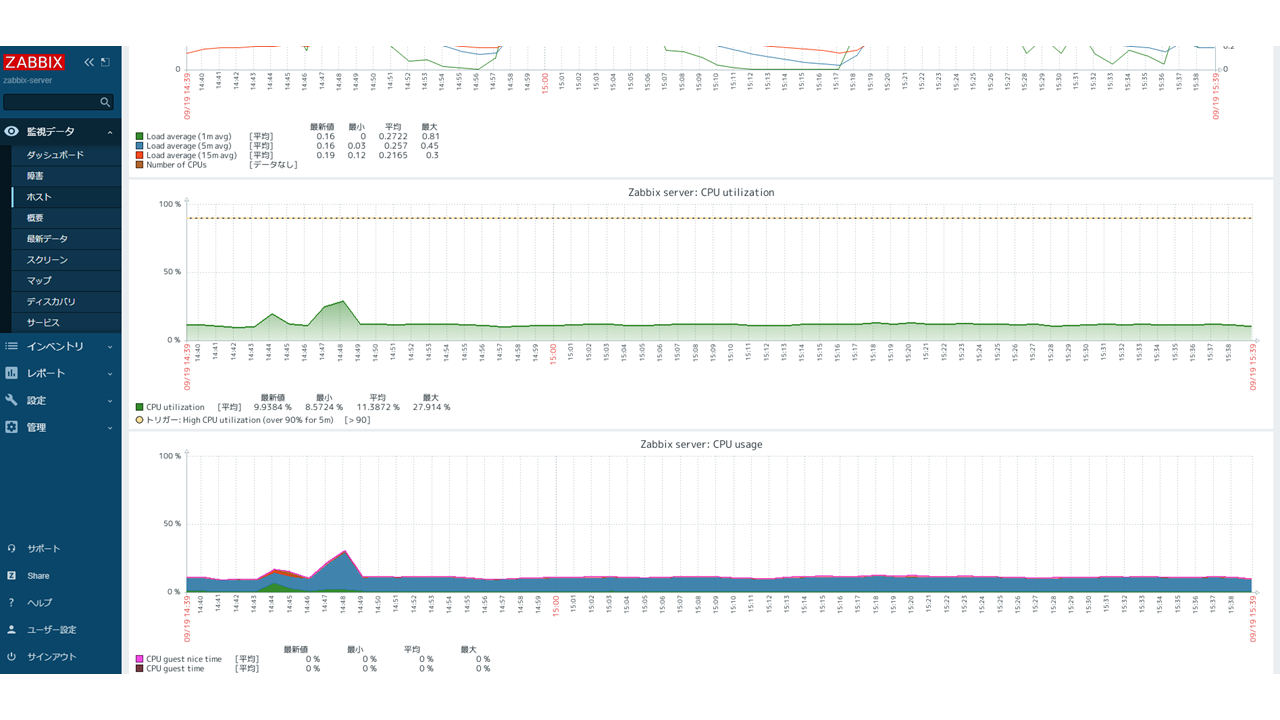
正常に構築できているとZabbixをインストールしたサーバのCPUの利用状況などのグラフが見えます。
※SNMP Trapの受信設定やポーリング設定については別記事にします。
前提条件(環境)
・ 利用するAMIはAmazon Linux2
・ EC2はパブリックサブネットにデプロイして、EC2に紐づけしたパブリックIPにクライアントPCからアクセスできるようにする
・ DBはMySQL(MariaDB)を利用し、サーバサイドはPHPを、WebサーバにはApacheを利用する
・ Zabbixはversion5.xを利用する
・ EC2にZabbixのサーバとクライアント双方のパッケージをDLする
作業の流れ
① VPCとセキュリティグループの設定
② EC2のデプロイ
③ OSの設定(タイムゾーン/言語など)
④ DB(MariaDB)のインストールおよび初期PW設定
⑤ ZabbixのインストールおよびDB作成
実際にやってみた
①と②については詳しい書いている記事がたくさんありますので、本記事では割愛します。とりあえずご利用のPCからEC2に紐づけしたパブリックIPアドレスにSSHおよびHTTPアクセスできる状態になればOKです。
それでは③から進めていきます。
OSの設定(タイムゾーン/言語など)
EC2をデプロイしただけだとタイムゾーンがUTCだったり、LANGが英語だったりしているので日本語および日本時間にしていきます。
まず各種設定に取り掛かる前にOSを最新バージョンに更新します。
#最新版にアップデート
yum -y update
次にタイムゾーンを日本時間(UTC+9:00)に変更します。
#タイムゾーン変更
timedatectl set-timezone Asia/Tokyo
言語を日本語に変更します。
#日本語に変更
localectl set-locale LANG=ja_JP.UTF-8
反映のためサーバ再起動
#再起動
reboot
DB(MariaDB)のインストールおよび初期PW設定
Zabbixはデータベースが必要なので、MariaDBをインストールし、データベースを設定していきます。
#MariaDBのインストール
yum -y install mariadb-server


#MariaDBを起動およびサーバ起動時の自動起動設定
systemctl start mariadb && sudo systemctl enable mariadb
#MariaDBのステータス確認

systemctl status mariadb
以下のように”Active”と表示がでればOKです。

● mariadb.service - MariaDB database server
Loaded: loaded (/usr/lib/systemd/system/mariadb.service; enabled; vendor preset: disabled)
Active: active (running) since 月 2022-09-19 13:54:02 JST; 11s ago
Main PID: 2664 (mysqld_safe)
CGroup: /system.slice/mariadb.service
       tq2664 /bin/sh /usr/bin/mysqld_safe --basedir=/usr
       mq2830 /usr/libexec/mysqld --basedir=/usr --datadir=/var/lib/mysql --plugin-dir=/usr/lib64/mysql/plugin --log-error=/var/log...


#DBへのログインPWの初期設定(対話形式)
mysql_secure_installation

  Setting the root password ensures that nobody can log into the MariaDB
  root user without the proper authorisation.

Set root password? [Y/n]  →「Y」を入力
New password: →「任意のPW」を入力
Re-enter new password:→「任意のPW」を入力
  Password updated successfully!
  Reloading privilege tables..
 ... Success!

Remove anonymous users? [Y/n]  →「Y」を入力
 ... Success!

Disallow root login remotely? [Y/n]  →「Y」を入力
... Success!

Remove test database and access to it? [Y/n]  →「Y」を入力
 - Dropping test database...
... Success!
 - Removing privileges on test database...
... Success!

Reload privilege tables now? [Y/n]  →「Y」を入力
... Success!

Cleaning up...

All done!  If you've completed all of the above steps, your MariaDB
installation should now be secure.

Thanks for using MariaDB!
これでDB の初期PW設定は完了
MariaDBにログインできるか確認しましょう。
#MariaDBへのログイン確認(rootユーザでログイン)
mysql -u root -p
 Enter password:[上記で入力したPW]

以下のような表示が出ればOKです。

Welcome to the MariaDB monitor.  Commands end with ; or \g.
Your MariaDB connection id is 10
Server version: 5.5.68-MariaDB MariaDB Server

Copyright (c) 2000, 2018, Oracle, MariaDB Corporation Ab and others.

Type 'help;' or '\h' for help. Type '\c' to clear the current input statement.


#いったんMariaDBからログアウトします。
MariaDB [(none)]>quit
ZabbixのインストールおよびDB作成
#Zabbixのレポジトリを追加
rpm -Uvh https://repo.zabbix.com/zabbix/5.0/rhel/7/x86_64/zabbix-release-5.0-1.el7.noarch.rpm


#リポジトリのお掃除
yum clean all
”Maybe you want: rm -rf /var/cache/yum”って言われますが無視でOKです


#Zabbixのパッケージ(サーバ機能とエージェント)をインストール
yum -y install zabbix-server-mysql zabbix-agent


#CentOSのSoftware Collections (SCL)をインストール
yum -y install http://mirror.centos.org/altarch/7/extras/aarch64/Packages/centos-release-scl-rh-2-3.el7.centos.noarch.rpm

#Zabbixのリポジトリ設定ファイルを修正
vim /etc/yum.repos.d/zabbix.repo

  [zabbix-frontend]
  name=Zabbix Official Repository frontend - $basearch →変更なし
  baseurl=http://repo.zabbix.com/zabbix/5.0/rhel/7/$basearch/frontend →変更なし
  enabled=1 →[0]から[1]に変更
  gpgcheck=1 →変更なし
  gpgkey=file:///etc/pki/rpm-gpg/RPM-GPG-KEY-ZABBIX-XXXXX →変更なし

#設定変更確認
cat /etc/yum.repos.d/zabbix.repo

以下のようになっていればOKです。
  [zabbix]
  name=Zabbix Official Repository - $basearch
  baseurl=http://repo.zabbix.com/zabbix/5.0/rhel/7/$basearch/
  enabled=1
  gpgcheck=1
  gpgkey=file:///etc/pki/rpm-gpg/RPM-GPG-KEY-ZABBIX-XXXXX

 [zabbix-frontend]
 name=Zabbix Official Repository frontend - $basearch
 baseurl=http://repo.zabbix.com/zabbix/5.0/rhel/7/$basearch/frontend
 enabled=1
 gpgcheck=1
 gpgkey=file:///etc/pki/rpm-gpg/RPM-GPG-KEY-ZABBIX-XXXXXX

 [zabbix-debuginfo]
 name=Zabbix Official Repository debuginfo - $basearch
 baseurl=http://repo.zabbix.com/zabbix/5.0/rhel/7/$basearch/debuginfo/
 enabled=0
 gpgkey=file:///etc/pki/rpm-gpg/RPM-GPG-KEY-ZABBIX-XXXXXX
 gpgcheck=1

 [zabbix-non-supported]
 name=Zabbix Official Repository non-supported - $basearch
 baseurl=http://repo.zabbix.com/non-supported/rhel/7/$basearch/
 enabled=1
 gpgkey=file:///etc/pki/rpm-gpg/RPM-GPG-KEY-ZABBIX
 gpgcheck=1


#日本語パッケージのインストール
yum -y install zabbix-web-mysql-scl zabbix-apache-conf-scl zabbix-web-japanese
次にDBを作成していきます。
#DBへログイン
mysql -u root -p
 Enter password:[任意で設定したPW]

#"zabbix"というデータベースを作成
MariaDB [(none)]> create database zabbix character set utf8 collate utf8_bin;
  Query OK, 1 row affected (0.00 sec)

#データベース用アクセス用のユーザとPWを作成
MariaDB [(none)]> create user zabbix@localhost identified by '任意のPW';
  Query OK, 0 rows affected (0.00 sec)

#作成したユーザにデータベースへのアクセス権を設定
MariaDB [(none)]> grant all privileges on zabbix.* to zabbix@localhost;
  Query OK, 0 rows affected (0.00 sec)

#DBから抜ける
MariaDB [(none)]> quit
これでDBの作成も完了です。
#Zabbixの初期データをインポート
zcat /usr/share/doc/zabbix-server-mysql*/create.sql.gz | mysql -uzabbix -p zabbix

#Zabbixサーバーの設定ファイルにデータベースのzabbixユーザのPWを書き込み
vim /etc/zabbix/zabbix_server.conf

 記載箇所は以下です。
 ### Option: DBPassword
 #       Database password.
 #       Comment this line if no password is used.
 #
 # Mandatory: no
 # Default:
 DBPassword=[任意のPW] →先頭の[#]を消し、PWを入力


#PHPのタイムゾーンを日本時間に変更
vim /etc/opt/rh/rh-php72/php-fpm.d/zabbix.conf

 最下部のphp_value[date.timezone]を Asia/Tokyoへ変更します。
 [zabbix]
 user = apache
 group = apache

 listen = /var/opt/rh/rh-php72/run/php-fpm/zabbix.sock
 listen.acl_users = apache
 listen.allowed_clients = 127.0.0.1

 pm = dynamic
 pm.max_children = 50
 pm.start_servers = 5
 pm.min_spare_servers = 5
 pm.max_spare_servers = 35
 pm.max_requests = 200

 php_value[session.save_handler] = files
 php_value[session.save_path]    = /var/opt/rh/rh-php72/lib/php/session/

 php_value[max_execution_time] = 300
 php_value[memory_limit] = 128M
 php_value[post_max_size] = 16M
 php_value[upload_max_filesize] = 2M
 php_value[max_input_time] = 300
 php_value[max_input_vars] = 10000
 php_value[date.timezone] = Asia/Tokyo →[Europe/Riga]から[Asia/Tokyo]に変更


#zabbix(サーバとエージェント)を起動およびサーバ再起動時にサービス自動起動
systemctl restart zabbix-server zabbix-agent
systemctl enable zabbix-server zabbix-agent

#Apacheを起動およびサーバ再起動時にサービス自動起動
systemctl restart httpd
systemctl enable httpd

#PHPを起動およびサーバ再起動時にサービス自動起動
systemctl restart rh-php72-php-fpm
systemctl enable rh-php72-php-fpm
これでAmazon Linux2側(サーバ側)の設定は完了です。
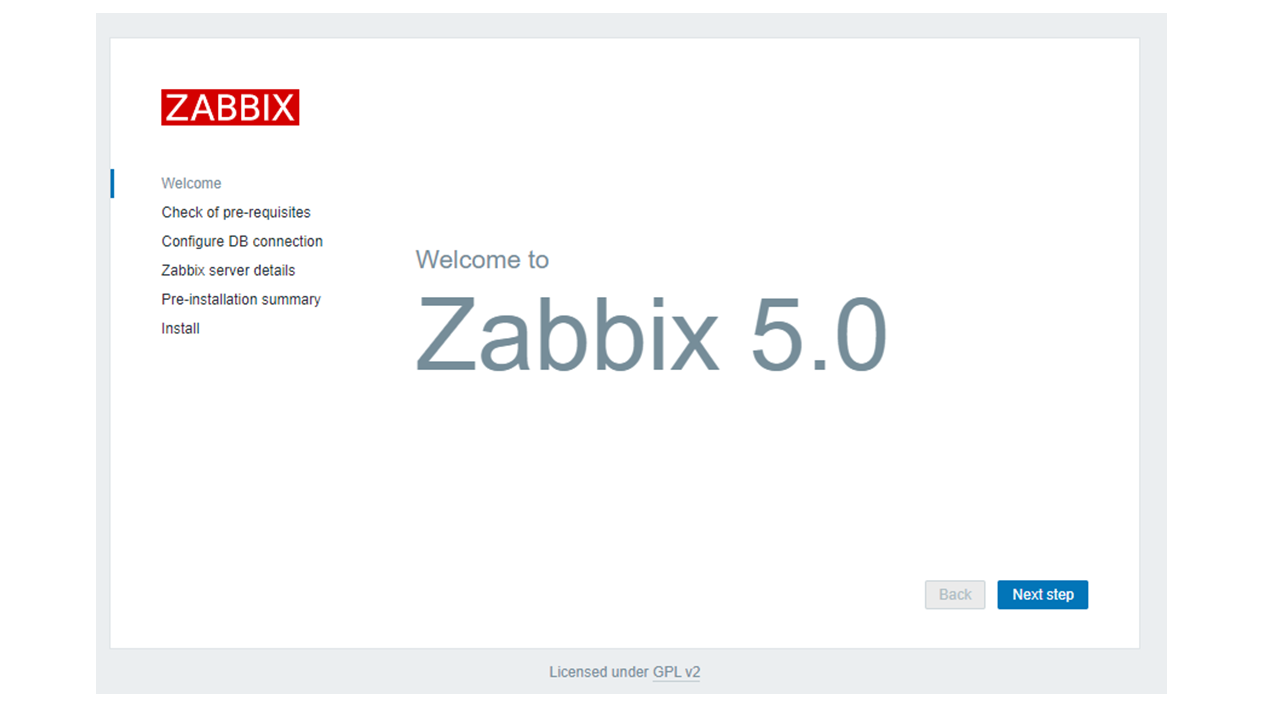
利用しているPCのWebブラウザーを立上げて、[http://"EC2のパブリックIP"/zabbix]にアクセスしてみましょう。
以下画面が表示されればOKです。
また全ての設定項目が正常なら以下のページのように「OK」マークが付きます。
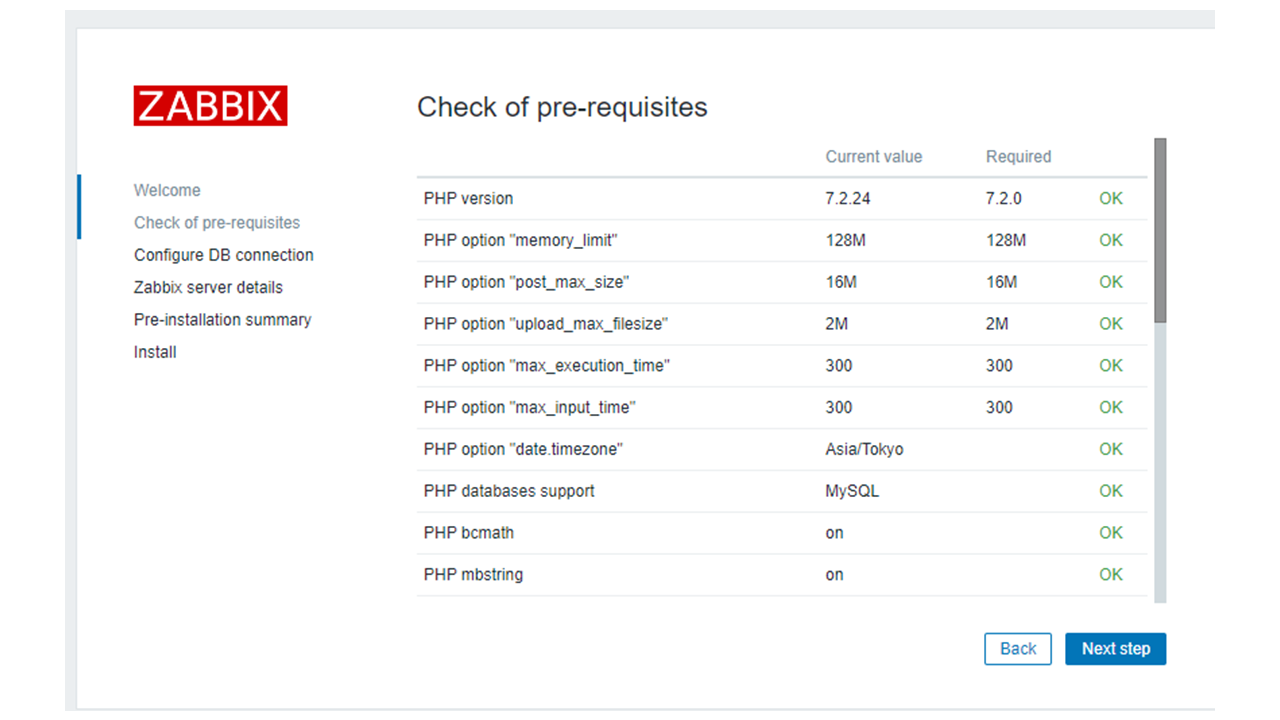
エラーになっているものがなければOKです。
上手くいかないとき
Zabbixが起動しない(systemctl status でActiveにならない)ときは/var/log/messageに何かエラーメッセージが出ていないか確認しましょう。
※SElinuxもdisableにしてサーバも再起動もしましょう。
zabbixは起動しているが、WebブラウザーでアクセスできないときはFirewall(セキュリティグループ等)などでブロックされていないか確認しましょう。
参考したサイト
AmazonLinux2にZabbix5.0を構築
Zabbixの構築手順(CentOS 7,MySQL)インストールとログインまで
おわりに
CentOSやらAmazon Linux2やらで微妙に利用できるリポジトリが違って上手くインストールできずに詰まることが多々ありましたm(_ _)m
リポジトリやらパッケージやらが難しい...ネット上の記事を書いてる人たちはどうやってマスターしたんでしょうか。教えてほしい。