
概要
PCA (AWS Private Certificate Authority)から発行したプライベート証明書を使って、プライベートサブネットに配置されているWEBサーバーをSSL化したいと思います。
AWS Private Certificate Authorityとは
プライベートCA(ルートCA / 下位CA)の作成及びプライベート証明書を発行・管理できるマネージドサービスです。
ACM (AWS Certificate Manager)の一機能として提供されているため、ACMと統合されているサービスに関連付けることが可能です。
ユースケースとしては以下が想定されます。(一部)
- 内部向けWebサーバー、VPN認証
- IoTデバイス認証
- AD連携による端末及びユーザー認証
パブリック証明書とプライベート証明書の違い
違いはざっくり以下の通りです。
プライベート証明書だからといって外部公開するサーバーに使えないわけではありませんが、デフォルトで信頼されていないため基本的には社内ネットワークシステムなどの特定ユーザー向けシステムで利用するものです。
| 項目 | パブリック証明書 | プライベート証明書 |
|---|---|---|
| 発行元 | 公開認証局 (公に認められた認証局) |
独自の認証局 |
| 信頼性 | 端末にデフォルトで認証局の ルート証明書がインストールされている |
発行元認証局のルート証明書を 別途インストールする必要あり |
| 安全性 | 差異なし | 差異なし |
| 用途 | ● 外部公開サーバー ● 一般ユーザー向けサービス |
● 内部システム ● 社内NWシステム ● 特定顧客向けサービス |
| 適用例 | ● 外部向けサービス | ● 社内システム ● VPN ● mTLS ● イントラネット |
実践
構成図
構成図は以下の通りです。
- 踏み台サーバーに
AWS Systems Manager Session Manager経由でログインし、各WEBサーバーにアクセス - 各サーバーでの作業も
AWS Systems Manager Session Manager経由でログインし実施 - WEBサーバーのドメインは
Amazon Route 53のPrivate Hosted Zoneで管理 - ルートCAからのルート証明書取得及び各サーバー証明書の取得は
AWS CloudShellにて作業を実施
その他環境の詳細はGitHubにて公開していますので、良かったら参照してみてください。

前提条件
- 作業PCに
AWS CLIをインストールしていること - 作業PCに
Session Manager Pluginをインストールしていること -
AdministratorAccessがアタッチされたIAMユーザーを作成していること - IAMユーザーの
アクセスキーID/シークレットアクセスキーを発行していること - AWS CLIのプロファイルを作成していること
(プロファイル名は任意ですが今回はadminとします)
権限が強いIAMユーザーのアクセスキーID/シークレットアクセスキーを発行しますので取り扱いには十分ご注意ください
作業環境
- 64bit版 Windows 11 Pro
- Visual Studio Code 1.96.2 (Default Terminal: Git Bash)
- Git 2.47.1.windows.2
- Session Manager Plugin 1.2.553.0
- AWS CLI 2.22.19.0
Linux編
Session Manager接続(Port Forwarding)
Session Manager Port Forwardingを使用し、SSH Over Session Managerで繋ぎます。
(Start Sessionでも良いのですがせっかくなので。)
まずターミナルを起動し以下コマンドを実行して、任意のエフェメラルポートをSSH用システムポート(22)に紐づけます。
実行後、Waiting for connections...と出力されればOKです。
これで作業PCからエフェメラルポートに対してSSH接続すると、Session Manager Pluginがその通信をカプセル化しSession Managerエンドポイントに投げます。
その通信をEC2内のSSM Agentがポーリングして取得し、非カプセル化してEC2内のSSHサービスで受け取ります。
--targetに指定するインスタンスIDはマネジメントコンソールで確認し修正してください
$ aws ssm start-session \
--target linux-instance-id \
--document-name AWS-StartPortForwardingSession \
--parameters portNumber="22",localPortNumber="10022" --profile admin

Starting session with SessionId: IAMユーザー名-セッションID
Port 10022 opened for sessionId IAMユーザー名-セッションID.
Waiting for connections...
上記コマンドを実行したターミナルは閉じずにそのままにしてください。別のターミナルを開いて以下コマンドを実行します。
EC2作成時に指定したキーペアの秘密鍵(PEMファイル)は、デプロイ後envsフォルダ配下の.keypairフォルダに作成されますのでそちらを使用してください
$ ssh -i 秘密鍵PEMファイル ec2-user@localhost -p 10022
The authenticity of host '[localhost]:10022 ([127.0.0.1]:10022)' can't be established.
ED25519 key fingerprint is SHA256:Oh168/Y9D19IC+mJ2vSxUkVBRGgv+Shzerg40oFGUd0.
This key is not known by any other names.
Are you sure you want to continue connecting (yes/no/[fingerprint])? yes
Warning: Permanently added '[localhost]:10022' (ED25519) to the list of known hosts.
   ,     #_
   ~\_  ####_        Amazon Linux 2023
  ~~  \_#####\
  ~~     \###|
  ~~       \#/ ___   https://aws.amazon.com/linux/amazon-linux-2023
   ~~       V~' '->
    ~~~         /
      ~~._.   _/
         _/ _/
       _/m/'
[ec2-user@ip-10-0-3-113 ~]$
接続ができました。以降はrootユーザーで作業を実施していきます。
Nginxインストール
Nginxをインストールします。
# dnf install -y nginx
~省略~
Complete!
Nginxの起動&自動起動設定を入れておきます。
# systemctl enable nginx --now
Created symlink /etc/systemd/system/multi-user.target.wants/nginx.service → /usr/lib/systemd/system/nginx.service.
以下コマンドでバックアップを取得後、Route 53 Private Hosted Zoneに作成したレコードのホスト名に設定ファイルを修正します。
# cp -p /etc/nginx/nginx.conf{,.org}
# For more information on configuration, see:
#   * Official English Documentation: http://nginx.org/en/docs/
#   * Official Russian Documentation: http://nginx.org/ru/docs/

user nginx;
worker_processes auto;
error_log /var/log/nginx/error.log notice;
pid /run/nginx.pid;

# Load dynamic modules. See /usr/share/doc/nginx/README.dynamic.
include /usr/share/nginx/modules/*.conf;

events {
    worker_connections 1024;
}

http {
    log_format  main  '$remote_addr - $remote_user [$time_local] "$request" '
                      '$status $body_bytes_sent "$http_referer" '
                      '"$http_user_agent" "$http_x_forwarded_for"';

    access_log  /var/log/nginx/access.log  main;

    sendfile            on;
    tcp_nopush          on;
    keepalive_timeout   65;
    types_hash_max_size 4096;

    include             /etc/nginx/mime.types;
    default_type        application/octet-stream;

    # Load modular configuration files from the /etc/nginx/conf.d directory.
    # See http://nginx.org/en/docs/ngx_core_module.html#include
    # for more information.
    include /etc/nginx/conf.d/*.conf;

    server {
        listen       80;
        listen       [::]:80;
-        server_name  _; ←全て受け入れになっている
+        server_name  linux.pcassl.com;
        root         /usr/share/nginx/html;

        # Load configuration files for the default server block.
        include /etc/nginx/default.d/*.conf;

        error_page 404 /404.html;
        location = /404.html {
        }

        error_page 500 502 503 504 /50x.html;
        location = /50x.html {
        }
    }

# Settings for a TLS enabled server.
#
#    server {
#        listen       443 ssl;
#        listen       [::]:443 ssl;
#        http2        on;
#        server_name  _;
#        root         /usr/share/nginx/html;
#
#        ssl_certificate "/etc/pki/nginx/server.crt";
#        ssl_certificate_key "/etc/pki/nginx/private/server.key";
#        ssl_session_cache shared:SSL:1m;
#        ssl_session_timeout  10m;
#        ssl_ciphers PROFILE=SYSTEM;
#        ssl_prefer_server_ciphers on;
#
#        # Load configuration files for the default server block.
#        include /etc/nginx/default.d/*.conf;
#
#        error_page 404 /404.html;
#        location = /404.html {
#        }
#
#        error_page 500 502 503 504 /50x.html;
#        location = /50x.html {
#        }
#    }
}
編集後、サービスをリロードして設定ファイルの変更を読み込ませます。
# systemctl reload nginx
これで踏み台サーバーからhttp://linux.pcassl.comでNginxのデフォルトページが表示されます。
サーバー証明書取得
この作業はCloudShellで実施していきます。
以下禁止フレーズ以外の文字4~128文字を記載したファイルを作成します。
今回はpassphrase.txtとします。
パスフレーズを作成する際は、#、$、% 以外の任意の ASCII 文字を使用できます。
パスフレーズのファイルには改行が含まれていてはいけません。
Linuxで作成したファイルの場合はLFを、Windowsで作成したファイルの場合はCRLFを取り除きます。
# Linux
$ cat 除去前ファイル名.txt | tr -d '\n' > 除去後ファイル名.txt

# Windows
$ cat 除去前ファイル名.txt | tr -d '\r\n' > 除去後ファイル名.txt
改行が入っているかの確認は以下コマンドを実行し、with no line terminatorsと出力されればOKです
$ file -k passphrase.txt
passphrase.txt: ASCII text, with no line terminators
以下コマンドを実行し「証明書本文」「証明書チェーン」「証明書のプライベートキー」をファイルに出力します。
証明書本文をcer.txt、証明書チェーンをcert_chain.txt、証明書プライベートキーをprivate_key.txtとして保存します。
--certificate-arnはエクスポート対象の証明書ARNに変更してください
$ aws acm export-certificate \
--certificate-arn arn:aws:acm:Region:444455556666:certificate/certificate_ID \
--passphrase fileb://passphrase.txt \
--output text \
--query Certificate > cert.txt

$ aws acm export-certificate \
--certificate-arn arn:aws:acm:Region:444455556666:certificate/certificate_ID \
--passphrase fileb://passphrase.txt \
--output text \
--query CertificateChain > cert_chain.txt

$ aws acm export-certificate \
--certificate-arn arn:aws:acm:Region:444455556666:certificate/certificate_ID \
--passphrase fileb://passphrase.txt \
--output text \
--query PrivateKey > private_key.txt
作成後、まずNginxの場合は証明書と証明書チェーンは連結しないといけないので以下コマンドを実行し連結後のファイルを作成します。
$ cat cert.txt cert_chain.txt | tee fullchain.pem
続いて証明書プライベートキーのパスフレーズを解除します。
$ openssl rsa -in private_key.txt -out private_key.pem
Enter pass phrase for private_key.txt:
writing RSA key
サーバー証明書設定
ここからはLinuxサーバーで作業していきます。
まずサーバー証明書とプライベートキーを格納するディレクトリを作成します。
# mkdir /etc/nginx/ssl
作成したディレクトリ内に、fullchain.pemとprivate_key.pemファイルを作成し、それぞれのファイルに先ほどCloudShellで作成したファイル内の値を張り付け保存します。
続いて設定ファイルを以下の通り修正します。
# For more information on configuration, see:
#   * Official English Documentation: http://nginx.org/en/docs/
#   * Official Russian Documentation: http://nginx.org/ru/docs/

user nginx;
worker_processes auto;
error_log /var/log/nginx/error.log notice;
pid /run/nginx.pid;

# Load dynamic modules. See /usr/share/doc/nginx/README.dynamic.
include /usr/share/nginx/modules/*.conf;

events {
    worker_connections 1024;
}

http {
    log_format  main  '$remote_addr - $remote_user [$time_local] "$request" '
                      '$status $body_bytes_sent "$http_referer" '
                      '"$http_user_agent" "$http_x_forwarded_for"';

    access_log  /var/log/nginx/access.log  main;

    sendfile            on;
    tcp_nopush          on;
    keepalive_timeout   65;
    types_hash_max_size 4096;

    include             /etc/nginx/mime.types;
    default_type        application/octet-stream;

    # Load modular configuration files from the /etc/nginx/conf.d directory.
    # See http://nginx.org/en/docs/ngx_core_module.html#include
    # for more information.
    include /etc/nginx/conf.d/*.conf;

    server {
        listen       80;
        listen       [::]:80;
        server_name  linux.pcassl.com;
        root         /usr/share/nginx/html;

        # Load configuration files for the default server block.
        include /etc/nginx/default.d/*.conf;

        error_page 404 /404.html;
        location = /404.html {
        }

        error_page 500 502 503 504 /50x.html;
        location = /50x.html {
        }
    }

# Settings for a TLS enabled server.
-#
-#    server {
-#        listen       443 ssl;
-#        listen       [::]:443 ssl;
-#        http2        on;
-#        server_name  _;
-#        root         /usr/share/nginx/html;
-#
-#        ssl_certificate "/etc/pki/nginx/server.crt";
-#        ssl_certificate_key "/etc/pki/nginx/private/server.key";
-#        ssl_session_cache shared:SSL:1m;
-#        ssl_session_timeout  10m;
-#        ssl_ciphers PROFILE=SYSTEM;
-#        ssl_prefer_server_ciphers on;
-#
-#        # Load configuration files for the default server block.
-#        include /etc/nginx/default.d/*.conf;
-#
-#        error_page 404 /404.html;
-#        location = /404.html {
-#        }
-#
-#        error_page 500 502 503 504 /50x.html;
-#        location = /50x.html {
-#        }
-#    }
+    server {
+        listen       443 ssl;
+        listen       [::]:443 ssl;
+        http2        on;
+        server_name  linux.pcassl.com;
+        root         /usr/share/nginx/html;
+
+        ssl_certificate "/etc/nginx/ssl/fullchain.pem";
+        ssl_certificate_key "/etc/nginx/ssl/private_key.pem";
+        ssl_session_cache shared:SSL:1m;
+        ssl_session_timeout  10m;
+        ssl_ciphers PROFILE=SYSTEM;
+        ssl_prefer_server_ciphers on;
+
+        # Load configuration files for the default server block.
+        include /etc/nginx/default.d/*.conf;
+
+        error_page 404 /404.html;
+        location = /404.html {
+        }
+
+        error_page 500 502 503 504 /50x.html;
+        location = /50x.html {
+        }
+    }
}
編集後、サービスをリロードして設定ファイルの変更を読み込ませます。
# systemctl reload nginx
これで踏み台サーバーからhttps://linux.pcassl.comでNginxのデフォルトページが表示されます。
ただし現状では、踏み台サーバー側にサーバー証明書を検証するルート証明書がないため、証明書エラーとなります。(後述で対応)
Windows Server編
Session Manager接続(Port Forwarding)
Session Manager Port Forwardingを使用し、RDP Over Session Managerで繋ぎます。
(Start Sessionでも良いのですが操作性を加味してこちらの方法で実施します。)
まずターミナルを起動し以下コマンドを実行して、任意のエフェメラルポートをRDP用システムポート(3389)に紐づけます。
実行後、Waiting for connections...と出力されればOKです。
これで作業PCからエフェメラルポートに対してRDP接続すると、Session Manager Pluginがその通信をカプセル化しSession Managerエンドポイントに投げます。
その通信をEC2内のSSM Agentがポーリングして取得し、非カプセル化してEC2内のRDPサービスで受け取ります。
--targetに指定するインスタンスIDはマネジメントコンソールで確認し修正してください
$ aws ssm start-session \
--target windows-instance-id \
--document-name AWS-StartPortForwardingSession \
--parameters portNumber="3389",localPortNumber="33389" --profile admin

Starting session with SessionId: IAMユーザー名-セッションID
Port 33389 opened for sessionId IAMユーザー名-セッションID.
Waiting for connections...
上記コマンドを実行したターミナルは閉じずにそのままにしてください。
リモートデスクトップを起動し接続します。
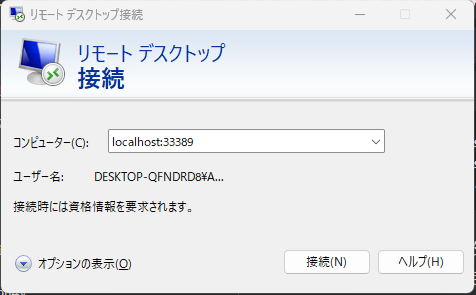
EC2作成時に指定したキーペアの秘密鍵(PEMファイル)が、デプロイ後envsフォルダ配下の.keypairフォルダに作成されます。
そちらを使用し、事前にAdministratorユーザーのパスワードを取得しておいてください。

Nginxインストール
こちらからStable versionのnginx/Windows-1.26.3(バージョンはインストール時のもので大丈夫です)をサーバーにダウンロードします。
zipファイルをダウンロードしたら任意の場所に解凍します。今回はDocumentsに解凍します。

Route 53 Private Hosted Zoneに作成したレコードのホスト名に設定ファイルを修正します。
$Env:USERPROFILE\Documents\nginx-1.26.3\confフォルダ配下にあるnginx.confを以下の通り修正します。
#user  nobody;
worker_processes  1;

#error_log  logs/error.log;
#error_log  logs/error.log  notice;
#error_log  logs/error.log  info;

#pid        logs/nginx.pid;


events {
    worker_connections  1024;
}


http {
    include       mime.types;
    default_type  application/octet-stream;

    #log_format  main  '$remote_addr - $remote_user [$time_local] "$request" '
    #                  '$status $body_bytes_sent "$http_referer" '
    #                  '"$http_user_agent" "$http_x_forwarded_for"';

    #access_log  logs/access.log  main;

    sendfile        on;
    #tcp_nopush     on;

    #keepalive_timeout  0;
    keepalive_timeout  65;

    #gzip  on;

    server {
        listen       80;
-        server_name  localhost;
+        server_name  windows.pcassl.com;

        #charset koi8-r;

        #access_log  logs/host.access.log  main;

        location / {
            root   html;
            index  index.html index.htm;
        }

        #error_page  404              /404.html;

        # redirect server error pages to the static page /50x.html
        #
        error_page   500 502 503 504  /50x.html;
        location = /50x.html {
            root   html;
        }

        # proxy the PHP scripts to Apache listening on 127.0.0.1:80
        #
        #location ~ \.php$ {
        #    proxy_pass   http://127.0.0.1;
        #}

        # pass the PHP scripts to FastCGI server listening on 127.0.0.1:9000
        #
        #location ~ \.php$ {
        #    root           html;
        #    fastcgi_pass   127.0.0.1:9000;
        #    fastcgi_index  index.php;
        #    fastcgi_param  SCRIPT_FILENAME  /scripts$fastcgi_script_name;
        #    include        fastcgi_params;
        #}

        # deny access to .htaccess files, if Apache's document root
        # concurs with nginx's one
        #
        #location ~ /\.ht {
        #    deny  all;
        #}
    }


    # another virtual host using mix of IP-, name-, and port-based configuration
    #
    #server {
    #    listen       8000;
    #    listen       somename:8080;
    #    server_name  somename  alias  another.alias;

    #    location / {
    #        root   html;
    #        index  index.html index.htm;
    #    }
    #}


    # HTTPS server
    #
    #server {
    #    listen       443 ssl;
    #    server_name  localhost;

    #    ssl_certificate      cert.pem;
    #    ssl_certificate_key  cert.key;

    #    ssl_session_cache    shared:SSL:1m;
    #    ssl_session_timeout  5m;

    #    ssl_ciphers  HIGH:!aNULL:!MD5;
    #    ssl_prefer_server_ciphers  on;

    #    location / {
    #        root   html;
    #        index  index.html index.htm;
    #    }
    #}

}
Nginxを起動します。
$Env:USERPROFILE\Documents\nginx-1.26.3フォルダに遷移し、パスタブにpowershellと入力しEnterを押します。

Powershell上で以下コマンドを実行します。
PS C:\Users\Administrator\Documents\nginx-1.26.3> start nginx
警告がでた場合は、実行を選択します。

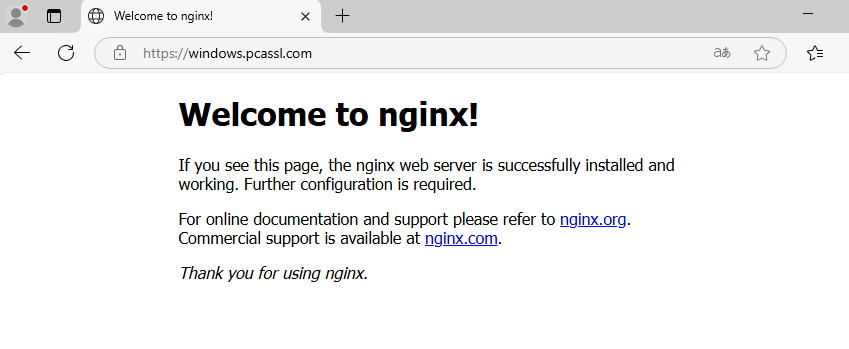
これで踏み台サーバーからhttp://windows.pcassl.comでNginxのデフォルトページが表示されます。
- もしつながらない場合は、
$Env:USERPROFILE\Documents\nginx-1.26.3フォルダ上で.\nginx -s reloadコマンドで設定を再読み込みするか、taskkill /F /IM nginx.exeで一度プロセスを削除して再度起動してみてください - それでもできない場合は、
Windows Defenderファイアウォールを無効化してください
せっかくなのでサービス化についてまとめてますのでよかったら参考にしてみてください
サーバー証明書設定
この作業はCloudShellで実施していきます。
以下禁止フレーズ以外の文字4~128文字を記載したファイルを作成します。
今回はpassphrase.txtとします。
パスフレーズを作成する際は、#、$、% 以外の任意の ASCII 文字を使用できます。
パスフレーズのファイルには改行が含まれていてはいけません。
Linuxで作成したファイルの場合はLFを、Windowsで作成したファイルの場合はCRLFを取り除きます。
# Linux
$ cat 除去前ファイル名.txt | tr -d '\n' > 除去後ファイル名.txt

# Windows
$ cat 除去前ファイル名.txt | tr -d '\r\n' > 除去後ファイル名.txt
改行が入っているかの確認は以下コマンドを実行し、with no line terminatorsと出力されればOKです
$ file -k passphrase.txt
passphrase.txt: ASCII text, with no line terminators
以下コマンドを実行し「証明書本文」「証明書チェーン」「証明書のプライベートキー」をファイルに出力します。
証明書本文をcer.txt、証明書チェーンをcert_chain.txt、証明書プライベートキーをprivate_key.txtとして保存します。
--certificate-arnはエクスポート対象の証明書ARNに変更してください
$ aws acm export-certificate \
--certificate-arn arn:aws:acm:Region:444455556666:certificate/certificate_ID \
--passphrase fileb://passphrase.txt \
--output text \
--query Certificate > cert.txt

$ aws acm export-certificate \
--certificate-arn arn:aws:acm:Region:444455556666:certificate/certificate_ID \
--passphrase fileb://passphrase.txt \
--output text \
--query CertificateChain > cert_chain.txt

$ aws acm export-certificate \
--certificate-arn arn:aws:acm:Region:444455556666:certificate/certificate_ID \
--passphrase fileb://passphrase.txt \
--output text \
--query PrivateKey > private_key.txt
作成後、まずNginxの場合は証明書と証明書チェーンは連結しないといけないので以下コマンドを実行し連結後のファイルを作成します。
$ cat cert.txt cert_chain.txt | tee fullchain.pem
続いて証明書プライベートキーのパスフレーズを解除します。
$ openssl rsa -in private_key.txt -out private_key.pem
Enter pass phrase for private_key.txt:
writing RSA key
サーバー証明書設定
ここからはWindowsサーバーで作業していきます。
まずサーバー証明書とプライベートキーを格納するディレクトリを作成します。

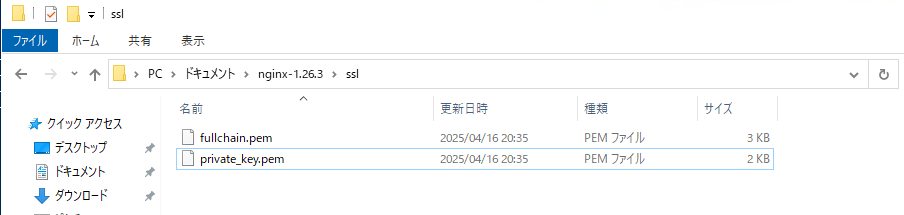
作成したディレクトリ内に、fullchain.pemとprivate_key.pemを作成し、CloudShellで作成したファイル内の値をそれぞれ張り付けて保存します。
続いて設定ファイルを以下の通り修正します。
#user  nobody;
worker_processes  1;

#error_log  logs/error.log;
#error_log  logs/error.log  notice;
#error_log  logs/error.log  info;

#pid        logs/nginx.pid;


events {
    worker_connections  1024;
}


http {
    include       mime.types;
    default_type  application/octet-stream;

    #log_format  main  '$remote_addr - $remote_user [$time_local] "$request" '
    #                  '$status $body_bytes_sent "$http_referer" '
    #                  '"$http_user_agent" "$http_x_forwarded_for"';

    #access_log  logs/access.log  main;

    sendfile        on;
    #tcp_nopush     on;

    #keepalive_timeout  0;
    keepalive_timeout  65;

    #gzip  on;

    server {
        listen       80;
        server_name  windows.pcassl.com;

        #charset koi8-r;

        #access_log  logs/host.access.log  main;

        location / {
            root   html;
            index  index.html index.htm;
        }

        #error_page  404              /404.html;

        # redirect server error pages to the static page /50x.html
        #
        error_page   500 502 503 504  /50x.html;
        location = /50x.html {
            root   html;
        }

        # proxy the PHP scripts to Apache listening on 127.0.0.1:80
        #
        #location ~ \.php$ {
        #    proxy_pass   http://127.0.0.1;
        #}

        # pass the PHP scripts to FastCGI server listening on 127.0.0.1:9000
        #
        #location ~ \.php$ {
        #    root           html;
        #    fastcgi_pass   127.0.0.1:9000;
        #    fastcgi_index  index.php;
        #    fastcgi_param  SCRIPT_FILENAME  /scripts$fastcgi_script_name;
        #    include        fastcgi_params;
        #}

        # deny access to .htaccess files, if Apache's document root
        # concurs with nginx's one
        #
        #location ~ /\.ht {
        #    deny  all;
        #}
    }


    # another virtual host using mix of IP-, name-, and port-based configuration
    #
    #server {
    #    listen       8000;
    #    listen       somename:8080;
    #    server_name  somename  alias  another.alias;

    #    location / {
    #        root   html;
    #        index  index.html index.htm;
    #    }
    #}


    # HTTPS server
-    #
-    #server {
-    #    listen       443 ssl;
-    #    server_name  localhost;
-
-    #    ssl_certificate      cert.pem;
-    #    ssl_certificate_key  cert.key;
-
-    #    ssl_session_cache    shared:SSL:1m;
-    #    ssl_session_timeout  5m;
-
-    #    ssl_ciphers  HIGH:!aNULL:!MD5;
-    #    ssl_prefer_server_ciphers  on;
-
-    #    location / {
-    #        root   html;
-    #        index  index.html index.htm;
-    #    }
-    #}
+    server {
+        listen       443 ssl;
+        server_name  windows.pcassl.com;
+
+        ssl_certificate      "C:\\Users\\Administrator\\Documents\\nginx-1.26.3\\ssl\\fullchain.pem";
+        ssl_certificate_key  "C:\\Users\\Administrator\\Documents\\nginx-1.26.3\\ssl\\private_key.pem";
+
+        ssl_session_cache    shared:SSL:1m;
+        ssl_session_timeout  5m;
+
+        ssl_ciphers  HIGH:!aNULL:!MD5;
+        ssl_prefer_server_ciphers  on;
+
+        location / {
+            root   html;
+            index  index.html index.htm;
+        }
+    }
}
設定ファイルの変更を読み込ませるため、Powershell上で以下コマンドを実行します。
PS C:\Users\Administrator\Documents\nginx-1.26.3> nginx -s reload
これで踏み台サーバーからhttps://windows.pcassl.comでNginxのデフォルトページが表示されます。
ただし現状では、踏み台サーバー側にサーバー証明書を検証するルート証明書がないため、証明書エラーとなります。(後述で対応)
ルート証明書インストール
ルート証明書取得
CloudShellで作業をします。
以下コマンドを実行し、PCAのルートCAの証明書を取得します。
--certificate-authority-arnはルートCAのARNに変更してください
$ aws acm-pca get-certificate-authority-certificate \
--certificate-authority-arn arn:aws:acm-pca:us-east-1:111122223333:certificate-authority/11223344-1234-1122-2233-112233445566 \
--output text \
--query Certificate > root_cert.txt
Session Manager接続(Port Forwarding)
Windows Server編と同じ方法で踏み台サーバーにRDP Over Session Managerで繋ぎます。(割愛)
エフェメラルポートは未使用の値を使用してください
ルート証明書インストール
任意のフォルダにpem形式のファイルを作成し、先ほど取得したPCAのルートCAの証明書の値を張り付け保存します。

「Windows キー」と「R キー」を同時に押して「certmgr.msc」と入力し「OK」を押します。

「信頼されたルート証明書」→「証明書」→「すべてのタスク」→「インポート」を選択します。
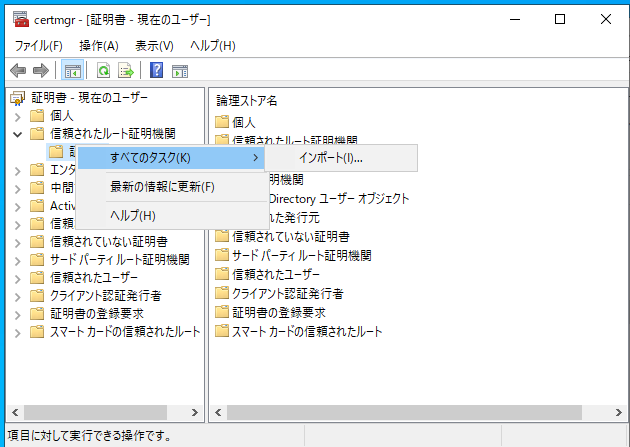
そのまま「次へ」を選択。

インポートするファイルとして先ほど任意の場所に保存したpem形式のファイルを選択し「次へ」を選択。

そのまま「次へ」を選択。

「完了」を選択。

警告が出ますが「はい」を選択。

インポートが完了します。
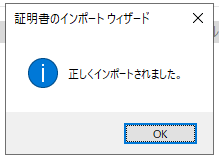
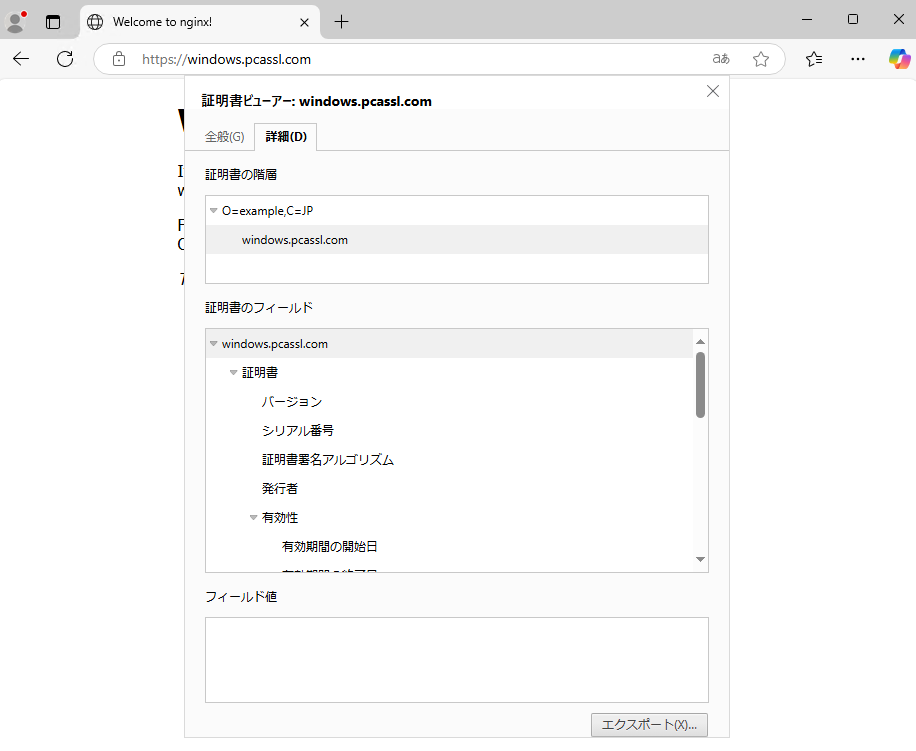
証明書一覧にインストールされているのが確認できます。

この状態で各サーバーにhttpsでアクセスすると、サーバー証明書の検証に成功するため証明書エラーが発生しなくなります。
動作確認
まずLinuxサーバーにアクセスしてみます。問題ないですね。


続いてWindowsサーバーにアクセスしてみます。こちらも問題ないですね。
まとめ
今回はPCA (AWS Private Certificate Authority)から発行したプライベート証明書を使って、プライベートサブネットに配置されているWEBサーバーをSSL化してみました。
余談ですが、今回の構成では「PCAを認証局としてACMで発行」としているので、
サーバー証明書の有効期限はACMの仕様上13ヵ月となり変更はできません。
より長い有効期限としたい場合は、PCAのルート証明書の有効期限未満とはなりますが、AWS CLIのIssue Certificate APIを使ってPCAに対して直接証明書を発行することになります。
こちらの記事が誰かの役に立てば幸いです。
- 「
PCAを認証局としてACMで発行」とする際、PCAの証明書の有効期限が13ヵ月未満の場合、発行はできるものの証明書のStatusはFailed(失効状態)になりますので注意してください - また「
短期間証明書モード(short-lived certificate mode)」の場合、PCAで発行できる証明書の有効期限は最大で7日のため、発行はできるものの証明書のStatusはFailedになりますので注意してください。PCAの証明書の有効期限が13ヵ月以上だとしてもStatusはFailedになります
おまけ(サービス化)
せっかくなのでWindows Serverにてサービス化してみましょう。
サービス化プログラム(winsw.exe)を使います。
同様のプログラムとしてNSSM - the Non-Sucking Service Managerもありますが最新版が2017年のため見送りました
以下リポジトリからWinSW-x64.exeをダウンロードし、任意のフォルダに配置します。
今回は$Env:USERPROFILE\Documents\nginx-1.26.3\serviceフォルダに配置しました。

任意ではありますが、わかりやすいようにWinSv-nginx.exeとリネームしておきます。

続いて、WinSW設定ファイル(XMLファイル)を作成します。
こちらの名称は実行ファイルと同一名称にする必要がありますのでWinSv-nginx.xmlとします。
記載内容は以下の通りです。
<service>
    <id>nginx</id>
    <name>nginx</name>
    <description>HTTP Server</description>
    <workingdirectory>C:\Users\Administrator\Documents\nginx-1.26.3</workingdirectory>
    <logpath>C:\Users\Administrator\Documents\nginx-1.26.3\logs</logpath>
    <logmode>roll</logmode>
    <depend></depend>
    <executable>C:\Users\Administrator\Documents\nginx-1.26.3\nginx.exe</executable>
    <startarguments></startarguments>
    <stoparguments>-s stop</stoparguments>
</service>
インストールします。
$Env:USERPROFILE\Documents\nginx-1.26.3\serviceフォルダに遷移し、パスタブにpowershellと入力しEnterを押します。

以下コマンドを実行しインストールします。
successfully.となれば成功です。
PS C:\Users\Administrator\Documents\nginx-1.26.3\service> .\WinSW-nginx.exe install
2025-04-01 16:09:26,805 INFO  - Installing service 'nginx (nginx)'...
2025-04-01 16:09:26,881 INFO  - Service 'nginx (nginx)' was installed successfully.
サービス一覧で確認すると問題なくサービス化されていますね。
