
UIBezierPathで描かれた図形にグラデーションを付ける方法が中々探しても見つからなかったので、備忘録も兼ねて投稿します。
UIViewのサブクラスを作り、ストーリーボード上に設置してみる
GradientArcView.swift
@IBDesignable class GradientArcView: UIView {

}
@IBDesignableアノテーションを付与すると、ストーリーボードで作業する際にリアルタイムでレンダリングしてくれるので便利です。
当然ながら、動作は重たくなりますが……。

作成したカスタムViewにAspectRatio1:1の制約をかけて画面中央に配置しています。
円弧を描く
UIViewのdraw(rect:)関数をオーバーライドして円弧を描きます。
この辺は詳しい記事がたくさんあるので簡単に。
GradientArcView.swift
override func draw(_ rect: CGRect) {
        let arcLayer = CAShapeLayer()
        let radius = rect.size.width / 2
        let lineWidth: CGFloat = 20
        let arcPath = UIBezierPath(arcCenter: CGPoint(x: rect.midX, y: rect.midY),
                               radius: radius - lineWidth,
                               startAngle: 0,
                               endAngle: CGFloat(Double.pi * 2),
                               clockwise: true)
        arcLayer.frame = rect
        arcLayer.path = arcPath.cgPath
        arcLayer.lineWidth = lineWidth
        arcLayer.fillColor = UIColor.clear.cgColor
        arcLayer.strokeColor = UIColor.red.cgColor
}
ここでaddSublayer()すれば円弧が表示されますが、マスクしていくのでまだ追加しません
円弧に重ねるためのグラデーションレイヤーを作る
GradientArcView.swift
let gradientLayer = CAGradientLayer()
gradientLayer.frame = rect
gradientLayer.colors = [
UIColor.orange.cgColor,
UIColor.red.cgColor,
UIColor.purple.cgColor,
UIColor.blue.cgColor
]
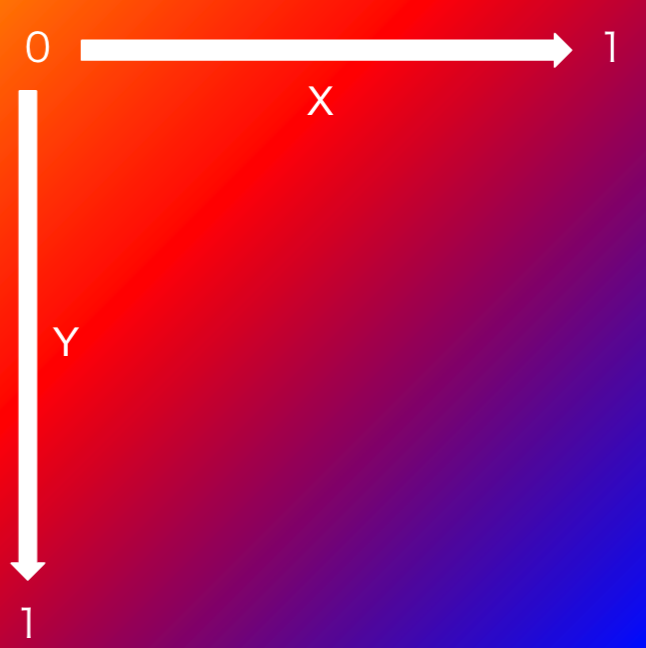
gradientLayer.startPoint = CGPoint(x: 0.0, y: 0.0)
gradientLayer.endPoint = CGPoint(x: 1.0, y: 1.0)
self.layer.addSublayer(gradientLayer)
draw(rect:)関数の中に続けて書いていきます。
CAGradientLayerのstartPoint、endPointはこのような関係になっています
左下が始点で右上が終点となるように書き換えてみます。
GradientArcView.swift
gradientLayer.startPoint = CGPoint(x: 0.0, y: 1.0)
gradientLayer.endPoint = CGPoint(x: 1.0, y: 0.0)
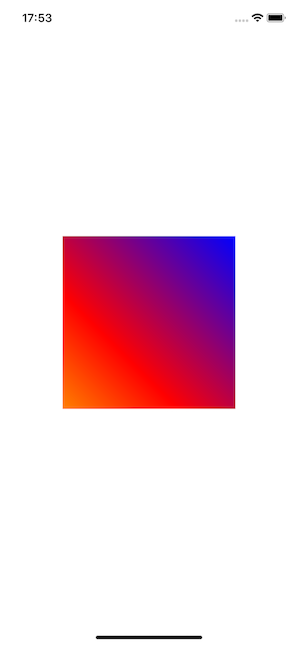
色の重なり順が変わりました。
グラデーションレイヤーでマスクする
.swift
gradientLayer.mask = arcLayer

無事マスクされました。
コード全文
GradientArcView.swift
import UIKit

@IBDesignable class GradientArcView: UIView {

    override func draw(_ rect: CGRect) {
        let arcLayer = CAShapeLayer()
        let radius = rect.size.width / 2
        let lineWidth: CGFloat = 20

        let arcPath = UIBezierPath(arcCenter: CGPoint(x: rect.midX, y: rect.midY),
                               radius: radius - lineWidth,
                               startAngle: 0,
                               endAngle: CGFloat(Double.pi * 2),
                               clockwise: true)
        arcLayer.frame = rect
        arcLayer.path = arcPath.cgPath
        arcLayer.lineWidth = lineWidth
        arcLayer.fillColor = UIColor.clear.cgColor
        arcLayer.strokeColor = UIColor.red.cgColor

        let gradientLayer = CAGradientLayer()
        gradientLayer.frame = rect
        gradientLayer.colors = [
            UIColor.orange.cgColor,
            UIColor.red.cgColor,
            UIColor.purple.cgColor,
            UIColor.blue.cgColor
        ]
        gradientLayer.startPoint = CGPoint(x: 0.0, y: 1.0)
        gradientLayer.endPoint = CGPoint(x: 1.0, y: 0.0)
        self.layer.addSublayer(gradientLayer)

        gradientLayer.mask = arcLayer
    }
}