はじめに
前回単純なインフラをCloudFormationのテンプレートを利用して自動構築しましたが、単純な構成にもかかわらずテンプレートファイルがごちゃごちゃしてしまいました。
今回スタックのネストを利用してテンプレートファイルを分割して記述する方法を学んだのでそのまとめです。
前回記事
https://qiita.com/tyoshitake/items/c5176c0ef4de8d7cf5d8
スタックのネストについて
前回はVPC、サブネット、EC2などのリソースを1つのテンプレートファイルに記述しましたが、スタックのネストをうまく使うことで、比較的独立したリソース群(上の例だとVPC、サブネット、EC2)を別個のテンプレートファイルに記述し、それらのテンプレートから作成されたスタックを組み合わせたスタックの構築ができます。
また、上位のテンプレートとネストしたテンプレート間ではパラメータの受け渡しが可能なので、下位テンプレートを変更せずに、上位のテンプレート側でリソースのプロパティを設定することができます。
テンプレートからのスタックの作成については、ネストするテンプレートをAmazonS3上にアップロードした状態で、通常のスタック作成の手順を踏む必要があります。
スタックのネストの記述方法
上位テンプレートで下位スタックをネストする場合
下位スタックをネストする場合の基本的な書き方は以下のようになります。
上位のテンプレート
Resources:
  # リソースの記述
  LowerStack:
    Type: AWS::CloudFormation::Stack
    Properties:
      TemplateURL: (URL for Template)
      Parameters:
        Property1: ValueOfProperty1
下位のテンプレート
Parameters:
  Property1:
    Type: PropertyType
    Default: DefaultValue
    Description: This is Property1

Resources:
  # リソースの記述
上位のテンプレートにはネストするテンプレートから作成されるスタックをリソースとして記述します。リソースタイプをAWS::CloudFormation::Stackとする必要があります。またネストするテンプレートはS3から読み込む必要があるのでTemplateURL属性でS3上のURLを指定します。
さらに上位のテンプレートからネストするテンプレートにパラメータを渡す場合は、Parameters属性として記述する必要があります。
下位のテンプレート側ですが、上位のテンプレートからパラメータを受ける場合はテンプレートのはじめにParametersとして各パラメータを設定しておく必要があります。
上の例では上位のテンプレートから下位のテンプレートにProperty1というパラメータを渡しています。
下位のテンプレートからの出力を受ける方法
逆に下位テンプレートの出力を上位のテンプレートで受ける際の記述は以下のようになります。
下位のテンプレート
Outputs:
  OutputParameter:
    Value: !Ref OutputId
    Description: Output Id
上位のテンプレート
Resources:
  # リソースの記述
  LowerStack:
    Type: AWS::CloudFormation::Stack
    Properties:
      TemplateURL: (URL for Template)

Outputs:
  OutputId:
    Value: !GetAtt LowerStack.Outputs.OutputParameter
    Description: Output parameter
下位のテンプレートでは渡したいパラメータをOutputsに記述します。
上位のテンプレートでは"!GetAtt (出力を受けたい下位スタックのリソース名).Outputs.(パラメータ名)"とすることで、下位テンプレートからの出力を受けることができます。
!GetAttはテンプレートのリソースから属性の値を取得する組み込み関数Fn::GetAttの短縮形です。
参考:Fn::GetAtt関数
https://docs.aws.amazon.com/ja_jp/AWSCloudFormation/latest/UserGuide/intrinsic-function-reference-getatt.html
上の例では下位スタックリソースLowerStackの出力OutputParameterを上位テンプレート内のOutputsとして出力しています。上位テンプレートで受けた出力は元リソースがLowerStackで、パラメータ名がOutputParameterです。したがって上位テンプレート内では出力パラメータ名はLowerStack.Outputs.OutputParameterとなります。上位テンプレートで受けたパラメータはOutputsとして出力するだけでなく、別の下位テンプレートへの入力パラメータとして指定することもできます。
具体例
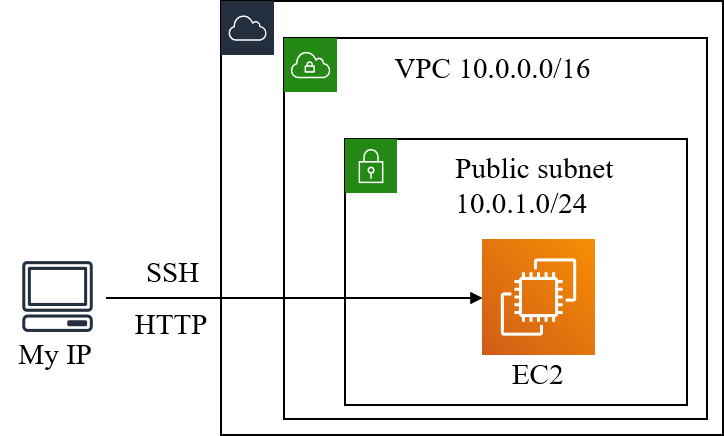
前回の記事と同じケースについて、スタックをネストした場合のテンプレート記述を説明します。
インフラの構成図
テンプレート
今回テンプレートは以下の4つに分けました。
- 上位テンプレート(各下位スタックの設定を記述)
- VPCを作成するテンプレート
- パブリックサブネットを作成するテンプレート
- EC2を作成するテンプレート
VPCを作成するテンプレート
AWSTemplateFormatVersion: "2010-09-09"
Description: Provision of VPC

# パラメータ
Parameters:
  CIDRBlock:
    Type: String
    Description: CIDRBlock of VPC

Resources:
  # VPCの作成
  VPC:
    Type: AWS::EC2::VPC
    Properties:
      CidrBlock: !Ref CIDRBlock

  # IGWの作成
  IGW:
    Type: AWS::EC2::InternetGateway

  # IGWをVPCにアタッチ
  AttachGateway:
    Type: AWS::EC2::VPCGatewayAttachment
    Properties:
      VpcId: !Ref VPC
      InternetGatewayId: !Ref IGW

Outputs:
  VPCId:
    Value: !Ref VPC
    Description: VPC id

  IGWId:
    Value: !Ref IGW
    Description: IGW id
このテンプレートでは入力パラメータとしてCIDRBlockを受けそのアドレス範囲のVPCとインターネットゲートウェイを作成し、出力としてVPCとインターネットゲートウェイのIDを返しています。
パブリックサブネットを作成するテンプレート
AWSTemplateFormatVersion: "2010-09-09"
Description: Provision of public subnet

# パラメータ
Parameters:
  VPCId:
    Type: String
    Description: VPC id

  AZ:
    Type: String
    Default: ap-northeast-1a
    Description: Availability zone of public subnet

  CIDRBlock:
    Type: String
    Description: CIDR of public subnet

  IGWId:
    Type: String
    Description: Internet gateway id

Resources:

  # パブリックサブネット
  PublicSubnet:
    Type: AWS::EC2::Subnet
    Properties:
      AvailabilityZone: !Ref AZ
      VpcId: !Ref VPCId
      CidrBlock: !Ref CIDRBlock

  # パブリックサブネットのルートテーブル
  PublicSubnetRT:
    Type: AWS::EC2::RouteTable
    Properties:
      VpcId: !Ref VPCId

  # IGWへのルーティング
  PublicSubnetToInternet:
    Type: AWS::EC2::Route
    Properties:
      RouteTableId: !Ref PublicSubnetRT
      DestinationCidrBlock: 0.0.0.0/0
      GatewayId: !Ref IGWId

  # ルートテーブルをパブリックサブネットに関連付け
  AssociatePublicSubnetRT:
    Type: AWS::EC2::SubnetRouteTableAssociation
    Properties:
      SubnetId: !Ref PublicSubnet
      RouteTableId: !Ref PublicSubnetRT

Outputs:
  PublicSubnetId:
    Value: !Ref PublicSubnet
    Description: PublicSubnet id
このテンプレートでは
- VPCのID
- アベイラビリティゾーン名
- サブネットのCIDR
- インターネットゲートウェイのID
を入力パラメータとして受け、サブネットの作成とルーティングテーブルの作成を行っています。
最終的に出力しているのはパブリックサブネットのIDになります。
EC2を作成するテンプレート
AWSTemplateFormatVersion: "2010-09-09"
Description: Provision of EC2

# パラメータ
Parameters:
  ImageId:
    Type: String
    Default: ami-00d101850e971728d
    Description: Image id
  InstanceType:
    Type: String
    Default: t2.micro
    Description: EC2 instance type.
  VPCId:
    Type: String
    Description: ID for VPC.
  SubnetId:
    Type: String
    Description: Subnet id on which EC2 instance locates.
  MyIP:
    Type: String
    Description: IP address allowed to access(HTTP, SSH) to EC2 instance.
  KeyName:
    Type: String
    Description: Name of an existing EC2 KeyPair to enable SSH access to the web server.

Resources:
 # EC2インスタンスの作成
  EC2:
    Type: AWS::EC2::Instance
    Properties:
      ImageId: !Ref ImageId
      KeyName: !Ref KeyName
      InstanceType: !Ref InstanceType
      NetworkInterfaces:
        - AssociatePublicIpAddress: true
          DeviceIndex: 0
          SubnetId: !Ref SubnetId
          GroupSet:
            - !Ref EC2SG
      UserData: !Base64 |
        #!/bin/bash
        sudo yum install -y git

  # EC2のセキュリティーグループの作成
  EC2SG:
    Type: AWS::EC2::SecurityGroup
    Properties:
      GroupDescription: Allow SSH and HTTP access only MyIP
      VpcId: !Ref VPCId
      SecurityGroupIngress:
        # http
        - IpProtocol: tcp
          FromPort: 80
          ToPort: 80
          CidrIp: !Ref MyIP
        # ssh
        - IpProtocol: tcp
          FromPort: 22
          ToPort: 22
          CidrIp: !Ref MyIP

Outputs:
  EC2PublicIP:
    Value: !GetAtt EC2.PublicIp
    Description: Public IP of EC2 instance
上のテンプレートでは
- EC2インスタンスのイメージID
- インスタンスタイプ名
- VPCのID
- サブネットのID
- 通信を許可するIPアドレス
- キーペア名
を入力として受け、EC2インスタンス及びセキュリティーグループの作成を行っています。
出力パラメータはEC2のパブリックIPです。
上位テンプレート
AWSTemplateFormatVersion: "2010-09-09"
Description: Provision of simple webserver

Parameters:
  KeyName:
    Description: The EC2 Key Pair to allow SSH access to the instance
    Type: "AWS::EC2::KeyPair::KeyName"

  MyIP:
    Description: IP address allowed to access EC2
    Type: String

  VPCTemplateURL:
    Description: URL of VPC Template file
    Type: String

  PublicSubnetTemplateURL:
    Description: URL of Public Subnet Template file
    Type: String

  EC2TemplateURL:
    Description: URL of EC2 Template file
    Type: String

Resources:

  # VPCの作成
  VPC:
    Type: AWS::CloudFormation::Stack
    Properties:
      TemplateURL: !Ref VPCTemplateURL
      Parameters:
        CIDRBlock: 10.0.0.0/16

  # パブリックサブネットの作成
  PublicSubnet:
    Type: AWS::CloudFormation::Stack
    Properties:
      TemplateURL: !Ref PublicSubnetTemplateURL
      Parameters:
        VPCId: !GetAtt VPC.Outputs.VPCId
        AZ: ap-northeast-1a
        CIDRBlock: 10.0.1.0/24
        IGWId: !GetAtt VPC.Outputs.IGWId

  # EC2の作成
  EC2:
    Type: AWS::CloudFormation::Stack
    Properties:
      TemplateURL: !Ref EC2TemplateURL
      Parameters:
        InstanceType: t2.micro
        VPCId: !GetAtt VPC.Outputs.VPCId
        SubnetId: !GetAtt PublicSubnet.Outputs.PublicSubnetId
        MyIP: !Ref MyIP
        KeyName: !Ref KeyName

Outputs:
  EC2PublicIP:
    Value: !GetAtt EC2.Outputs.EC2PublicIP
    Description: Public IP of EC2 instance
最後に上位テンプレートの説明です。
入力パラメータとして以下を定義しています。
- キーペア名
- 接続を許可するIPアドレス
- VPC作成テンプレートのURL
- パブリックサブネット作成テンプレートのURL
- EC2インスタンス作成テンプレートのURL
また、テンプレート内でははじめに説明した3つのテンプレートにより作成されるスタックをリソースとして設定しています。その際には本テンプレートの入力パラメータや他のリソースの出力値を適宜入力として渡しています。
最終的にはEC2インスタンスのパブリックIPを出力しています。
スタックの作成
実際のスタックの作成作業は以下のようになります。
- 下位のテンプレートファイル3つをS3にアップロード
- AWS CloudFormationのメニューから上位テンプレートファイルをアップロードする。
- 入力パラメータを入力し、スタックを作成する。
2, 3については前回の記事の手順と同じなので良ければ参考にしてください。
参考:スタックの作成手順
https://qiita.com/tyoshitake/items/c5176c0ef4de8d7cf5d8
終わりに
テンプレート間で値の受け渡しをする方法は今回紹介した方法以外にもあるようです。今後勉強しておきたいと思います。
参考:テンプレート間での値の受け渡し
https://qiita.com/tiibun/items/67aa74cdc17bc0b9812c
