はじめに
作ったゲームを配布したりする際にキーコンフィグが用意されているとユーザーとしては嬉しかったりします。
同時押しが不可能なキーがキーボード事にあるので、その回避策にもなります。
しかし、キーコンフィグを作るのって結構めんどくさかったりします…
そこで今回はSiv3D(Openじゃないほう)でキーコンフィグを実現するためのものを作りました。
ソースコード
- KeyConfig.hpp/cpp
- KeyManager.hpp/cpp
KeyConfig class
KeyConfig.cpp/hppを追加することで使用できます。
KeyConfig classはキーの変更を行うクラスで
- キーボード
- ゲームパッド(DirectInput)
- XInput
に対応しています
サンプルコード
# include <Siv3D.hpp>
# include"KeyConfig.hpp"

void Main()
{
	using namespace s3dkc;

	KeyConfig config;

	Key key;//変更したいキー

	while (System::Update())
	{
		auto state = config.update(key);

		if (state == KeyConfig::State::Normal ||
			state == KeyConfig::State::IsSetting&&System::FrameCount() / 10 % 2 == 0)
			PutText(GetKeyName(key)).at(Window::Center());

		if (state == KeyConfig::State::OnDelete)
		{
			Println(L"キーを消去しました");
		}
		if (state == KeyConfig::State::OnChange)
		{
			Println(L"キーを変更しました");
		}

	}
}
コンストラクタ
KeyConfigはコンストラクタで
- 設定開始の合図になるキー
- キー設定の消去をするためのキー
を与えます。
デフォルトではInput::KeyEnterとInput::KeyDeleteになっています。
KeyConfig::update
引数に渡したキーを変更します。
返り値で現在の状態を取得できます。
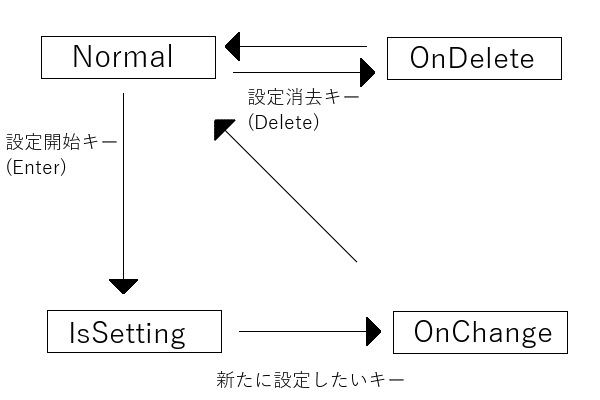
KeyConfig::State
- Normal //通常時
- IsSetting //設定中
- OnChange //設定完了時
- OnDelete //消去時
KeyConfig::isSetting
サンプルソースでは使用していませんが、
状態がIsSettingの時はtrueになり、そうでないときはfalseになります
GetKeyName
Keyの名前を取得できる関数
画面に現在設定されているキーの名前を出すのが大変なので作成
ちなみにOpenSiv3DだとKeyのメンバ関数にあるようです。
KeyManager class
キーコンフィグができるようになったのはいいですが、
ゲーム終了時に設定していたキーをすべて保存して、次の開始時も設定が引き継がれていると嬉しいですね
複数のキーの管理と、キーデータのロード/セーブを行えるのが
KeyManagerです。
KeyManager.hpp/cppを追加することで使用できます。
サンプルコード
# include <Siv3D.hpp>
# include"KeyManager.hpp"

void Main()
{
	using namespace s3dkc;
	KeyManager keys(L"keyconfig.csv");//load()が自動で呼ばれます

	keys.add(L"Jump",   { Input::KeyZ, Input::KeyUp});
	keys.add(L"Attack", { Input::KeyX, Input::KeySpace });

	while (System::Update())
	{
		if (keys[L"Jump"].clicked)
		{
			Println(L"Jump");
		}
		if (keys[L"Attack"].clicked)
		{
			Println(L"Attack");
		}
	}

	keys.save();
}
KeyManager::add
タグと使用できるキーのリストを登録します。
登録成功した場合trueが返り
すでに登録済みのタグだった場合、falseが返ります。(この際キーのリストの更新は行われません)
operator[]に、この時つけたタグでアクセスすることができ、登録したキーのクリック等の判定が行えます。
KeyManager::load
引数を指定した場合、そのパスからキー設定をロードします。
指定がない場合はコンストラクタで指定したパスからロードします。
KeyManager::save
引数を指定した場合、そのパスでキー設定を書き出します。
指定がない場合はコンストラクタで指定したパスで書き出しをします。
KeyManager::getKeys
登録しているKeyを取得します
返り値の型はstd::unordered_map < String, KeyList >で、KeyListはArray<Key>をラップしたものになります。
これらを使って
今紹介した、KeyConfigとKeyManagerを使って実際にキーコンフィグをするclassを作ってみます。
# include"KeyConfig.hpp"
# include"KeyManager.hpp"

class SampleKeyConfig :public s3dkc::KeyManager
{
private:
	Font m_font;
	s3dkc::KeyConfig m_config;
	std::pair<uint32, uint32> m_currentSelect;

	//選択中のタグ取得
	const String getCurrentTag()const
	{
		uint32 i = 0;
		for (auto& elm : this->getKeys())
		{
			if (m_currentSelect.first == i)
			{
				return elm.first;
			}
			++i;
		}
		return L"";
	}
	void select()
	{

		if (Input::KeyUp.clicked)
		{
			if (m_currentSelect.first > 0)
				m_currentSelect.first--;
		}
		else if (Input::KeyDown.clicked)
		{
			if (m_currentSelect.first < this->getKeys().size() - 1)
			{
				m_currentSelect.first++;
			}

		}
		if (Input::KeyLeft.clicked)
		{
			if (m_currentSelect.second > 0)
				m_currentSelect.second--;
		}
		else if (Input::KeyRight.clicked)
		{
			if (m_currentSelect.second < this->getKeys().at(this->getCurrentTag()).size() - 1)
			{
				m_currentSelect.second++;
			}
		}

	}
public:
	SampleKeyConfig(const FilePath& path) :
		KeyManager(path),
		m_currentSelect(0, 0)
	{}


	void update()
	{
		m_config.update((*this)[this->getCurrentTag()][m_currentSelect.second]);

		if (m_config.isSetting())
			return;

		//選択中の場所変更
		this->select();

	}
	void draw()const
	{
		uint32 i = 0;
		for (auto&&elm : this->getKeys())
		{
			m_font(elm.first).drawCenter(100, 100 + i * 50);

			for (uint32 j = 0; j < elm.second.size(); ++j)
			{
				auto& key = elm.second[j];

				//色取得
				Color color = Palette::White;

				bool isSelected = i == m_currentSelect.first&&j == m_currentSelect.second;
				if (isSelected)
				{
					color = Palette::Red;
					if (m_config.isSetting() &&
						System::FrameCount() / 10 % 2 == 0)
					{
						color.a = 0;
					}
				}

				m_font(s3dkc::GetKeyName(key)).drawCenter(200 + j * 100, 100 + i * 50, color);
			}

			++i;
		}
	}
};
void Main()
{
	SampleKeyConfig keyConfig(L"keyconfig.csv");

	keyConfig.add(L"Jump", { Input::KeyZ, Input::KeyUp, Key() });
	keyConfig.add(L"Attack", { Input::KeyX, Input::KeySpace, Key() });


	while (System::Update())
	{

		keyConfig.update();

		if (keyConfig[L"Jump"].clicked)
		{
			Println(L"Jump");
		}
		if (keyConfig[L"Attack"].clicked)
		{
			Println(L"Attack");
		}


		keyConfig.draw();


	}

	keyConfig.save();
}
さいごに
最終的にはゴリおしなコードになってしまいました
現時点ではマウスとスティック入力はコンフィグできないので今後の課題
また、同じキーを指定したときに前設定されていた場所が消去されたりもできてません。
あと、XInputのコントローラーをもってなかったのでもしかするとバグってるかもしれません。
