はじめに
SIGMAはログ分析のためのシグネチャーフォーマットです。ログからサイバー攻撃の形跡を見つけるための検索方法を特定のSIEMなどの環境に依存しない形式で記述できるものです。
この解説が「Software Design」の2024年11月号
に掲載されていました。(P158)
この中で紹介されているハンズオンをGo言語で試してみた時の記録です。
sigma-goパッケージ
Go言語でSIGMAを扱うパケージは2つ見つかりました。今回使ったのはsigma-go
です。
ハンズオン#1 Windows whoami検知
Windowsの環境で
>whoami /priv
というコマンドを実行したことを検知するハンズオンです。
Aurora Liteという商用EDRの無償版で試していますが、これをGO言語のsigma-goで検知してみました。
ログの準備
検知対象のログはWindowsの環境で簡単に作成できます。
sysmonのインストール
まず、プロセスの起動、停止をイベントログに記録するため、sysmonをWindowsにインストールします。
にダウンロード先やインストール方法が記載されいます。
whoamiを実行
sysmonをインストールした後、Powweshellなどで
のように実行します。
ログの確認と保存
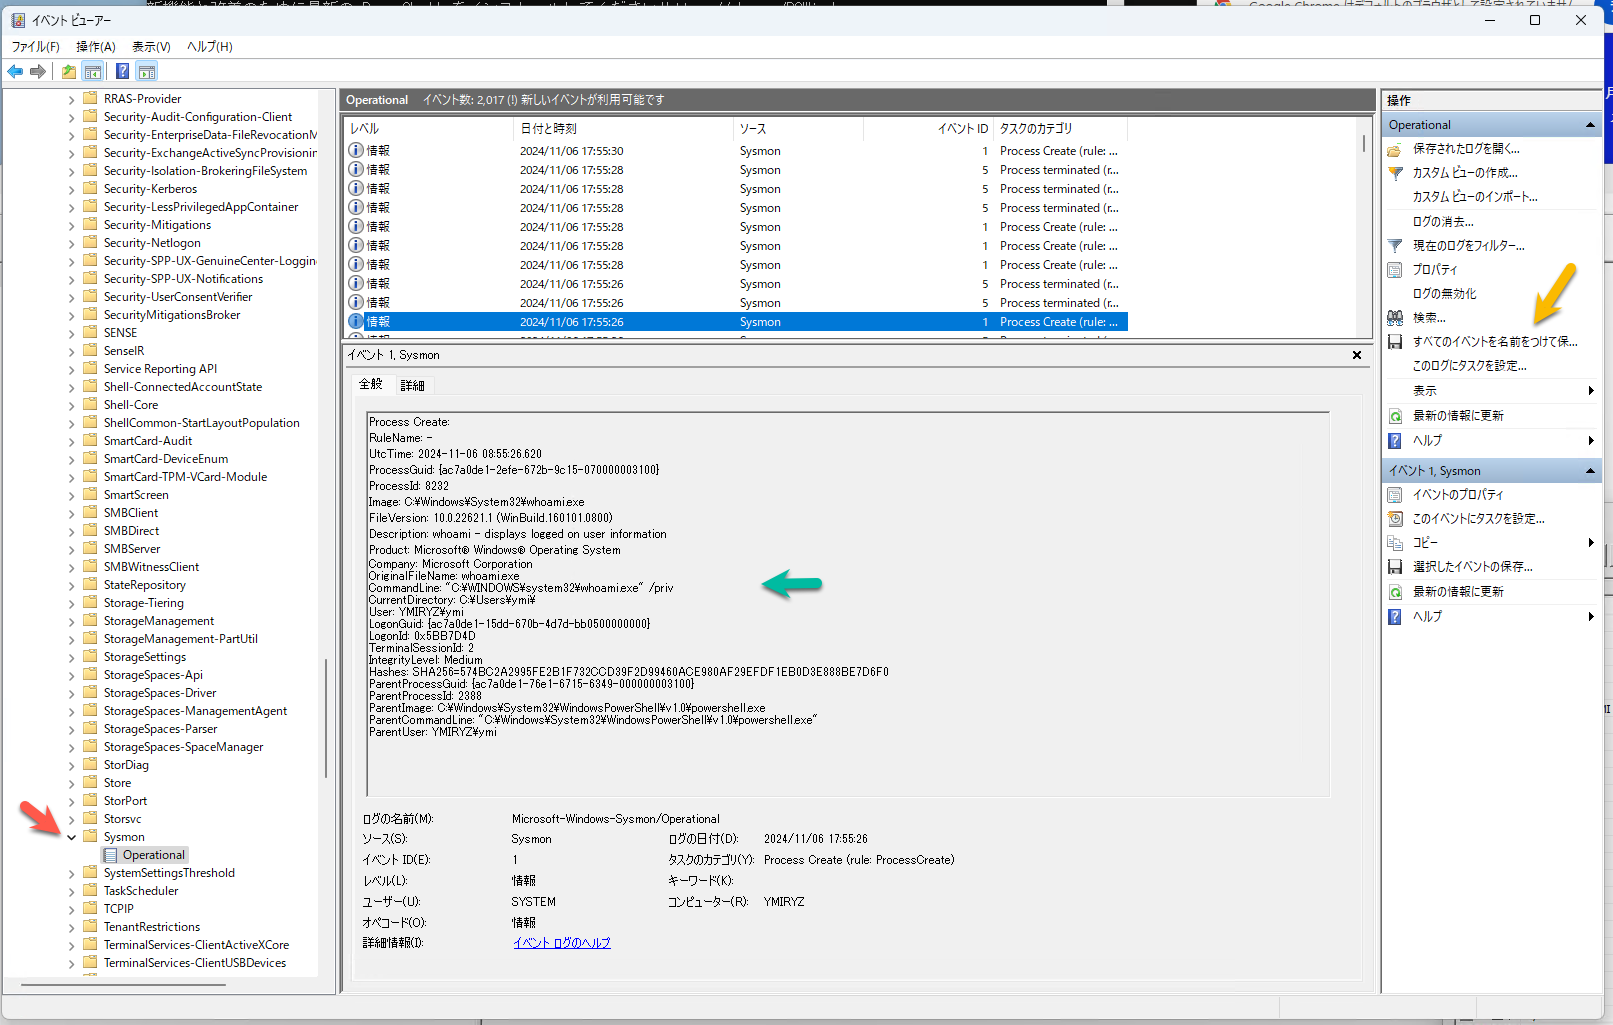
whoamiを実行した後、イベントビューアーでログを確認します。
ログは、Applications and Services Logs/Microsoft/Windows/Sysmon/Operational にあります。(赤の矢印)
whoamiを検索すれば、ログが見つかるはずです。見つけたら「すべてのログを名前をつけて保存」を実行します。
sysmon.evtxなどです。これが、対象のログです。
SIGMAルール
ルールは、
のrulesのディレクトリからダウンロードできます。
rules/proc_creation_win_whoami_priv_discovery.yml
です。
このルールのままではsigma-goでエラーになったので少し変更しました。
title: Security Privileges Enumeration Via Whoami.EXE
id: 97a80ec7-0e2f-4d05-9ef4-65760e634f6b
status: test
description: Detects a whoami.exe executed with the /priv command line flag instructing the tool to show all current user privileges. This is often used after a privilege escalation attempt.
references:
    - https://learn.microsoft.com/en-us/windows-server/administration/windows-commands/whoami
author: Florian Roth (Nextron Systems)
date: 2021-05-05
modified: 2023-02-28
tags:
    - attack.privilege-escalation
    - attack.discovery
    - attack.t1033
logsource:
    category: process_creation
    product: windows
detection:
    selection_img:
        Image|endswith: '\whoami.exe'
    selection_cli:
        CommandLine|contains:
            - ' /priv'
            - ' -priv'
    condition: all of selection_*
falsepositives:
    - Unknown
level: high
変更したのは
detection:
    selection_img:
-        - Image|endswith: '\whoami.exe'
-        - OriginalFileName: 'whoami.exe'
+        Image|endswith: '\whoami.exe'
です。
-で始まる配列の中にキーバリュー(マップ)を書くとsigma-goが認識できないためです。ロジックを工夫すれば、同じ条件で書き換えできます。OriginalFileNameというのが不要なので削除しました。
検知プログラム
package main

import (
	"context"
	"encoding/json"
	"fmt"
	"log"
	"os"

	"github.com/0xrawsec/golang-evtx/evtx"

	"github.com/bradleyjkemp/sigma-go"
	"github.com/bradleyjkemp/sigma-go/evaluator"
)

func main() {
	//  ルールを読み込む
	c, err := os.ReadFile("./rules/proc_creation_win_whoami_priv_discovery.yml")
	if err != nil {
		log.Fatalln(err)
	}
	r, err := sigma.ParseRule(c)
	if err != nil {
		log.Fatalln(err)
	}
	ev := evaluator.ForRule(r, evaluator.WithConfig(sigma.Config{
		FieldMappings: map[string]sigma.FieldMapping{
			"Image":             {TargetNames: []string{"$.Event.EventData.Image"}},
			"CommandLine":       {TargetNames: []string{"$.Event.EventData.CommandLine"}},
			"ParentProcessName": {TargetNames: []string{"$.Event.EventData.ParentProcessName"}},
			"NewProcessName":    {TargetNames: []string{"$.Event.EventData.NewProcessName"}},
		},
	}))
	evtx.SetDebug(true)
	// イベントログを読み込む
	ef, err := evtx.OpenDirty("./testdata/sysmon.evtx")
	if err != nil {
		log.Fatalln(err)
	}
	for e := range ef.FastEvents() {
		if e == nil {
			break
		}
		// sigma-goで扱いやすいデータ形式に変換
		var je interface{}
		err := json.Unmarshal(evtx.ToJSON(e), &je)
		if err != nil {
			log.Fatalln(err)
		}
		r, err := ev.Matches(context.Background(), je)
		if err != nil {
			log.Fatalln(err)
		}
		if r.Match {
			// 見つけたログを出力
			fmt.Printf("%+v: %s\n", r, string(evtx.ToJSON(e)))
		}
	}
}
evtxを読むためには、
のパッケージを使っています。
フィールド名を変換するために
	ev := evaluator.ForRule(r, evaluator.WithConfig(sigma.Config{
		FieldMappings: map[string]sigma.FieldMapping{
			"Image":             {TargetNames: []string{"$.Event.EventData.Image"}},
			"CommandLine":       {TargetNames: []string{"$.Event.EventData.CommandLine"}},
			"ParentProcessName": {TargetNames: []string{"$.Event.EventData.ParentProcessName"}},
			"NewProcessName":    {TargetNames: []string{"$.Event.EventData.NewProcessName"}},
		},
	}))
の部分でフィールドマッピングを設定しています。
Imageは、JSONPATJでEvent.EventData.Imageのところにあるという意味で、階層化された
データでも扱えます。
		// sigma-goで扱いやすいデータ形式に変換
		var je interface{}
		err := json.Unmarshal(evtx.ToJSON(e), &je)
		if err != nil {
			log.Fatalln(err)
		}
		r, err := ev.Matches(context.Background(), je)
の部分は、データ形式を変換する裏技です。もっと良い方法があるかもしれませんが、
単純に型変換するとエラーになったので、この方法にしています。
実行結果
$ go run main.go
{Match:true SearchResults:map[selection_cli:true selection_img:true] ConditionResults:[true]}: {"Event":{"EventData":{"CommandLine":"\"C:\\WINDOWS\\system32\\whoami.exe\" /priv","Company":"Microsoft Corporation","CurrentDirectory":"C:\\Users\\ymi\\","Description":"whoami - displays logged on user information","FileVersion":"10.0.22621.1 (WinBuild.160101.0800)","Hashes":"SHA256=574BC2A2995FE2B1F732CCD39F2D99460ACE980AF29EFDF1EB0D3E888BE7D6F0","Image":"C:\\Windows\\System32\\whoami.exe","IntegrityLevel":"Medium","LogonGuid":"AC7A0DE1-15DD-670B-4D7D-BB0500000000","LogonId":"0x05bb7d4d","OriginalFileName":"whoami.exe","ParentCommandLine":"\"C:\\Windows\\System32\\WindowsPowerShell\\v1.0\\powershell.exe\" ","ParentImage":"C:\\Windows\\System32\\WindowsPowerShell\\v1.0\\powershell.exe","ParentProcessGuid":"AC7A0DE1-76E1-6715-6349-000000003100","ParentProcessId":"2388","ParentUser":"YMIRYZ\\ymi","ProcessGuid":"AC7A0DE1-2EA0-672B-1C15-070000003100","ProcessId":"4516","Product":"Microsoft® Windows® Operating System","RuleName":"-","TerminalSessionId":"2","User":"YMIRYZ\\ymi","UtcTime":"2024-11-06 08:53:52.063"},"System":{"Channel":"Microsoft-Windows-Sysmon/Operational","Computer":"YMIRYZ","Correlation":{},"EventID":"1","EventRecordID":"1739","Execution":{"ProcessID":"15836","ThreadID":"17760"},"Keywords":"0x8000000000000000","Level":"4","Opcode":"0","Provider":{"Guid":"5770385F-C22A-43E0-BF4C-06F5698FFBD9","Name":"Microsoft-Windows-Sysmon"},"Security":{"UserID":"S-1-5-18"},"Task":"1","TimeCreated":{"SystemTime":"2024-11-06T08:53:52.0892215Z"},"Version":"5"}}}
のように検知できました。
ハンズオン#2 :攻撃ログの分析
記事ではWMIを悪用した攻撃をChainsawというツールで検知する方法を紹介していますが、Go言語のsigma-goで試してみました。
ログの準備
こちらは、Windows環境で実際に再現するのは難しいので、
からダウンロードできます。
evtx/sliver-security.evtx
です。
SIGMAルール
title: Suspicius Cmd Execution via WMI
description: Detects suspicious command execution via Windows Management Instrumentation(WMI)
logsource:
  category: presess_creation
  product: windows
detection:
  selection1:
    ParentProcessName|contains: 'WmiPrvSE.exe'
  selection2:
    NewProcessName|contains:
      - 'rundll32.exe'
      - 'msbuild.exe'
      - 'powershell.exe'
      - 'cmd.exe'
      - 'mshta.exe'
  condition: selection1 and selection2
level: critical
このルールもsigma-goの制約(配列の下は文字列)に合わせるため書き換えています。
検知コード
検知コードは、ハンズオン#1とまったく同じで、読み込むファイル名だけ変更しました。
func main() {
	//  ルールを読み込む
-	c, err := os.ReadFile("./rules/proc_creation_win_whoami_priv_discovery.yml")
+	c, err := os.ReadFile("./rules/hanson2.yml")
	if err != nil {
		log.Fatalln(err)
	}
|
  evtx.SetDebug(true)
	// イベントログを読み込む
-	ef, err := evtx.OpenDirty("./testdata/sysmon.evtx")
+	ef, err := evtx.OpenDirty("./testdata/sliver-security.evtx")
	if err != nil {
実行結果
$ go run main.go h2
{Match:true SearchResults:map[selection1:true selection2:true] ConditionResults:[true]}: {"Event":{"EventData":{"CommandLine":"cmd.exe /Q /c cd \\ 1\u003e \\\\127.0.0.1\\ADMIN$\\__1684434503.6905713 2\u003e\u00261","MandatoryLabel":"S-1-16-12288","NewProcessId":"0x00002d80","NewProcessName":"C:\\Windows\\System32\\cmd.exe","ParentProcessName":"C:\\Windows\\System32\\wbem\\WmiPrvSE.exe","ProcessId":"0x00000e4c","SubjectDomainName":"GALACTICA","SubjectLogonId":"0x000003e4","SubjectUserName":"VALKYRIE$","SubjectUserSid":"S-1-5-20","TargetDomainName":"VALKYRIE","TargetLogonId":"0x03e2f5f3","TargetUserName":"fgaeta","TargetUserSid":"S-1-0-0","TokenElevationType":"%%1936"},"System":{"Channel":"Security","Computer":"VALKYRIE.galactica.cc","Correlation":{},"EventID":"4688","EventRecordID":"245081","Execution":{"ProcessID":"4","ThreadID":"5912"},"Keywords":"0x8020000000000000","Level":"0","Opcode":"0","Provider":{"Guid":"54849625-5478-4994-A5BA-3E3B0328C30D","Name":"Microsoft-Windows-Security-Auditing"},"Security":{},"Task":"13312","TimeCreated":{"SystemTime":"2023-05-18T18:28:24.1090439Z"},"Version":"2"}}}
検知できたようです。
デモ#1: ネットワークログ(zeek)の分析
zeekのログから外部ネットワークとの通信を検知するデモです。記事ではElastic Stackを使っていますが、Go言語のsigma-goで試してみました。
ログの準備
ログは、
からダウンロードできます。
https://github.com/brimdata/zed-sample-data/blob/main/zeek-json/conn.json.gz
のファイルです。
SIGMAルール
検知するためのルールは、
title: Public Accesible IP Addaree
status: test
description: Detects connections from external IPs
logsource:
  product: zeek
detection:
  selection:
    id.orig_h|cidr:
      - '10.0.0.0/8'
      - '172.16.0.0/12'
      - '192.168.0.0/16'
  condition: not selection
level: high
です。
このcidrというキーは、IPアドレスの範囲を指定するものです。
sigma-goのソースコードを読んで対応しているのを確認しました。
他のsigmaパッケージは対応していませんでした。
検知プログラム
package main

import (
	"bufio"
	"context"
	"encoding/json"
	"fmt"
	"log"
	"os"

	"github.com/bradleyjkemp/sigma-go"
	"github.com/bradleyjkemp/sigma-go/evaluator"
)

func main() {
	c, err := os.ReadFile("./rules/zeek.yml")
	if err != nil {
		log.Fatalln(err)
	}
	r, err := sigma.ParseRule(c)
	if err != nil {
		log.Fatalln(err)
	}
	e := evaluator.ForRule(r)
	fp, err := os.Open("./testdata/conn.json")
	if err != nil {
		log.Fatalln(err)
	}
	defer fp.Close()
	scanner := bufio.NewScanner(fp)
	for scanner.Scan() {
		l := scanner.Text()
		var i map[string]interface{}
		err := json.Unmarshal([]byte(l), &i)
		if err != nil {
			log.Fatalln(err)
		}
		ret, err := e.Matches(context.Background(), i)
		if err != nil {
			log.Fatalln(err)
		}
		if ret.Match {
			log.Printf("ret=%v l=%s", ret, l)
		}
	}
}
evtxではなくJSONのログなので、1行ずつ読み込で処理しています。
実行結果
$ go run main.go
2024/11/08 06:05:01 ret={true map[selection:false] [true]} l={"_path":"conn","_write_ts":"2018-03-24T17:18:11.352693Z","ts":"2018-03-24T17:17:02.350685Z","uid":"C02MQ23wnJMnNy7p3i","id.orig_h":"134.71.1.17","id.orig_p":3,"id.resp_h":"10.47.22.25","id.resp_p":1,"proto":"icmp","duration":8.9999520778656,"orig_bytes":112,"resp_bytes":0,"conn_state":"OTH","local_orig":false,"local_resp":true,"missed_bytes":0,"orig_pkts":4,"orig_ip_bytes":224,"resp_pkts":0,"resp_ip_bytes":0}
検知できました。
余談
sigma-goを使っていろいろ検知する方法を習得したので、このパッケージを使って
や
のTWSNMPシリーズにSIGMAによるログ検知機能をつけようと思っています。

