概略
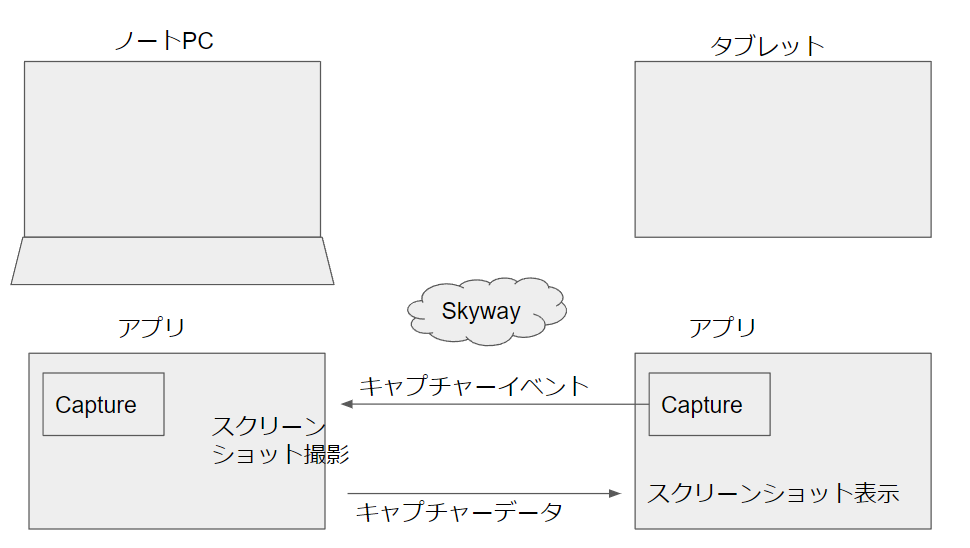
Skywayを使ってノートPCのスクリーンショットをタブレットに表示するアプリを作ります。
サーバーを使わずにWebview2を利用し、javascriptでSkywayを動作させ、データ通信部分を利用してスクリーンショットを送信します。送信側、受信側アプリは同じものを使います。
PC上で問題集の電子書籍を使っていると問題と解答のページが違うため見比べながらの勉強が面倒でタブレットで問題を見てメモしながらPC上で解答を見て確認するような使い方ができないか?というところが始まりです。スクリーンショットにメモ書き等の機能を追加すれば、また使いやすくなると思います。
簡単な仕組み
開発環境・利用しているもの
- Visual Studio(C#・WPF・javascript)
- Webview2
- 新しいSkyway
SkeywayのアプリケーションIDとシークレットキーの取得
下記に記載されてる方法でSkywayのアプリケーションIDとシークレットキーを取得してソフトに組み込む必要があります。
Visual Studioのプロジェクト作成
C#のWPFアプリ(.NET Framework)でプロジェクトを新規作成します。
NuGetパッケージの管理からWebView2を選択し、インストールします。
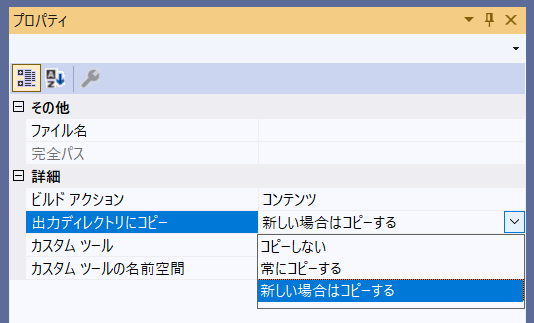
プロジェクト上に新規にwebviewフォルダを作成し、その中にindex.html、index.jsを作成しますが、そのままでは実行形式に入らないため、index.html、index.jsのプロパティで出力ディレクトリにコピーするよう修正します。

ソースコード
WPFのウィンドウ構成はWebView2を配置するのみです。
<Window
        xmlns="http://schemas.microsoft.com/winfx/2006/xaml/presentation"
        xmlns:x="http://schemas.microsoft.com/winfx/2006/xaml"
        xmlns:d="http://schemas.microsoft.com/expression/blend/2008"
        xmlns:mc="http://schemas.openxmlformats.org/markup-compatibility/2006"
        xmlns:local="clr-namespace:SkywayShot"
        xmlns:Wpf="clr-namespace:Microsoft.Web.WebView2.Wpf;assembly=Microsoft.Web.WebView2.Wpf" x:Class="SkywayShot.MainWindow"
        mc:Ignorable="d"
        Title="MainWindow" Height="450" Width="800">
    <Grid>
        <Wpf:WebView2 Name="webview"/>
    </Grid>
</Window>
C#でスクリーンキャプチャーを取得してBASE64に変換し、javascript側へ送ります。
FHDのスクリーンショットを送るとなぜか2回目以降の送信ができなくなるため、Heightを小さめにしています。データサイズのような気がしますが、何かお気づきの点がありましたら教えてくださいませ。
using Microsoft.Web.WebView2.Core;
using System;
using System.Drawing;
using System.IO;
using System.Windows;
using System.Windows.Forms;

namespace SkywayShot
{
    public partial class MainWindow : Window
    {
        public MainWindow()
        {
            InitializeComponent();

            webview.Loaded += Webview_Loaded;
            webview.NavigationCompleted += Webview_NavigationCompleted;
        }

        private async void Webview_Loaded(object sender, RoutedEventArgs e)
        {
            await webview.EnsureCoreWebView2Async();
            webview.CoreWebView2.SetVirtualHostNameToFolderMapping("skyway.example", "webview", CoreWebView2HostResourceAccessKind.Allow);

            var uri = new Uri("https://skyway.example/index.html");
            webview.CoreWebView2.Navigate(uri.AbsoluteUri);
        }
        public void Webview_NavigationCompleted(object sender, CoreWebView2NavigationCompletedEventArgs args)
        {
            webview.CoreWebView2.WebMessageReceived += MessageReceived;
        }
        private void MessageReceived(object sender, CoreWebView2WebMessageReceivedEventArgs args)
        {
            string cmd = args.TryGetWebMessageAsString();
            Console.WriteLine("received: " + cmd);

            switch (cmd)
            {
                case "capture":
                    CaptureScreen();
                    break;
            }

        }

        private void CaptureScreen()
        {
            int width = Screen.PrimaryScreen.Bounds.Width;
            int height = Screen.PrimaryScreen.Bounds.Height * 5 / 6;
                                                         //ここを消すと1回しかキャプチャできない(ファイルサイズ?)
            Bitmap bmp = new Bitmap(width, height, System.Drawing.Imaging.PixelFormat.Format32bppRgb);
            Graphics g = Graphics.FromImage(bmp);

            g.CopyFromScreen(0, 0, 0, 0, bmp.Size, CopyPixelOperation.SourceCopy);
            //string file = @".\screen.jpg";
            //bmp.Save(file, System.Drawing.Imaging.ImageFormat.Jpeg);

            string b64;
            using (MemoryStream ms = new MemoryStream())
            {
                bmp.Save(ms, System.Drawing.Imaging.ImageFormat.Jpeg);
                byte[] bites = ms.ToArray();
                b64 = Convert.ToBase64String(bites);
            }
            Dispatcher.Invoke((Action)(() =>
            {
                var cmd = @"{""cmd"":""screenshot"", ""base64"": """ + b64 + @"""}";
                webview.CoreWebView2?.PostWebMessageAsJson(cmd);
            }));
            g.Dispose();
        }

    }
}
HTMLファイルはキャプチャーボタンと、送られてきたスクリーンショットを表示する<img>を配置しておきます。
<!DOCTYPE html>
<html>
<head>
    <meta charset="UTF-8" />
    <meta name="viewport" content="width=device-width" />
    <title>SkyWayShot</title>
</head>
<body>
    <script src="https://cdn.jsdelivr.net/npm/@skyway-sdk/room/dist/skyway_room-latest.js"></script>

    <img id="captureimg" style="width:95%;">
    <button id="capture">capture</button>
    <script src="index.js"></script>
</body>
</html>
index.jsでSkywayを使ってP2Pの通信を行います。
アプリケーションID、シークレットキーは取得したものに差し替えてください。
ROOM名は決め打ちにしています。
const { nowInSec, SkyWayAuthToken, SkyWayContext, SkyWayRoom, SkyWayStreamFactory, uuidV4 } = skyway_room;

const appId = 'アプリケーションID';
const secret = 'シークレットキー';

const token = new SkyWayAuthToken({
    jti: uuidV4(),
    iat: nowInSec(),
    exp: nowInSec() + 60 * 60 * 24,
    scope: {
        app: {
            id: appId,
            turn: true,
            actions: ['read'],
            channels: [
                {
                    id: '*',
                    name: '*',
                    actions: ['write'],
                    members: [
                        {
                            id: '*',
                            name: '*',
                            actions: ['write'],
                            publication: {
                                actions: ['write'],
                            },
                            subscription: {
                                actions: ['write'],
                            },
                        },
                    ],
                },
            ],
        },
    },
}).encode(secret);

(async () => {
    const datastream = await SkyWayStreamFactory.createDataStream();
    const context = await SkyWayContext.Create(token);
    const room = await SkyWayRoom.FindOrCreate(context, {
        type: 'p2p',
        name: 'skywayshotroom'
    });
    const me = await room.join();
    await me.publish(datastream);

    const subscribeAndAttach = async (publication) => {
        if (publication.publisher.id === me.id) return;

        const { stream } = await me.subscribe(publication.id);

        switch (stream.contentType) {
            case 'data': {
                stream.onData.add((data) => {
                    console.log(data);
                    switch (data.cmd) {
                        case 'screenshot':
                            var base64 = data.base64
                            var capimg = document.getElementById('captureimg');
                            capimg.src = "data:image/jpeg;base64," + base64;
                            break;
                        case 'capture':
                            window.chrome.webview.postMessage("capture");
                            break;
                    }
                });
            }
            default:
                return;
        }
    };

    room.publications.forEach(subscribeAndAttach);
    room.onStreamPublished.add((e) => subscribeAndAttach(e.publication));
    room.onClosed.add((event) => {
        console.log(event);
    });

    const captureButton = document.getElementById('capture');
    captureButton.onclick = async () => {
        let cmd = {cmd: 'capture'};
        datastream.write(cmd);
    };

    window.chrome.webview.addEventListener("message", function (e) {
        switch (e.data.cmd) {
            case 'screenshot':
                datastream.write(e.data);
                break;
        }
    });

})();
以上です。
最後に
上記で作成したアプリをノートPC、タブレットの両方で起動し、タブレット側でキャプチャーボタンを押すことでノートPCのスクリーンショットをタブレットに表示することができます。ボタンを押すごとにキャプチャーされますが、スクリーンショットにペンでメモを書き込み、メモが保存されるともっと使いやすくなると思います。
参考文献

