画像を合成したジェネラティブNFTの画像を作るためのツールとしてHashLipsを使ってみました。
READMEを読めばOKと言ったところですが、やってみたことをまとめてみます。
環境
- WSL2 Ubuntu 20.04
HashLips Art Engineをfork
hashlips_art_engineのリポジトリをforkして使いました。
fork先は、
https://github.com/two-pack/hashlips_art_engine
です。作成したサンプルは example_stick_figure ブランチにコミットしています。1
サンプルを動かす
とりあえず、元々リポジトリに入っているサンプルを動かしてみようとして、以下のエラーになりました。
Node.jsのバージョンが18.16.0で行っていたのですが、16.20.0にしたらエラーが解消しました。
$ node -v
v18.16.0
$ yarn install
yarn install v1.22.5
warning package-lock.json found. Your project contains lock files generated by tools other than Yarn. It is advised not to mix package managers in order to avoid resolution inconsistencies caused by unsynchronized lock files. To clear this warning, remove package-lock.json.
[1/4] Resolving packages...
[2/4] Fetching packages...
[3/4] Linking dependencies...
[4/4] Building fresh packages...
error /xxxxxxxxx/hashlips_art_engine/node_modules/canvas: Command failed.
Exit code: 1
<snip>
Package pangocairo was not found in the pkg-config search path.
Perhaps you should add the directory containing `pangocairo.pc'
to the PKG_CONFIG_PATH environment variable
No package 'pangocairo' found
<snip>
info Visit https://yarnpkg.com/en/docs/cli/install for documentation about this command.
$ n 16.20.0
     copying : node/16.20.0
   installed : v16.20.0 (with npm 8.19.4)
$ yarn install
yarn install v1.22.5
warning package-lock.json found. Your project contains lock files generated by tools other than Yarn. It is advised not to mix package managers in order to avoid resolution inconsistencies caused by unsynchronized lock files. To clear this warning, remove package-lock.json.
[1/4] Resolving packages...
[2/4] Fetching packages...
[3/4] Linking dependencies...
[4/4] Building fresh packages...
Done in 4.01s.
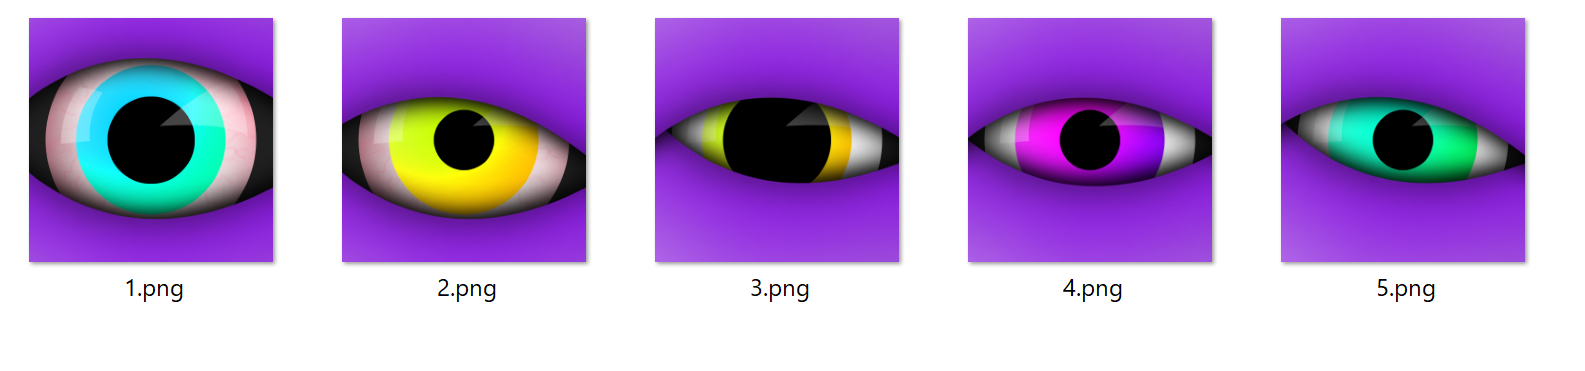
インストールできたらbuildスクリプトでサンプルの画像を生成してみます。
$ yarn build
yarn run v1.22.5
$ node index.js
Created edition: 1, with DNA: 091d1c319c862444e4a361144387ba5d73f6c64d
Created edition: 2, with DNA: 59ed9aa1f8dba18e866485aeda070367f75a8c6f
Created edition: 3, with DNA: dc5a0fac249210c035a6dccd4097fe8514a02d91
Created edition: 4, with DNA: af161f9867c4637db787cee2b434c581a657de98
Created edition: 5, with DNA: 1e7cf568fe568edc2238426a8a67cf0e7c343017
Done in 0.87s.
build/images に画像が生成されます。
build/json にメタデータが出力されます。
1.json のように、画像ごとのメタデータも出力されます。
{
  "name": "Your Collection #1",
  "description": "Remember to replace this description",
  "image": "ipfs://NewUriToReplace/1.png",
  "dna": "091d1c319c862444e4a361144387ba5d73f6c64d",
  "edition": 1,
  "date": 1686485821428,
  "attributes": [
    {
      "trait_type": "Background",
      "value": "Black"
    },
    {
      "trait_type": "Eyeball",
      "value": "Red"
    },
    {
      "trait_type": "Eye color",
      "value": "Cyan"
    },
    {
      "trait_type": "Iris",
      "value": "Medium"
    },
    {
      "trait_type": "Shine",
      "value": "Shapes"
    },
    {
      "trait_type": "Bottom lid",
      "value": "Low"
    },
    {
      "trait_type": "Top lid",
      "value": "High"
    }
  ],
  "compiler": "HashLips Art Engine"
}
また、 build/json/_metadata.json には生成した画像全てのメタデータがリストで出力されます。
生成された画像の元データは、 layers/ に置かれた画像が元になっています。
以降、この中身などを変更していきます。
画像の登録
元となる画像は、以下のルールで登録します。
- レイヤーごとにフォルダを分けます。 フォルダ名がメタデータの属性タイプ(trait_type) になります。
- 画像ファイルは、 ファイル名は<属性値>#<重み付け>.png というルールになります。 2
属性値(value)の部分がメタデータに出力されます。
画像ファイルはレイヤーごとに重なることになるので、背景は透過する必要があります。
今回は例として棒人間の画像を作ることとしました。
頭、体、右腕、左腕、右足、左足のレイヤーごとに赤、青、黄のパーツ画像を作りました。
作った画像は、 layers/ にレイヤーごとに配置します。
この際、重み付けをファイル名に付与します。これで生成時の割合が変化します。 3
/xxxxxxxxx/hashlips_art_engine/layers
|--Body
|  |--Blue#5.png
|  |--Red#15.png
|  |--Yellow#30.png
|--Head
|  |--Blue#30.png
|  |--Red#15.png
|  |--Yellow#5.png
|--Left Arm
|  |--Blue#30.png
|  |--Red#3.png
|  |--Yellow#17.png
|--Left Leg
|  |--Blue#20.png
|  |--Red#20.png
|  |--Yellow#10.png
|--Right Arm
|  |--Blue#3.png
|  |--Red#25.png
|  |--Yellow#22.png
|--Right Leg
|  |--Blue#1.png
|  |--Red#20.png
|  |--Yellow#29.png
最後に、 src/config.json でレイヤーの設定を行います。
layerConfigurations の layersOrder に作成したレイヤーを列挙します。列挙した順番が画像での重なる順番になります。
growEditionSizeTo は、生成する画像の数を指定します。今回は50とします。
では、生成してみましょう。
$ yarn build
yarn run v1.22.5
$ node index.js
(node:2321) [DEP0147] DeprecationWarning: In future versions of Node.js, fs.rmdir(path, { recursive: true }) will be removed. Use fs.rm(path, { recursive: true }) instead
(Use `node --trace-deprecation ...` to show where the warning was created)
Created edition: 1, with DNA: da8aeb7830b5344b96ca23e8d818770965ea602d
Created edition: 2, with DNA: 01e2b3a793fae036bfedd82909dbaa0820aae46b
Created edition: 3, with DNA: 93f7cecb9fdf2966426ca53373f939f1af04fcaf
<snip>
Created edition: 20, with DNA: 56849aff7fe25b9a6d6c4f07daf5d00f2dd8a465
DNA exists!
Created edition: 21, with DNA: 2a2e29a36e1d69c9e35aa8b2b61ccdb83dd0935d
Created edition: 22, with DNA: eb57a162380baab9c2b3b16e1d41359c3099bf5f
Created edition: 23, with DNA: e3ed7ab316dcf1702af63da099486764ef8bbcfb
Created edition: 24, with DNA: 3b021a18c8145dff885bd6b2842a4b6e950bbaf0
DNA exists!
<snip>
DNA exists!
Created edition: 50, with DNA: eb3b63e821ee4498c9acb56540207dad85fa8fad
Done in 1.36s.
DNAは画像の固有値で、同じ画像が生成されないようにしているようです。
生成したものが同じと判断されると、 DNA exists! となってスキップされています。
こんな感じの結果になりました。デフォルトで background の指定がtrueになっているため、背景色もついています。
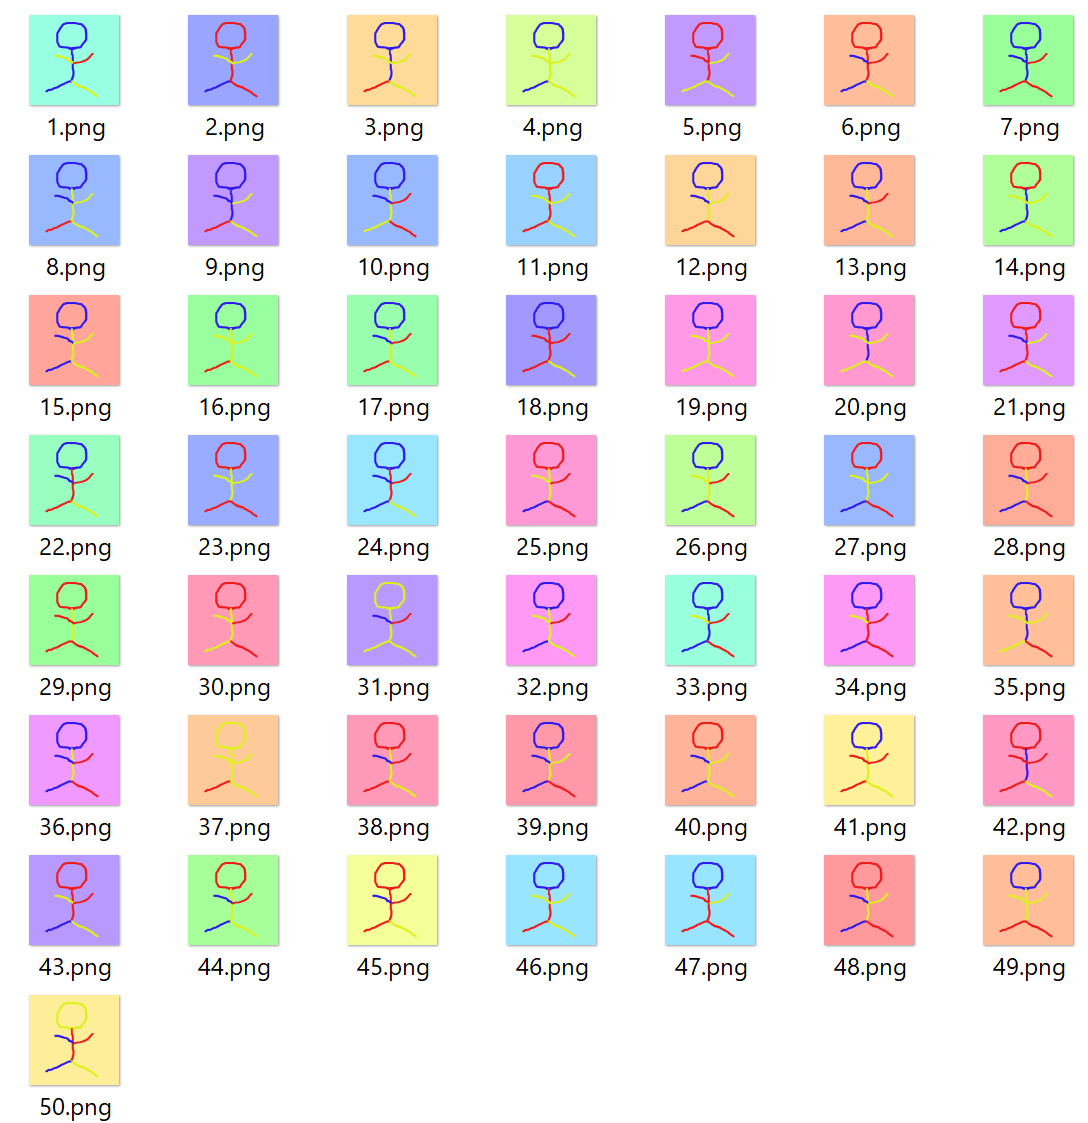
24.pngを例に見てみると layersOrder で指定した通り、
Head > Body > Left Arm > Left Leg > Right Arm > Right Leg
の順番で重なっていることがわかります。
重み付けの結果の確認
重み付けの結果、生成された画像で各レイヤーのファイルが実際にどの程度使われたかを確認する rarity スクリプトが用意されています。
上の結果で実行したのが以下になります。およそ近い数で生成されていることがわかります。2
$ yarn rarity
yarn run v1.22.5
$ node utils/rarity.js
Trait type: Head
{
  trait: 'Blue',
  weight: '30',
  occurrence: '28 in 50 editions (56.00 %)'
}
{
  trait: 'Red',
  weight: '15',
  occurrence: '19 in 50 editions (38.00 %)'
}
{
  trait: 'Yellow',
  weight: '5',
  occurrence: '3 in 50 editions (6.00 %)'
}

<snip>

Trait type: Right Leg
{ trait: 'Blue', weight: '1', occurrence: '0 in 50 editions (0.00 %)' }
{
  trait: 'Red',
  weight: '20',
  occurrence: '19 in 50 editions (38.00 %)'
}
{
  trait: 'Yellow',
  weight: '29',
  occurrence: '31 in 50 editions (62.00 %)'
}

Done in 0.17s.
最後に
こんな感じで画像を用意するだけで簡単に画像を合成したジェネラティブNFTの画像を作ることができました。
もっと細かい設定もできるようなので、実際に使う際には README を参考にしてもらえたらと思います。