始めに
最近MEANスタックの学習をしており、Angularのチュートリアルにある「Tour of Heroes」を一通りこなしました。
Express サーバも、それ自体は構築できたのですがAngularと連携させようとすると途端に難しかったため、記事にして残しておこうと思います。
「Tour of Heroes」をAngularのサイトからダウンロードする所から始めたいと思います。
開発環境
開発環境を統一しておくことは重要だと思います。
私はWindows10でVisual Studio Codeを使用しています。
コマンドはWindowsのコマンドプロンプトから行います。
Node.js
Node.js はこちらからダウンロードします。
私は V12.16.3 を使用しました。
Visual Studio Code
エディタは何でも良いのですが、Visual Studio Codeはこちらからダウンロードします。
開発ディレクトリの用意
開発用のトップレベルディレクトリを用意します。
ここでは仮に D:\angular\ としました。
Tour of Heroesのダウンロード
Tour of HeroesをAngularのチュートリアルから順に構築できるのですが、その解説は本家に譲る事とします。
ここからダウンロードできるのでこれを使います。
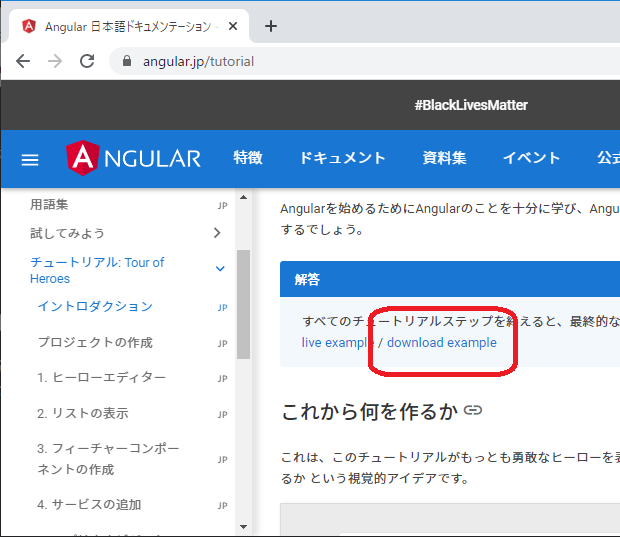
ダウンロードしたファイル toh-pt6.zip を D:\angular\ に解凍します。
D:\angular\toh-pt6 というディレクトリが出来、その下に解凍したファイルなどが展開されています。
Tour of Heroesの実行
Windows のコマンドプロンプトを開き、D:\angular\toh-pt6 に移動します。
以下のコマンドで必要なパッケージをインストールします。
D:\angular\toh-pt6>npm install
D:\angular\toh-pt6\package.json に記述されている必要なパッケージがインストールされます。
次に以下のコマンドを打って Angular の Tour of Heroes を起動します。
D:\angular\toh-pt6>ng serve --open
ブラウザでこの様に Tour of Heroes のページが開ければ成功です。

Ctrl+C で一旦終了します。
Anguler の修正
VisualStudioCode で D:\angular\toh-pt6\ を開きます。
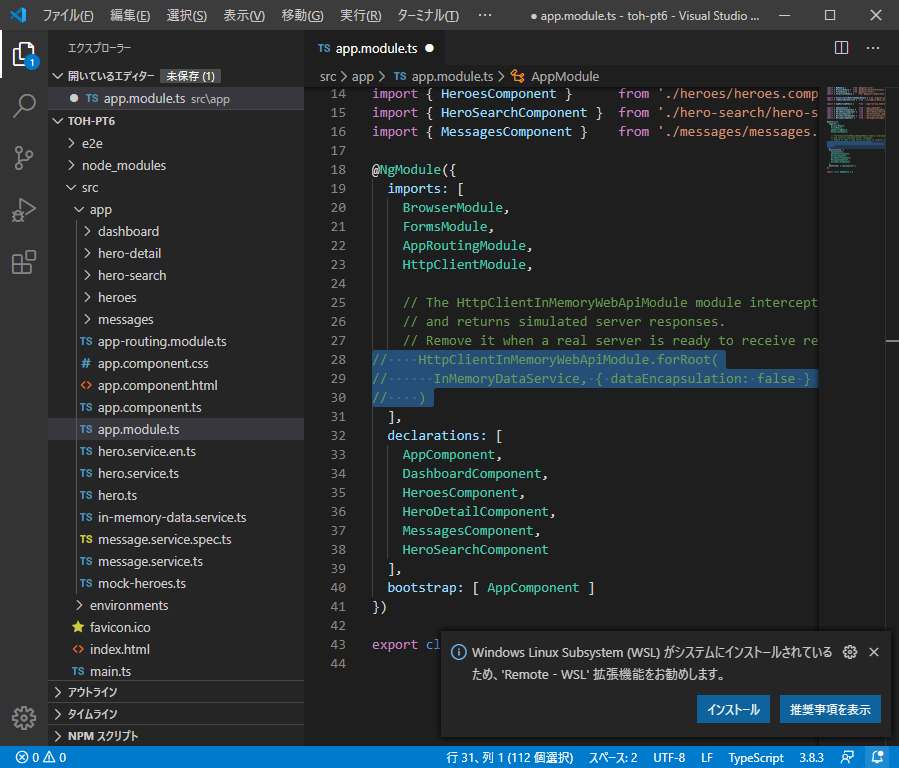
この様に src\app\app.module.ts にある以下3行分をコメントアウトします。
//    HttpClientInMemoryWebApiModule.forRoot(
//      InMemoryDataService, { dataEncapsulation: false }
//    )
これで Tour of Heroes のチュートリアルで説明されていたインメモリWeb APIを除外します。
このファイルの6-7行目の import 文も不要ですのでコメントアウトして構いません。
proxy 設定
この後構築する Express のサーバと Angular で異なるポート番号を使用します。
これを正しく処理させるために Angular 側にプロクシ設定をしておきます。
src/proxy.conf.json というファイルを追加します。
{
    "/api/heroes": {
      "target": "http://localhost:3000",
      "secure": false,
      "pathRewrite": {"^/api/": ""}
    },
    "logLevel": "debug"
  }
内容はこんな感じ。
次に、追加した json ファイルを Angular に認識させます。
プロジェクトのトップレベルにある angular.jsonファイルを開きます。
{
...
  "projects": {
...
    "angular.io-example": {
...
      "architect": {
...
        "serve": {
...
          "options": {
            "browserTarget": "angular.io-example:build",
            "proxyConfig": "src/proxy.conf.json"    <-- ここを追加
          },
この様に1行追加します。前の行の末尾にカンマを足し忘れない様に注意してください。
src/proxy.conf.json は angular.json から見た相対的パスになっています。
以上で Angular 側の修正は終了です。
すでに Angular 単独では機能しないようになっています。
サーバが必要です。用意しましょう。
Express サーバの構築
Express 環境構築
まずはExpress サーバを構築するための場所を用意します。
以下のディレクトリを作成します。
D:\angular\toh-srv
次に Node.js のプロジェクトを作成します。
D:\angular\toh-srv>npm init
全てのオプションを初期値にするため、エンター連打してコマンドラインからの問い合わせを終了します。
これで D:\angular\toh-srv\package.json が作成されます。
次に、Express サーバで必要になるパッケージをインストールします。
D:\angular\toh-srv>npm install express body-parser multer
わりと npm install には --save のオプションを付ける様に説明されているサイトを見かけますが、どうも不要な様です。
Qiitaのこちらのサイトを参照下さい。
プログラム作成
toh-srv\index.js を作成して下さい。
内容は以下の通り
const express = require('express'); // expressモジュールを読み込む
const bodyParser = require('body-parser');  // body-parserモジュールを読み込む
const multer = require('multer'); // multerモジュールを読み込む

const app = express(); // expressアプリを生成する
app.use(bodyParser.urlencoded({ extended: false }))
app.use(bodyParser.json())

// heroes リストデータ
const heroes  = [
    { id: 11, name: 'Dr Nice' },
    { id: 12, name: 'Narco' },
    { id: 13, name: 'Bombasto' },
    { id: 14, name: 'Celeritas' },
    { id: 15, name: 'Magneta' },
    { id: 16, name: 'RubberMan' },
    { id: 17, name: 'Dynama' },
    { id: 18, name: 'Dr IQ' },
    { id: 19, name: 'Magma' },
    { id: 20, name: 'Tornado' }
  ];

// 新しいヒーローIDを作成.
function genId(heroes)
{
    return heroes.length > 0 ? Math.max(...heroes.map(hero => hero.id)) + 1 : 11;
}

// ヒーローのリストを取得
app.get('/heroes', (req, res) => {
    console.log('@@ get heroes');

    if(req.query.name)
    {
        // req.query.name を含むヒーローのリストを作成して返す.
        var subheroes = [];
        const name = req.query.name;

        heroes.forEach(element => {
            var idx = element.name.indexOf(name);
            if(idx>=0)
                subheroes.push(element);
        });

        res.json(subheroes);
    }else{
        res.json(heroes);
    }
});

// idを指定してヒーローを取得
app.get('/heroes/:id', (req, res) => {
    const index = heroes.findIndex((item) => item.id == req.params.id);
    console.log('@@ get heroes id:' + req.params.id);

    if(index >= 0) {
        const heroe = heroes[index];
        res.json(heroe);
    }else{
        res.sendStatus(404);
    }
});

// 新しいヒーローを登録
app.post('/heroes', (req, res) => {
    console.log('@@post heroes');
    const id = genId(heroes);
    const name = req.body.name;

    const newheroe = {
        id: id,
        name: name
    };
    heroes.push(newheroe);

    console.log('Add heroe: ' + JSON.stringify(newheroe));

    // 追加した項目をクライアントに返す
    res.json(newheroe);
});

// ヒーロー削除
app.delete('/heroes/:id', (req, res) => {
    console.log('@@delete heroes id');
    const index = heroes.findIndex((item) => item.id == req.params.id);

    if(index >= 0) {
        const deleted = heroes.splice(index, 1); // indexの位置にある項目を削除
        console.log('Delete: ' + JSON.stringify(deleted[0]));
    }

    // ステータスコード200:OKを送信
    res.sendStatus(200);
});

// ヒーロー名修正
app.put('/heroes', (req, res) => {
    // URLの:idと同じIDを持つ項目を検索
    console.log('@@put heroes / req.body:' + req.body.id);
    const index = heroes.findIndex((item) => item.id == req.body.id);

    if(index >= 0) {
        const hero = heroes[index];
        hero.name = req.body.name ;
        console.log('Edit: ' + JSON.stringify(hero));
    }

    // ステータスコード200:OKを送信
    res.sendStatus(200);
});

// ポート3000でサーバを立てる
app.listen(3000, () => console.log('Listening on port 3000'));
チョット、長いですがこうなりました。
Express サーバと Angular クライアントの起動
Express サーバの起動
以下のコマンドで Express サーバを起動します。
D:\angular\toh-srv>node index.js
Angular クライアントの起動
サーバとは別のコマンドプロンプトのウインドウを開きます。
以下のコマンドで Angular クライアントを起動します。
D:\angular\toh-pt6>ng serve --open
Tour of Heroes のそれぞれの機能を試してみて下さい。
上手く動くでしょうか。
サーバ側にログ出力を足しているのでそれぞれのアクション毎に Express サーバを起動したコマンドプロンプトにログが出力されるはずです。
これで良いのか?
Angular のヒーロー名検索に対応する Express サーバのコードについて、
app.get('/heroes', (req, res) => {
    console.log('@@ get heroes');

    if(req.query.name)
の様に、 req.query.name を使用して分岐処理しています。
理由は app.get の url 記述で上手く分けられなかったから。
例えばこの様にしたかったのです。
app.get('/heroes/?name=:name', (req, res) => {
}):
今回の方法でよかったのか、他の方法があるのかご存知の方がいらっしゃれば教えて頂けるとありがたいです。
終わりに
この後 MongoDB とも連携させて MEAN スタックを構築したいと考えているのですが、ここまででも長かったです。
ここまでを一旦記事の形にしておこうと考えました。
リンク
Angular
Tour of Heroes
express実践入門
[Angular] Angular CLIでプロキシを利用する