はじめに
コンテナの実行環境をAWSでサクッと構築したいよね...ということから今回Terraformを用いて、さらのAWS上にECSを構築することにします。
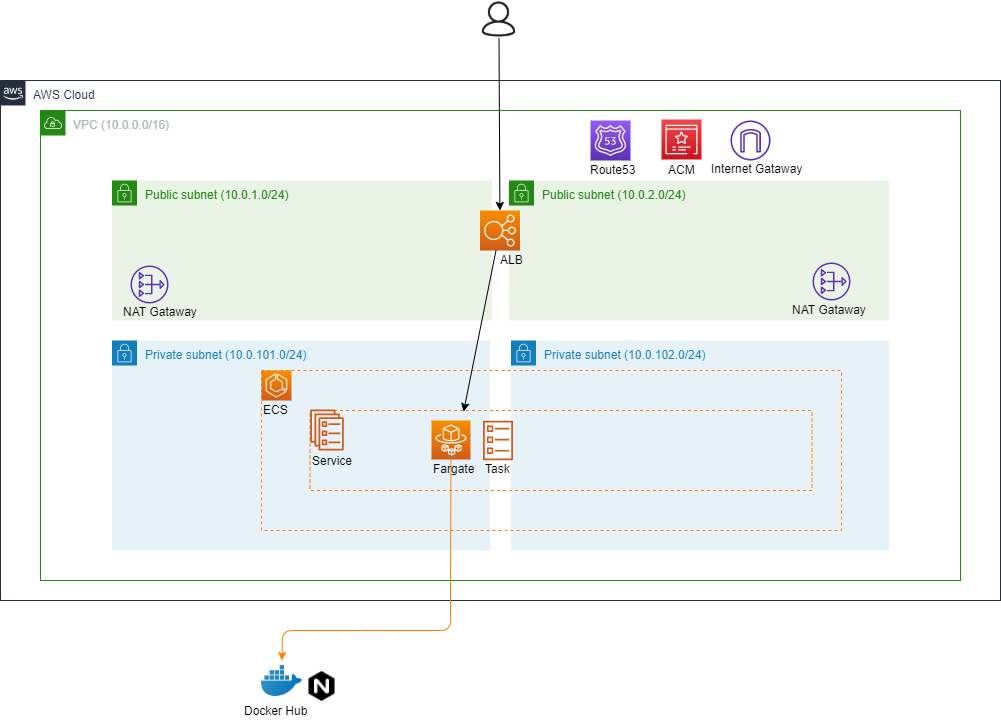
構成図
今回以下のような環境を構築することを目指します。
構築
まずはベースになるネットワークから構築しましょう。
VPCネットワークの構築
構成要素は以下になります。ネットワーク制御に関しては、今回はセキュリティグループのみで制御し、ネットワークACLは使わないことにします。
- VPC
- サブネット
- インターネットゲートウェイ
- ルートテーブル
- NATゲートウェイ
- セキュリティグループ
- (ネットワークACL)
VPC
VPCです。IPアドレスの構築規約は適当ですがVPCはCIDRの/16で構築し、サブネットは/24で構築することとします。
resource "aws_vpc" "example" {
  cidr_block = "10.0.0.0/16"

  tags = {
    Name = "sample"
  }
}
サブネット
続いてサブネットの構築です。Multi-AZ環境とするため、publicとprivateでそれぞれap-northeast-1aとap-northeast-1cに合わせて2つのサブネットを構築します。
resource "aws_subnet" "public_0" {
  cidr_block        = "10.0.1.0/24"
  vpc_id            = aws_vpc.example.id
  availability_zone = "ap-northeast-1a"
}

resource "aws_subnet" "public_1" {
  cidr_block        = "10.0.2.0/24"
  vpc_id            = aws_vpc.example.id
  availability_zone = "ap-northeast-1c"
}

resource "aws_subnet" "private_0" {
  vpc_id            = aws_vpc.example.id
  cidr_block        = "10.0.101.0/24"
  availability_zone = "ap-northeast-1a"
}

resource "aws_subnet" "private_1" {
  vpc_id            = aws_vpc.example.id
  cidr_block        = "10.0.102.0/24"
  availability_zone = "ap-northeast-1c"
}
インターネットゲートウェイ
VPCとインターネットを接続するためにインターネットゲートウェイを構築します。
resource "aws_internet_gateway" "example" {
  vpc_id = aws_vpc.example.id
}
NATゲートウェイ
インターネットからprivateサブネットから直接通信できません。しかし、privateサブネットからインターネットへ通信したいことがあります。privateサブネットからインターネットに通信するためにNATゲートウェイを構築します。NATゲートウェイにはElastic IPをソースアドレスとして使用します。
resource "aws_eip" "nat_gateway_0" {
  vpc        = true
  depends_on = [aws_internet_gateway.example]
}

resource "aws_eip" "nat_gateway_1" {
  vpc        = true
  depends_on = [aws_internet_gateway.example]
}

resource "aws_nat_gateway" "nat_gateway_0" {
  allocation_id = aws_eip.nat_gateway_0.id
  subnet_id     = aws_subnet.public_0.id
  depends_on    = [aws_internet_gateway.example]
}

resource "aws_nat_gateway" "nat_gateway_1" {
  allocation_id = aws_eip.nat_gateway_1.id
  subnet_id     = aws_subnet.public_1.id
  depends_on    = [aws_internet_gateway.example]
}
ルートテーブル
サブネットのルーティングの設定をしましょう。ルートテーブルはVPC内部の通信はlocalというローカルルートで通信します。publicサブネットのデフォルトゲートウェイをインターネットゲートウェイに設定します。
resource "aws_route_table" "public" {
  vpc_id = aws_vpc.example.id
}

resource "aws_route" "public" {
  route_table_id         = aws_route_table.public.id
  gateway_id             = aws_internet_gateway.example.id
  destination_cidr_block = "0.0.0.0/0"
}
privateサブネットの場合はデフォルトゲートウェイはNATゲートウェイにします。
resource "aws_route_table" "private_0" {
  vpc_id = aws_vpc.example.id
}

resource "aws_route_table" "private_1" {
  vpc_id = aws_vpc.example.id
}

resource "aws_route" "private_0" {
  route_table_id         = aws_route_table.private_0.id
  nat_gateway_id         = aws_nat_gateway.nat_gateway_0.id
  destination_cidr_block = "0.0.0.0/0"
}

resource "aws_route" "private_1" {
  route_table_id         = aws_route_table.private_1.id
  nat_gateway_id         = aws_nat_gateway.nat_gateway_1.id
  destination_cidr_block = "0.0.0.0/0"
}
作成したルートテーブルをどのサブネットで使用するか設定します。
resource "aws_route_table_association" "public_0" {
  route_table_id = aws_route_table.public.id
  subnet_id      = aws_subnet.public_0.id
}

resource "aws_route_table_association" "public_1" {
  route_table_id = aws_route_table.public.id
  subnet_id      = aws_subnet.public_1.id
}

resource "aws_route_table_association" "private_0" {
  subnet_id      = aws_subnet.private_0.id
  route_table_id = aws_route_table.private_0.id
}

resource "aws_route_table_association" "private_1" {
  subnet_id      = aws_subnet.private_1.id
  route_table_id = aws_route_table.private_1.id
}
セキュリティグループ
セキュリティグループの設定をします。ひとまず以下のような通信を許可するセキュリティグループを作成します。
ingressの通信はHTTPとHTTPSのみ許可し、egressの通信はすべてのIPアドレスに通信可能とします。
| 通信の向き | ポート | プロトコル | IPアドレス |
|---|---|---|---|
| ingress | 80 | tcp | 0.0.0.0/0 |
| ingress | 443 | tcp | 0.0.0.0/0 |
| egress | x | x | 0.0.0.0/0 |
resource "aws_security_group" "example" {
  name   = "example"
  vpc_id = aws_vpc.dev-example.id
}

resource "aws_security_group_rule" "ingress_example_http" {
  from_port         = "80"
  to_port           = "80"
  protocol          = "tcp"
  security_group_id = aws_security_group.example.id
  type              = "ingress"
  cidr_blocks       = ["0.0.0.0/0"]
}

resource "aws_security_group_rule" "ingress_example_https" {
  from_port         = "443"
  to_port           = "443"
  protocol          = "tcp"
  security_group_id = aws_security_group.example.id
  type              = "ingress"
  cidr_blocks       = ["0.0.0.0/0"]
}

resource "aws_security_group_rule" "egress_example" {
  from_port         = 0
  to_port           = 0
  protocol          = "-1"
  security_group_id = aws_security_group.example.id
  type              = "egress"
  cidr_blocks       = ["0.0.0.0/0"]
}
ALBの作成
ユーザからリクエストするエンドポイントはHTTPSで通信することにします。まずはALBに紐付けるSSL証明書を取得するためにACMで証明書の取得とDNSでドメインを取得しましょう。
ALB本体は先に作成しておきます。
resource "aws_alb" "example" {
  name                       = "web"
  load_balancer_type         = "application"
  internal                   = false
  idle_timeout               = 60
  enable_deletion_protection = false

  subnets = [
    aws_subnet.public_0.id,
    aws_subnet.public_1.id,
  ]
  security_groups = [aws_security_group.example.id]
}
DNS
ドメインを新規に取得することにします。管理コンソールから手動で取得することにします。新規に取得するのでお金がかかります。適当なドメインを取得し、ドメインが登録できたものとします。本記事ではドメイン名を sample.com としておきます。※実際に sample.com を取得しようとすると、このドメインはすでに登録されているため登録できません。別のドメインで登録します。
data "aws_route53_zone" "example" {
  name = "sample.com"
}
ACM
取得したゾーンからACMで証明書を作成します。
resource "aws_acm_certificate" "example" {
  domain_name               = data.aws_route53_zone.example.name
  subject_alternative_names = []
  validation_method         = "DNS"

  lifecycle {
    create_before_destroy = true
  }
}
Route53
登録したドメインを利用できるように data でゾーンを取得しておきます。
data "aws_route53_zone" "example" {
  name = "sample.com"
}

resource "aws_route53_record" "example" {
  name    = data.aws_route53_zone.example.name
  zone_id = data.aws_route53_zone.example.id
  type    = "A"

  alias {
    evaluate_target_health = true
    name                   = aws_alb.example.dns_name
    zone_id                = aws_alb.example.zone_id
  }
}
検証用のDNSレコードの作成と検証をします。
# 検証用DNSレコードの作成
resource "aws_route53_record" "example" {
  name    = aws_acm_certificate.example.domain_validation_options[0].resource_record_name
  type    = aws_acm_certificate.example.domain_validation_options[0].resource_record_type
  records = [aws_acm_certificate.example.domain_validation_options[0].resource_record_value]
  zone_id = data.aws_route53_zone.example.id
  ttl     = 60
}

# DNSレコードの検証
resource "aws_acm_certificate_validation" "example" {
  certificate_arn         = aws_acm_certificate.example.arn
  validation_record_fqdns = [aws_route53_record.example.fqdn]
}
ALB
リスナーとターゲットグループを作成します。
リスナー
リスナーとは外部からALBが接続を待ち受けるポート/プロトコルをチェックするプロセスです。HTTPSのみのリクエストを待ち受けることにします。
resource "aws_alb_listener" "example" {
  load_balancer_arn = aws_alb.example.arn
  port              = "443"
  protocol          = "HTTPS"
  certificate_arn   = aws_acm_certificate.example.arn
  ssl_policy        = "ELBSecurityPolicy-2016-08"

  default_action {
    type             = "forward"
    target_group_arn = aws_alb_target_group.example.arn
  }
}
ターゲットグループ
ALBで振り分け先となるターゲットグループを作成します。
resource "aws_alb_target_group" "example" {
  name                 = "example-target"
  vpc_id               = aws_vpc.example.id
  target_type          = "ip"
  port                 = 80
  protocol             = "HTTP"
  deregistration_delay = 300

  health_check {
    path                = "/"
    healthy_threshold   = 5
    unhealthy_threshold = 2
    timeout             = 5
    interval            = 30
    matcher             = 200
    port                = "traffic-port"
    protocol            = "HTTP"
  }

  depends_on = [aws_alb.example]
}
リスナールール
リスナールールによってマッチしたURLのパスに応じたリクエストの振り分けをすることができます。
resource "aws_alb_listener_rule" "example" {
  listener_arn = aws_alb_listener.example.arn
  priority     = 100
  action {
    type             = "forward"
    target_group_arn = aws_alb_target_group.example.arn
  }

  condition {
    field  = "path-pattern"
    values = ["/*"]
  }
}
ECSの作成
準備が整ったのでECSの構築をします。
クラスタの作成
まずはECSクラスタを作成します。
resource "aws_ecs_cluster" "example" {
  name = "nginx-cluster"
}
タスク定義
続いてタスク定義です。実態は example_task_definitions.json のファイルに記述していきます。
resource "aws_ecs_task_definition" "example" {
  container_definitions    = file("./example_task_definitions.json")
  family                   = "example"
  cpu                      = 256
  memory                   = 512
  network_mode             = "awsvpc"
  requires_compatibilities = ["FARGATE"]
  execution_role_arn       = aws_iam_role.example.arn
}
ログを CloudWatch Logsで参照します。logConfigurationのlogDriverにawslogsを指定することで、ログ出力先をCloudWatch Logsに設定することができます。
[
  {
    "name": "example",
    "image": "nginx:latest",
    "essential": true,
    "logConfiguration": {
      "logDriver": "awslogs",
      "options": {
        "awslogs-region": "ap-northeast-1",
        "awslogs-stream-prefix": "ecs",
        "awslogs-group": "/ecs/example"
      }
    },
    "portMappings": [
      {
        "protocol": "tcp",
        "containerPort": 80
      }
    ]
  }
]
サービス
resource "aws_ecs_service" "example-nginx-service" {
  name                              = "example"
  cluster                           = aws_ecs_cluster.example.arn
  task_definition                   = aws_ecs_task_definition.example.arn
  desired_count                     = 2
  launch_type                       = "FARGATE"
  platform_version                  = "1.3.0"
  health_check_grace_period_seconds = 60

  network_configuration {
    assign_public_ip = false
    security_groups  = [aws_security_group.example.id]

    subnets = [
      aws_subnet.private_0.id,
      aws_subnet.private_1.id,
    ]
  }

  load_balancer {
    target_group_arn = aws_lb_target_group.target.arn
    container_name   = "example"
    container_port   = 80
  }

  lifecycle {
    ignore_changes = [task_definition]
  }
}
ログ
CloudWatch Logs
resource "aws_cloudwatch_log_group" "for_ecs" {
  name              = "/ecs/nginx/example"
  retention_in_days = 7
}
IAM
ECSに権限を付与するために、IAMロールを作成します。タスク実行IAMロールとして AmazonECSTaskExecutionRolePolicy を用いることができます。
このロールにパラメータストアからパラメータを取得する権限と、KMSから復号化するための権限を付与しておきます。
data "aws_iam_policy" "ecs_task_execution_role_policy" {
  arn = "arn:aws:iam::aws:policy/service-role/AmazonECSTaskExecutionRolePolicy"
}

data "aws_iam_policy_document" "ecs_task_execution" {
  source_json = data.aws_iam_policy.ecs_task_execution_role_policy.policy

  statement {
    effect    = "Allow"
    actions   = ["ssm:GetParameters", "kms:Decrypt"]
    resources = ["*"]
  }
}

resource "aws_iam_policy" "example" {
  name   = "example-policy-ecs-task-execution"
  policy = data.aws_iam_policy_document.ecs_task_execution.json
}

data "aws_iam_policy_document" "assume_role" {
  statement {
    actions = ["sts:AssumeRole"]

    principals {
      type        = "Service"
      identifiers = ["ecs-tasks.amazonaws.com"]
    }
  }
}

resource "aws_iam_role" "example" {
  name               = "example-role-ecs-task-execution"
  assume_role_policy = data.aws_iam_policy_document.assume_role.json
}

resource "aws_iam_role_policy_attachment" "example" {
  role       = aws_iam_role.example.name
  policy_arn = aws_iam_policy.example.arn
}
まとめ
Terraformを用いてFargateを構築しました。
今回はECRを用いずにDockerHubにあるイメージで簡易的なnginxが動く環境を構築しました。
次は、ECRに構築したイメージからタスクを実行したり、GitHubと連携してWebhookでCI/CDを回したり、ECSのAutoScalingをしたり...といったことについて書きたいと思います。
今回使用したファイルは以下にあります。
なお、今回はサンプルとして構築したので1ファイルにごっそり書いてますが、tfファイル構成などは Terraformのベストなプラクティスってなんだろうか が参考になります。