はじめに
なんからの技術的な調査(もちろん技術的でなくてもよいのですが)をしたときに、なんらかの形でアウトプットすることが多いと思います。たとえばQiitaやはてなブログ、Wikiといったものです。
今回は Sphinx+GitHub Pages を用いることで比較的簡単にWebで技術ノートを作れてアウトプットできるよ、ということを紹介します。Webページだけでなく、PDFなんかも生成することができます。
なお想定する環境は Windows10 です。試してはいないですが MacOS でも問題ないと思います。
ライトな Web ページからしっかりしたドキュメントまでいろいろな用途で用いることができます。例えば Docker ドキュメント日本語化プロジェクト には Sphinx が使われています。
Sphinxとは?
Sphinx は知的で美しいドキュメントを簡単に作れるようにするツールです。Georg Brandl によって開発された Python 製のツールです。
インストール方法
ということでさっそく Python をインストールします。こちら から Python3 をダウンロードしてインストールしましょう。
D:\>python --version
Python 3.7.3
続いて pip install で Sphinx をインストールしましょう。基本的に Sphinxの最初の一歩 のUser's ドキュメントに沿って実施します。
D:\>pip install sphinx
使い方
プロジェクト作成
まずはプロジェクトを作りましょう。sphinx-quickstart コマンドでプロジェクトを作成することができます。なんやかんや聞かれますが、基本的にはそのまま Enter を押せばOKです。
D:\note>sphinx-quickstart
Welcome to the Sphinx 2.1.2 quickstart utility.

Please enter values for the following settings (just press Enter to
accept a default value, if one is given in brackets).

Selected root path: .

You have two options for placing the build directory for Sphinx output.
Either, you use a directory "_build" within the root path, or you separate
"source" and "build" directories within the root path.
> Separate source and build directories (y/n) [n]: y

The project name will occur in several places in the built documentation.
> Project name: sample-project
> Author name(s): tsuji
> Project release []:

If the documents are to be written in a language other than English,
you can select a language here by its language code. Sphinx will then
translate text that it generates into that language.

For a list of supported codes, see
https://www.sphinx-doc.org/en/master/usage/configuration.html#confval-language.
> Project language [en]: ja

Creating file .\source\conf.py.
Creating file .\source\index.rst.
Creating file .\Makefile.
Creating file .\make.bat.

Finished: An initial directory structure has been created.

You should now populate your master file .\source\index.rst and create other documentation
source files. Use the Makefile to build the docs, like so:
   make builder
where "builder" is one of the supported builders, e.g. html, latex or linkcheck.
プロジェクトの作成が完了すると以下のような構成のファイルが生成されていることがわかります。
D:\note>tree /f
D:.
│  make.bat
│  Makefile
│
├─build
└─source
    │  conf.py
    │  index.rst
    │
    ├─_static
    └─_templates
make.bat を用いて HTML ファイルを生成したり、ローカルで Preview ができます。
ドキュメント作成
それでは、ドキュメントを作成します。まずは Web サイトのトップページ、ノートの目次となるような index ドキュメントを作成しましょう。(といってもファイルは自動生成されています)
ポイントは reStructuredText というマークアップ言語を用いて記述することです。ドキュメントの記述といえば markdown! という方も多いと思います。私もそうでした。最初は reStructuredText の記述方法がちょっと慣れないかも知れませんが、reStructuredText はシンプルに設計された、控えめなマークアップ言語なので、すぐに慣れると思います。reStructuredText は reST と省略することが多いようで、reST と省略することにします。
index となるファイルは index.rst です。中を見ると以下のようになっていることがわかります。
.. sample-project documentation master file, created by
   sphinx-quickstart on Mon Jul  8 22:38:47 2019.
   You can adapt this file completely to your liking, but it should at least
   contain the root `toctree` directive.

Welcome to sample-project's documentation!
==========================================

.. toctree::
   :maxdepth: 2
   :caption: Contents:


Indices and tables
==================

* :ref:`genindex`
* :ref:`modindex`
* :ref:`search`
早速ビルドしてHTMLファイルを生成しましょう。ビルドは make.bat を用いて make html コマンドでビルドできます。
D:\note>make html
Running Sphinx v2.1.2
loading translations [ja]... done
making output directory... done
building [mo]: targets for 0 po files that are out of date
building [html]: targets for 1 source files that are out of date
updating environment: 1 added, 0 changed, 0 removed
reading sources... [100%] index
looking for now-outdated files... none found
pickling environment... done
checking consistency... done
preparing documents... done
writing output... [100%] index
generating indices... genindex
writing additional pages... search
copying static files... done
copying extra files... done
dumping search index in Japanese (code: ja) ... done
dumping object inventory... done
build succeeded.

The HTML pages are in build\html.
build\html 配下に index.html というファイルが生成されていることがわかります。アクセスすると以下のようになっていることがわかります。

コンテンツの追加
index ページが作成できたらコンテンツを追加したいですよね?追加してみます。以下のように index.rst に追記し、hello.rst というファイルを作成します。「はじめてのSphinx」というページを追加します。
.. sample-project documentation master file, created by
   sphinx-quickstart on Mon Jul  8 22:38:47 2019.
   You can adapt this file completely to your liking, but it should at least
   contain the root `toctree` directive.

Welcome to sample-project's documentation!
==========================================

.. toctree::
   :maxdepth: 2
   :caption: Contents:

+   hello

Indices and tables
==================

* :ref:`genindex`
* :ref:`modindex`
* :ref:`search`
+はじめてのSphinx
+===============================
+
+Hello Sphinx!!!
make html でビルドして、再度 index.html にアクセスすると以下のようになります。

「はじめてのSphinx」 のページが追加されていることがわかります。このページにアクセスしてみましょう。

ちゃんとページのコンテンツが表示されています。
階層のあるコンテンツ
階層のあるコンテンツを追加することも簡単にできます。先ほどの index.rst に段落のあるページを追加してみます。index.rst への追記と新しいファイル hierarchy.rst を作成します。
.. sample-project documentation master file, created by
   sphinx-quickstart on Mon Jul  8 22:38:47 2019.
   You can adapt this file completely to your liking, but it should at least
   contain the root `toctree` directive.

Welcome to sample-project's documentation!
==========================================

.. toctree::
   :maxdepth: 2
   :caption: Contents:

   hello
+   hierarchy

Indices and tables
==================

* :ref:`genindex`
* :ref:`modindex`
* :ref:`search`
+段落
+==================================
+
+---------------------------------
+段落1
+---------------------------------
+
+AAAAAA
+
+---------------------------------
+段落2
+---------------------------------
+
+BBBBBB
+
+---------------------------------
+段落3
+---------------------------------
+
+CCCCCC
+
+---------------------------------
+段落4
+---------------------------------
+
+DDDDDD
hierarchy.rst は reST で書かれています。必要になったときに こちら を見てみると良いかもしれません。
make html でビルドして、アクセスします。すると、階層のあるページが追加されたことがわかります。

コードの記述
コードを記述して、シンタックスハイライトで表示することももちろん可能です。
.. sample-project documentation master file, created by
   sphinx-quickstart on Mon Jul  8 22:38:47 2019.
   You can adapt this file completely to your liking, but it should at least
   contain the root `toctree` directive.

Welcome to sample-project's documentation!
==========================================

.. toctree::
   :maxdepth: 2
   :caption: Contents:

   hello
   hierarchy
+   code

Indices and tables
==================

* :ref:`genindex`
* :ref:`modindex`
* :ref:`search`
コードは .. code-block:: を用いて記述することができます。
+コードを記述
+==================================
+
+`` .. code-block:: `` を用いることでコードをハイライトすることができます。
+
+.. code-block:: go
+    :caption: hello.go
+
+    package main
+
+    import "fmt"
+
+    func main() {
+        fmt.Println("Hello, world!")
+    }
以下のように表示されます。

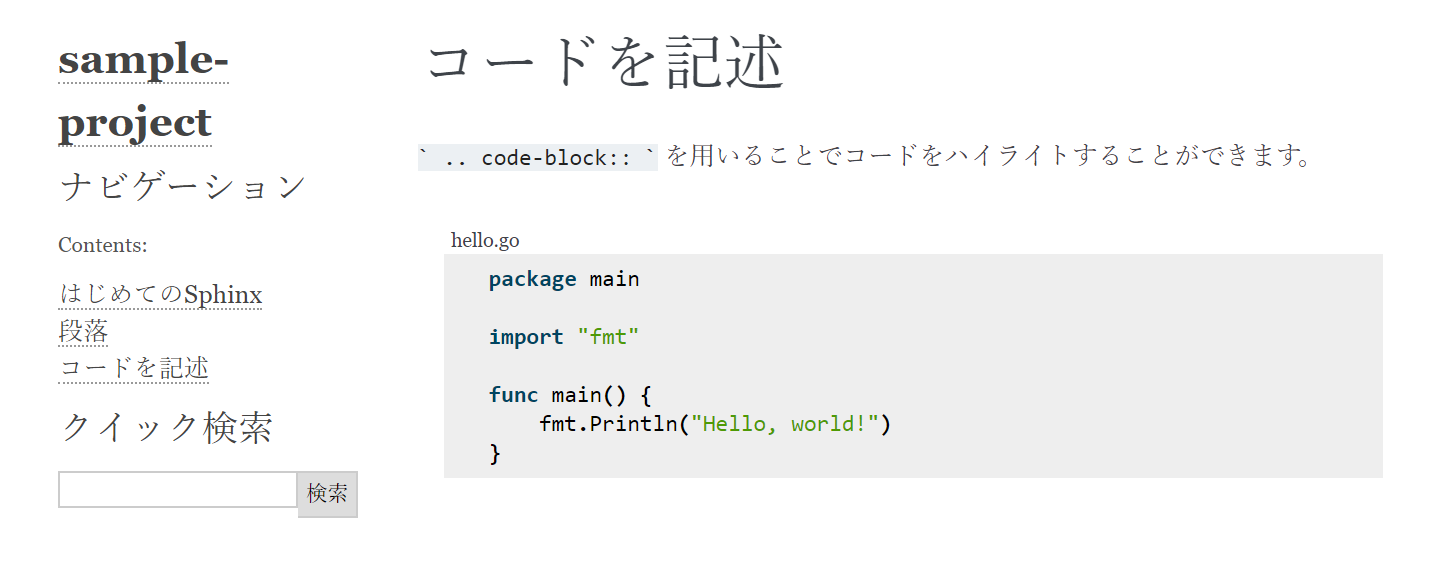
ポイントは、正しく インデントと 空行 が必要ということです。(.. code-block::) だけに限った話ではないですが。インデントと空行を含めないと表示されません。
たとえば以下のようにすると表示されません。気づきにくいと思うので注意が必要です。私は最初にハマりました。
コードを記述
==================================

`` .. code-block:: `` を用いることでコードをハイライトすることができます。

.. code-block:: go
コードを記述
==================================
+
+表示されるコード
+-------------------------------------------------

``` .. code-block:: ``` を用いることでコードをハイライトすることができます。

.. code-block:: go
    :caption: hello.go

    package main

    import "fmt"

    func main() {
        fmt.Println("Hello, world!")
    }
+
+正しく表示されないコード(その1:インデントがない)
+--------------------------------------------------
+
+.. code-block:: go
+
+package main
+
+import "fmt"
+
+func main() {
+    fmt.Println("Hello, world!")
+}
+
+正しく表示されないコード(その2:空行がない)
+-------------------------------------------------
+
+.. code-block:: go
+    package main
+
+    import "fmt"
+
+    func main() {
+        fmt.Println("Hello, world!")
+    }
こんな感じになります。

その他いろいろな記述方法
階層以外にも reST を用いていろいろな記述ができます。その中の一部である以下の記述方法を紹介します。
- テーブル
- 脚注
- 数式
- TODO
.. sample-project documentation master file, created by
   sphinx-quickstart on Mon Jul  8 22:38:47 2019.
   You can adapt this file completely to your liking, but it should at least
   contain the root `toctree` directive.

Welcome to sample-project's documentation!
==========================================

.. toctree::
   :maxdepth: 2
   :caption: Contents:

   hello
   hierarchy
   code
+   other

Indices and tables
==================

* :ref:`genindex`
* :ref:`modindex`
* :ref:`search`

+.. todolist::
+その他の機能
+==================================
+
+---------------------------------
+テーブル
+---------------------------------
+
+=====  =====  =======
+A      B      A and B
+=====  =====  =======
+False  False  False
+True   False  False
+False  True   False
+True   True   True
+=====  =====  =======
+
+---------------------------------
+脚注
+---------------------------------
+
+これは 脚注 [#]_ です。
+
+.. [#] 本文の下の方につける注記
+
+---------------------------------
+数式
+---------------------------------
+
+数式を有効にするには、``conf.py`` に ``sphinx.ext.mathjax`` という拡張モジュールを追加する必要があります。以下のような感じです。モジュールを有効にすれば、LaTeX で数式を記述することができます。
+
+.. code-block:: python
+    :caption: conf.py
+
+    # Add any Sphinx extension module names here, as strings. They can be
+    # extensions coming with Sphinx (named 'sphinx.ext.*') or your custom
+    # ones.
+    extensions = ['sphinx.ext.mathjax'
+    ]
+
+`N` 個の整数 :math:`d[0], d[1], \dots, d[N-1]` が与えられます。これは数式のサンプルです。
+
+---------------------------------
+TODO
+---------------------------------
+
+TODOも拡張モジュール ``sphinx.ext.todo`` を有効にすると記述できるようになります。あとでやりたいことを残しておくときに便利ですね。
+
+.. code-block:: none
+    :caption: conf.py
+
+    # Add any Sphinx extension module names here, as strings. They can be
+    # extensions coming with Sphinx (named 'sphinx.ext.*') or your custom
+    # ones.
+    extensions = ['sphinx.ext.mathjax', 'sphinx.ext.todo'
+    ]
+
+    [extensions]
+    todo_include_todos = True
+
+.. todo::
+
+    これは TODO なので、後ほど調査する
+
+TODOを表示する場所も選ぶことができます。今回は index ページに記載しておきましょう。表示させたい場所に ``` .. todolist:: ``` と記述しておけばよいです。
+
+.. code-block:: rest
+
+    .. sample-project documentation master file, created by
+    sphinx-quickstart on Mon Jul  8 22:38:47 2019.
+    You can adapt this file completely to your liking, but it should at least
+    contain the root `toctree` directive.
+
+    Welcome to sample-project's documentation!
+    ==========================================
+
+    .. toctree::
+    :maxdepth: 2
+    :caption: Contents:
+
+    hello
+    hierarchy
+    code
+    other
+
+    Indices and tables
+    ==================
+
+    * :ref:`genindex`
+    * :ref:`modindex`
+    * :ref:`search`
こんな感じで見えます。きれいですね。

プレビュー
先ほどまではページについての記述方法でした。今度はビルドするときの便利な方法を紹介します。
いままではファイルを修正するたびに make html とビルドして、HTML を生成して確認する、、、としていました。何度も変更するとちょっと面倒です。ファイルの変更が自動的に Web ページに反映されると嬉しいですよね。
Sphinxの sphinx-autobuild を用いると、ファイルを変更すると自動的にビルドが実行され、更新が反映されます。便利です。これを使ってみましょう。
sphinx-autobuild モジュールが必要なので、pip でインストールします。
pip install sphinx-autobuild
インストールできたら、sphinx-autobuild コマンドで起動させます。
$ sphinx-autobuild -b html source build/html

+--------- manually triggered build ---------------------------------------------
| Running Sphinx v2.1.2
| loading translations [ja]... done
| building [mo]: targets for 0 po files that are out of date
| building [html]: targets for 5 source files that are out of date
| updating environment: 5 added, 0 changed, 0 removed
| reading sources... [ 20%] code
| reading sources... [ 40%] hello
| reading sources... [ 60%] hierarchy
| reading sources... [ 80%] index
| reading sources... [100%] other
|
| looking for now-outdated files... none found
| pickling environment... done
| checking consistency... done
| preparing documents... done
| writing output... [ 20%] code
| writing output... [ 40%] hello
| writing output... [ 60%] hierarchy
| writing output... [ 80%] index
| writing output... [100%] other
|
| generating indices... genindex
| writing additional pages... search
| copying static files... done
| copying extra files... done
| dumping search index in Japanese (code: ja) ... done
| dumping object inventory... done
| build succeeded.
|
| The HTML pages are in build\html.
+--------------------------------------------------------------------------------

[I 190709 08:34:05 server:296] Serving on http://127.0.0.1:8000
[I 190709 08:34:05 handlers:62] Start watching changes
[I 190709 08:34:05 handlers:64] Start detecting changes
するとローカルで Web サーバが 8000 ポートで listen するようになることがわかります。ブラウザから以下にアクセスすると、先ほどまでローカルでビルドしてHTMLを生成していた内容が表示されていることがわかります。
http://localhost:8000/

sphinx-autobuild のコマンドを覚えるのがちょっと面倒という方は make.bat に追記すると便利かもしれません。
以下のように make.bat に追記しておきます。
@ECHO OFF

pushd %~dp0

REM Command file for Sphinx documentation

if "%SPHINXBUILD%" == "" (
	set SPHINXBUILD=sphinx-build
)
set SOURCEDIR=source
set BUILDDIR=build

if "%1" == "" goto help

if "%1" == "preview" (
    echo.Running sphinx-autobuild. View live edits at:
    echo.  http://0.0.0.0:8000
    sphinx-autobuild -b html %SOURCEDIR% %BUILDDIR%/html
    if errorlevel 1 exit /b 1
    goto end
)

%SPHINXBUILD% >NUL 2>NUL
if errorlevel 9009 (
	echo.
	echo.The 'sphinx-build' command was not found. Make sure you have Sphinx
	echo.installed, then set the SPHINXBUILD environment variable to point
	echo.to the full path of the 'sphinx-build' executable. Alternatively you
	echo.may add the Sphinx directory to PATH.
	echo.
	echo.If you don't have Sphinx installed, grab it from
	echo.http://sphinx-doc.org/
	exit /b 1
)

+:html
+%SPHINXBUILD% -b html %SOURCEDIR% "docs" %SPHINXOPTS% %O%
+goto end

%SPHINXBUILD% -M %1 %SOURCEDIR% %BUILDDIR% %SPHINXOPTS% %O%
goto end

:help
%SPHINXBUILD% -M help %SOURCEDIR% %BUILDDIR% %SPHINXOPTS% %O%

:end
popd
起動するときは以下のように
make preview
とすれば良いです。
GitHub Pages との連携
さて、ローカルでドキュメントを作成することができたので、これを GitHub Pages で公開してみましょう。GitHub でドキュメントのソースを管理しつつ、簡単に公開できるのがよいですね。
まずは作成したドキュメントを GitHub にアップしておきます。GitHub のリポジトリ名は sphinx-sample としておきます。
+build/doctrees
+.DS_Store
git init
git add -A
git commit -m "init"
git remote add origin https://github.com/d-tsuji/sphinx-sample.git
git push -u origin master
GitHub Pages で公開するにあたって今回は master ブランチの docs ディレクトリを用いて公開することにします。
そのためにビルドしたときに出力されるディレクトリを少し修正します。ビルドするときのコマンドは make html としておきます。
@ECHO OFF

pushd %~dp0

REM Command file for Sphinx documentation

if "%SPHINXBUILD%" == "" (
	set SPHINXBUILD=sphinx-build
)
set SOURCEDIR=source
set BUILDDIR=build

if "%1" == "" goto help

if "%1" == "preview" (
    echo.Running sphinx-autobuild. View live edits at:
    echo.  http://0.0.0.0:8000
    sphinx-autobuild -b html %SOURCEDIR% %BUILDDIR%/html
    if errorlevel 1 exit /b 1
    goto end
)

%SPHINXBUILD% >NUL 2>NUL
if errorlevel 9009 (
	echo.
	echo.The 'sphinx-build' command was not found. Make sure you have Sphinx
	echo.installed, then set the SPHINXBUILD environment variable to point
	echo.to the full path of the 'sphinx-build' executable. Alternatively you
	echo.may add the Sphinx directory to PATH.
	echo.
	echo.If you don't have Sphinx installed, grab it from
	echo.http://sphinx-doc.org/
	exit /b 1
)

+:html
+%SPHINXBUILD% -b html %SOURCEDIR% "docs" %SPHINXOPTS% %O%
+goto end

%SPHINXBUILD% -M %1 %SOURCEDIR% %BUILDDIR% %SPHINXOPTS% %O%
goto end

:help
%SPHINXBUILD% -M help %SOURCEDIR% %BUILDDIR% %SPHINXOPTS% %O%

:end
popd
make html でビルドすると docs ディレクトリに HTML ファイルが生成されたことがわかります。build ディレクトリは不要なので削除しておきます。
ディレクトリ構成は以下のようになっています。( HTML ファイルや doctree ファイルは省略)
D:.
│  .gitignore
│  make.bat
│  Makefile
├─docs
│  ├─.doctrees
│  ├─_sources
│  └─_static
└─source
コミットして GitHub にアップします。
GitHub の GUI から GitHub Pages の設定をしておきます。以下のようになります。
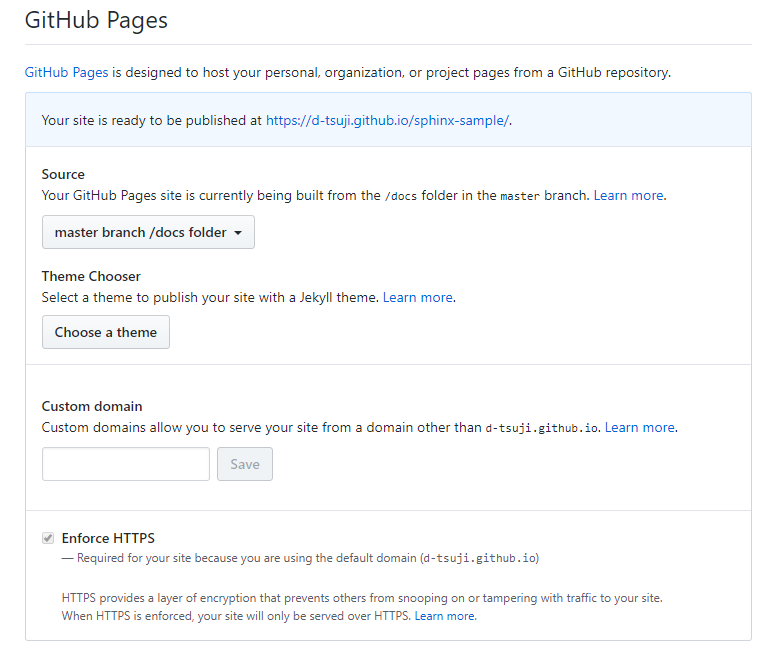
設定したら、URL(https://d-tsuji.github.io/sphinx-sample/) にアクセスします。
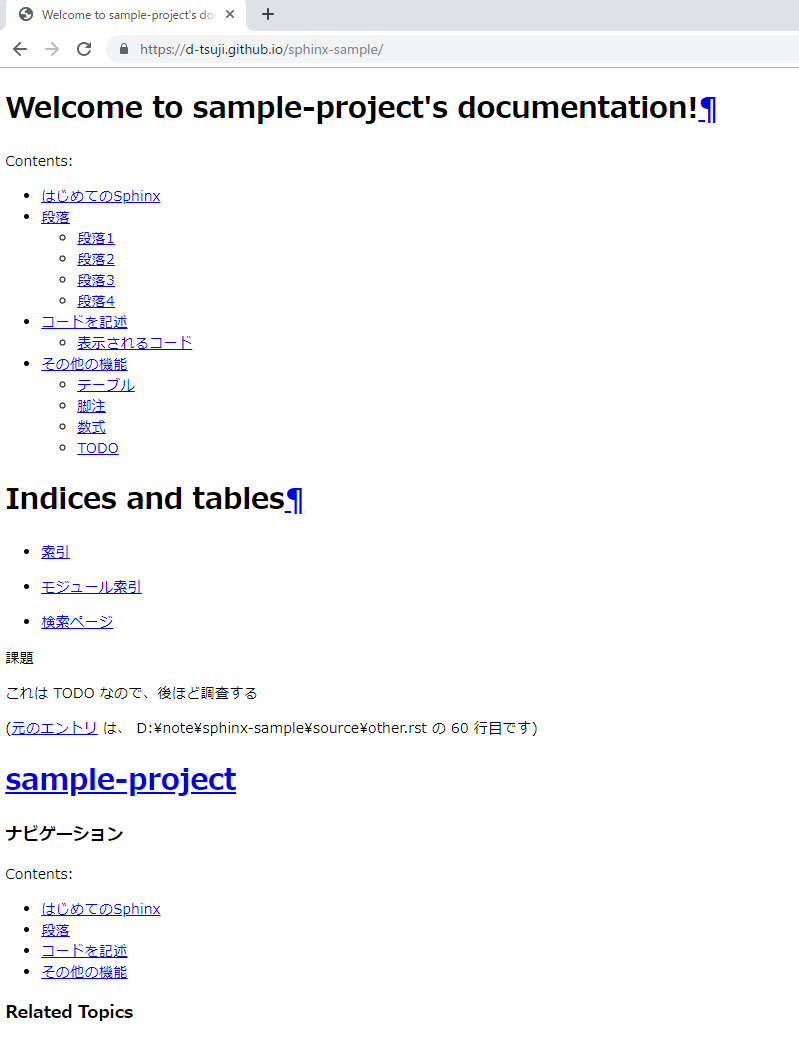
そうすると、CSS が見事きいていないことがわかります。悲しいですね。
GitHi Pages は、デフォルトで JekyII でホスティングを行います。しかし、JekyII は Sphinx に対応していないため、 _static などにあるパスを読み取ることができません。対応として .nojekyll のディレクトリを作成する必要があります。手動で作成しても問題ないですが、今回は sphinx.ext.githubpages を用いて対応することができます。
sphinx.ext.githubpages プラグインは GitHub Pages で公開するために、 .nojekyll ファイルをHTMLディレクトリ内に作成します。
...

# -- General configuration ---------------------------------------------------

# Add any Sphinx extension module names here, as strings. They can be
# extensions coming with Sphinx (named 'sphinx.ext.*') or your custom
# ones.
-extensions = ['sphinx.ext.mathjax', 'sphinx.ext.todo'
+extensions = ['sphinx.ext.mathjax', 'sphinx.ext.todo', 'sphinx.ext.githubpages'
]

# Add any paths that contain templates here, relative to this directory.
templates_path = ['_templates']

...
conf.py でプラグインの有効化したのち、再度 make html でビルドします。そうすると docs/.nojekyll のディレクトリが作成されていることがわかります。
この状態で GitHub にプッシュします。
再度 https://d-tsuji.github.io/sphinx-sample/ にアクセスしてみます。
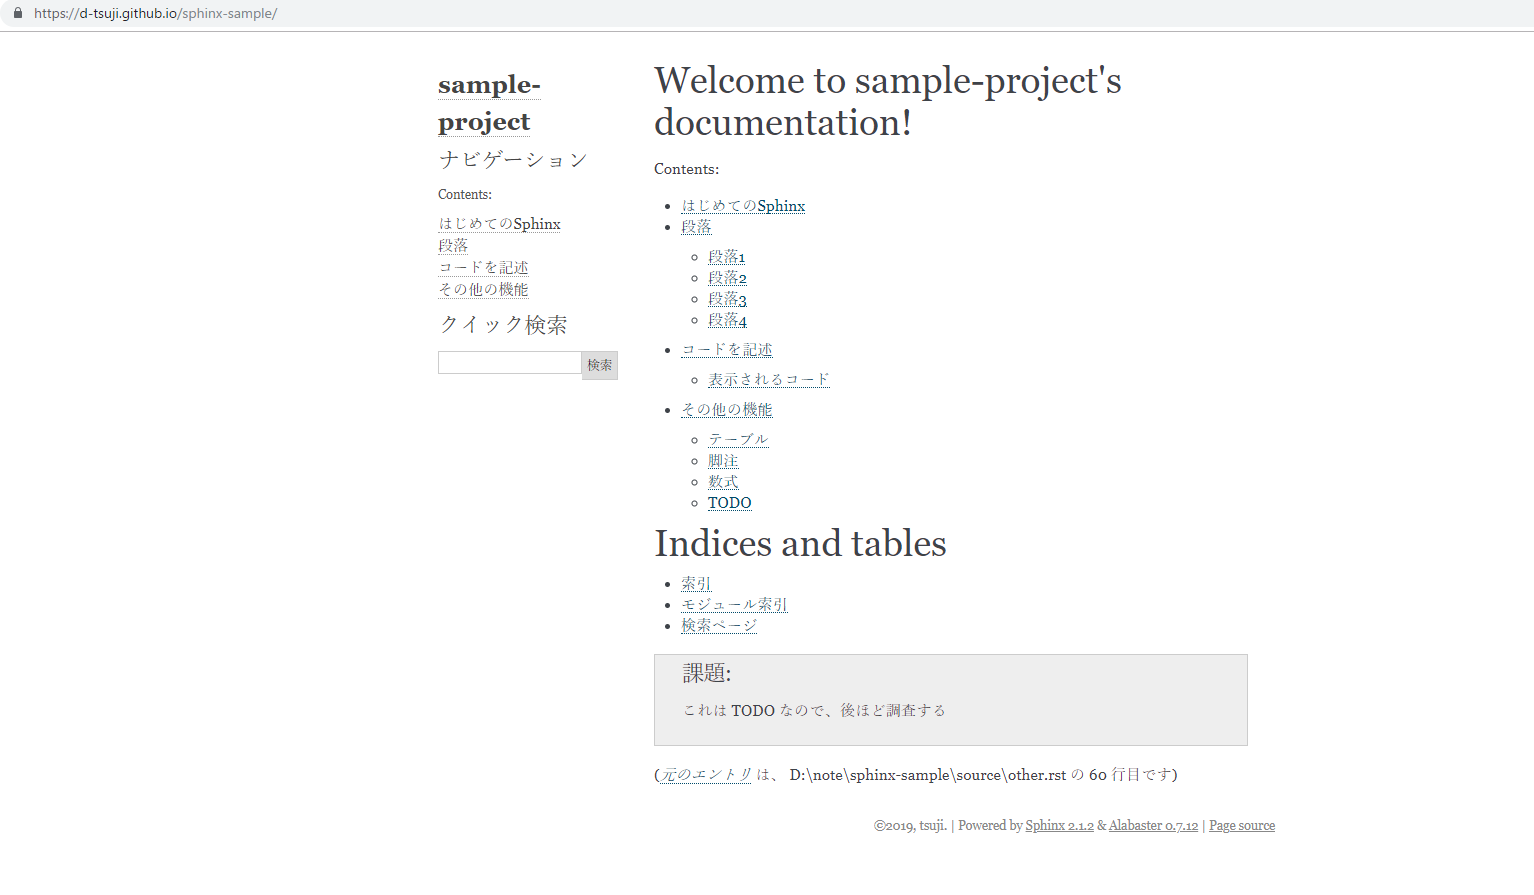
無事に CSS がきいて、いい感じになっていることがわかります!!!
ページのデザインは conf.py から設定することができます。( Sphinx に組み込まれていないテーマを選択する場合は theme.conf などの追加の設定が必要です。)デフォルトだと以下のように alabaster になっています。
...

# -- Options for HTML output -------------------------------------------------

# The theme to use for HTML and HTML Help pages.  See the documentation for
# a list of builtin themes.
#
html_theme = 'alabaster'

...
以下にテーマごとのサンプルがあります。
一番最初に紹介した Docker ドキュメント日本語化プロジェクト のテーマは sphinx_rtd_theme になっています。好みに合わせて選ぶことができます。
まとめ
Sphinx を用いて技術ノートのような静的 Web ページを作成し、GitHub Pages で公開することができました。
今回は紹介しませんでしたが同じソースファイルから HTML ファイルだけでなく PDF ファイルも作成することができます。シンプルなツールで使いやすく、みなさんもたくさんドキュメントを書きたくなるのではないでしょうか。