GoFのデザインパターンを学習する素材として、書籍「増補改訂版Java言語で学ぶデザインパターン入門」が参考になるみたいですね。
取り上げられている実例は、JAVAベースのため、Pythonで同等のプラクティスに挑んだことがありました。
Qiita記事: "Pythonで、デザインパターン「Decorator」を学ぶ"
今回は、Pythonで実装した”Decorator”のサンプルアプリをGolangで実装し直してみました。
■ Decorator(デコレータ・パターン)
Decoratorパターン(デコレータ・パターン)とは、GoF(Gang of Four; 4人のギャングたち)によって定義されたデザインパターンの1つである。 このパターンは、既存のオブジェクトに新しい機能や振る舞いを動的に追加することを可能にする。
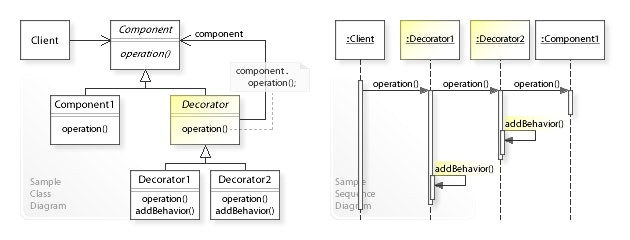
UML class and sequence diagram
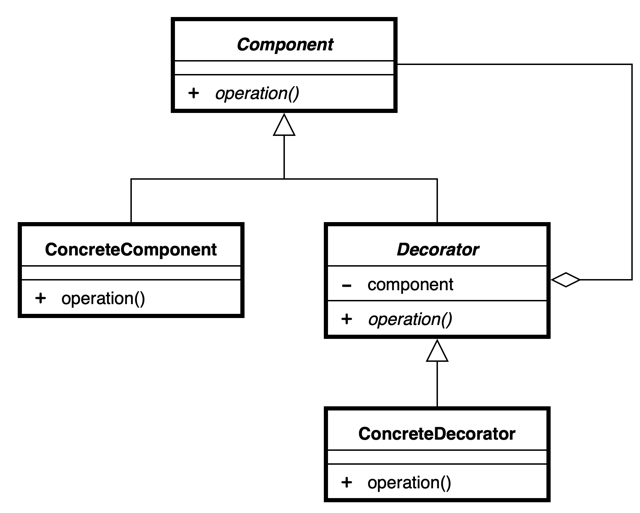
UML class diagram
□ 備忘録
オブジェクトにどんどんデコレーション(飾り付け)を施していくようなデザインパターンとのことです。
スポンジケーキに、クリームを塗り、イチゴを載せればストロベリーショートケーキになるような感じです。
Pythonプログラミングに携わっていると、よくお目にかかるやつですね。
■ "Decorator"のサンプルプログラム
実際に、Decoratorパターンを活用したサンプルプログラムを動かしてみて、次のような動作の様子を確認したいと思います。
- 文字列
Hello, world.をそのまま表示する - 文字列
Hello, world.の前後に、#文字を差し込んで表示する - 文字列
Hello, world.の前後に、#文字を差し込んで、さらに、 枠線で囲んで表示する - 文字列
HELLOを 枠線で囲んで、前後に、*文字を差し込んで、さらに、 枠線で2回囲んで、、、(以下、略)
$ go run Main.go
Hello, world.
# Hello, world.#
+---------------+
|#Hello, world.#|
+---------------+

/+-----------+/
/|+---------+|/
/||*+-----+*||/
/||*|HELLO|*||/
/||*+-----+*||/
/|+---------+|/
/+-----------+/
見た目、ハノイの塔みたいな表示になりました。
■ サンプルプログラムの詳細
Gitリポジトリにも、同様のコードをアップしています。
https://github.com/ttsubo/study_of_design_pattern_with_golang/tree/master/Decorator
- ディレクトリ構成
.
├── Main.go
└── decorator
    ├── border.go
    └── display.go
(1) Componentの役
機能を追加するときの核に役です。Component役は。スポンジケーキのインタフェースだけを定めます。
サンプルプログラムでは、display構造体と、displayInterfaceインタフェースが、この役を努めます。
package decorator

import "fmt"

type displayInterface interface {
	getColumns() int
	getRows() int
	getRowText(row int) string
}

type display struct {
	myDisplay displayInterface
}

// Show func for printing something
func (d *display) Show() {
	str := ""
	for i := 0; i < d.myDisplay.getRows(); i++ {
		str += d.myDisplay.getRowText(i) + "\n"
	}
	fmt.Printf("%s", str)
}

... (snip)
(2) ConcreteComponentの役
Component役のインタフェースを実装している具体的なスポンジケーキです。
サンプルプログラムでは、StringDisplay構造体が、この役を努めます。
// StringDisplay is struct
type StringDisplay struct {
	*display
	String string
}

// NewStringDisplay func for initalizing StringDisplay
func NewStringDisplay(str string) *StringDisplay {
	stringDisplay := &StringDisplay{
		display: &display{},
		String:  str,
	}
	stringDisplay.myDisplay = stringDisplay
	return stringDisplay
}

func (s *StringDisplay) getColumns() int {
	return len(s.String)
}

func (s *StringDisplay) getRows() int {
	return 1
}

func (s *StringDisplay) getRowText(row int) string {
	if row == 0 {
		return s.String
	}
	return ""
}
(3) Decorator(装飾者)の役
Component役と同じインタフェースを持ちます。そして、さらに、このDecorator役が飾る対象となるComponent役を持っています。この役は、自分が飾っている対象を「知っている」わけです。
サンプルプログラムでは、border構造体が、この役を努めます。
package decorator

type border struct {
	*display
	neighorDisplay displayInterface
}

... (snip)
(4) ConcreteDecorator(具体的な装飾者)の役
具体的なDecoratorの役です。
サンプルプログラムでは、SideBorder構造体と、FullBorder構造体が、この役を努めます。
// SideBorder is struct
type SideBorder struct {
	*border
	borderChar string
}

// NewSideBorder func for initalizing SideBorder
func NewSideBorder(displayIf displayInterface, borderChar string) *SideBorder {
	sideBorder := &SideBorder{
		border: &border{
			display:        &display{},
			neighorDisplay: displayIf,
		},
		borderChar: borderChar,
	}
	sideBorder.myDisplay = sideBorder
	return sideBorder
}

func (s *SideBorder) getColumns() int {
	return len(s.borderChar)*2 + s.neighorDisplay.getColumns()
}

func (s *SideBorder) getRows() int {
	return s.neighorDisplay.getRows()
}

func (s *SideBorder) getRowText(row int) string {
	return s.borderChar + s.neighorDisplay.getRowText(row) + s.borderChar
}
// FullBorder is struct
type FullBorder struct {
	*SideBorder
}

// NewFullBorder func for initalizing SideBorder
func NewFullBorder(displayIf displayInterface) *FullBorder {
	fullBorder := &FullBorder{
		SideBorder: &SideBorder{
			border: &border{
				display:        &display{},
				neighorDisplay: displayIf}},
	}
	fullBorder.myDisplay = fullBorder
	return fullBorder
}

func (f *FullBorder) getColumns() int {
	return 2 + f.neighorDisplay.getColumns()
}

func (f *FullBorder) getRows() int {
	return 2 + f.neighorDisplay.getRows()
}

func (f *FullBorder) getRowText(row int) string {
	if row == 0 {
		return "+" + f.makeLine("-", f.neighorDisplay.getColumns()) + "+"
	} else if row == f.neighorDisplay.getRows()+1 {
		return "+" + f.makeLine("-", f.neighorDisplay.getColumns()) + "+"
	} else {
		return "|" + f.neighorDisplay.getRowText(row-1) + "|"
	}
}

func (f *FullBorder) makeLine(char string, count int) string {
	buf := ""
	for i := 0; i < count; i++ {
		buf += char
	}
	return buf
}
(5) Client(依頼人)の役
サンプルプログラムでは、startMain関数が、この役を努めます。
package main

import (
	"fmt"

	"./decorator"
)

func startMain() {
	b1 := decorator.NewStringDisplay("Hello, world.")
	b2 := decorator.NewSideBorder(b1, "#")
	b3 := decorator.NewFullBorder(b2)
	b1.Show()
	b2.Show()
	b3.Show()
	fmt.Println("")
	b4 := decorator.NewSideBorder(
		decorator.NewFullBorder(
			decorator.NewFullBorder(
				decorator.NewSideBorder(
					decorator.NewFullBorder(
						decorator.NewStringDisplay("HELLO"),
					),
					"*",
				),
			),
		),
		"/",
	)
	b4.Show()
}

func main() {
	startMain()
}