世間一般では、kubernetesを活用したマルチノード環境でのDockerコンテナ群のネットワーキングが浸透している最中、
敢えて、Project Calicoを活用したdockerコンテナ間ネットワーク環境整備を行う必要があったため、その作業メモを残しておきます。
ちなみに、Project Calicoのイントロダクションには、
"Note: For integrations with the Mesos, DC/OS, and Docker orchestrators, use Calico v2.6."
という記載があるので、最新バージョンv3.2ではなく、v2.6を使用する必要があります。
(いきなりの挫折感 ....)
なお、Project Calicoの動作概要を理解するのは、なかなか大変だと思いますが、こちらのSlideShare資料が大変参考になりました。
フォーラム資料(2018/01/19) Calico検証PJ CalicoとBGP
■ Ubuntu環境準備
今回、構築したdockerコンテナ間ネットワークは、次のようなUbuntu構成(3台)としました。
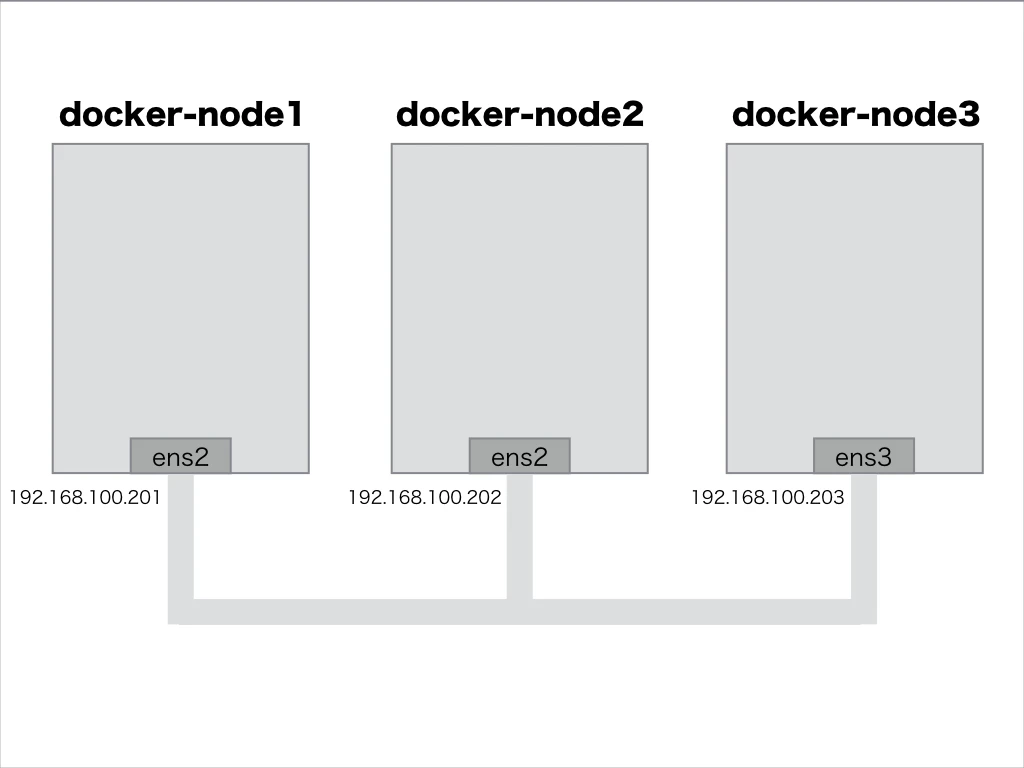
(1) Ubuntuサーバ環境
tsubo@docker-node1:~$ cat /etc/lsb-release
DISTRIB_ID=Ubuntu
DISTRIB_RELEASE=16.04
DISTRIB_CODENAME=xenial
DISTRIB_DESCRIPTION="Ubuntu 16.04.5 LTS"
(2) Docker for ubuntu インストール
- Docker for ubuntu をインストールする
tsubo@docker-node1:~$ docker version
Client:
 Version:           18.06.1-ce
 API version:       1.38
 Go version:        go1.10.3
 Git commit:        e68fc7a
 Built:             Tue Aug 21 17:24:56 2018
 OS/Arch:           linux/amd64
 Experimental:      false

Server:
 Engine:
  Version:          18.06.1-ce
  API version:      1.38 (minimum version 1.12)
  Go version:       go1.10.3
  Git commit:       e68fc7a
  Built:            Tue Aug 21 17:23:21 2018
  OS/Arch:          linux/amd64
  Experimental:     false
- Ubuntuサーバ側ネットワーク構成を確認しておく
tsubo@docker-node1:~$ ifconfig
docker0   Link encap:Ethernet  HWaddr 02:42:4b:53:0c:44
          inet addr:172.17.0.1  Bcast:172.17.255.255  Mask:255.255.0.0
          UP BROADCAST MULTICAST  MTU:1500  Metric:1
          RX packets:0 errors:0 dropped:0 overruns:0 frame:0
          TX packets:0 errors:0 dropped:0 overruns:0 carrier:0
          collisions:0 txqueuelen:0
          RX bytes:0 (0.0 B)  TX bytes:0 (0.0 B)

ens2      Link encap:Ethernet  HWaddr 52:54:00:2a:d7:b1
          inet addr:192.168.100.201  Bcast:192.168.100.255  Mask:255.255.255.0
          inet6 addr: 240b:11:53a0:400:5054:ff:fe2a:d7b1/64 Scope:Global
          inet6 addr: fe80::5054:ff:fe2a:d7b1/64 Scope:Link
          UP BROADCAST RUNNING MULTICAST  MTU:1500  Metric:1
          RX packets:3009 errors:0 dropped:0 overruns:0 frame:0
          TX packets:3012 errors:0 dropped:0 overruns:0 carrier:0
          collisions:0 txqueuelen:1000
          RX bytes:248266 (248.2 KB)  TX bytes:265342 (265.3 KB)

lo        Link encap:Local Loopback
          inet addr:127.0.0.1  Mask:255.0.0.0
          inet6 addr: ::1/128 Scope:Host
          UP LOOPBACK RUNNING  MTU:65536  Metric:1
          RX packets:285 errors:0 dropped:0 overruns:0 frame:0
          TX packets:285 errors:0 dropped:0 overruns:0 carrier:0
          collisions:0 txqueuelen:1
          RX bytes:18952 (18.9 KB)  TX bytes:18952 (18.9 KB)
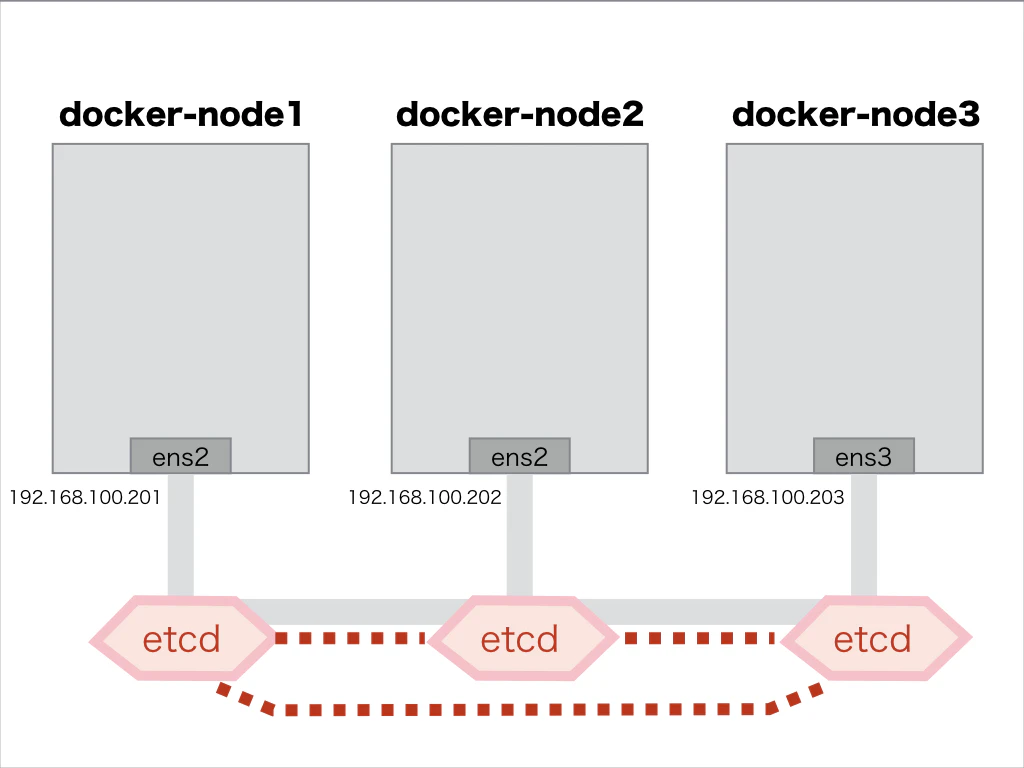
■ etcd環境構築
dockerコンテナ間ネットワーク情報は、次のようなUbuntu構成(3台)に、KeyValueストア"etcd"を配備して共有する形態となります。
(1) etcd環境整備
etcd3 multi-node clusterの構築手順を参考に、etcd環境をセットアップする。
以下、 docker-node1 でのetcd環境整備の作業履歴メモ
- etcdデータ保管ディレクトリの作成
tsubo@docker-node1:~$ sudo mkdir -p /var/lib/etcd
tsubo@docker-node1:~$ sudo chown -R root:$(whoami) /var/lib/etcd
tsubo@docker-node1:~$ sudo chmod -R a+rwx /var/lib/etcd
- etcdソフトウェアのダウンロード&配備
tsubo@docker-node1:~$ wget https://github.com/coreos/etcd/releases/download/v3.3.9/etcd-v3.3.9-linux-amd64.tar.gz
tsubo@docker-node1:~$ gzip -d etcd-v3.3.9-linux-amd64.tar.gz
tsubo@docker-node1:~$ tar xvf etcd-v3.3.9-linux-amd64.tar
tsubo@docker-node1:~$ cd etcd-v3.3.9-linux-amd64/
tsubo@docker-node1:~/etcd-v3.3.9-linux-amd64$ ls -l
total 33992
drwxr-xr-x 11 tsubo tsubo     4096 Jul 25 02:13 Documentation
-rw-r--r--  1 tsubo tsubo    38864 Jul 25 02:13 README-etcdctl.md
-rw-r--r--  1 tsubo tsubo     7262 Jul 25 02:13 README.md
-rw-r--r--  1 tsubo tsubo     7855 Jul 25 02:13 READMEv2-etcdctl.md
-rwxr-xr-x  1 tsubo tsubo 18934016 Jul 25 02:13 etcd
-rwxr-xr-x  1 tsubo tsubo 15809280 Jul 25 02:13 etcdctl

tsubo@docker-node1:~/etcd-v3.3.9-linux-amd64$ sudo cp etcd /usr/local/sbin/
tsubo@docker-node1:~/etcd-v3.3.9-linux-amd64$ sudo cp etcdctl /usr/local/sbin/
- etcd起動用systemdファイルの準備
tsubo@docker-node1:~$ IP_1="192.168.100.201"
tsubo@docker-node1:~$ IP_2="192.168.100.202"
tsubo@docker-node1:~$ IP_3="192.168.100.203"
tsubo@docker-node1:~$ cat > /tmp/my-etcd-1.service <<EOF
> [Unit]
> Description=etcd
> Documentation=https://github.com/coreos/etcd
> Conflicts=etcd.service
> Conflicts=etcd2.service
>
> [Service]
> Type=notify
> Restart=always
> RestartSec=5s
> LimitNOFILE=40000
> TimeoutStartSec=0
>
> ExecStart=/usr/local/sbin/etcd --name my-etcd-1 \
>     --data-dir /var/lib/etcd \
>     --listen-client-urls http://${IP_1}:2379 \
>     --advertise-client-urls http://${IP_1}:2379 \
>     --listen-peer-urls http://${IP_1}:2380 \
>     --initial-advertise-peer-urls http://${IP_1}:2380 \
>     --initial-cluster my-etcd-1=http://${IP_1}:2380,my-etcd-2=http://${IP_2}:2380,my-etcd-3=http://${IP_3}:2380 \
>     --initial-cluster-token my-etcd-token \
>     --initial-cluster-state new
>
> [Install]
> WantedBy=multi-user.target
> EOF
tsubo@docker-node1:~$ sudo mv /tmp/my-etcd-1.service /etc/systemd/system/my-etcd-1.service
- etcd起動用systemdファイルの適用
tsubo@docker-node1:~$ sudo systemctl daemon-reload
tsubo@docker-node1:~$ sudo systemctl enable my-etcd-1.service
tsubo@docker-node1:~$ sudo systemctl start my-etcd-1.service
(2) etcdクラスタ構成確認
docker-node1, docker-node2, docker-node3全てにおいて、etcd環境整備を行ったのちに、etcdクラスタ構成を確認しておく。
tsubo@docker-node1:~$ etcdctl -C http://192.168.100.201:2379 cluster-health
member 39b9111a3bc023ca is healthy: got healthy result from http://192.168.100.201:2379
member 98c8df2619e159f6 is healthy: got healthy result from http://192.168.100.202:2379
member e322c953b6b14c07 is healthy: got healthy result from http://192.168.100.203:2379
cluster is healthy
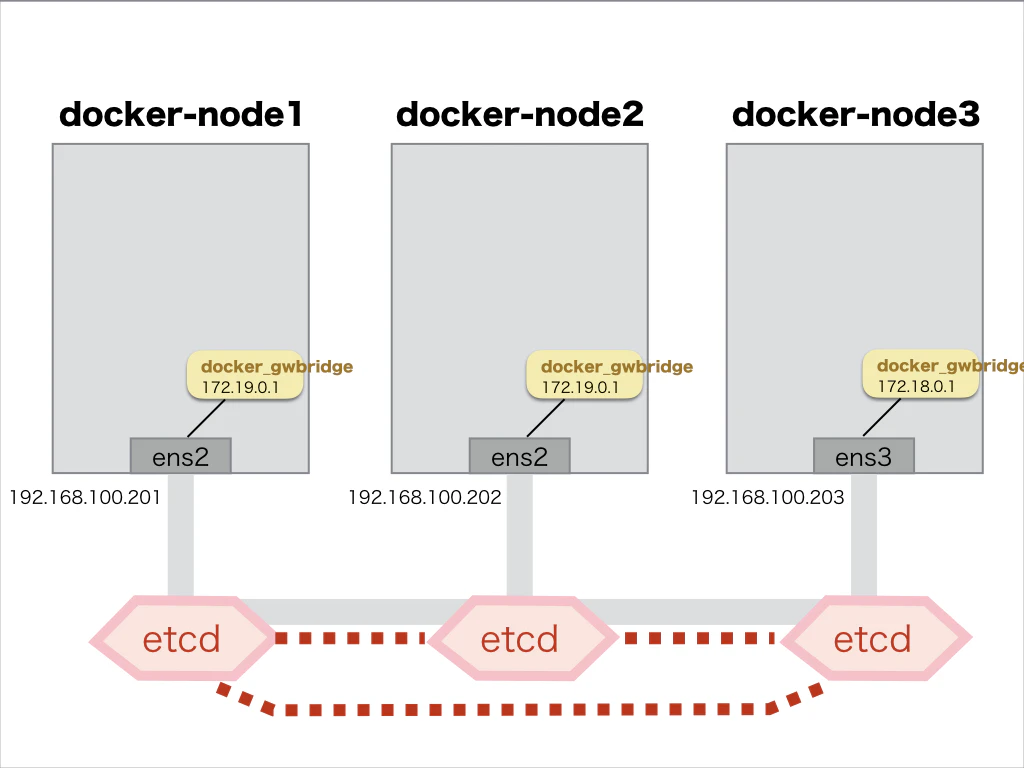
■ Docker with Multi-host Networking 環境整備
マルチホスト環境でのdockerコンテナ間ネットワークが有効になるように、Dockerエンジンの起動オプションを変更します。
(1) docker-node1での、docker起動オプション設定
- docker-engine起動ファイル場所の確認
tsubo@docker-node1:~$ sudo service docker status
● docker.service - Docker Application Container Engine
   Loaded: loaded (/lib/systemd/system/docker.service; enabled; vendor preset: enabled)
   Active: active (running) since Thu 2018-09-27 08:44:20 JST; 1h 10min ago
     Docs: https://docs.docker.com
 Main PID: 640 (dockerd)
    Tasks: 32
   Memory: 179.5M
      CPU: 20.955s
   CGroup: /system.slice/docker.service
           ├─640 /usr/bin/dockerd -H fd://
           └─752 docker-containerd --config /var/run/docker/containerd/containerd.toml

Sep 27 08:44:19 docker-node1 dockerd[640]: time="2018-09-27T08:44:19.315284175+09:00" lev
Sep 27 08:44:19 docker-node1 dockerd[640]: time="2018-09-27T08:44:19.315331295+09:00" lev
Sep 27 08:44:19 docker-node1 dockerd[640]: time="2018-09-27T08:44:19.315661102+09:00" lev
Sep 27 08:44:19 docker-node1 dockerd[640]: time="2018-09-27T08:44:19.315687104+09:00" lev
Sep 27 08:44:19 docker-node1 dockerd[640]: time="2018-09-27T08:44:19.837864761+09:00" lev
Sep 27 08:44:19 docker-node1 dockerd[640]: time="2018-09-27T08:44:19.979038913+09:00" lev
Sep 27 08:44:20 docker-node1 dockerd[640]: time="2018-09-27T08:44:20.016485828+09:00" lev
Sep 27 08:44:20 docker-node1 dockerd[640]: time="2018-09-27T08:44:20.016885790+09:00" lev
Sep 27 08:44:20 docker-node1 dockerd[640]: time="2018-09-27T08:44:20.070150577+09:00" lev
Sep 27 08:44:20 docker-node1 systemd[1]: Started Docker Application Container Engine.
- docker engine停止
tsubo@docker-node1:~$ sudo service docker stop
- docker-engine起動ファイルの編集
tsubo@docker-node1:~$ sudo vi /lib/systemd/system/docker.service
...(snip)
ExecStart=/usr/bin/dockerd -H tcp://0.0.0.0:2376 -H unix:///var/run/docker.sock --cluster-store=etcd://192.168.100.201:2379 --cluster-advertise=192.168.100.201:2376
...(snip)
- docker-engine起動ファイルの適用
tsubo@docker-node1:~$ sudo systemctl daemon-reload
- docker-engine起動
tsubo@docker-node1:~$ sudo service docker start
- docker-engine起動結果の確認
tsubo@docker-node1:~$ sudo service docker status
● docker.service - Docker Application Container Engine
   Loaded: loaded (/lib/systemd/system/docker.service; enabled; vendor preset: enabled)
   Active: active (running) since Thu 2018-09-27 09:56:25 JST; 8s ago
     Docs: https://docs.docker.com
 Main PID: 1668 (dockerd)
    Tasks: 27
   Memory: 174.4M
      CPU: 948ms
   CGroup: /system.slice/docker.service
           ├─1668 /usr/bin/dockerd -H tcp://0.0.0.0:2376 -H unix:///var/run/docker.sock -
           └─1678 docker-containerd --config /var/run/docker/containerd/containerd.toml

Sep 27 09:56:23 docker-node1 dockerd[1668]: time="2018-09-27T09:56:23.887721158+09:00" le
Sep 27 09:56:23 docker-node1 dockerd[1668]: time="2018-09-27T09:56:23.887777496+09:00" le
Sep 27 09:56:24 docker-node1 dockerd[1668]: time="2018-09-27T09:56:24.439637282+09:00" le
Sep 27 09:56:25 docker-node1 dockerd[1668]: time="2018-09-27T09:56:25.563648097+09:00" le
Sep 27 09:56:25 docker-node1 dockerd[1668]: time="2018-09-27T09:56:25.716963378+09:00" le
Sep 27 09:56:25 docker-node1 dockerd[1668]: time="2018-09-27T09:56:25.819701288+09:00" le
Sep 27 09:56:25 docker-node1 dockerd[1668]: time="2018-09-27T09:56:25.819793818+09:00" le
Sep 27 09:56:25 docker-node1 dockerd[1668]: time="2018-09-27T09:56:25.852983239+09:00" le
Sep 27 09:56:25 docker-node1 dockerd[1668]: time="2018-09-27T09:56:25.852998881+09:00" le
Sep 27 09:56:25 docker-node1 systemd[1]: Started Docker Application Container Engine.
(2) docker-node2での、docker起動オプション設定
- docker engine停止
tsubo@docker-node2:~$ sudo service docker stop
- docker-engine起動ファイルの編集
tsubo@docker-node2:~$ sudo vi /lib/systemd/system/docker.service
...(snip)
ExecStart=/usr/bin/dockerd -H tcp://0.0.0.0:2376 -H unix:///var/run/docker.sock --cluster-store=etcd://192.168.100.202:2379 --cluster-advertise=192.168.100.202:2376
...(snip)
- docker-engine起動ファイルの適用
tsubo@docker-node2:~$ sudo systemctl daemon-reload
- docker-engine起動
tsubo@docker-node2:~$ sudo service docker start
(3) docker-node3での、docker起動オプション設定
- docker engine停止
tsubo@docker-node3:~$ sudo service docker stop
- docker-engine起動ファイルの編集
tsubo@docker-node3:~$ sudo vi /lib/systemd/system/docker.service
...(snip)
ExecStart=/usr/bin/dockerd -H tcp://0.0.0.0:2376 -H unix:///var/run/docker.sock --cluster-store=etcd://192.168.100.203:2379 --cluster-advertise=192.168.100.203:2376
...(snip)
- docker-engine起動ファイルの適用
tsubo@docker-node3:~$ sudo systemctl daemon-reload
- docker-engine起動
tsubo@docker-node3:~$ sudo service docker start
■ Calico環境セットアップ
以下、 docker-node1 でのCalico環境の作業履歴メモになります
(1) calicoctl用バイナリファイルをダウンロードする
tsubo@docker-node1:~$ sudo wget -O /usr/local/bin/calicoctl https://github.com/projectcalico/calicoctl/releases/download/v1.6.4/calicoctl
(2) calicoctl用コマンドに実行権限を付与する
tsubo@docker-node1:~$ sudo chmod +x /usr/local/bin/calicoctl
(3) "Configuring calicoctl - etcdv2 datastore"を参考にして、コンフィグファイルを作成する
apiVersion: v1
kind: calicoApiConfig
metadata:
spec:
  datastoreType: "etcdv2"
  etcdEndpoints: "http://192.168.100.201:2379,http://192.168.100.202:2379,http://192.168.100.203:2379"
作成したコンフィグファイルを配置する
tsubo@docker-node1:~$ sudo mkdir /etc/calico
tsubo@docker-node1:~$ sudo cp calicoctl.cfg /etc/calico/calicoctl.cfg
(4) とりあえず、calicoを起動してみる
tsubo@docker-node1:~$ sudo calicoctl node run --node-image=quay.io/calico/node:v2.6.11
Running command to load modules: modprobe -a xt_set ip6_tables
Enabling IPv4 forwarding
Enabling IPv6 forwarding
Increasing conntrack limit
Removing old calico-node container (if running).
Running the following command to start calico-node:

docker run --net=host --privileged --name=calico-node -d --restart=always -e NODENAME=docker-node1 -e CALICO_NETWORKING_BACKEND=bird -e CALICO_LIBNETWORK_ENABLED=true -e ETCD_ENDPOINTS=http://192.168.100.201:2379,http://192.168.100.202:2379,http://192.168.100.203:2379 -v /var/log/calico:/var/log/calico -v /var/run/calico:/var/run/calico -v /lib/modules:/lib/modules -v /run:/run -v /run/docker/plugins:/run/docker/plugins -v /var/run/docker.sock:/var/run/docker.sock quay.io/calico/node:v2.6.11

Image may take a short time to download if it is not available locally.
Container started, checking progress logs.

2018-09-27 04:30:10.111 [INFO][10] startup.go 173: Early log level set to info
2018-09-27 04:30:10.111 [INFO][10] client.go 202: Loading config from environment
2018-09-27 04:30:10.111 [INFO][10] startup.go 83: Skipping datastore connection test
2018-09-27 04:30:10.250 [INFO][10] startup.go 392: IPv4 address 192.168.100.201 discovered on interface ens2
2018-09-27 04:30:10.250 [INFO][10] startup.go 530: No AS number configured on node resource, using global value
2018-09-27 04:30:10.261 [INFO][10] etcd.go 111: Ready flag is already set
2018-09-27 04:30:10.273 [INFO][10] client.go 139: Using previously configured cluster GUID
2018-09-27 04:30:10.483 [INFO][10] compat.go 796: Returning configured node to node mesh
2018-09-27 04:30:10.628 [INFO][10] startup.go 131: Using node name: docker-node1
2018-09-27 04:30:10.724 [INFO][18] client.go 202: Loading config from environment
Starting libnetwork service
Calico node started successfully
(5) calicoの状態を確認してみる
tsubo@docker-node1:~$ docker ps
CONTAINER ID        IMAGE                         COMMAND             CREATED             STATUS              PORTS               NAMES
af7a0141e898        quay.io/calico/node:v2.6.11   "start_runit"       43 seconds ago      Up 42 seconds                           calico-node
tsubo@docker-node1:~$ ETCD_ENDPOINTS=http://192.168.100.201:2379 calicoctl get bgppeers
SCOPE   PEERIP   NODE   ASN
tsubo@docker-node1:~$ sudo calicoctl node status
Calico process is running.

IPv4 BGP status
No IPv4 peers found.

IPv6 BGP status
No IPv6 peers found.
(6) とりあえず、停止してみる
tsubo@docker-node1:~$ docker stop calico-node
calico-node
■ 実際に、Calicoを動かしてみる
実際、以下のような構成で動作を確認してみました
- マルチホスト環境下で、各々のノードで"ubuntu01","ubuntu02","ubuntu03"のDockerコンテナを動作される
- Dockerコンテナ側ネットワーク情報が、対向BGPルータ(GoBGP-1)に経路配信されるようにBGP Peer開設する
- GoBGP-1側から、"ubuntu01","ubuntu02","ubuntu03"へのping通信が可能なことを確認する
+---------+                      +---------+                      +----------------+
|         | .101    iBGP    .201 |         |                      | ubuntu01       |
| GoBGP-1 | +------------------+ | Calico  | +------------------+ | (172.16.100.1) |
|         |  192.168.100.0/24    |         |  172.16.100.0/24     +----------------+
|         |                      |         |                      +----------------+
+---------+                      +---------+                      | ubuntu02       |
< AS65001 >                      < AS65001 >                      | (172.16.100.2) |
                                                                  +----------------+
                                                                  +----------------+
                                                                  | ubuntu03       |
                                                                  | (172.16.100.3) |
                                                                  +----------------+
ちなみに、Calicoと対向BGPルータ間は、iBGPを指定する必要がありそうです。
eBGPだと、マルチホスト環境に配置されるdockerコンテナのIPアドレスが、一部適切にBGP配信されませんでした。
(1) 各ノードにて、Calicoを起動する
以下、 docker-node1 でのCalico環境の作業履歴メモになります
tsubo@docker-node1:~$ sudo calicoctl node run --node-image=quay.io/calico/node:v2.6.11
Running command to load modules: modprobe -a xt_set ip6_tables
Enabling IPv4 forwarding
Enabling IPv6 forwarding
Increasing conntrack limit
Removing old calico-node container (if running).
Running the following command to start calico-node:

docker run --net=host --privileged --name=calico-node -d --restart=always -e NODENAME=docker-node1 -e CALICO_NETWORKING_BACKEND=bird -e CALICO_LIBNETWORK_ENABLED=true -e ETCD_ENDPOINTS=http://192.168.100.201:2379,http://192.168.100.202:2379,http://192.168.100.203:2379 -v /var/log/calico:/var/log/calico -v /var/run/calico:/var/run/calico -v /lib/modules:/lib/modules -v /run:/run -v /run/docker/plugins:/run/docker/plugins -v /var/run/docker.sock:/var/run/docker.sock quay.io/calico/node:v2.6.11

Image may take a short time to download if it is not available locally.
Container started, checking progress logs.

2018-09-29 22:36:36.879 [INFO][10] startup.go 173: Early log level set to info
2018-09-29 22:36:36.879 [INFO][10] client.go 202: Loading config from environment
2018-09-29 22:36:36.880 [INFO][10] startup.go 83: Skipping datastore connection test
2018-09-29 22:36:37.018 [INFO][10] startup.go 392: IPv4 address 192.168.100.201 discovered on interface ens2
2018-09-29 22:36:37.019 [INFO][10] startup.go 532: Using AS number 65001 configured in node resource
2018-09-29 22:36:37.028 [INFO][10] etcd.go 111: Ready flag is already set
2018-09-29 22:36:37.058 [INFO][10] client.go 139: Using previously configured cluster GUID
2018-09-29 22:36:37.212 [INFO][10] compat.go 796: Returning configured node to node mesh
2018-09-29 22:36:37.342 [INFO][10] startup.go 131: Using node name: docker-node1
2018-09-29 22:36:37.445 [INFO][17] client.go 202: Loading config from environment
Starting libnetwork service
Calico node started successfully
(2) Nodeリソースを定義する
- Nodeリソース設定用コンフィグファイルを準備する
apiVersion: v1
kind: node
metadata:
  name: docker-node1
spec:
  bgp:
    asNumber: 65001
    ipv4Address: 192.168.100.201/24
- Nodeリソース設定用コンフィグファイルを適用する
tsubo@docker-node1:~$ calicoctl apply -f add_node.cfg
Successfully applied 1 'node' resource(s)
- その他ノード(docker-node2、docker-node3)でも、同様にNodeリソースを作成する
- 正しく、Nodeリソースが作成されたことを確認する
tsubo@docker-node1:~$ calicoctl get node --output wide
NAME           ASN     IPV4                 IPV6
docker-node1   65001   192.168.100.201/24
docker-node2   65001   192.168.100.202/24
docker-node3   65001   192.168.100.203/24
(3) ip_poolを作る
- ip_tool設定用コンフィグファイルを準備する
apiVersion: v1
kind: ipPool
metadata:
  cidr: 172.16.100.0/24
spec:
  ipip:
    enabled: false
  nat-outgoing: false
  disabled: false
- ip_tool設定用コンフィグファイルを適用する
tsubo@docker-node1:~$ calicoctl apply -f add_ip_pool.cfg
Successfully applied 1 'ipPool' resource(s)
- 正しく、ip_toolリソースが作成されたことを確認する
tsubo@docker-node1:~$ calicoctl get pool --output=wide
CIDR                       NAT     IPIP
172.16.100.0/24            false   false
192.168.0.0/16             true    false
fd80:24e2:f998:72d6::/64   false   false
(4) Docker networkを作る
tsubo@docker-node1:~$ docker network create --driver calico \
> --ipam-driver calico-ipam \
> --subnet 172.16.100.0/24 \
> calico-net
46a199107d5f329a7f785a11de20a6208224c07892d334db66957933454c91f1
(5) profileを作る
- profile設定用コンフィグファイルを準備する
apiVersion: v1
kind: profile
metadata:
  name: calico-net
  tags:
  - calico-net
spec:
  egress:
  - action: allow
    destination: {}
    source: {}
  ingress:
  - action: allow
    destination: {}
    source: {}
- profile設定用コンフィグファイルを適用する
tsubo@docker-node1:~$ calicoctl apply -f add_profile.cfg
Successfully applied 1 'profile' resource(s)
- 正しく、profileリソースが作成されたことを確認する
tsubo@docker-node1:~$ calicoctl get profile --output=wide
NAME         TAGS
calico-net   calico-net
(6) BGP Peerを開設する
- BGP Peer設定用コンフィグファイルを準備する
apiVersion: v1
kind: bgpPeer
metadata:
  peerIP: 192.168.100.101
  scope: global
spec:
  asNumber: 65001
- BGP Peer設定用コンフィグファイルを適用する
tsubo@docker-node1:~$ calicoctl apply -f add_bgp_peer.cfg
Successfully applied 1 'bgpPeer' resource(s)
- 正しく、BGP Peerリソースが作成されたことを確認する
tsubo@docker-node1:~$ calicoctl get bgpPeer --output=wide
SCOPE    PEERIP            NODE   ASN
global   192.168.100.101          65001
(7) Calicoルータ(BIRD)でBGP Peerの状態を確認する
- BGP Peer開設の状態を確認する
tsubo@docker-node1:~$ sudo calicoctl node status
Calico process is running.

IPv4 BGP status
+-----------------+-------------------+-------+----------+-------------+
|  PEER ADDRESS   |     PEER TYPE     | STATE |  SINCE   |    INFO     |
+-----------------+-------------------+-------+----------+-------------+
| 192.168.100.202 | node-to-node mesh | up    | 22:50:03 | Established |
| 192.168.100.203 | node-to-node mesh | up    | 22:59:23 | Established |
| 192.168.100.101 | global            | up    | 22:59:52 | Established |
+-----------------+-------------------+-------+----------+-------------+
tsubo@docker-node1:~$ ETCD_ENDPOINTS=http://192.168.100.201:2379 calicoctl get bgppeers
SCOPE    PEERIP            NODE   ASN
global   192.168.100.101          65001
(8) 対向BGPルータでBGP Peerの状態を確認する
- BGP Neighborを確認する
tsubo@gobgp-1:~/golang/bin$ gobgp neighbor
Peer               AS  Up/Down State       |#Received  Accepted
192.168.100.201 65001 00:00:56 Establ      |        1         1
192.168.100.202 65001 00:00:56 Establ      |        1         1
192.168.100.203 65001 00:00:57 Establ      |        1         1
- Calico側から経路広告された状態を確認する
tsubo@gobgp-1:~/golang/bin$ gobgp global rib
   Network              Next Hop         AS_PATH   Age        Attrs
*> 192.168.100.0/24     192.168.100.203            00:01:24   [{Origin: i} {LocalPref: 100}]
*  192.168.100.0/24     192.168.100.201            00:01:24   [{Origin: i} {LocalPref: 100}]
*  192.168.100.0/24     192.168.100.202            00:01:24   [{Origin: i} {LocalPref: 100}]
(9) 各ノードで"ubuntu01","ubuntu02","ubuntu03"のDockerコンテナを動作させる
- docker-node1上で、Dockerコンテナ"ubuntu01"を動作させる
tsubo@docker-node1:~$ docker run -d --name ubuntu01 -h ubuntu01 --net calico-net --ip 172.16.100.1 -it ubuntu:14.04 bash
a5a9244e3077dcf90505696bc64d6111424351e02423d36a4abe6610b98ec83d
- docker-node2上で、Dockerコンテナ"ubuntu02"を動作させる
tsubo@docker-node2:~$ docker run -d --name ubuntu02 -h ubuntu02 --net calico-net --ip 172.16.100.2 -it ubuntu:14.04 bash
1ef1524bf982a6fabf8592ff4e240187c44d1000ae1698b7071b1d2befa95690
- docker-node3上で、Dockerコンテナ"ubuntu03"を動作させる
tsubo@docker-node3:~$ docker run -d --name ubuntu03 -h ubuntu03 --net calico-net --ip 172.16.100.3 -it ubuntu:14.04 bash
d30911927b10a25d7fd992b68f84b02381eb6155136f8e4982512b96fa94bac9
- ipamの割り当て状況も、確認しておく-> calicoctl ipam
tsubo@docker-node1:~$ calicoctl ipam show --ip=172.16.100.1
No attributes defined for IP 172.16.100.1
tsubo@docker-node1:~$ calicoctl ipam show --ip=172.16.100.2
No attributes defined for IP 172.16.100.2
tsubo@docker-node1:~$ calicoctl ipam show --ip=172.16.100.3
No attributes defined for IP 172.16.100.3
tsubo@docker-node1:~$ calicoctl ipam show --ip=172.16.100.4
IP 172.16.100.4 is not currently assigned in block
(10) 再度、対向BGPルータでBGP Peerの状態を確認する
- BGP Neighborを確認する
tsubo@gobgp-1:~/golang/bin$ gobgp neighbor
Peer               AS  Up/Down State       |#Received  Accepted
192.168.100.201 65001 00:32:16 Establ      |        2         2
192.168.100.202 65001 00:32:17 Establ      |        2         2
192.168.100.203 65001 00:32:17 Establ      |        2         2
- Calico側から経路広告された状態を確認する
tsubo@gobgp-1:~/golang/bin$ gobgp global rib
   Network              Next Hop         AS_PATH   Age        Attrs
*> 172.16.100.0/26      192.168.100.201            00:11:47   [{Origin: i} {LocalPref: 100}]
*> 172.16.100.2/32      192.168.100.202            00:11:48   [{Origin: i} {LocalPref: 100}]
*> 172.16.100.3/32      192.168.100.203            00:11:48   [{Origin: i} {LocalPref: 100}]
*> 192.168.100.0/24     192.168.100.203            00:11:48   [{Origin: i} {LocalPref: 100}]
*  192.168.100.0/24     192.168.100.201            00:11:48   [{Origin: i} {LocalPref: 100}]
*  192.168.100.0/24     192.168.100.202            00:11:47   [{Origin: i} {LocalPref: 100}]
■ dockerコンテナと通信してみる
(1) dockerコンテナ間でping通信してみる
- dockerコンテナ"ubuntu01"と、dockerコンテナ"ubuntu02"との間でのping通信
root@ubuntu01:/# ifconfig
cali0     Link encap:Ethernet  HWaddr ee:ee:ee:ee:ee:ee
          inet addr:172.16.100.1  Bcast:172.16.100.1  Mask:255.255.255.255
          UP BROADCAST RUNNING MULTICAST  MTU:1500  Metric:1
          RX packets:15 errors:0 dropped:0 overruns:0 frame:0
          TX packets:9 errors:0 dropped:0 overruns:0 carrier:0
          collisions:0 txqueuelen:0
          RX bytes:1490 (1.4 KB)  TX bytes:830 (830.0 B)

lo        Link encap:Local Loopback
          inet addr:127.0.0.1  Mask:255.0.0.0
          UP LOOPBACK RUNNING  MTU:65536  Metric:1
          RX packets:0 errors:0 dropped:0 overruns:0 frame:0
          TX packets:0 errors:0 dropped:0 overruns:0 carrier:0
          collisions:0 txqueuelen:1
          RX bytes:0 (0.0 B)  TX bytes:0 (0.0 B)
root@ubuntu01:/# ping 172.16.100.2
PING 172.16.100.2 (172.16.100.2) 56(84) bytes of data.
64 bytes from 172.16.100.2: icmp_seq=1 ttl=62 time=1.25 ms
64 bytes from 172.16.100.2: icmp_seq=2 ttl=62 time=0.975 ms
64 bytes from 172.16.100.2: icmp_seq=3 ttl=62 time=1.08 ms
^C
--- 172.16.100.2 ping statistics ---
3 packets transmitted, 3 received, 0% packet loss, time 2003ms
rtt min/avg/max/mdev = 0.975/1.104/1.251/0.116 ms
root@ubuntu01:/# ping 172.16.100.3
PING 172.16.100.3 (172.16.100.3) 56(84) bytes of data.
64 bytes from 172.16.100.3: icmp_seq=1 ttl=62 time=1.36 ms
64 bytes from 172.16.100.3: icmp_seq=2 ttl=62 time=1.18 ms
64 bytes from 172.16.100.3: icmp_seq=3 ttl=62 time=1.10 ms
^C
--- 172.16.100.3 ping statistics ---
3 packets transmitted, 3 received, 0% packet loss, time 2002ms
rtt min/avg/max/mdev = 1.101/1.215/1.365/0.114 ms
(2) 対向BGPルータとdockerコンテナとの間でping通信してみる
tsubo@gobgp-1:~/golang/bin$ ping 172.16.100.1
PING 172.16.100.1 (172.16.100.1) 56(84) bytes of data.
64 bytes from 172.16.100.1: icmp_seq=1 ttl=63 time=0.735 ms
64 bytes from 172.16.100.1: icmp_seq=2 ttl=63 time=0.446 ms
64 bytes from 172.16.100.1: icmp_seq=3 ttl=63 time=0.657 ms
^C
--- 172.16.100.1 ping statistics ---
3 packets transmitted, 3 received, 0% packet loss, time 2000ms
rtt min/avg/max/mdev = 0.446/0.612/0.735/0.125 ms
tsubo@gobgp-1:~/golang/bin$ ping 172.16.100.2
PING 172.16.100.2 (172.16.100.2) 56(84) bytes of data.
64 bytes from 172.16.100.2: icmp_seq=1 ttl=63 time=1.20 ms
64 bytes from 172.16.100.2: icmp_seq=2 ttl=63 time=0.896 ms
64 bytes from 172.16.100.2: icmp_seq=3 ttl=63 time=1.01 ms
^C
--- 172.16.100.2 ping statistics ---
3 packets transmitted, 3 received, 0% packet loss, time 2002ms
rtt min/avg/max/mdev = 0.896/1.038/1.206/0.130 ms
tsubo@gobgp-1:~/golang/bin$ ping 172.16.100.3
PING 172.16.100.3 (172.16.100.3) 56(84) bytes of data.
64 bytes from 172.16.100.3: icmp_seq=1 ttl=63 time=1.16 ms
64 bytes from 172.16.100.3: icmp_seq=2 ttl=63 time=1.12 ms
64 bytes from 172.16.100.3: icmp_seq=3 ttl=63 time=0.917 ms
^C
--- 172.16.100.3 ping statistics ---
3 packets transmitted, 3 received, 0% packet loss, time 2003ms
rtt min/avg/max/mdev = 0.917/1.071/1.167/0.109 ms
(3) dockerコンテナ作成後の"calico-net"の構成状態を確認しておく
tsubo@docker-node1:~$ docker inspect calico-net
[
    {
        "Name": "calico-net",
        "Id": "46a199107d5f329a7f785a11de20a6208224c07892d334db66957933454c91f1",
        "Created": "2018-09-30T07:56:15.342247618+09:00",
        "Scope": "global",
        "Driver": "calico",
        "EnableIPv6": false,
        "IPAM": {
            "Driver": "calico-ipam",
            "Options": {},
            "Config": [
                {
                    "Subnet": "172.16.100.0/24"
                }
            ]
        },
        "Internal": false,
        "Attachable": false,
        "Ingress": false,
        "ConfigFrom": {
            "Network": ""
        },
        "ConfigOnly": false,
        "Containers": {
            "837ae4e77018e9117dbda427e20076e46e1dc8cc14760a9dd8156bcfe1a2fe74": {
                "Name": "ubuntu01",
                "EndpointID": "a1883bb96493b5d3367e0376d2ca8f47042c6c0d79a42961d42c20a23915a766",
                "MacAddress": "ee:ee:ee:ee:ee:ee",
                "IPv4Address": "172.16.100.1/32",
                "IPv6Address": ""
            },
            "ep-46bfcdedfa5d99d88be484673896e4211434ff2905524e29c483b057ac6d250e": {
                "Name": "ubuntu02",
                "EndpointID": "46bfcdedfa5d99d88be484673896e4211434ff2905524e29c483b057ac6d250e",
                "MacAddress": "ee:ee:ee:ee:ee:ee",
                "IPv4Address": "172.16.100.2/32",
                "IPv6Address": ""
            },
            "ep-a843cfb843cfeda10cd038e6c686466ef7ceed8da05c1f06795a85fd20f0f6f8": {
                "Name": "ubuntu03",
                "EndpointID": "a843cfb843cfeda10cd038e6c686466ef7ceed8da05c1f06795a85fd20f0f6f8",
                "MacAddress": "ee:ee:ee:ee:ee:ee",
                "IPv4Address": "172.16.100.3/32",
                "IPv6Address": ""
            }
        },
        "Options": {},
        "Labels": {}
    }
]
■ 終わりに
以前、Qiita記事「マルチホスト上での、dockerコンテナ間ネットワーク環境整備メモ(Overlay Networking w/ Etcd)」と比較してみると、Project Calicoのお手軽感が際立っている印象を受けました。