VMware Fusion on Mac OS X環境にて、vMXソフトウェアルータをセットアップした備忘録です。
- MacBook Pro (Retina, 15-inch, Mid 2015)
- プロセッサ: 2.2 GHz Intel Core i7
- メモリ:16 GB 1600 MHz DDR3
基本的には、"vMX Getting Started Guide for KVM"の記載に従って、vMX環境を整備しました。
■ vMXトライアル版の入手
次のURLから、vMXトライアル版をダウンロードします。
http://www.juniper.net/us/en/dm/free-vmx-trial
たぶん、ここの工程が、一番難易度が高いのかもしれません
■ vMXのセットアップ備忘録
最小構成となる、"Lab simulation"環境のセットアップを目指します。
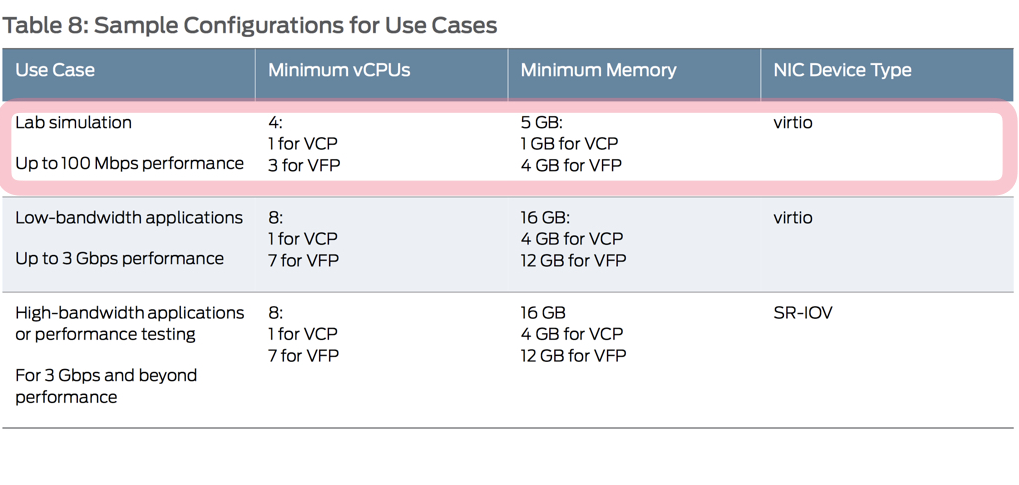
次なる難関は、最小構成といえども、4CPU, 5GB (+数GB)の仮想インスタンスが必要になる点ですね
(ちなみに、今回は、4CPU, 8GBの仮想インスタンスで作業を進めました。)
(1) Ubuntu環境確認
VMware Fusion上に、仮想インスタンス"Ubuntu Server版 16.04.1"をデプロイしました。
- Ubuntuバージョンの確認
$ cat /etc/lsb-release
DISTRIB_ID=Ubuntu
DISTRIB_RELEASE=16.04
DISTRIB_CODENAME=xenial
DISTRIB_DESCRIPTION="Ubuntu 16.04.1 LTS"
- 搭載nicの確認
$ lspci|grep Ethernet
02:01.0 Ethernet controller: Intel Corporation 82545EM Gigabit Ethernet Controller (Copper) (rev 01)
02:02.0 Ethernet controller: Intel Corporation 82545EM Gigabit Ethernet Controller (Copper) (rev 01)
02:03.0 Ethernet controller: Intel Corporation 82545EM Gigabit Ethernet Controller (Copper) (rev 01)
- network設定の確認
$ cat /etc/network/interfaces
/etc/network/interfaces
# This file describes the network interfaces available on your system
# and how to activate them. For more information, see interfaces(5).

source /etc/network/interfaces.d/*

# The loopback network interface
auto lo
iface lo inet loopback

# The primary network interface
auto ens33
iface ens33 inet static
address 192.168.100.201
netmask 255.255.255.0
gateway 192.168.100.1
$ ip addr
1: lo: <LOOPBACK,UP,LOWER_UP> mtu 65536 qdisc noqueue state UNKNOWN group default qlen 1
    link/loopback 00:00:00:00:00:00 brd 00:00:00:00:00:00
    inet 127.0.0.1/8 scope host lo
       valid_lft forever preferred_lft forever
    inet6 ::1/128 scope host
       valid_lft forever preferred_lft forever
2: ens33: <BROADCAST,MULTICAST,UP,LOWER_UP> mtu 1500 qdisc pfifo_fast state UP group default qlen 1000
    link/ether 00:0c:29:f3:16:bb brd ff:ff:ff:ff:ff:ff
    inet 192.168.100.201/24 brd 192.168.100.255 scope global ens33
       valid_lft forever preferred_lft forever
    inet6 240b:11:53a0:400:20c:29ff:fef3:16bb/64 scope global mngtmpaddr dynamic
       valid_lft 14378sec preferred_lft 12578sec
    inet6 fe80::20c:29ff:fef3:16bb/64 scope link
       valid_lft forever preferred_lft forever
3: ens34: <BROADCAST,MULTICAST> mtu 1500 qdisc noop state DOWN group default qlen 1000
    link/ether 00:0c:29:f3:16:c5 brd ff:ff:ff:ff:ff:ff
4: ens35: <BROADCAST,MULTICAST> mtu 1500 qdisc noop state DOWN group default qlen 1000
    link/ether 00:0c:29:f3:16:cf brd ff:ff:ff:ff:ff:ff
- kernel バージョン確認
$ uname -a
Linux vMX-1 4.4.0-31-generic #50-Ubuntu SMP Wed Jul 13 00:07:12 UTC 2016 x86_64 x86_64 x86_64 GNU/Linux
- "vMX-1"仮想インスタンス上で、vt-xが有効になっていることを確認する
$ cat /proc/cpuinfo | grep vmx
flags		: fpu vme de pse tsc msr pae mce cx8 apic sep mtrr pge mca cmov pat pse36 clflush dts mmx fxsr sse sse2 ss syscall nx pdpe1gb rdtscp lm constant_tsc arch_perfmon pebs bts nopl xtopology tsc_reliable nonstop_tsc aperfmperf eagerfpu pni pclmulqdq vmx ssse3 fma cx16 pcid sse4_1 sse4_2 x2apic movbe popcnt tsc_deadline_timer aes xsave avx f16c rdrand hypervisor lahf_lm abm epb tpr_shadow vnmi ept vpid fsgsbase tsc_adjust bmi1 avx2 smep bmi2 invpcid xsaveopt dtherm ida arat pln pts
flags		: fpu vme de pse tsc msr pae mce cx8 apic sep mtrr pge mca cmov pat pse36 clflush dts mmx fxsr sse sse2 ss syscall nx pdpe1gb rdtscp lm constant_tsc arch_perfmon pebs bts nopl xtopology tsc_reliable nonstop_tsc aperfmperf eagerfpu pni pclmulqdq vmx ssse3 fma cx16 pcid sse4_1 sse4_2 x2apic movbe popcnt tsc_deadline_timer aes xsave avx f16c rdrand hypervisor lahf_lm abm epb tpr_shadow vnmi ept vpid fsgsbase tsc_adjust bmi1 avx2 smep bmi2 invpcid xsaveopt dtherm ida arat pln pts
flags		: fpu vme de pse tsc msr pae mce cx8 apic sep mtrr pge mca cmov pat pse36 clflush dts mmx fxsr sse sse2 ss syscall nx pdpe1gb rdtscp lm constant_tsc arch_perfmon pebs bts nopl xtopology tsc_reliable nonstop_tsc aperfmperf eagerfpu pni pclmulqdq vmx ssse3 fma cx16 pcid sse4_1 sse4_2 x2apic movbe popcnt tsc_deadline_timer aes xsave avx f16c rdrand hypervisor lahf_lm abm epb tpr_shadow vnmi ept vpid fsgsbase tsc_adjust bmi1 avx2 smep bmi2 invpcid xsaveopt dtherm ida arat pln pts
flags		: fpu vme de pse tsc msr pae mce cx8 apic sep mtrr pge mca cmov pat pse36 clflush dts mmx fxsr sse sse2 ss syscall nx pdpe1gb rdtscp lm constant_tsc arch_perfmon pebs bts nopl xtopology tsc_reliable nonstop_tsc aperfmperf eagerfpu pni pclmulqdq vmx ssse3 fma cx16 pcid sse4_1 sse4_2 x2apic movbe popcnt tsc_deadline_timer aes xsave avx f16c rdrand hypervisor lahf_lm abm epb tpr_shadow vnmi ept vpid fsgsbase tsc_adjust bmi1 avx2 smep bmi2 invpcid xsaveopt dtherm ida arat pln pts
(2) vMXインストールに向けての事前準備
- 各種パッケージのインストール
$ sudo apt-get update
$ sudo apt-get install -y bridge-utils qemu-kvm libvirt-bin
$ sudo apt-get install -y libyaml-dev python-yaml numactl libparted0-dev libpciaccess-dev
$ sudo apt-get install -y libnuma-dev libyajl-dev libxml2-dev libglib2.0-dev
$ sudo apt-get install -y python-pip python-dev libxml2-dev libxslt-dev libnl-3-dev
$ sudo apt-get install -y python python-netifaces vnc4server
- libvirtのバージョン確認
$ libvirtd --version
libvirtd (libvirt) 1.3.1
- virtshのバージョン確認
$ virsh --version
1.3.1
(3) Ubuntu環境の設定変更
- KSMを無効にする
$ sudo vi /etc/default/qemu-kvm
qemu-kvm
KSM_ENABLED=0
- APICを無効にする
$ sudo vi /etc/modprobe.d/qemu-system-x86.conf
qemu-system-x86.conf
options kvm_intel enable_apicv=0 nested=1 enable_apicv=0
- 再起動 ..
$ sudo reboot
- "kvm-intel"カーネルモジュールを組み込む
$ sudo modprobe kvm_intel

$ lsmod|grep kvm
kvm_intel             172032  0
kvm                   536576  1 kvm_intel
irqbypass              16384  1 kvm
(4) vMXパッケージのインストール
- vMXパッケージを展開する(ここでは、/home/tsubo配下に展開したものとする)
$ ls -l /home/tsubo
total 4
drwxrwxr-x 8 tsubo tsubo 4096 Dec 31 04:30 vmx-16.1R1.7
- vMX設定ファイルを配布する
$ vi /home/tsubo/vmx-16.1R1.7/config/vmx.conf
vmx.conf
##############################################################
#
#  vmx.conf
#  Config file for vmx on the hypervisor.
#  Uses YAML syntax.
#  Leave a space after ":" to specify the parameter value.
#
##############################################################

---
# Configuration on the host side - management interface, VM images etc.
HOST:
    identifier                : vmx1   # Maximum 4 characters
    host-management-interface : ens33
    routing-engine-image      : "/home/tsubo/vmx-16.1R1.7/images/junos-vmx-x86-64-16.1R1.7.qcow2"
    routing-engine-hdd        : "/home/tsubo/vmx-16.1R1.7/images/vmxhdd.img"
    forwarding-engine-image   : "/home/tsubo/vmx-16.1R1.7/images/vFPC-20160617.img"

---
# External bridge configuration
BRIDGES:
    - type  : external
      name  : br-ext                  # Max 10 characters

---
# vRE VM parameters
CONTROL_PLANE:
    vcpus       : 1
    memory-mb   : 1024
    console_port: 8601

    interfaces  :
      - type      : static
        ipaddr    : 10.102.144.94
        macaddr   : "0A:00:DD:C0:DE:0E"

---
# vPFE VM parameters
FORWARDING_PLANE:
    memory-mb   : 4096
    vcpus       : 3
    console_port: 8602
    device-type : virtio

    interfaces  :
      - type      : static
        ipaddr    : 10.102.144.98
        macaddr   : "0A:00:DD:C0:DE:10"

---
# Interfaces
JUNOS_DEVICES:
   - interface            : ge-0/0/0
     mac-address          : "02:06:0A:0E:FF:F0"
     description          : "ge-0/0/0 interface"

   - interface            : ge-0/0/1
     mac-address          : "02:06:0A:0E:FF:F1"
     description          : "ge-0/0/1 interface"
- vMXパッケージをインストールする
$ cd /home/tsubo/vmx-16.1R1.7
$ sudo ./vmx.sh -lv --install
==================================================
    Welcome to VMX
==================================================
Date..............................................12/31/16 04:46:07
VMX Identifier....................................vmx1
Config file......................................./home/tsubo/vmx-16.1R1.7/config/vmx.conf
Build Directory.................................../home/tsubo/vmx-16.1R1.7/build/vmx1
Environment file................................../home/tsubo/vmx-16.1R1.7/env/ubuntu_virtio.env
Junos Device Type.................................virtio
Initialize scripts................................[OK]
Copy images to build directory....................[OK]
==================================================
    VMX Environment Setup Completed
==================================================
==================================================
    VMX Install & Start
==================================================
Linux distribution................................ubuntu
Check GRUB........................................[Disabled]
Installation status of qemu-kvm...................[OK]
Installation status of libvirt-bin................[OK]
Installation status of bridge-utils...............[OK]
Installation status of python.....................[OK]
Installation status of libyaml-dev................[OK]
Installation status of python-yaml................[OK]
Installation status of numactl....................[OK]
Installation status of libnuma-dev................[OK]
Installation status of libparted0-dev.............[OK]
Installation status of libpciaccess-dev...........[OK]
Installation status of libyajl-dev................[OK]
Installation status of libxml2-dev................[OK]
Installation status of libglib2.0-dev.............[OK]
Installation status of libnl-dev..................[OK]
Check Kernel Version..............................[Disabled]
Check Qemu Version................................[Disabled]
Check libvirt Version.............................[Disabled]
Check virsh connectivity..........................[OK]
IXGBE Enabled.....................................[Disabled]
==================================================
    Pre-Install Checks Completed
==================================================
Check for VM vcp-vmx1.............................[Not Running]
Check for VM vfp-vmx1.............................[Not Running]
Cleanup VM states.................................[OK]
Check if bridge br-ext exists.....................[No]
Cleanup VM bridge br-ext..........................[OK]
Cleanup VM bridge br-int-vmx1.....................[OK]
==================================================
    VMX Stop Completed
==================================================
Check VCP image...................................[OK]
Check VFP image...................................[OK]
VMX Model.........................................FPC
Check VCP Config image............................[OK]
Check management interface........................[OK]
Check interface ens34.............................[OK]
Check interface ens35.............................[OK]
Setup huge pages to 8192..........................[OK]
Attempt to kill libvirt...........................[OK]
Attempt to start libvirt..........................[OK]
Sleep 2 secs......................................[OK]
Check libvirt support for hugepages...............[OK]
==================================================
    System Setup Completed
==================================================
Get Management Address of ens33...................[OK]
Generate libvirt files............................[OK]
Sleep 2 secs......................................[OK]
Find configured management interface..............ens33
Find existing management gateway..................ens33
Check if ens33 is already enslaved to br-ext......[No]
Gateway interface needs change....................[Yes]
Create br-ext.....................................[OK]
Get Management Gateway............................192.168.100.1
Flush ens33.......................................[OK]
Start br-ext......................................[OK]
Bind ens33 to br-ext..............................[OK]
Get Management MAC................................00:0c:29:f3:16:bb
Assign Management MAC 00:0c:29:f3:16:bb...........[OK]
Add default gw 192.168.100.1......................[OK]
Create br-int-vmx1................................[OK]
Start br-int-vmx1.................................[OK]
Check and start default bridge....................[OK]
Define vcp-vmx1...................................[OK]
Define vfp-vmx1...................................[OK]
Wait 2 secs.......................................[OK]
Start vcp-vmx1....................................[OK]
Start vfp-vmx1....................................[OK]
Wait 2 secs.......................................[OK]
==================================================
    VMX Bringup Completed
==================================================
Check if br-ext is created........................[Created]
Check if br-int-vmx1 is created...................[Created]
Check if VM vcp-vmx1 is running...................[Running]
Check if VM vfp-vmx1 is running...................[Running]
Check if tap interface vcp_ext-vmx1 exists........[OK]
Check if tap interface vcp_int-vmx1 exists........[OK]
Check if tap interface vfp_ext-vmx1 exists........[OK]
Check if tap interface vfp_int-vmx1 exists........[OK]
==================================================
    VMX Status Verification Completed.
==================================================
Log file........................................../home/tsubo/vmx-16.1R1.7/build/vmx1/logs/vmx_1483127167.log
==================================================
    Thank you for using VMX
==================================================
(5) vMXインストール後の初期コンフィグ設定
- VCPにtelnetログインする
$ telnet localhost 8601
Trying ::1...
Trying 127.0.0.1...
Connected to localhost.
Escape character is '^]'.


FreeBSD/amd64 (Amnesiac) (ttyu0)

login: root

--- JUNOS 16.1R1.7 Kernel 64-bit  JNPR-10.1-20160624.329953_builder_stable_10
root@:~ # cli
root> configure
Entering configuration mode

[edit]
root#
- rootユーザのパスワードを設定する
root# set system root-authentication plain-text-password
New password:
Retype new password:

[edit]
- ssh経由でのリモートログインを許容する
root# set system services ssh root-login allow

[edit]
- マネージメントポートのアドレス設定を行う
root# set interfaces fxp0 unit 0 family inet address 192.168.100.101/24

[edit]
- lite modeを有効にする
root# set chassis fpc 0 lite-mode
- 初期コンフィグ設定をコミットする
root# commit
Generating RSA key /etc/ssh/ssh_host_key
Generating DSA key /etc/ssh/ssh_host_dsa_key
Generating RSA2 key /etc/ssh/ssh_host_rsa_key
Generating ECDSA key /etc/ssh/ssh_host_ecdsa_key
Generating ED25519 key /etc/ssh/ssh_host_ed25519_key
commit complete

[edit]
- telnetを終了する(ctrl + "]"でloginセッションを終了したのち、"quit"にて終了する)
telnet> quit
Connection closed.
- リモートログインできることを確認する
$ ssh root@192.168.100.101
Password:
Last login: Fri Dec 30 20:01:47 2016
--- JUNOS 16.1R1.7 Kernel 64-bit  JNPR-10.1-20160624.329953_builder_stable_10
root@:~ # cli
root>
- vMXの初期コンフィグ内容を確認してみる
root> show configuration |display set
set version 16.1R1.7
set system root-authentication encrypted-password "$5$hb1aiak5$ffPgYwaiom.2CADb.NARz/mLcM4PivxkYCRDU/lSVxC"
set system services ssh root-login allow
set system syslog user * any emergency
set system syslog file messages any notice
set system syslog file messages authorization info
set system syslog file interactive-commands interactive-commands any
set chassis fpc 0 lite-mode
set interfaces fxp0 unit 0 family inet address 192.168.100.101/24
- vMX構成を確認してみる
root> show chassis hardware
Hardware inventory:
Item             Version  Part number  Serial number     Description
Chassis                                VM5866BB5829      VMX
Midplane
Routing Engine 0                                         RE-VMX
CB 0                                                     VMX SCB
CB 1                                                     VMX SCB
FPC 0                                                    Virtual FPC
  CPU            Rev. 1.0 RIOT         123XYZ987
  MIC 0                                                  Virtual
    PIC 0                 BUILTIN      BUILTIN           Virtual
- interface動作状態を確認してみる
root> show interfaces terse
Interface               Admin Link Proto    Local                 Remote
ge-0/0/0                up    up
lc-0/0/0                up    up
lc-0/0/0.32769          up    up   vpls
pfe-0/0/0               up    up
pfe-0/0/0.16383         up    up   inet
                                   inet6
pfh-0/0/0               up    up
pfh-0/0/0.16383         up    up   inet
pfh-0/0/0.16384         up    up   inet
ge-0/0/1                up    up
ge-0/0/2                up    down
ge-0/0/3                up    down
ge-0/0/4                up    down
ge-0/0/5                up    down
ge-0/0/6                up    down
ge-0/0/7                up    down
ge-0/0/8                up    down
ge-0/0/9                up    down
cbp0                    up    up
demux0                  up    up
dsc                     up    up
em1                     up    up
em1.0                   up    up   inet     10.0.0.4/8
                                            128.0.0.1/2
                                            128.0.0.4/2
                                   inet6    fe80::5254:ff:fe61:3c61/64
                                            fec0::a:0:0:4/64
                                   tnp      0x4
esi                     up    up
fxp0                    up    up
fxp0.0                  up    up   inet     192.168.100.101/24
gre                     up    up
ipip                    up    up
irb                     up    up
jsrv                    up    up
jsrv.1                  up    up   inet     128.0.0.127/2
lo0                     up    up
lo0.16384               up    up   inet     127.0.0.1           --> 0/0
lo0.16385               up    up   inet
lsi                     up    up
mtun                    up    up
pimd                    up    up
pime                    up    up
pip0                    up    up
pp0                     up    up
rbeb                    up    up
tap                     up    up
vtep                    up    up
以上、vMXの初期セットアップが、完了できました。
■ 最後に
そもそも、MacBook Proに、vMXソフトルータをセットアップするのは、無謀なチャレンジでした。
本来、Intel Xeon搭載のマルチコアCPUを多数搭載しているサーバ / ワークステーションに、セットアップするべきでした。
ただ、セットアップ作業は、だいぶ熟知できたので、今後、新たなサーバ入手する機会があれば、本格的に、vMXソフトウェアルータの検証を行ってみたいです。