GoFのデザインパターンをGolangで学習してみたいと思います。
今回は、Qiita記事: "Pythonで、デザインパターン「Command」を学ぶ"で取り上げた、Pythonベースの”Command”のサンプルアプリをGolangで実装し直してみました。
■ Command(コマンド・パターン)
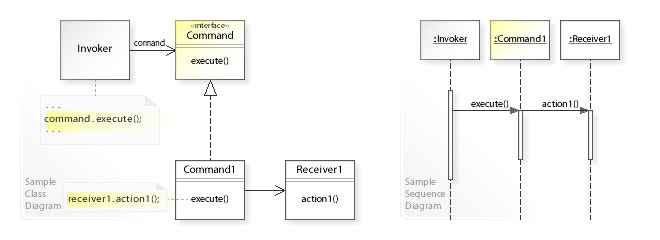
Command パターン(英: command pattern)はオブジェクト指向プログラミングにおけるデザインパターンの一つで、動作を表現するオブジェクトを示す。Command オブジェクトは、動作とそれに伴うパラメータをカプセル化したものである。
例として、印刷を行うライブラリが PrintJob クラスを備えているとする。ライブラリのユーザーは新たに PrintJob オブジェクトを作成し、パラメータ(印刷するドキュメント、印刷部数など)をセットし、最後にプリンターにジョブを送信するメソッドを呼び出す。
UML class and sequence diagram
UML class diagram
■ "Command"のサンプルプログラム
実際に、Commandパターンを活用したサンプルプログラムを動かしてみて、次のような動作の様子を確認したいと思います。
- ファイル権限"777"の
test1.txtファイルを作成する - ファイル権限"600"の
test2.txtファイルを作成する
なお、サンプルプログラムは、第一引数:作成したいファイル名、第二引数:付与したいファイル権限とします。
$ go run Main.go test1.txt 777
% touch test1.txt
% chmod 777 test1.txt
$ go run Main.go test2.txt 600
% touch test2.txt
% chmod 600 test2.txt
ファイル一覧を確認します。
$ ls -l|grep test
-rwxrwxrwx  1 ttsubo  staff    0  3 29 05:28 test1.txt
-rw-------  1 ttsubo  staff    0  3 29 05:29 test2.txt
想定どおり、ファイルが生成できました。
■ サンプルプログラムの詳細
Gitリポジトリにも、同様のコードをアップしています。
https://github.com/ttsubo/study_of_design_pattern_with_golang/tree/master/Command
- ディレクトリ構成
.
├── Main.go
└── command
    └── command.go
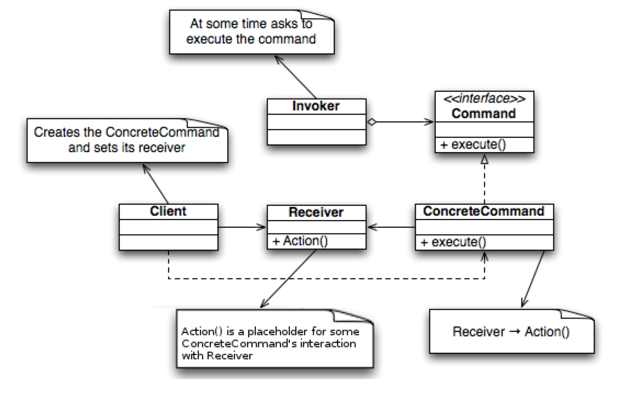
(1) Command(命令)の役
命令のインタフェースを定める役です。
サンプルプログラムでは、commandインタフェースが、この役を努めます。
package command

import (
	"fmt"
	"os"
)

type command interface {
	execute()
	display()
}
(2) ConcreteCommand(具体的命令)の役
Command役のインタフェースを実際に実装している役です。
サンプルプログラムでは、FileTouchCommand構造体と ChmodCommand構造体が、この役を努めます。
// FileTouchCommand is struct
type FileTouchCommand struct {
	filename string
	receiver *FileOperator
}

// NewFileTouchCommand func for initializing FileTouchCommand
func NewFileTouchCommand(filename string, receiverObj *FileOperator) *FileTouchCommand {
	return &FileTouchCommand{
		filename: filename,
		receiver: receiverObj,
	}
}

func (f *FileTouchCommand) execute() {
	f.receiver.createFile(f.filename)
}

func (f *FileTouchCommand) display() {
	fmt.Printf("%% touch %s\n", f.filename)
}
// ChmodCommand is struct
type ChmodCommand struct {
	filename   string
	permission uint64
	receiver   *FileOperator
}

// NewChmodCommand func for initializing ChmodCommand
func NewChmodCommand(filename string, permission uint64, receiverObj *FileOperator) *ChmodCommand {
	return &ChmodCommand{
		filename:   filename,
		permission: permission,
		receiver:   receiverObj,
	}
}

func (c *ChmodCommand) execute() {
	c.receiver.changeFileMode(c.filename, c.permission)
}

func (c *ChmodCommand) display() {
	fmt.Printf("%% chmod %o %s\n", c.permission, c.filename)
}
(3) Receiver(受信者)の役
ConcreteCommand役の命令を実行するときに対象となる役です。命令の受け取り手と呼んでもよいでしょう。
サンプルプログラムでは、FileOperator構造体が、この役を努めます。
// FileOperator is struct
type FileOperator struct {
}

// NewFileOperator func for initializing FileOperator
func NewFileOperator() *FileOperator {
	return &FileOperator{}
}

func (f *FileOperator) createFile(filename string) {
	os.Create(filename)
}

func (f *FileOperator) changeFileMode(filename string, permission uint64) {
	os.Chmod(filename, os.FileMode(permission))
}
(4) Invoker(起動者)の役
命令の実行を開始する役です。Command役で定義されているインタフェースを呼び出す役になります。
サンプルプログラムでは、CompositeCommand構造体が、この役を努めます。
// CompositeCommand is struct
type CompositeCommand struct {
	cmds []command
}

//NewCompositeCommand func for initializing CompositeCommand
func NewCompositeCommand() *CompositeCommand {
	return &CompositeCommand{}
}

// AppendCmd func for appending command
func (c *CompositeCommand) AppendCmd(cmd command) {
	c.cmds = append(c.cmds, cmd)
}

// Execute func for executing command
func (c *CompositeCommand) Execute() {
	for _, cmd := range c.cmds {
		cmd.execute()
	}
}
(5) Client(依頼人)の役
ConcreteCommand役を生成し、その際にReceiver役を割り当てる役です。
サンプルプログラムでは、startMain関数が、この役を努めます。
package main

import (
	"flag"
	"strconv"

	"./command"
)

func startMain(filename string, permission uint64) {
	recv := command.NewFileOperator()
	cc := command.NewCompositeCommand()
	cc.AppendCmd(command.NewFileTouchCommand(filename, recv))
	cc.AppendCmd(command.NewChmodCommand(filename, permission, recv))
	cc.Execute()
	cc.Display()
}

func main() {
	flag.Parse()
	perm32, _ := strconv.ParseUint(flag.Arg(1), 8, 32)
	startMain(flag.Arg(0), perm32)
}

