はじめに
Webサーバーとして知られているnginxですが、ロードバランサー的な使い方をすることもできます。
今回はnginxをminecraftマルチサーバーのフロントエンドサーバー(TCPリバースプロキシ)として使う実験をしたいと思います。
minecraftに限らず、サービスを動かすサーバーに直接接続させずにリバースプロキシを経由させることはセキュリティ的に意味のある事だと思います。
また、自宅サーバーを立てている場合にVPS等をリバースプロキシとして使用することで、レイテンシを犠牲にDoS攻撃のリスクを回避できる可能性があります。
VPSを利用したリバースプロキシは自宅サーバーを立てる際に障害となる固定IPアドレス問題の解決策でもあります。
つくるもの
VirtualBoxを使用してローカル環境で実験をしていきます。
※VirtualBoxはこういった遊びができるのでいいですよね。
※図はdraw.ioを使用して作成しました。
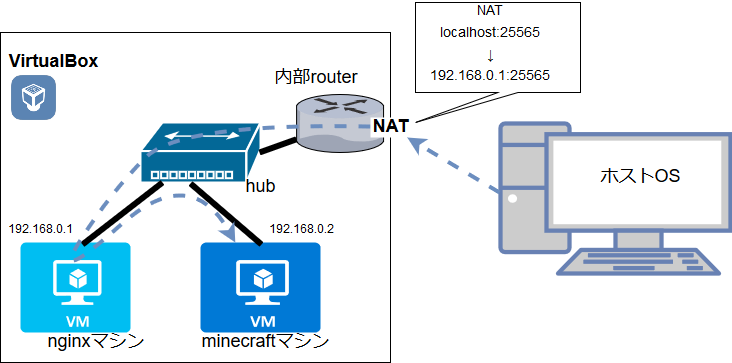
VirtualBox上に二つの仮想マシンを用意します。
一方はnginxマシン、もう一方はminecraftマシンとして使用します(以降この呼び分けに注意)。
この二つは互いに内部ネットワークで接続します。
ホストOSからはnginxマシンにNATで接続します。
ホストOSから、nginxマシンにNATで接続した後、nginxを経由してminecraftマシンに接続します。
準備するもの
- VirtualBox上のCentOS7をインストールした仮想マシンx2
(一応)
VirtualBoxのダウンロード元:http://www.oracle.com/technetwork/server-storage/virtualbox/downloads/index.html?ssSourceSiteId=otnjp
CentOS7のダウンロード元:https://www.centos.org/download/
実験開始
仮想マシンの初期設定
仮想マシンを二つ扱うので、設定する方を間違えるのを防ぐためにホスト名を変更しておきましょう。
この作業は必須ではありませんが事故防止のためやっておきましょう。
[root@localhost ~]# hostnamectl set-hostname minecraft01
ログインしなおして、設定が反映されていることを確認しましょう。
[root@minecraft01 ~]#
nginx用の仮想マシンも変更します。
[root@localhost ~]# hostnamectl set-hostname nginx01
以降の説明でどちらの仮想マシンを操作しているかはホスト名で見分けてください。
NATの設定
nginxマシンの設定からNATのポートフォワーディングの設定をしましょう。
これは上の図で、ホストOSが25565ポートでnginxに接続するための設定です。

Rule2をこのように追加しました。
Rule1はssh接続をするための設定なので気にしなくて大丈夫です。
内部ネットワークの設定
アダプターの追加
二つの仮想マシンが互いに通信するためのネットワークの設定をします。
この設定をするときは仮想マシンの電源をオフにしておきます。
- ネットワークの項目を開き、アダプター2を選択します
- 「ネットワークアダプターを有効化」にチェックを入れ割り当てを内部ネットワークに指定します
名前は何でもいいですが、もう一つの仮想マシンと同じにします。
アダプターの有効化とIPの設定
仮想マシンを起動します。
そのままでは追加したネットワークアダプターは有効になっていないので、有効にします(同時にIPアドレスを設定します)。
[root@nginx01 ~]# nmcli d
デバイス  タイプ    状態                       接続
enp0s3    ethernet  接続済み                   enp0s3
enp0s8    ethernet  接続中(IP 設定を取得中)  有線接続 1
lo        loopback  管理無し
[root@nginx01 ~]# nmcli c add type ethernet ifname enp0s8 con-name enp0s8
接続 'enp0s8' (f2bff77f-da44-4744-89b7-2ff70309dba1) が正常に追加されました。
[root@nginx01 ~]# nmcli c m enp0s8 ipv4.method manual ipv4.addresses 192.168.0.1/24 connection.autoconnect true
[root@nginx01 ~]# nmcli d
デバイス  タイプ    状態      接続
enp0s3    ethernet  接続済み  enp0s3
enp0s8    ethernet  接続済み  enp0s8
lo        loopback  管理無し  --
nginxマシンのIPを192.168.0.1に設定しました。
同様の操作でminecraftマシンのIPを192.168.0.2に設定します。
次に仮想マシン間で通信ができることを確認します。
[root@minecraft01 ~]# ping 192.168.0.1 -c 3
PING 192.168.0.1 (192.168.0.1) 56(84) bytes of data.
64 bytes from 192.168.0.1: icmp_seq=1 ttl=64 time=0.237 ms
64 bytes from 192.168.0.1: icmp_seq=2 ttl=64 time=0.426 ms
64 bytes from 192.168.0.1: icmp_seq=3 ttl=64 time=0.682 ms

--- 192.168.0.1 ping statistics ---
3 packets transmitted, 3 received, 0% packet loss, time 2000ms
rtt min/avg/max/mdev = 0.237/0.448/0.682/0.183 ms
minecraftマシンから192.168.0.1(nginxマシン)にpingを投げました。
nginxのインストールと設定
nginxをTPCモードで使うためには自前でビルドする必要があります。
参考(公式):https://www.nginx.com/resources/admin-guide/tcp-load-balancing/
ビルド
ビルドしていきましょう。
※gccやgit等は各自インストールしておきましょう。
--with-streamオプションを付けることでTCP/UDPモードで動作するようになります。
# nginxのリポジトリをクローン
[root@nginx01 nginx]# git clone https://github.com/nginx/nginx
# ビルド
[root@nginx01 nginx]# cd nginx
[root@nginx01 nginx]# ./auto/configure --prefix=/usr/local/nginx --without-http_rewrite_module --without-http_gzip_module --with-stream
[root@nginx01 nginx]# make && make install
pidファイルの指定
設定ファイルの場所を確認しましょう
[root@nginx01 nginx]# ls /usr/local/nginx/conf/nginx.conf
/usr/local/nginx/conf/nginx.conf
pidファイルの設定がコメントアウトされているので次のように変更します。
pid /var/run/nginx.pid;
systemdの設定
systemd用の設定ファイルを作成します
[root@nginx01 nginx]# emacs /usr/lib/systemd/system/nginx.service
[Unit]
Description=nginx - high performance web server
Documentation=http://nginx.org/en/docs/
After=network-online.target remote-fs.target nss-lookup.target
Wants=network-online.target

[Service]
Type=forking
PIDFile=/var/run/nginx.pid
ExecStartPre=/usr/local/nginx/sbin/nginx -t -c /usr/local/nginx/conf/nginx.conf
ExecStart=/usr/local/nginx/sbin/nginx -c /usr/local/nginx/conf/nginx.conf
ExecReload=/bin/kill -s HUP $MAINPID
ExecStop=/bin/kill -s TERM $MAINPID

[Install]
WantedBy=multi-user.target
この書き方は一例です。
私は書き方がわからなかったのでyumで入るnginxの設定を流用しました(書き方が間違えていたらすみません)。
起動確認
[root@nginx01 nginx]# systemctl start nginx
[root@nginx01 nginx]# systemctl status nginx
● nginx.service - nginx - high performance web server
   Loaded: loaded (/usr/lib/systemd/system/nginx.service; disabled; vendor preset: disabled)
   Active: active (running) since 木 2018-02-01 01:49:49 JST; 5s ago
     Docs: http://nginx.org/en/docs/
  Process: 14972 ExecStart=/usr/local/nginx/sbin/nginx -c /usr/local/nginx/conf/nginx.conf (code=exited, status=0/SUCCESS)
  Process: 14971 ExecStartPre=/usr/local/nginx/sbin/nginx -t -c /usr/local/nginx/conf/nginx.conf (code=exited, status=0/SUCCESS)
 Main PID: 14974 (nginx)
   CGroup: /system.slice/nginx.service
           ├─14974 nginx: master process /usr/local/nginx/sbin/nginx -c /usr/local/nginx/conf/nginx.conf
           └─14976 nginx: worker process

 2月 01 01:49:49 nginx01 systemd[1]: Starting nginx - high performance web server...
 2月 01 01:49:49 nginx01 nginx[14971]: nginx: the configuration file /usr/local/nginx/conf/nginx.conf syntax is ok
 2月 01 01:49:49 nginx01 nginx[14971]: nginx: configuration file /usr/local/nginx/conf/nginx.conf test is ...ssful
 2月 01 01:49:49 nginx01 systemd[1]: Failed to read PID from file /var/run/nginx.pid: Invalid argument
 2月 01 01:49:49 nginx01 systemd[1]: Started nginx - high performance web server.
Hint: Some lines were ellipsized, use -l to show in full.
[root@nginx01 nginx]#
なんかFailed to read PID from file /var/run/nginx.pid: Invalid argumentと不安な文字が出ていますが起動できています(これの直し方がわかりませんでした)。
TCPリバースプロキシのための設定
設定ファイルを次のように書き換えます。
これはあくまでも一例ですので適宜修正して使用してください。
worker_processes  1;

pid        /var/run/nginx.pid;

events {
    worker_connections  1024;
}
stream {
    upstream mcserver {
        server 192.168.0.2:25565;
        server 127.0.0.1:25566 backup;
    }
    server {
        listen     25565;
        proxy_pass mcserver;
    }
}
minecraftマシン上のminecraftサーバーに接続できない場合に、nginxマシンのローカルのminecraftサーバーに接続するようserver 127.0.0.1:25566 backup;を設定しておきます。
最後にfirewallの設定をします。
[root@nginx01 nginx]# firewall-cmd --add-port=25565/tcp --zone=public --permanent
success
[root@nginx01 nginx]# firewall-cmd --reload
success
これでnginxの準備は整いました。
あとはminecraftサーバーの準備をしていきましょう。
minecraftサーバーの立ち上げ
nginxの設定に書いた通り、minecraftマシン上のminecraftサーバーに接続できない場合に、nginxマシン上のminecraftサーバーに接続するようにしたいので両方の仮想マシンにminecraftサーバーをインストールします。
ただし、nginxマシン上のminecraftサーバーはnginxがListenしているポートを避けるため25566番ポートで起動します。ローカルからのアクセスとなるためfirewallの設定は不要です。
今回は設定しませんが、minecraftマシンにはnginxマシンからしかアクセスしないので192.168.0.1からの接続だけを通すfirewallの設定にするとよいと思います。
設定していきましょう。
minecraftサーバーのインストール
javaのインストール
[root@minecraft01 ~]# yum -y install java-1.8.0-openjdk.x86_64
minecraftサーバーのダウンロード
[root@minecraft01 ~]# mkdir server
[root@minecraft01 ~]# cd server/
[root@minecraft01 server]# wget https://s3.amazonaws.com/Minecraft.Download/versions/1.12.2/minecraft_server.1.12.2.jar
起動
java -Xmx1024M -Xms1024M -jar minecraft_server.1.12.2.jar nogui
初回起動時はeulaの同意が必要です。(eula.txtをeula=trueに変更)
変更後もう一度起動コマンドを実行します(この時にserver.propertiesファイルが生成されます)。
stopコマンドでminecraftサーバーを停止して設定に進みます。
設定
motdの値を書き換えて、どちらのサーバーに接続しているかわかりやすくします。
minecraftマシンのみ
firewall設定をします。
[root@minecraft01 server]# firewall-cmd --add-port=25565/tcp --zone=public --permanent
success
[root@minecraft01 server]# firewall-cmd --reload
success
server.propertiesを編集してmotdの値をminecraft machineに変更します。
nginxマシンのみ
minecraftサーバーのポートを25566番ポートに変更します。
server.propertiesを編集してserver-portの値を25566に設定します。
server.propertiesを編集してmotdの値をnginx machineに変更します。
ホストOSから接続してみる
ここまでで図で示したものが出来上がっているはずです。
minecraftクライアントから接続してみましょう。
↓minecraftサーバー、nginxを起動した状態でminecraftクライアントからlocalhostに接続します。
↓minecraftマシン上のminecraftサーバーが起動した状態だとサーバーの選択画面でminecraft machineの文字が見えるはずです。
↓minecraftマシン上のminecraftサーバーが停止した状態だとサーバーの選択画面でnginx machineの文字が見えるはずです。
実際に中身のワールドも切り替わっています。
このような構成にすることで、外から見るとminecraftサーバーを停止せず(詳しくは説明しませんが、pingパケットがちゃんと処理されるということです)にメンテナンスをすることができます。
また、バックアップサーバーのほうに看板等でメッセージを残すこともできます。
まとめ
nginxをTCPリバースプロキシとして使用する一例としてminecraftサーバーを構築してみました。
個人的に自宅サーバーを立てるときにリバースプロキシは有用だと思っているのでまとめてみました。
参考にしてもらえたら幸いです。


