SSH認証キーをGitLabに登録・設定手順 覚書
SSH認証キーをGitlabに登録するまでの手順をざっくりまとめました。
随時、更新していきたいと思います。
SSH認証の公開鍵と秘密鍵を作成
ターミナルでssh keyを作成
* アドレス@example.comの部分に自分のメアドを登録
* 途中でパスフレーズ(passphrase)を求められますが、Enterを押すだけ
ターミナルでSSH Keyを作成するコマンド
cd ~/.ssh
ssh-keygen -t rsa -C アドレス@example.com
Generating public/private rsa key pair.
Enter file in which to save the key (/home/.ssh/id_rsa):    ← なにも入力せずに[Enter]
Enter passphrase (empty for no passphrase):    ← 好きなパスワードを入力
Enter same passphrase again:        ← 確認のためにもう一度入力
Your identification has been saved in /home/.ssh/id_rsa.
Your public key has been saved in /home/.ssh/id_rsa.pub.
The key fingerprint is:
e8:ae:60:8f:38:c2:98:1d:6d:84:60:8c:9e:dd:47:81 foo@hoge.com
鍵の生成が完了したら2つのファイルが生成
id_rsa: 秘密鍵、他人には見られないようにする
id_rsa.pub: 公開鍵、Bitbucket/GitHub/GitLabに渡す
※ 秘密の鍵のセキュリティを強化するために以下のコマンドを実行
コマンド
chmod 600 id_rsa
クライアント側へのSSHキーの設定
鍵の管理を簡単にするために、~/.ssh/configに設定を追加
vim ~/.ssh/config
~/.ssh/configのファイル以下を追加
Host gitlab.example.com
  User git
  Port 指定のポート番号
  HostName gitlab.example.com
  TCPKeepAlive yes
  identitiesonly yes
  identityFile ~/.ssh/id_rsa  →key(id_rsa)秘密鍵までのパスを記述
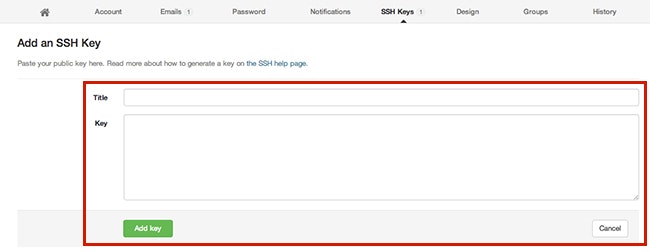
GitLabへ公開鍵の登録
- 右上のアイコンをクリック
- Edit Profile settingをクリック
- SSH Keysをクリック
フォームのTitleにssh keyの名前をセットして、ターミナルで以下のコマンドを実行。
※タイトルは任意
pbcopy < ~/.ssh/id_rsa.pub
クリップボードにsshキーの中身がコピーされます。
コマンドでクリップボードに保存したKeyをKey入力枠へペースト
Add Keyを押して、GitLabへの登録は完了になります。
Branch削除したいときあるよね
git branch -d [ブランチ名]
マージ済みのブランチのみ削除ができる
マージされていないブランチを削除しようとすると下記のようなエラーがでます
error: Cannot delete the branch 'ブランチ名' which you are currently on)
マージされていないブランチを削除したいときは以下のコマンドを
git branch -D [ブランチ名]
どんなローカルブランチも削除できる
diffはファイル名だけにしたいよね
git diff 比較ブランチ名 --name-only
特定のコミットに戻りたいときあるよね
git reset --hard HEAD@{N}
もうそのままremote のmasterの情報に変えたいときあるよね
git reset --hard origin/master
.gitignore の設定を反映させる
すでにリポジトリにignoreファイルを追加していると、
キャッシュが残っており.gitignoreファイルの内容が反映されない。
.gitignore
git rm -r --cached .
git add .
git commit -m ".gitignore is now working"
git push origin master
コミットの取り消し
git reset HEAD
Addのログ表示
add だけしていた人は反省してちゃんとvorboseつけよう
git add . -v
commitしてある場合は
git pull origin master
してから
git push origin master
commitしていない場合は
git push origin master
ここから下はメモ
初回のコミットを取り消したいときにはgit update-refを使う
git update-ref -d HEAD
addしたあとcommit前に差分を確認する方法
git diff --cached ファイル名
さらにaddしたものをキャンセルする場合は
git reset HEAD ファイル名
いまのブランチのすべてのコミット歴史を表示
git reflog
リモートの master 参照を強制に戻す
$ git push -f origin master
branch delete
git push --delete origin branch_name
cleanup
git filter-branch --index-filter 'git rm --cached --ignore-unmatch Binaries/*' HEAD
git push origin master --force
stashについて
git stashの基本
stashコマンドは変更を一時的にしまっておけるコマンド。
$ git stash # 変更をスタックにプッシュする
$ git stash list # スタックにある変更を一覧表示する
$ git stash drop # スタックの一番上にある変更を削除する
$ git stash pop # スタックから変更を一つポップする
スタックにある変更差分を確認したい時
git stash listでstash@{N}の番号を確認する。
$ git stash list
stash@{0}: WIP on branch_name: commit_id2 commit_comment2
stash@{1}: WIP on branch_name: commit_id1 commit_comment1
中身を見たい番号を指定して、以下のコマンドでHEADとの差分を確認できる。
$ git diff stash@{0}
ファイル指定もできる。
$ git diff stash@{0} hoge.txt
ALLOW MERGE UNRELATED HISTORIES
git merge --allow-unrelated-histories origin/master
最後に
様々なサイトを参考にさせていただきました。
ありがとうございます!

