はじめに
こんにちは、梅雨です。
先日、React 19 が正式にリリースされました。
今回の記事では、React 19 をTypeScriptで動かすための環境構築方法について、解説していきたいと思います。
React プロジェクト作成
まずは、おなじみ create-react-app@latest コマンドで React プロジェクトを作成しましょう。
$ npx create-react-app@latest --template typescript react-typescript-demo
すると、プロジェクト自体は作成されますが不穏なエラーが発生します。
npm error code ERESOLVE
npm error ERESOLVE unable to resolve dependency tree
npm error
npm error While resolving: react-typescript-demo@0.1.0
npm error Found: react@19.0.0
npm error node_modules/react
npm error   react@"^19.0.0" from the root project
npm error
npm error Could not resolve dependency:
npm error peer react@"^18.0.0" from @testing-library/react@13.4.0
npm error node_modules/@testing-library/react
npm error   @testing-library/react@"^13.0.0" from the root project
npm error
npm error Fix the upstream dependency conflict, or retry
npm error this command with --force or --legacy-peer-deps
npm error to accept an incorrect (and potentially broken) dependency resolution.
npm error
npm error
npm error For a full report see:
npm error /Users/meiyu/.npm/_logs/2024-12-10T17_40_16_131Z-eresolve-report.txt
npm error A complete log of this run can be found in: /Users/meiyu/.npm/_logs/2024-12-10T17_40_16_131Z-debug-0.log
`npm install --no-audit --save @testing-library/jest-dom@^5.14.1 @testing-library/react@^13.0.0 @testing-library/user-event@^13.2.1 @types/jest@^27.0.1 @types/node@^16.7.13 @types/react@^18.0.0 @types/react-dom@^18.0.0 typescript@^4.4.2 web-vitals@^2.1.0` failed
とりあえずこれらのエラーを解決していきましょう。
エラーの原因は @testing-library/react@13.4.0 が peerDependencies として react@"^18.0.0" を指定していることにあります。
これは @testing-library/react@16.1.0 で解消されています。
そのため、create-react-app に頼らず手動で必要なパッケージをインストールしてあげれば問題なく入ります。
$ npm i -D @testing-library/jest-dom @testing-library/react @testing-library/user-event @types/jest @types/node @types/react @types/react-dom typescript web-vitals
web-vitals 周り
web-vitals とは Web サイトの UX 指標を定量化して測定してくれるライブラリです。
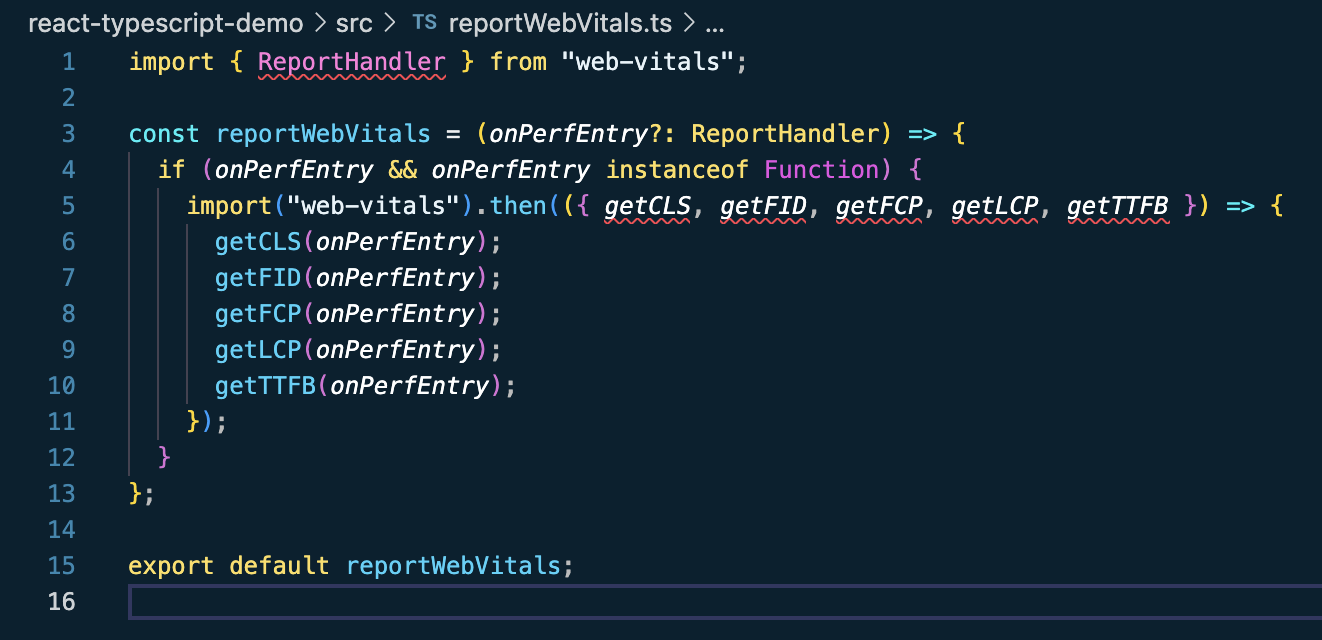
create-react-app で作成されたプロジェクトにはデフォルトでこのweb-vitalsを使用するためのコードが記述されていて、src/reportWebVitals.ts からその中身が確認できます。
ファイルを開いてみると、いくつかエラーが表示されていると思います。
今度はこれらのエラーを治していきましょう。
まず、ReportHandlerに関してですが、以下の issue で議論されている通り web-vitals@4.0.0 以降では廃止されています。
代わりに MetricType を使いましょう。
- import { ReportHandler } from "web-vitals";
+ import { MetricType } from "web-vitals";

- const reportWebVitals = (onPerfEntry?: ReportHandler) => {
+ const reportWebVitals = (onPerfEntry?: (metric: MetricType) => void) => {
  if (onPerfEntry && onPerfEntry instanceof Function) {
    import("web-vitals").then(({ getCLS, getFID, getFCP, getLCP, getTTFB }) => {
      getCLS(onPerfEntry);
      getFID(onPerfEntry);
      getFCP(onPerfEntry);
      getLCP(onPerfEntry);
      getTTFB(onPerfEntry);
    });
  }
};

export default reportWebVitals;
また、getCLS、getFID、getFCP、getLCP、getTTFB はそれぞれonCLS、onINP、onFCP、onLCP、onTTFBへと変更になっています。
getFID が onINP になっている点に注意してください。それ以外は get → on です。
import { MetricType } from "web-vitals";

const reportWebVitals = (onPerfEntry?: (metric: MetricType) => void) => {
  if (onPerfEntry && onPerfEntry instanceof Function) {
-     import("web-vitals").then(({ getCLS, getFID, getFCP, getLCP, getTTFB }) => {
-       getCLS(onPerfEntry);
-       getFID(onPerfEntry);
-       getFCP(onPerfEntry);
-       getLCP(onPerfEntry);
-       getTTFB(onPerfEntry);
+     import("web-vitals").then(({ onCLS, onINP, onFCP, onLCP, onTTFB }) => {
+       onCLS(onPerfEntry);
+       onINP(onPerfEntry);
+       onFCP(onPerfEntry);
+       onLCP(onPerfEntry);
+       onTTFB(onPerfEntry);
    });
  }
};

export default reportWebVitals;
最終的なコードは以下のようになるはずです。
import { MetricType } from "web-vitals";

const reportWebVitals = (onPerfEntry?: (metric: MetricType) => void) => {
  if (onPerfEntry && onPerfEntry instanceof Function) {
    import("web-vitals").then(({ onCLS, onINP, onFCP, onLCP, onTTFB }) => {
      onCLS(onPerfEntry);
      onINP(onPerfEntry);
      onFCP(onPerfEntry);
      onLCP(onPerfEntry);
      onTTFB(onPerfEntry);
    });
  }
};

export default reportWebVitals;
SVG インポート
今度は src/App.tsx を開いてみましょう。./logo.svgのインポートでエラーが発生していると思います。
このエラーは、TypeScript がデフォルトで svg ファイルをモジュールとして扱わないことに起因します。
解決策としては、svg という拡張子に対してカスタムの型定義を行うことです。
src ディレクトリ配下に custom.d.ts を作成しましょう。
$ touch ./src/custom.d.ts
declare module "*.svg" {
  const content: string;
  export default content;
}
これで src/App.tsx 内のインポートエラーは解消するはずです。
コンパイル設定
今までで静的解析のエラー(エディタ上に表示されるエラー)は全て解消しているはずです。
ところが、いざアプリケーションを起動しようとするとエラーが発生します。
Failed to compile.

Module not found: Error: Can't resolve './App' in '/Users/meiyu/Documents/react-typescript-demo/src'
ERROR in ./src/index.tsx 7:0-24
Module not found: Error: Can't resolve './App' in '/Users/meiyu/Documents/react-typescript-demo/src'

ERROR in ./src/index.tsx 8:0-48
Module not found: Error: Can't resolve './reportWebVitals' in '/Users/meiyu/Documents/react-typescript-demo/src'

webpack compiled with 2 errors
これは TypeScript のコードをコンパイルする際に上手くいっていないために起きるエラーです。
コンパイル設定を記述する tsconfig.json を作成するために、プロジェクトルートで
TypeScript の初期化を行いましょう。
$ tsc --init
tsconfig.json にはデフォルトでたくさんのコメントアウトが記述されていますが、全て消して以下のようにしてしまって大丈夫です。
{
  "compilerOptions": {
    "target": "es2016",
    "jsx": "react-jsx",
    "module": "commonjs",
    "esModuleInterop": true,
    "forceConsistentCasingInFileNames": true,
    "strict": true,
    "skipLibCheck": true
  }
}
ポイントは compilerOptions.jsx の値を react-jsxにすることです。これによって各ファイル内で import React from "react" を書く必要がなくなります。
これでエラーなくアプリケーションが起動できるようになっているはずです。
$ npm run start
Compiled successfully!

You can now view react-typescript-demo in the browser.

  Local:            http://localhost:3000
  On Your Network:  http://192.168.10.2:3000

Note that the development build is not optimized.
To create a production build, use npm run build.

webpack compiled successfully
No issues found.
おわりに
以上で React 19 で TypeScript を使用する際の環境構築ができました。
create-react-app は3年近くアップデートが入っていないので、もう使わないほうがいいのかもしれません。
個人的には Webpack よりも Vite で環境構築を行うことをおすすめします。
React 19 のリリース内容は以下の記事にまとめられているので、開発の際はぜひ目を通してみてください。

