Electronのアプリケーションはローカルファイルを扱うことも多いかと思います。画像のアップロードをする際にやっぱりファイルロードだとめんどくさいし、ドラッグドロップでいけたらUX的にも良いと思いますので、それを実現するためのコードです。なお、ドラッグドロップでもいけますし、該当範囲をクリックするとファイル選択にもなります。
完成はこんなイメージのやつです。
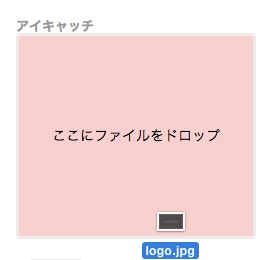
ドラッグ&ドロップでファイルをもってくると所定のDiv上で色が変わってそのまま放るとそのDiv内に放ったファイルが表示されます。それと同時に指定のディレクトリにローカルファイルとして保存します。
まずjs側はこんなかんじです。書き出し先ディレクトリは適宜修正してください。
osモジュールをいれてこうしておくと便利です。
global.js
const os = require('os'),
      fs = require('fs'); //もちろんfsモジュールも

var home = os.homedir(); //こうしてOSに対応したホームディレクトリを取得しておくと便利
でもって関数群のjsファイルを適当につくってこうです。
functions.js
function dnd_thumb() {
    var box = document.getElementById('fileBox'),
        elm = document.getElementById('receiveFile'),
        input = document.getElementById('inputFile'),
        ua = navigator.userAgent,
        ua_ie = false,
        elm_className_base = elm.className;
    var file_select = function(evnt){
        var files = evnt.target.files,
            img_num = 0;
        elm.className = elm_className_base;
        elm.innerHTML = '';
        for ( var i = 0; i < files.length; i++ ){
            var indx = i;
            file = files[indx],
                reader = new FileReader();
            if( !file.type.match('image.*')){
                continue;
            }
            reader.onerror = function() {
                this.innerHTML = '<p>Error!!</p>';
            };
            img_num += 1;
            reader.onload = (function(theFile){
                return function(e){
                    var item = document.createElement('div'),
                        item_txt = '';
                    item.className = 'item';
                    item.innerHTML = '<img src="' + e.target.result + '" title="' + item_txt + '" alt="' + item_txt + '">';

                    var public = '/User/userame/Directory/rename.jpg';
                    var enc = e.target.result;
                    var data = enc.replace(/^data:image\/\w+;base64,/, '');
                    fs.writeFile(public, data, {encoding: 'base64'}, function(err){
                        console.log("Success local data publish");
                    });

                    elm.insertBefore(item, null);
                };
            })(file);
            reader.readAsDataURL(file);
        }
        if( img_num < 1 ){
            elm.innerHTML = '<p>画像ファイルが含まれていません。<br>画像ファイルをドロップしてください。</p>';
        }
    };
    if( ua_ie === false ){
        box.ondragover = function(evnt){
            evnt.stopPropagation();
            evnt.preventDefault();
            elm.className = elm_className_base + 'draggle';
        };
        box.ondragleave = function(evnt){
            evnt.stopPropagation();
            evnt.preventDefault();
            elm.className = elm_className_base;
        };
    }
    input.addEventListener('change', file_select, false);
}
で、フロント側はこう。
<div id="fileBox">
  <div id="receiveFileOuter">
    <div id="receiveFile"><p>ここにファイルをドロップ</p></div>
   </div>
   <input type="file" id="inputFile" value="">
</div>
年末出血大サービスでCSSも。
#fileBox {
    max-width: 236px;
    height: 200px;
    position: relative;
    margin: 0 auto;
    border: 3px solid #ebebeb;
    border-radius: 5px;
    -webkit-border-radius: 5px;
    -moz-border-radius: 5px;
}
#receiveFileOuter {
    width: 100%;
    height: 100%;
    display: table;
    position: absolute;
    top: 0;
    left: 0;
    z-index: 1;
    background: #fff;
}
#receiveFile {
    width: 100%;
    height: 100%;
    display: table-cell;
    vertical-align: middle;
    text-align: center;
}
#receiveFile.draggle {
    background: #fcc;
}
#receiveFile .item {
    display: inline-block;
    text-align: center;
}
#receiveFile .item img {
    min-width: 100%;
    height: 200px;
    display: table;
    margin: 0 auto;
    border-radius: 5px;
    -webkit-border-radius: 5px;
    -moz-border-radius: 5px;
}
#receiveFile .item .image .imageInner {
    display: table-cell;
    vertical-align: middle;
    text-align: center;
}
#receiveFile .item .image img {
    height: 100px;
}
#fileBox input#inputFile {
    width: 100%;
    height: 300px;
    opacity: 0;
    position: absolute;
    top: 0;
    left: 0;
    z-index: 2;
}
#fileBox input#inputFile.nodrop,
#fileBox.unsupported input#inputFile {
    width: auto;
    height: auto;
    top: 30px;
    left: 30px;
    opacity: 1;
    background: none;
}
これで日本のElectron開発者20人くらいは幸せになれるはず。
だれか、これにリサイズ機能つけてコメントで返してください。。。
だれかー。。。(このままじゃリリース目標日に間に合わない・・・)
せっかくローカルアプリなので、画像処理はローカルのCPUをフル活用させてもらいたいですね。
では。
追記:2017/1/7 ArrayBufferでの実装
結局こんな感じでまとまりました。
const thumbnailDrop = e => {

    e.stopPropagation();
    e.preventDefault();

    let file = e.dataTransfer.files,
        area = document.getElementById('upload-thumbnail'),
        output = document.getElementById('file-output'),
        f = file[0];

    if (f.type === 'image/png' || f.type === 'image/jpeg' ) {
        let reader = new FileReader();
        reader.onload = (function(theFile) {
            return function(e) {
                let data = new Buffer(e.target.result);
                fs.writeFileSync('core/image.jpg', data, {encoding:'binary'})
                area.innerHTML = '';
                output.innerHTML = '<img src="core/image.jpg">';
            };
        })(f);
        reader.readAsArrayBuffer(f);
    } else {
        area.innerHTML = '';
    }

}
CSSとかは先述のものは使えなくなりますが、こっちのほうがコードがスッキリ。