概要
fastlaneとは?
iOSまたはAndroidのタスクを自動化できるツールです。
fastlaneに用意されたアクションを利用すると、ビルド、テスト、スクショの撮影、アプリのリリースなど様々なタスクを自動化できます。
今回はFirebase App DistributionにiOSアプリをデプロイする作業を自動化しようと思います。
Firebase App Distributionとは?
Firebaseに用意されているアプリ配布サービスです。
一つのFirebaseプロジェクトに最大500人までテスターを追加できます。(公式ドキュメント参照)
環境構築
前準備
-
Firebaseのプロジェクトを作成する
割愛します。公式ドキュメントを参考に作成しましょう。 -
プロビジニングプロファイルを作成する
ビルドしてipaを生成するために必要です。こちらも作成方法は割愛します。
ツール系のインストール
- Xcode: 12
- Ruby: 2.5.1
-> rbenv使うと便利です(公式ドキュメント)。 - Bundler: 2.1.4
実演
基本的には公式ドキュメントの通りに進めます。
fastlaneのセットアップ
fastlaneの公式ドキュメントに記載されているように、インストール方法は
- Gemfile
- RubyGems
- Homebrew
の三通りありますが、バージョンの明記ができるGemfileが推奨されています。
それでは下記コマンドでGemfileを生成します。
cd {プロジェクトのパス}
bundle init
プロジェクトのディレクトリ直下にGemfileが生成されるので、下記のように編集してください。
- Gemfile
source "https://rubygems.org"

gem "fastlane"
編集したら下記コマンドでfastlaneをインストールします。
bundle install
fastlane --version (fastlaneのバージョンが表示されたらインストールできている)
インストールできたら、fastlaneでどんなタスクを行うかを定義するファイルを生成します。下記のコマンドを実行します。
fastlane init
コマンド実行中に、どんな使用目的なのかを聞かれます。
今回はテスターに配信する目的で使うので、2を選択します。
❯ fastlane init
[✔] 🚀
[✔] Looking for iOS and Android projects in current directory...
[22:14:04]: Created new folder './fastlane'.
[22:14:04]: Detected an iOS/macOS project in the current directory: 'DietGoal.xcworkspace'
[22:14:04]: -----------------------------
[22:14:04]: --- Welcome to fastlane 🚀 ---
[22:14:04]: -----------------------------
[22:14:04]: fastlane can help you with all kinds of automation for your mobile app
[22:14:04]: We recommend automating one task first, and then gradually automating more over time
[22:14:04]: What would you like to use fastlane for?
1. 📸 Automate screenshots
2. 👩✈️ Automate beta distribution to TestFlight
3. 🚀 Automate App Store distribution
4. 🛠 Manual setup - manually setup your project to automate your tasks
その後はAppleIDを入力し、質問に適宜答えていきます。
[22:17:47]: ✅ Logging in with your Apple ID was successful
[22:17:47]: Checking if the app '' exists in your Apple Developer Portal...
[22:17:47]: ✅ Your app '' is available in your Apple Developer Portal
[22:17:47]: Checking if the app '' exists on App Store Connect...
[22:17:48]: Looks like the app '' isn't available on App Store Connect
[22:17:48]: for the team ID '' on Apple ID ''
[22:17:48]: Would you like fastlane to create the App on App Store Connect for you? (y/n)
n
[22:18:00]: Alright, we won't create the app for you. Be aware, the build is probably going to fail when you try it
[22:18:00]: It looks like your project isn't set up to do automatic version incrementing
[22:18:00]: To enable fastlane to handle automatic version incrementing for you, please follow this guide:
[22:18:00]: https://developer.apple.com/library/content/qa/qa1827/_index.html
[22:18:00]: Afterwards check out the fastlane docs on how to set up automatic build increments
[22:18:00]: https://docs.fastlane.tools/getting-started/ios/beta-deployment/#best-practices
[22:18:00]: --------------------------------------------------------
[22:18:00]: --- ✅ Successfully generated fastlane configuration ---
[22:18:00]: --------------------------------------------------------
[22:18:00]: Generated Fastfile at path `./fastlane/Fastfile`
[22:18:00]: Generated Appfile at path `./fastlane/Appfile`
[22:18:00]: Gemfile and Gemfile.lock at path `Gemfile`
[22:18:00]: Please check the newly generated configuration files into git along with your project
[22:18:00]: This way everyone in your team can benefit from your fastlane setup
[22:18:00]: Continue by pressing Enter ⏎
[22:18:06]: fastlane will collect the number of errors for each action to detect integration issues
[22:18:06]: No sensitive/private information will be uploaded, more information: https://docs.fastlane.tools/#metrics
[22:18:06]: ----------------------
[22:18:06]: --- fastlane lanes ---
[22:18:06]: ----------------------
[22:18:06]: fastlane uses a `Fastfile` to store the automation configuration
[22:18:06]: Within that, you'll see different lanes.
[22:18:06]: Each is there to automate a different task, like screenshots, code signing, or pushing new releases
[22:18:06]: Continue by pressing Enter ⏎
[22:18:07]: --------------------------------------
[22:18:07]: --- How to customize your Fastfile ---
[22:18:07]: --------------------------------------
[22:18:07]: Use a text editor of your choice to open the newly created Fastfile and take a look
[22:18:07]: You can now edit the available lanes and actions to customize the setup to fit your needs
[22:18:07]: To get a list of all the available actions, open https://docs.fastlane.tools/actions
[22:18:07]: Continue by pressing Enter ⏎
[22:18:08]: ------------------------------
[22:18:08]: --- Where to go from here? ---
[22:18:08]: ------------------------------
[22:18:08]: 📸 Learn more about how to automatically generate localized App Store screenshots:
[22:18:08]: https://docs.fastlane.tools/getting-started/ios/screenshots/
[22:18:08]: 👩✈️ Learn more about distribution to beta testing services:
[22:18:08]: https://docs.fastlane.tools/getting-started/ios/beta-deployment/
[22:18:08]: 🚀 Learn more about how to automate the App Store release process:
[22:18:08]: https://docs.fastlane.tools/getting-started/ios/appstore-deployment/
[22:18:08]: 👩⚕️ Learn more about how to setup code signing with fastlane
[22:18:08]: https://docs.fastlane.tools/codesigning/getting-started/
[22:18:08]:
[22:18:08]: To try your new fastlane setup, just enter and run
[22:18:08]: $ fastlane beta
最終的にプロジェクト直下に下記のディレクトリ構造ができていればOKです。
fastlane
├── Appfile
└── Fastfile
firebase_app_distributionプラグインのインストール
fastlaneには、Firebase App Distributionへデプロイする機能はないので、下記コマンドでプラグインを追加します。
sudo fastlane add_plugin firebase_app_distribution
コマンドが終了したら、Pluginfileファイルが生成され、Gemfileにもfirebase_app_distributionインストールのための記述が追加されている。
- Pluginfile
# Autogenerated by fastlane
#
# Ensure this file is checked in to source control!

gem 'fastlane-plugin-firebase_app_distribution'
- Gemfile
# frozen_string_literal: true

source "https://rubygems.org"

gem "fastlane"
##### ここから↓追加箇所
plugins_path = File.join(File.dirname(__FILE__), 'fastlane', 'Pluginfile')
eval_gemfile(plugins_path) if File.exist?(plugins_path)
デプロイ時にFirebaseに認証できるようにする
先ほど追加したfirebase_app_distributionプラグインは、使用する前にFirebaseプロジェクトで認証する必要があります。
公式ドキュメントによると、三つ方法がありますが、今回はFirebaseサービスアカウントの認証情報を使用するという方法にしました。
サービスカウントの作成
まずは新しいサービスアカウントをこちらから作成します。
プロジェクトを選択し、

サービスアカウントを作成を選択します。

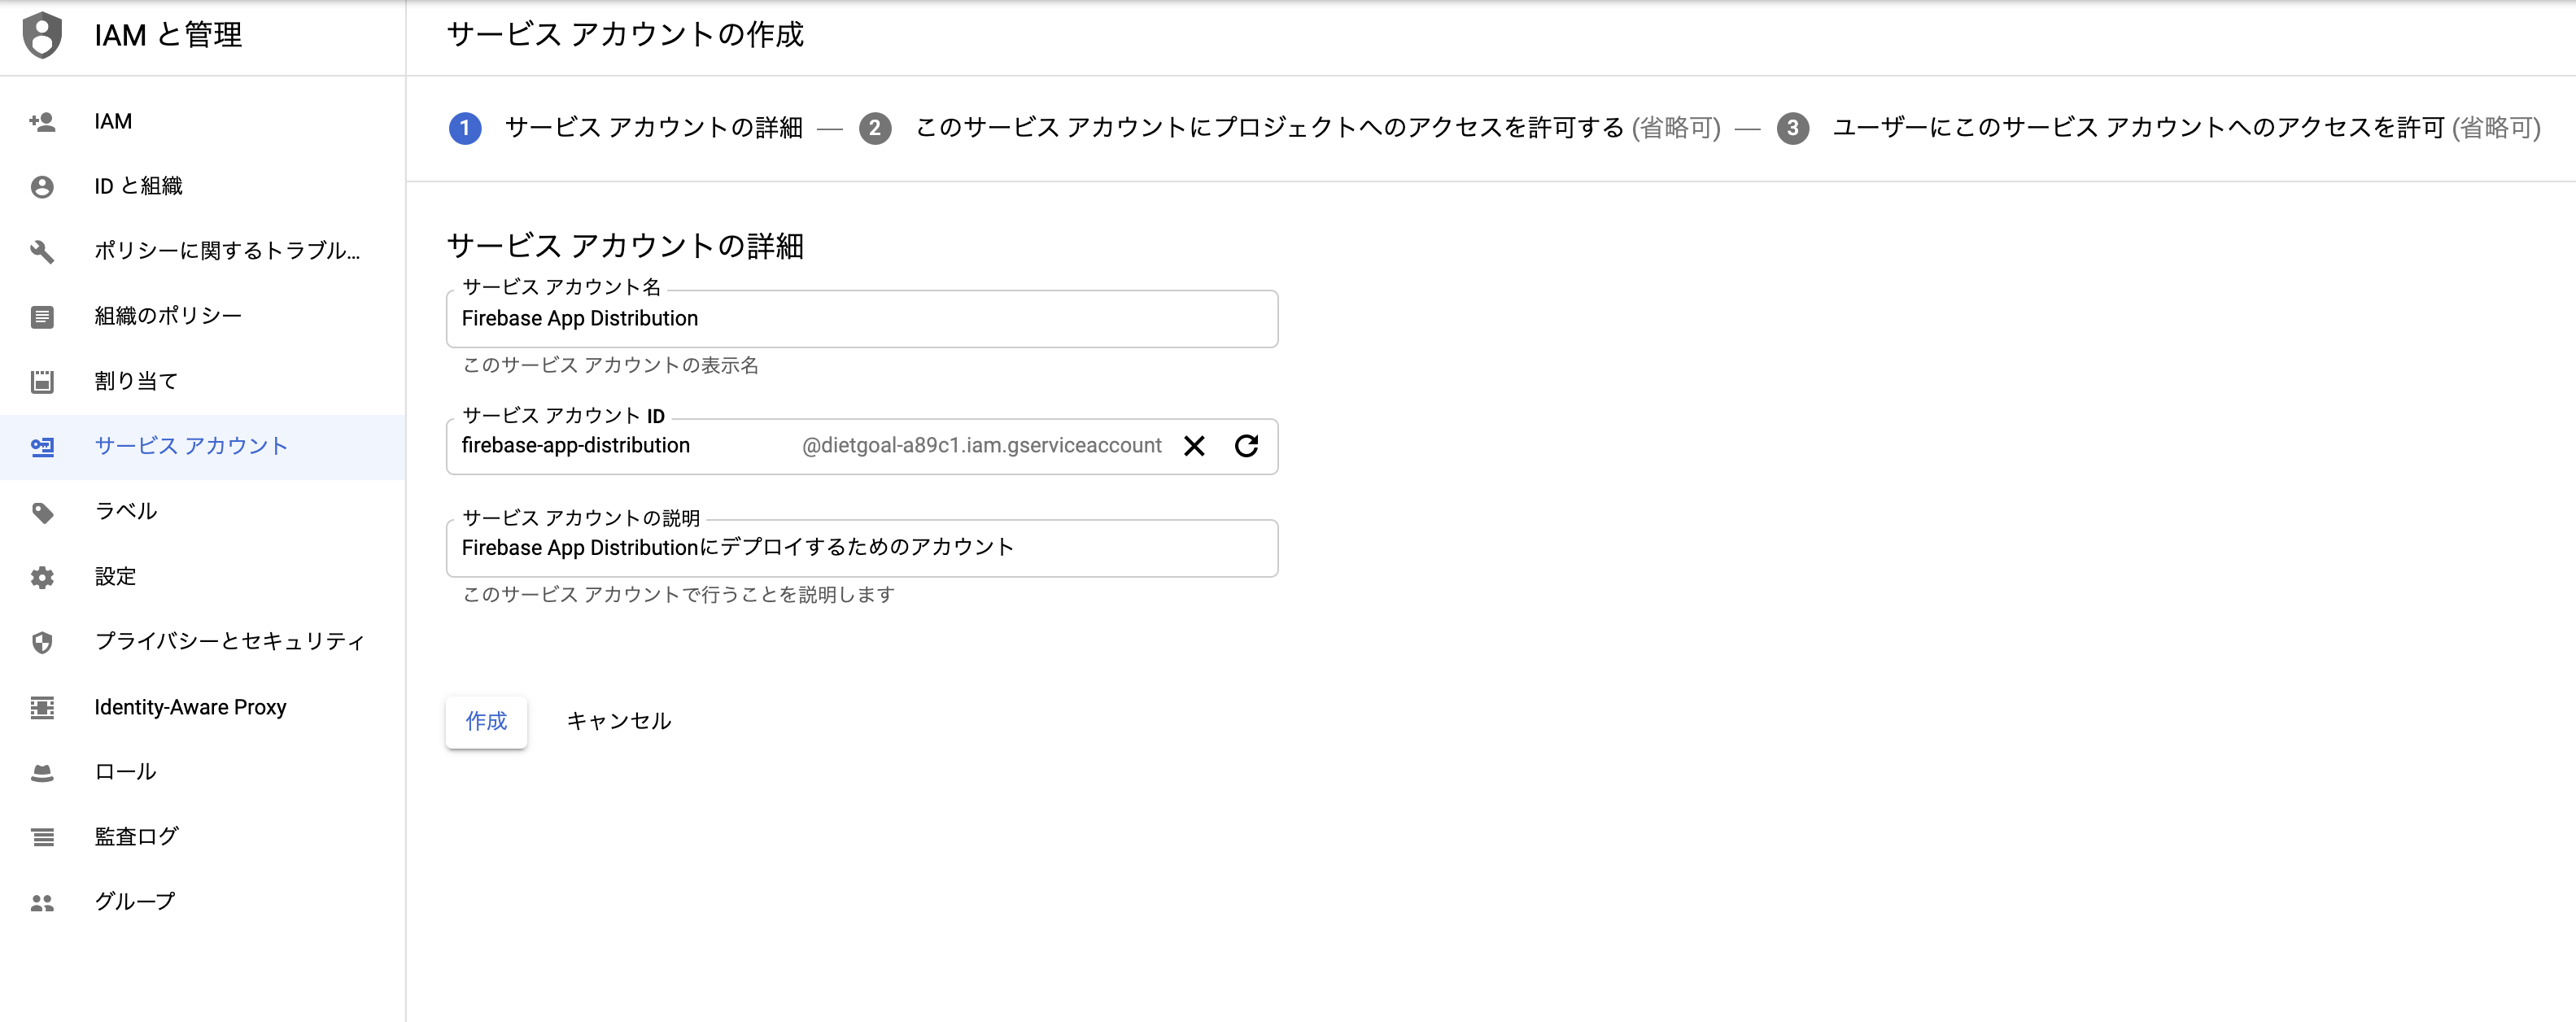
作成画面で入力項目があるので、下記のように入力します。(Firebase App Distribution用のアカウントだとわかれば十分です)
- サービスアカウント名:
Firebase App Distribution - サービスアカウントID:
firebase-app-distribution - サービスアカウントの説明:
Firebase App Distributionにデプロイするためのアカウント
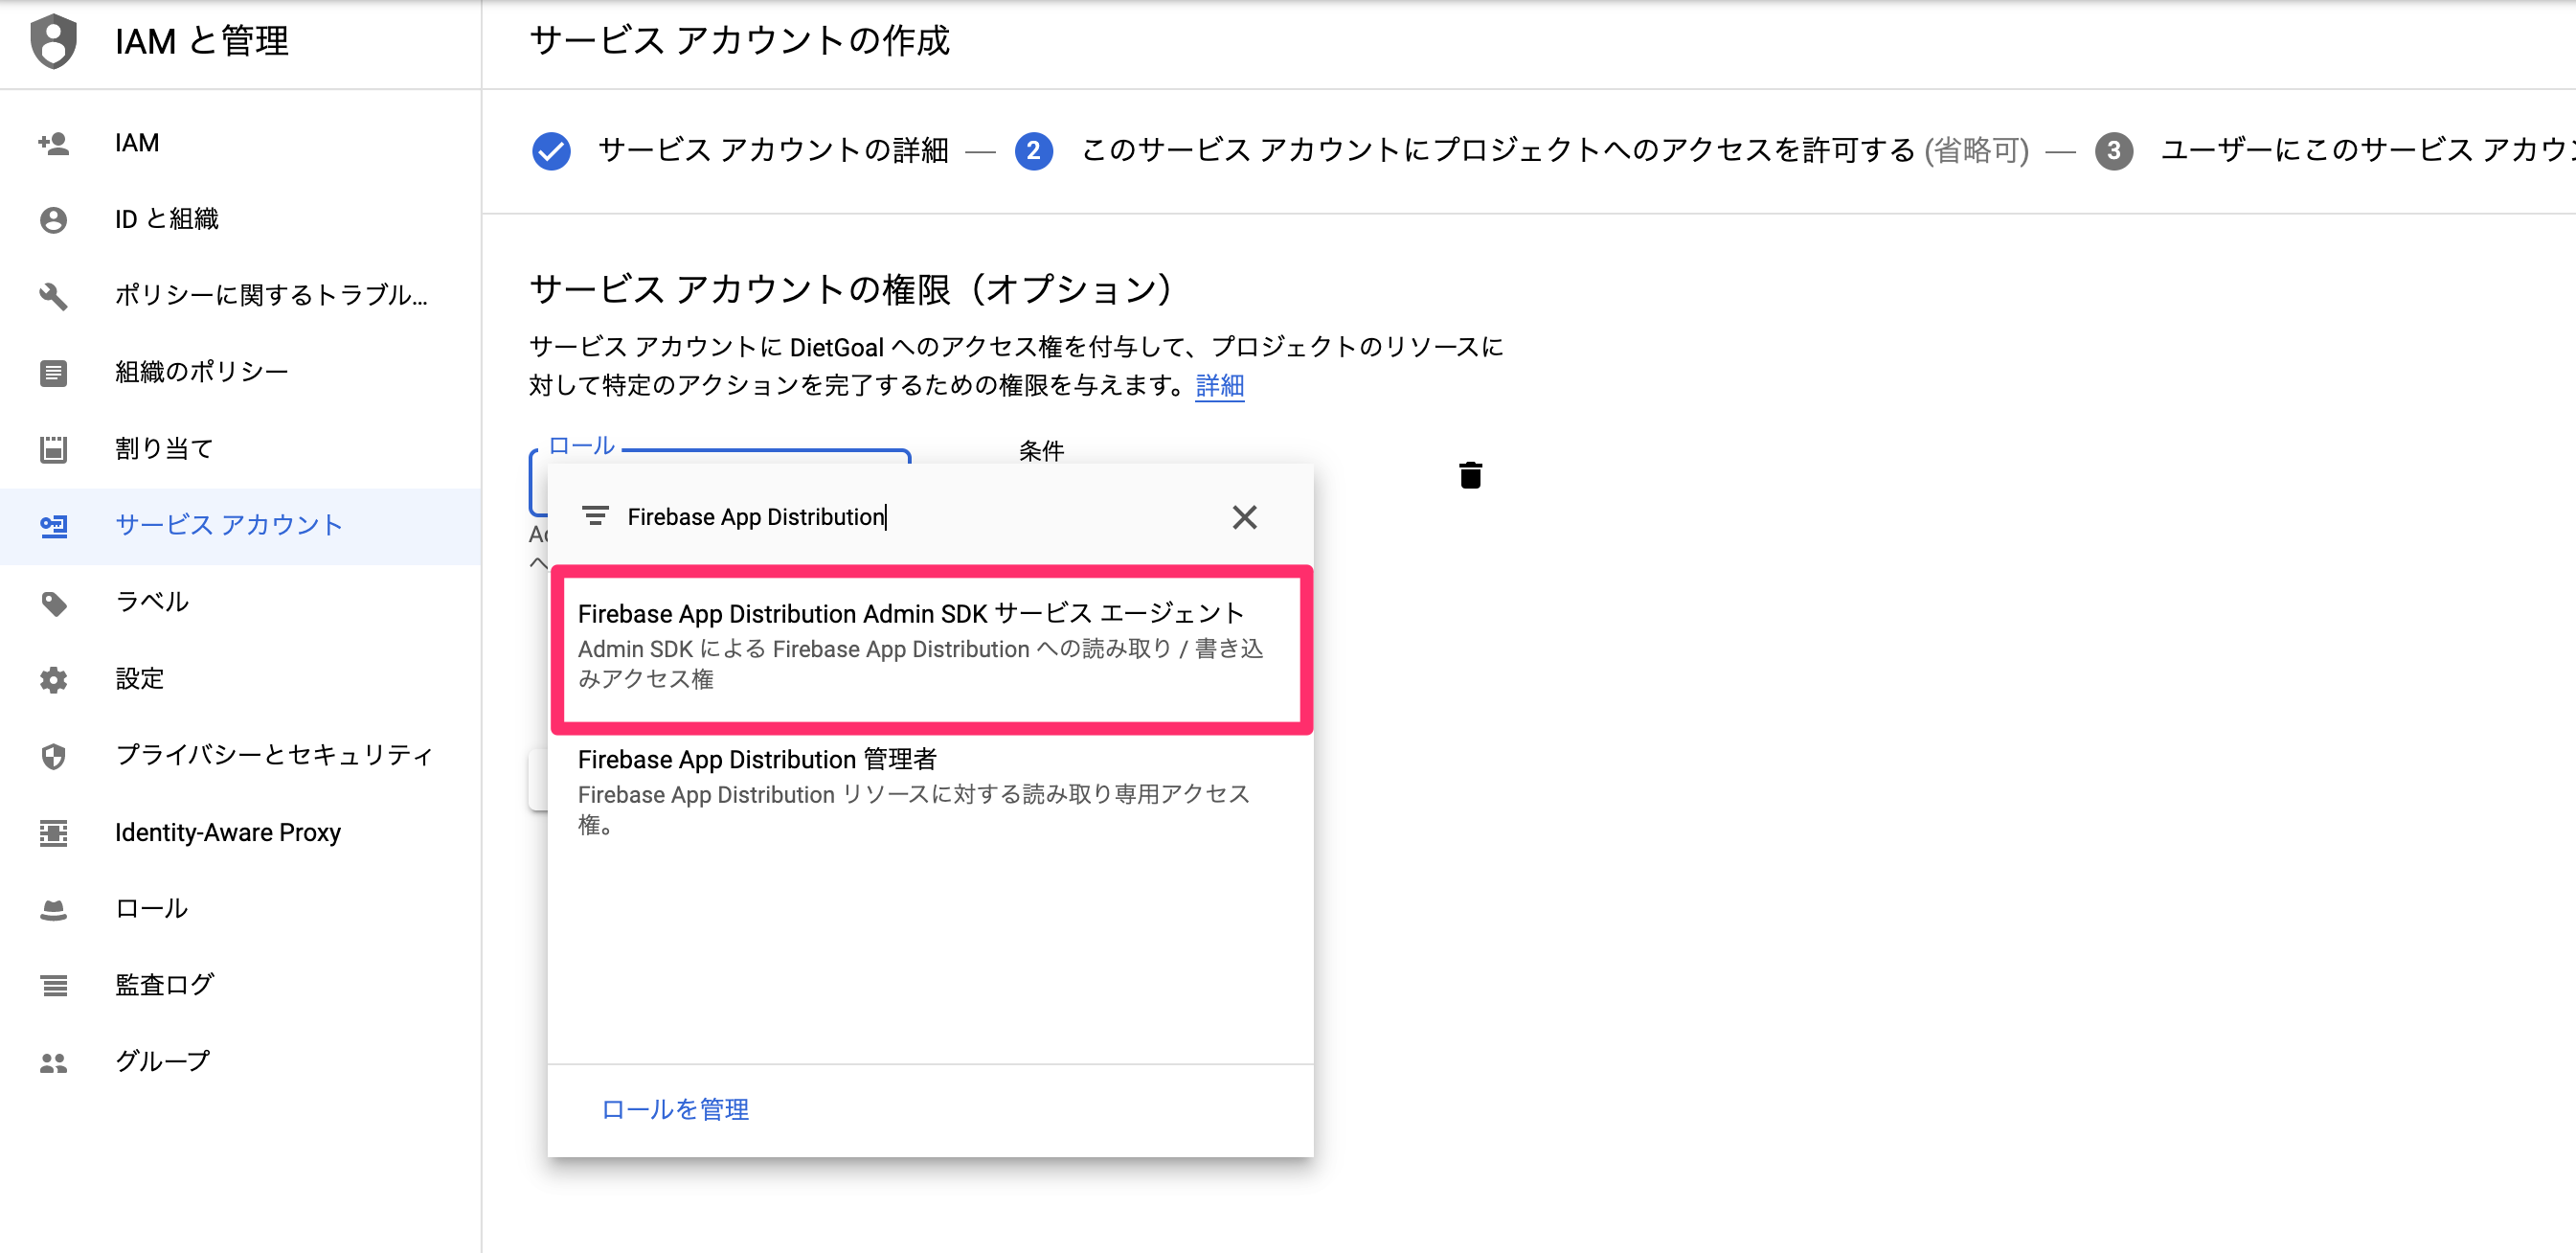
次に、作成するサービスアカウントのロールを設定します。
デプロイするためのアカウントですので書き込み権限がある、Firebase App Distribution Admin SDK サービス エージェントを選択し、続行ボタンを押します。
※公式ドキュメントには、Firebase App Distribution 管理者を選択するよう書かれているのですが、こちらのロールは読み込みしかできないので間違えないよう注意が必要です。
最後にアクセス権を設定できる画面です。
こちらは特に入力せずに、完了ボタンを押します。
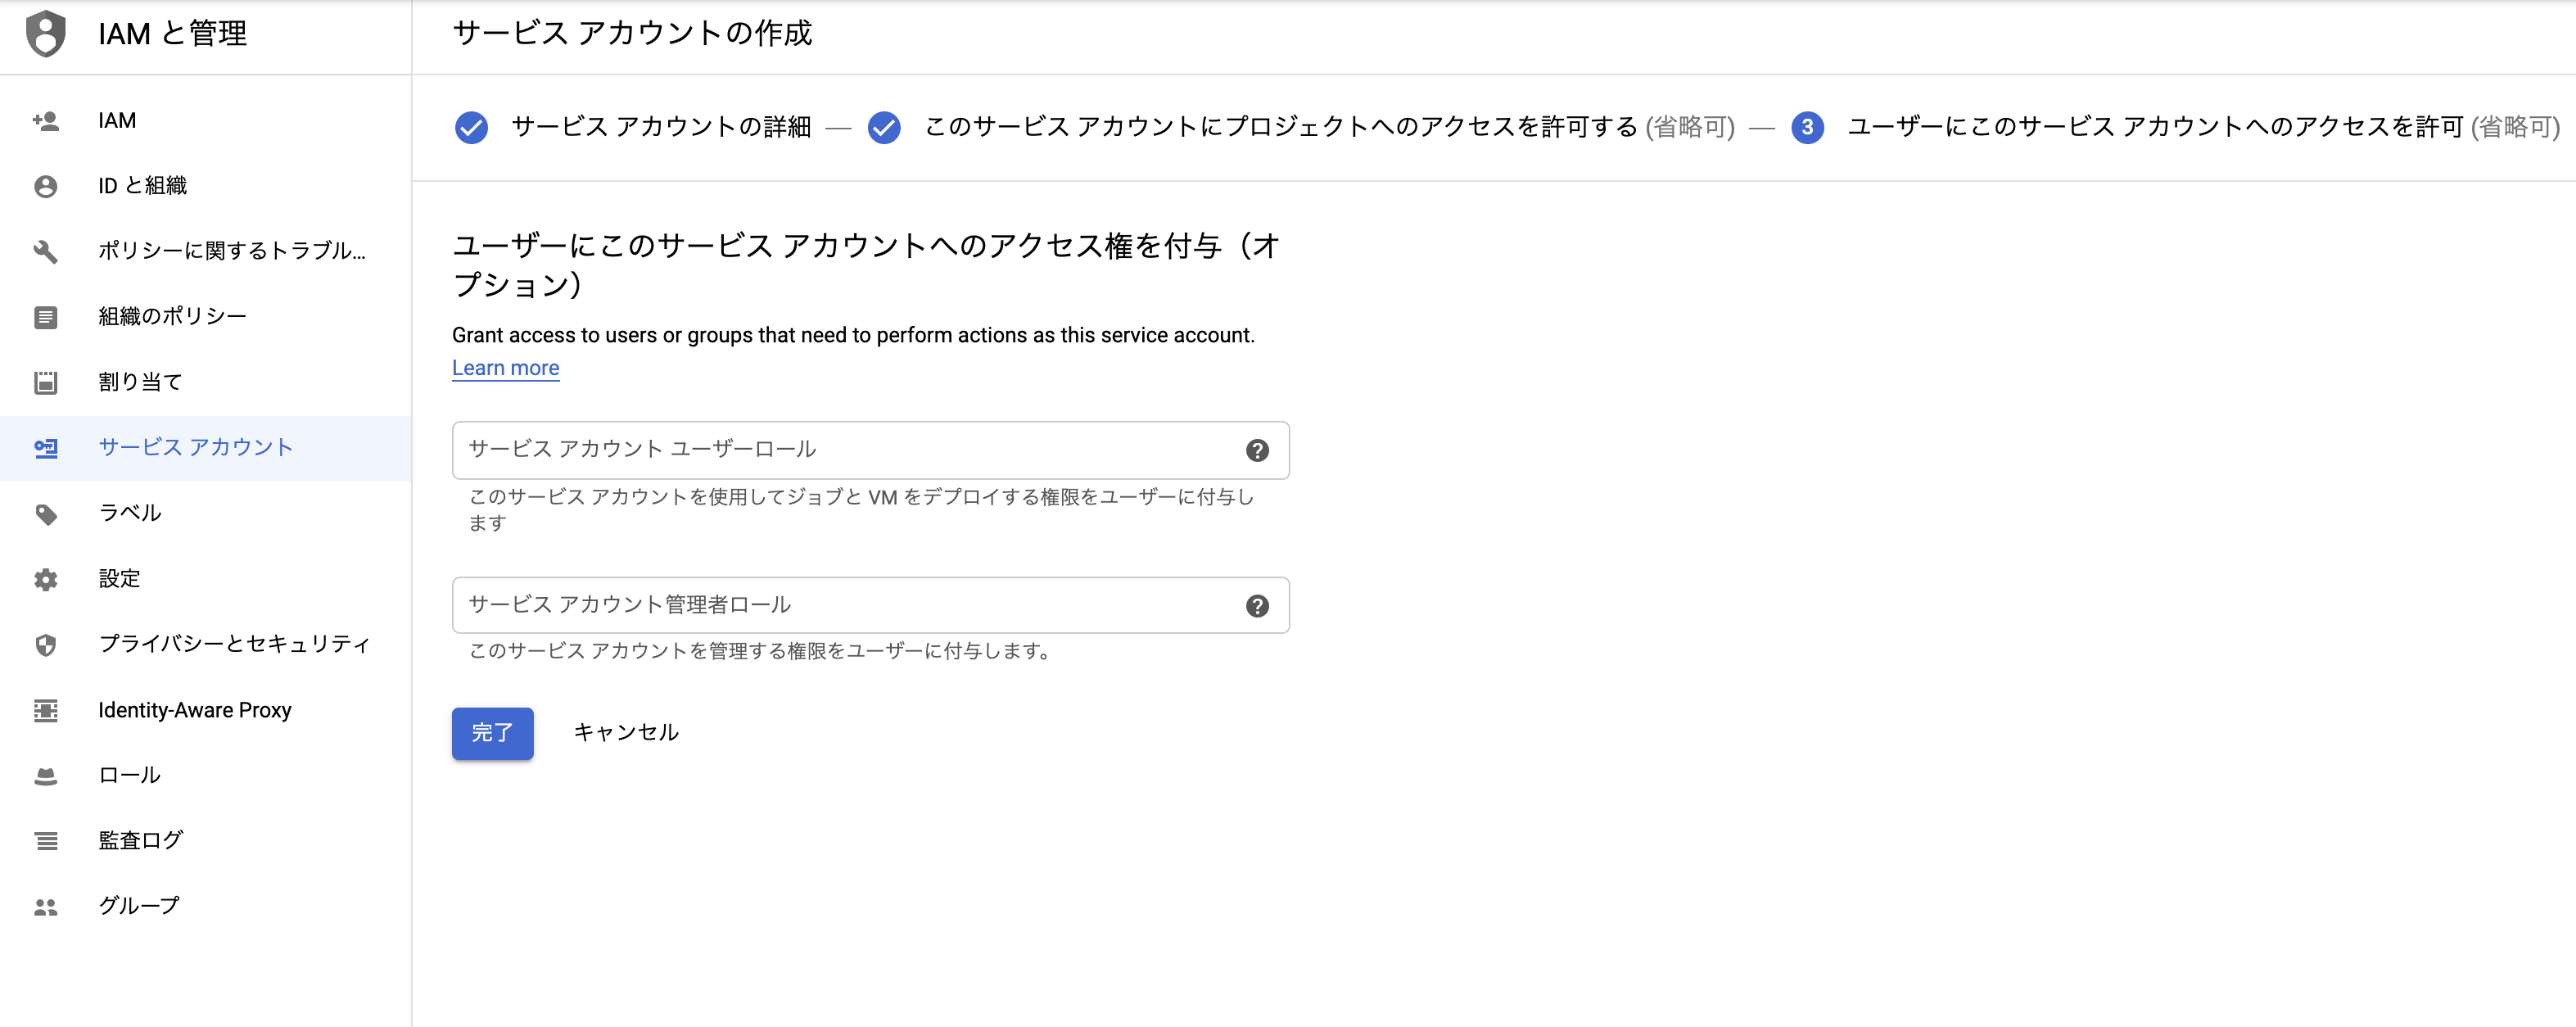
以上でサービスアカウントの作成は終わりです。
秘密鍵のjsonファイルの作成
作成したサービスアカウントが表示されているのを確認したら、右端にあるボタンから、編集ボタンを押下します。
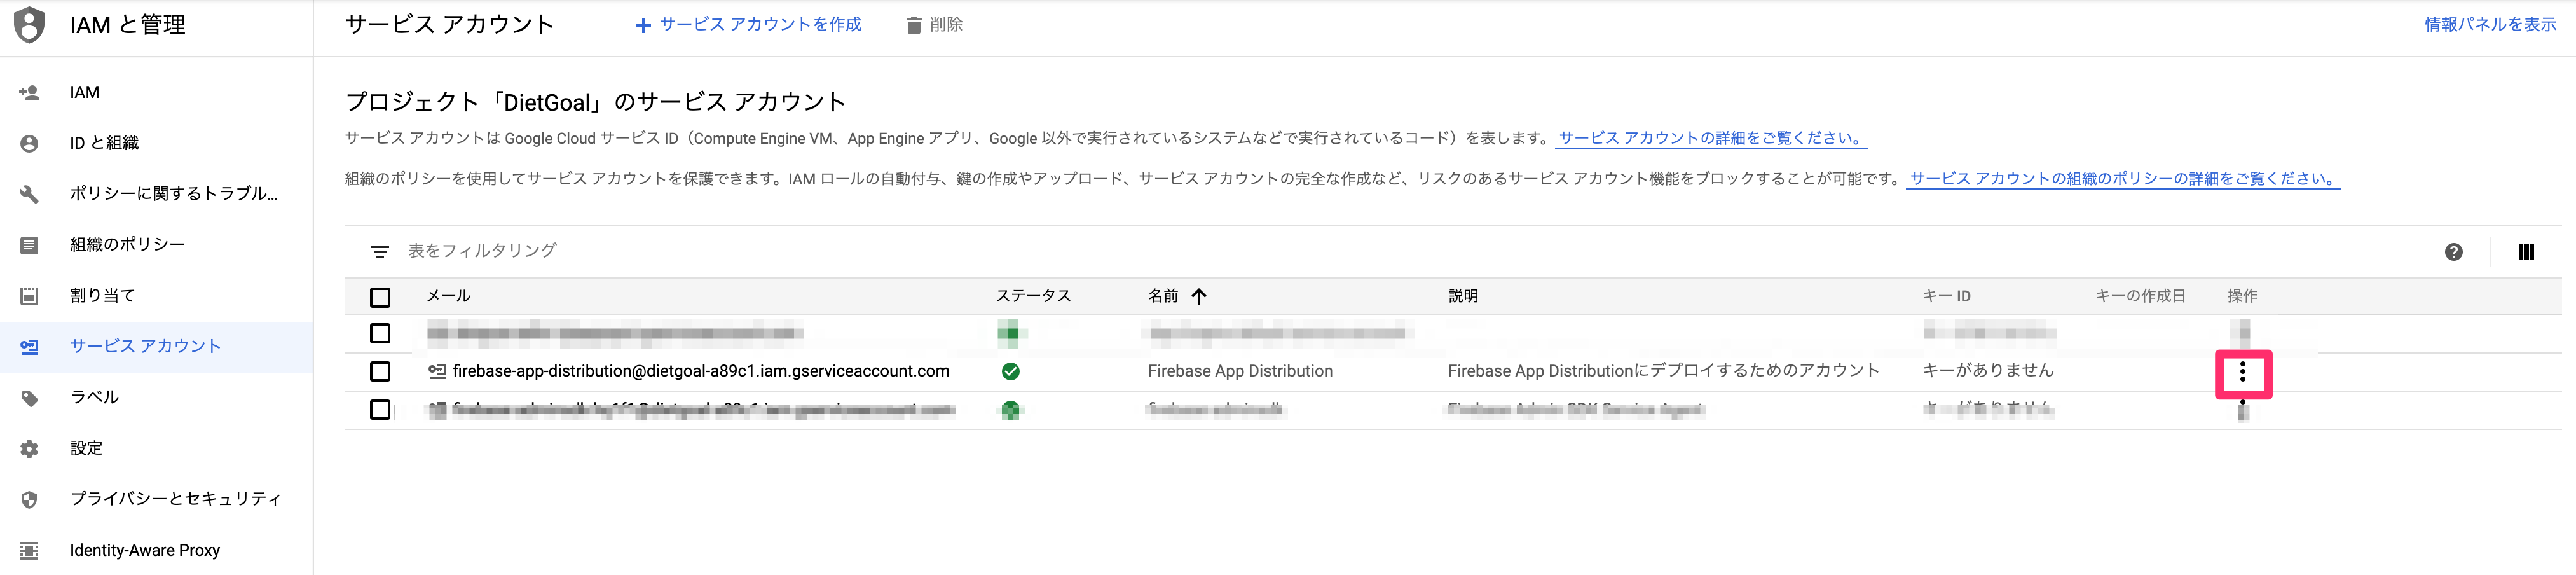
編集画面から、「鍵を追加」ボタンを押下し、「新しい鍵を作成」を選択し、jsonタイプのキーを作成します。
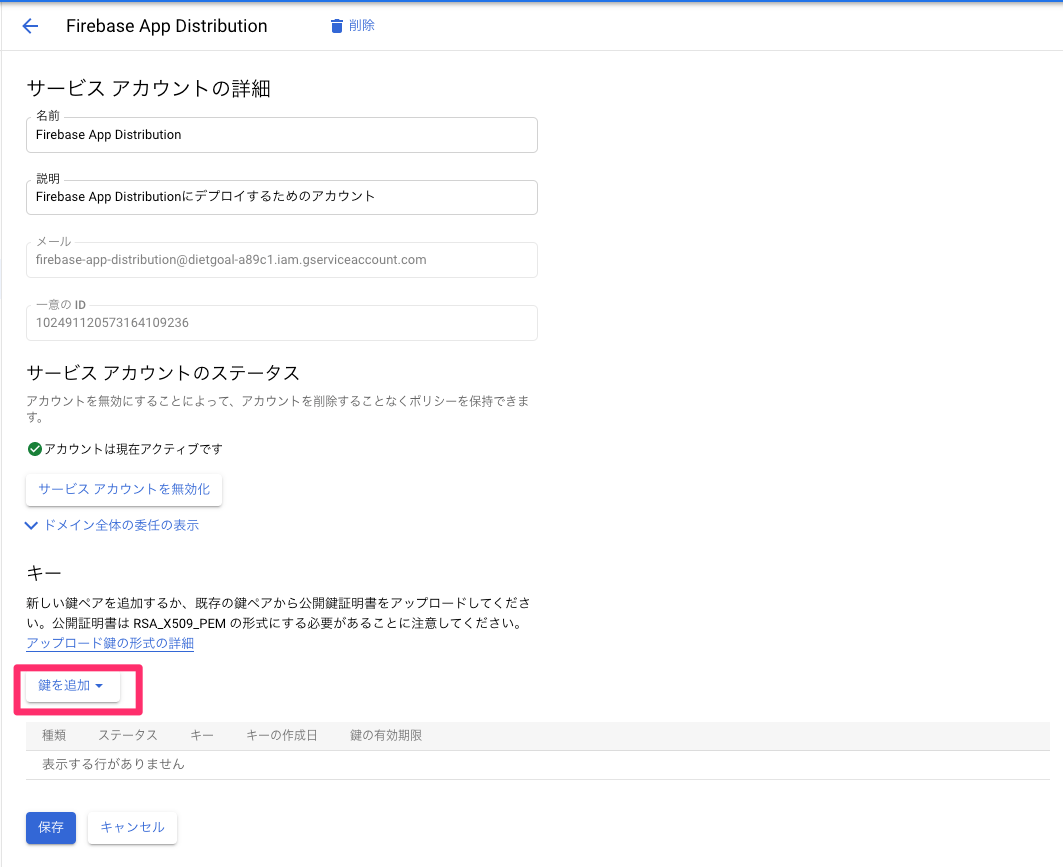
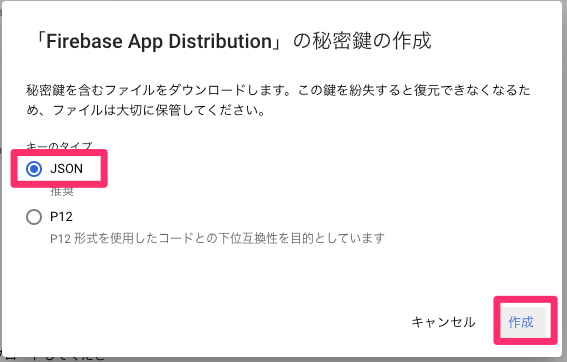
ローカルPCにjsonタイプの秘密鍵をダウンロードできたら以上となります。
秘密鍵のパスを環境変数に設定する
先ほど作成した秘密鍵のjsonファイルをパスを環境変数に設定し、firebase_app_distributionプラグインから秘密鍵を参照できるようにします。
firebase_app_distributionが参照するのはGOOGLE_APPLICATION_CREDENTIALSという変数名になります。
これと同じ名前の環境変数をローカルPCに設定します。
まずはダウンロードした秘密鍵のjsonのファイルを任意のディレクトリにdeploy.jsonというファイル名で移動します。(ファイル名も任意でOKです)
mv ~/Downloads/{jsonファイル名} ~/{任意のディレクトリ}/deploy_dev.json
次に~/.zprofile(bashを使っている場合は~/.bash_profile)に下記のコマンドを記述します。
export GOOGLE_APPLICATION_CREDENTIALS={deploy_dev.jsonの絶対パス}
環境変数を反映させるために下記のコマンドを実行します。
source ~/.zprofile
下記のコマンドで、GOOGLE_APPLICATION_CREDENTIALSにdeploy.jsonのパスが設定されていることを確認します。
echo ${GOOGLE_APPLICATION_CREDENTIALS}
パスが表示されたら環境変数の設定は完了です。ここまでできたらデプロイ時に認証できるようになります。
App Distributionにテスターを登録する
次にデプロイしたipaを配布するテスターの登録をします。
またApp Distributionでは配布したいテスターをグループで管理できるので、iOSとAndroidでテスターを分けるみたいなこともできます。
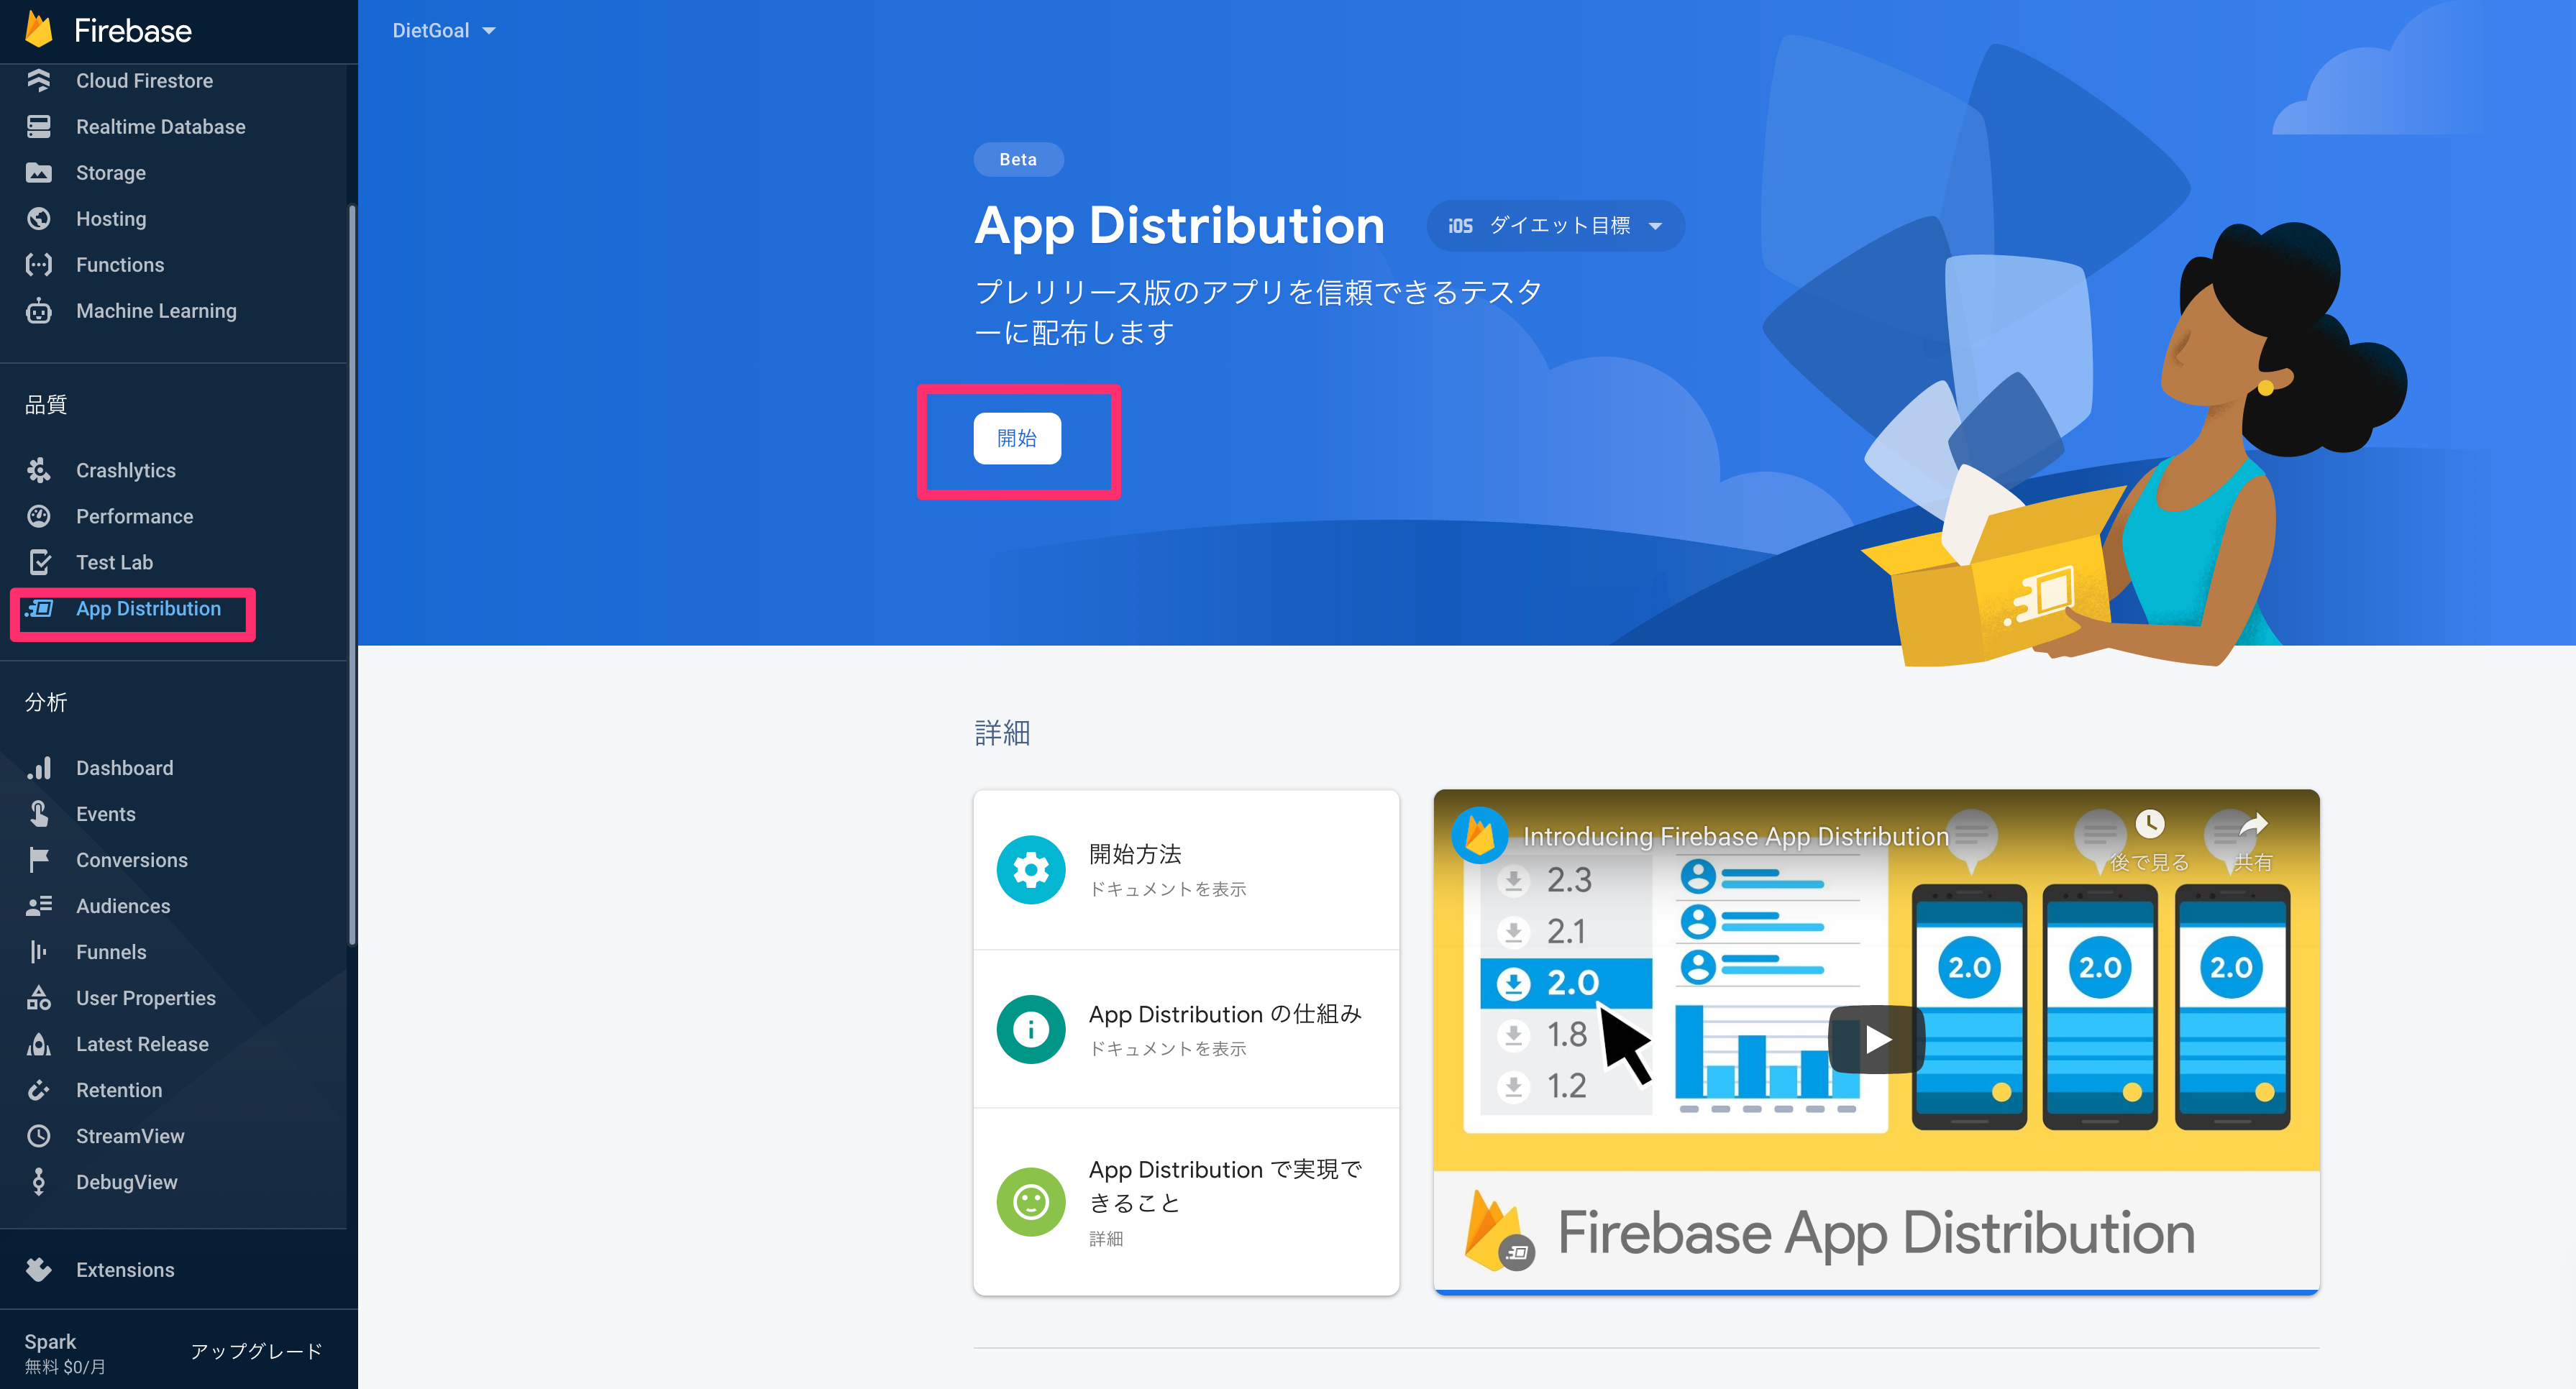
ではFirebaseのコンソールを開き、左のメニューから、App Distributionを選択し、開始ボタンを押します。
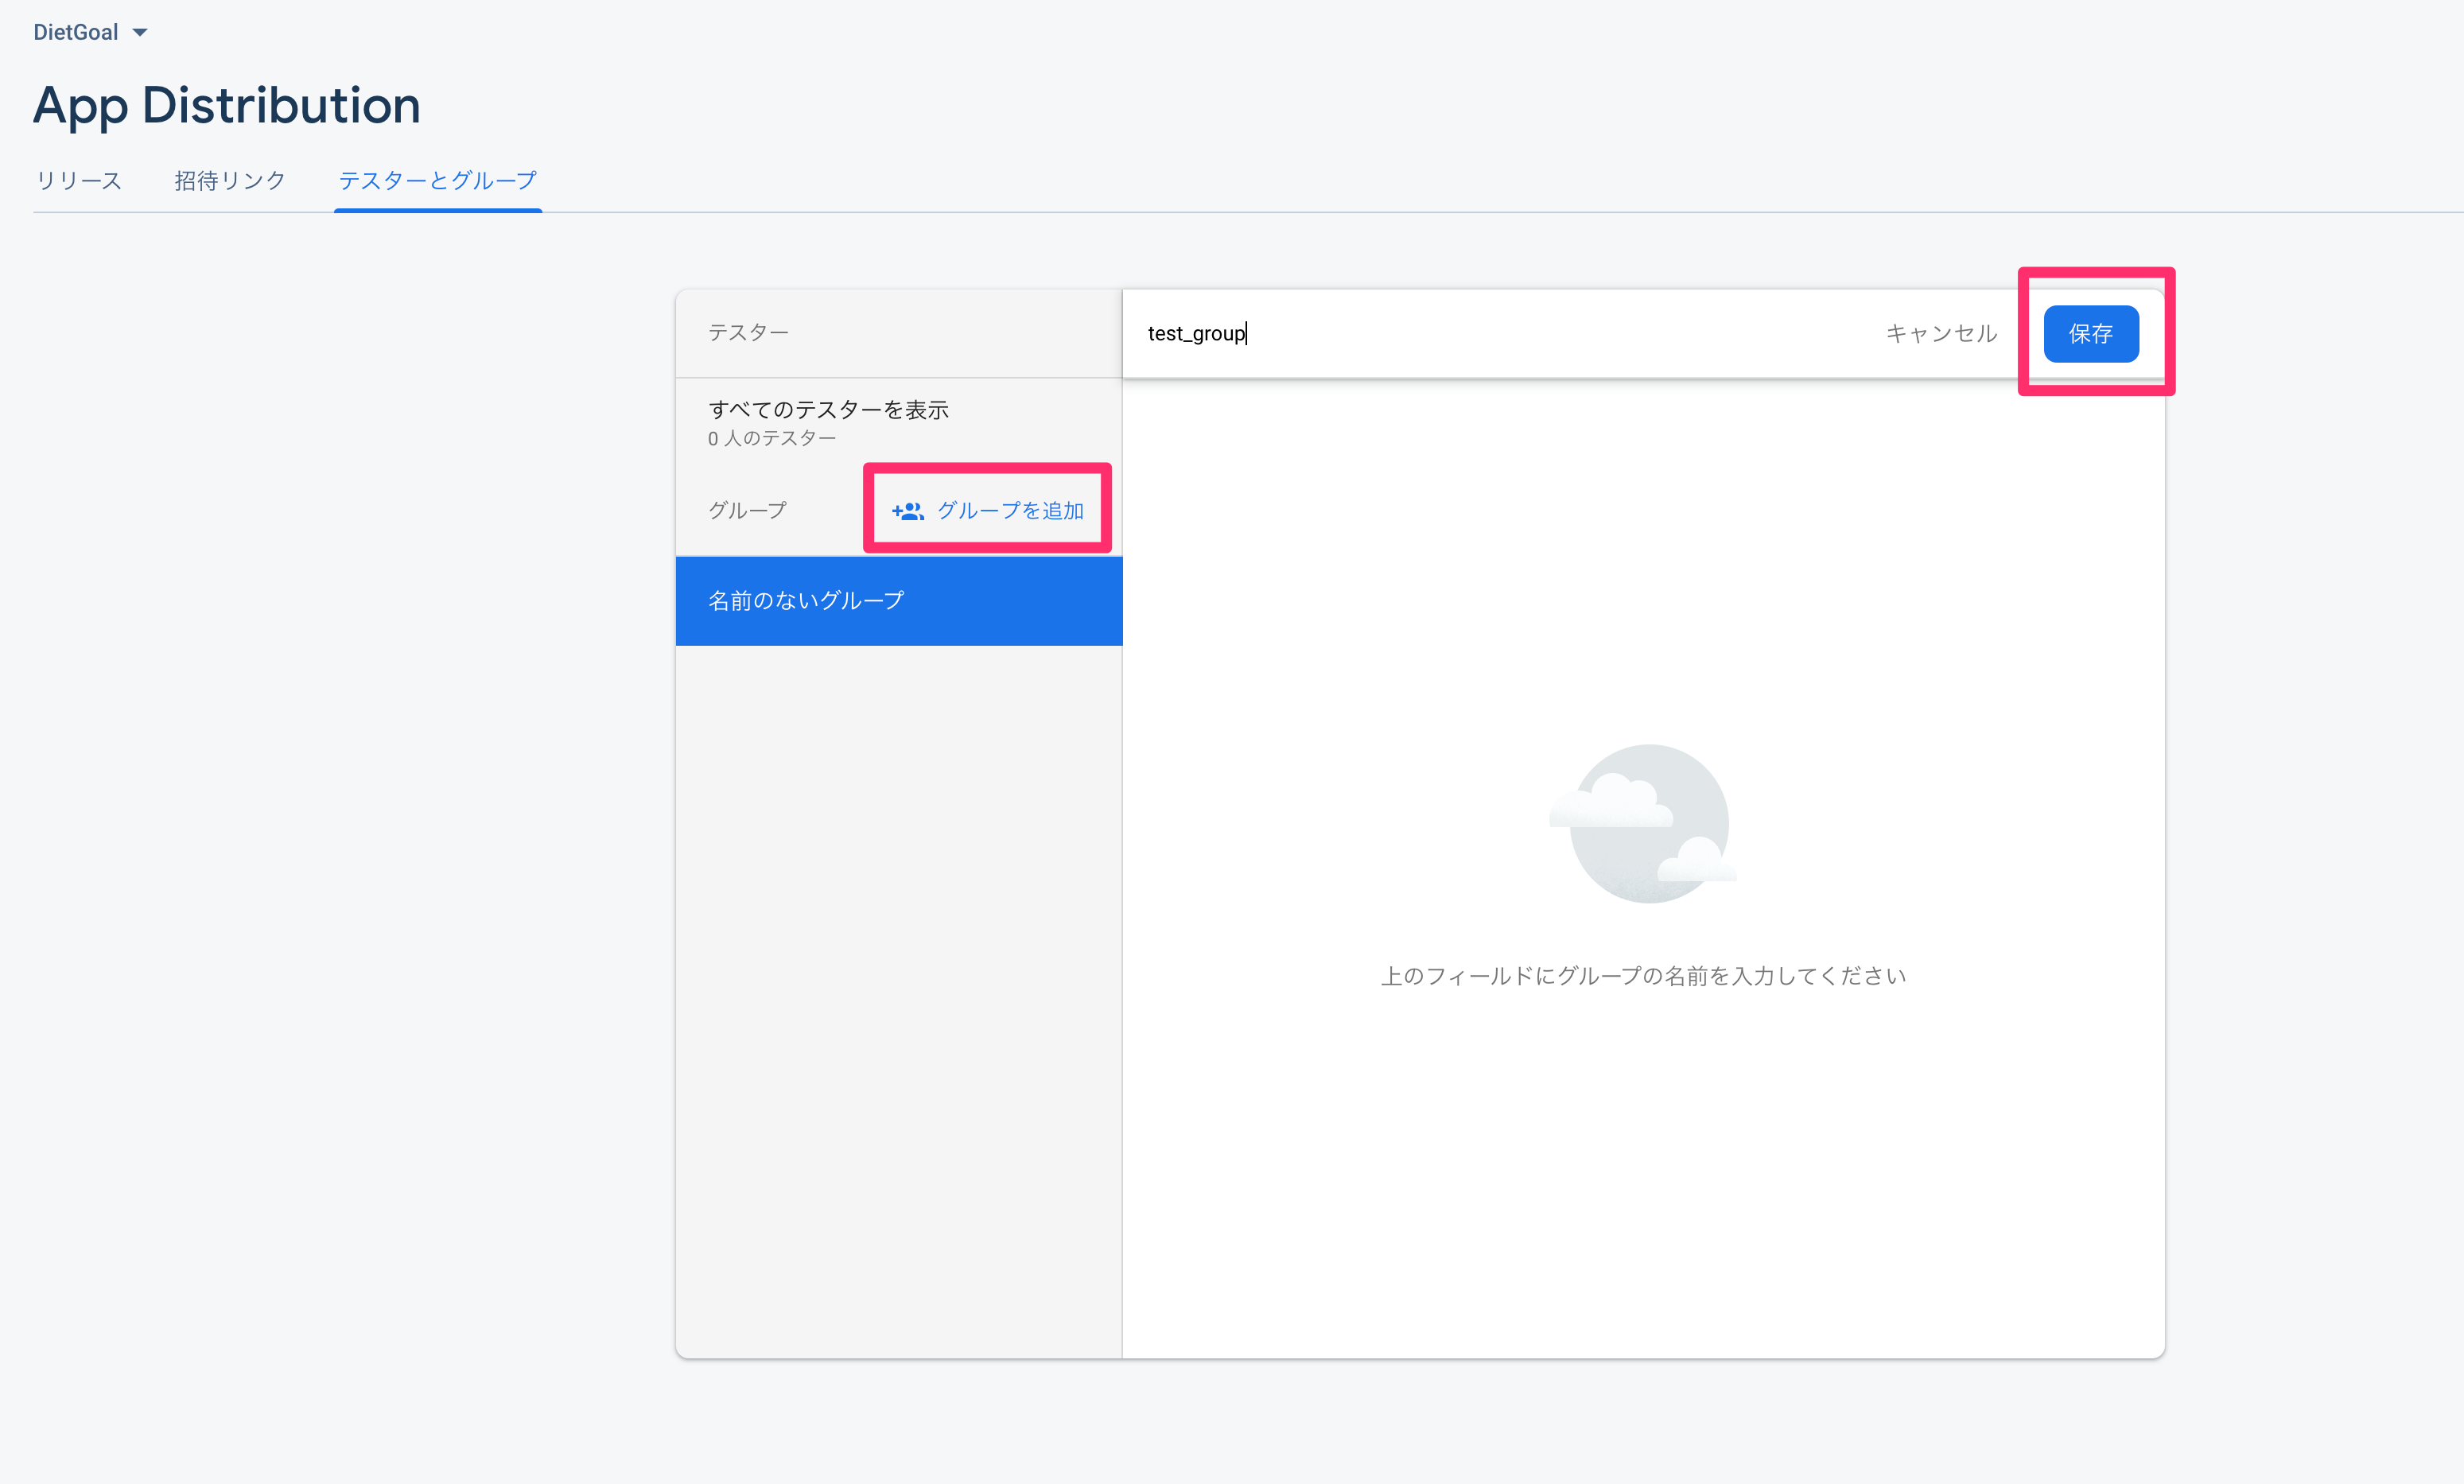
App Distributionの画面が開いたら、テスターとグループを選択します。
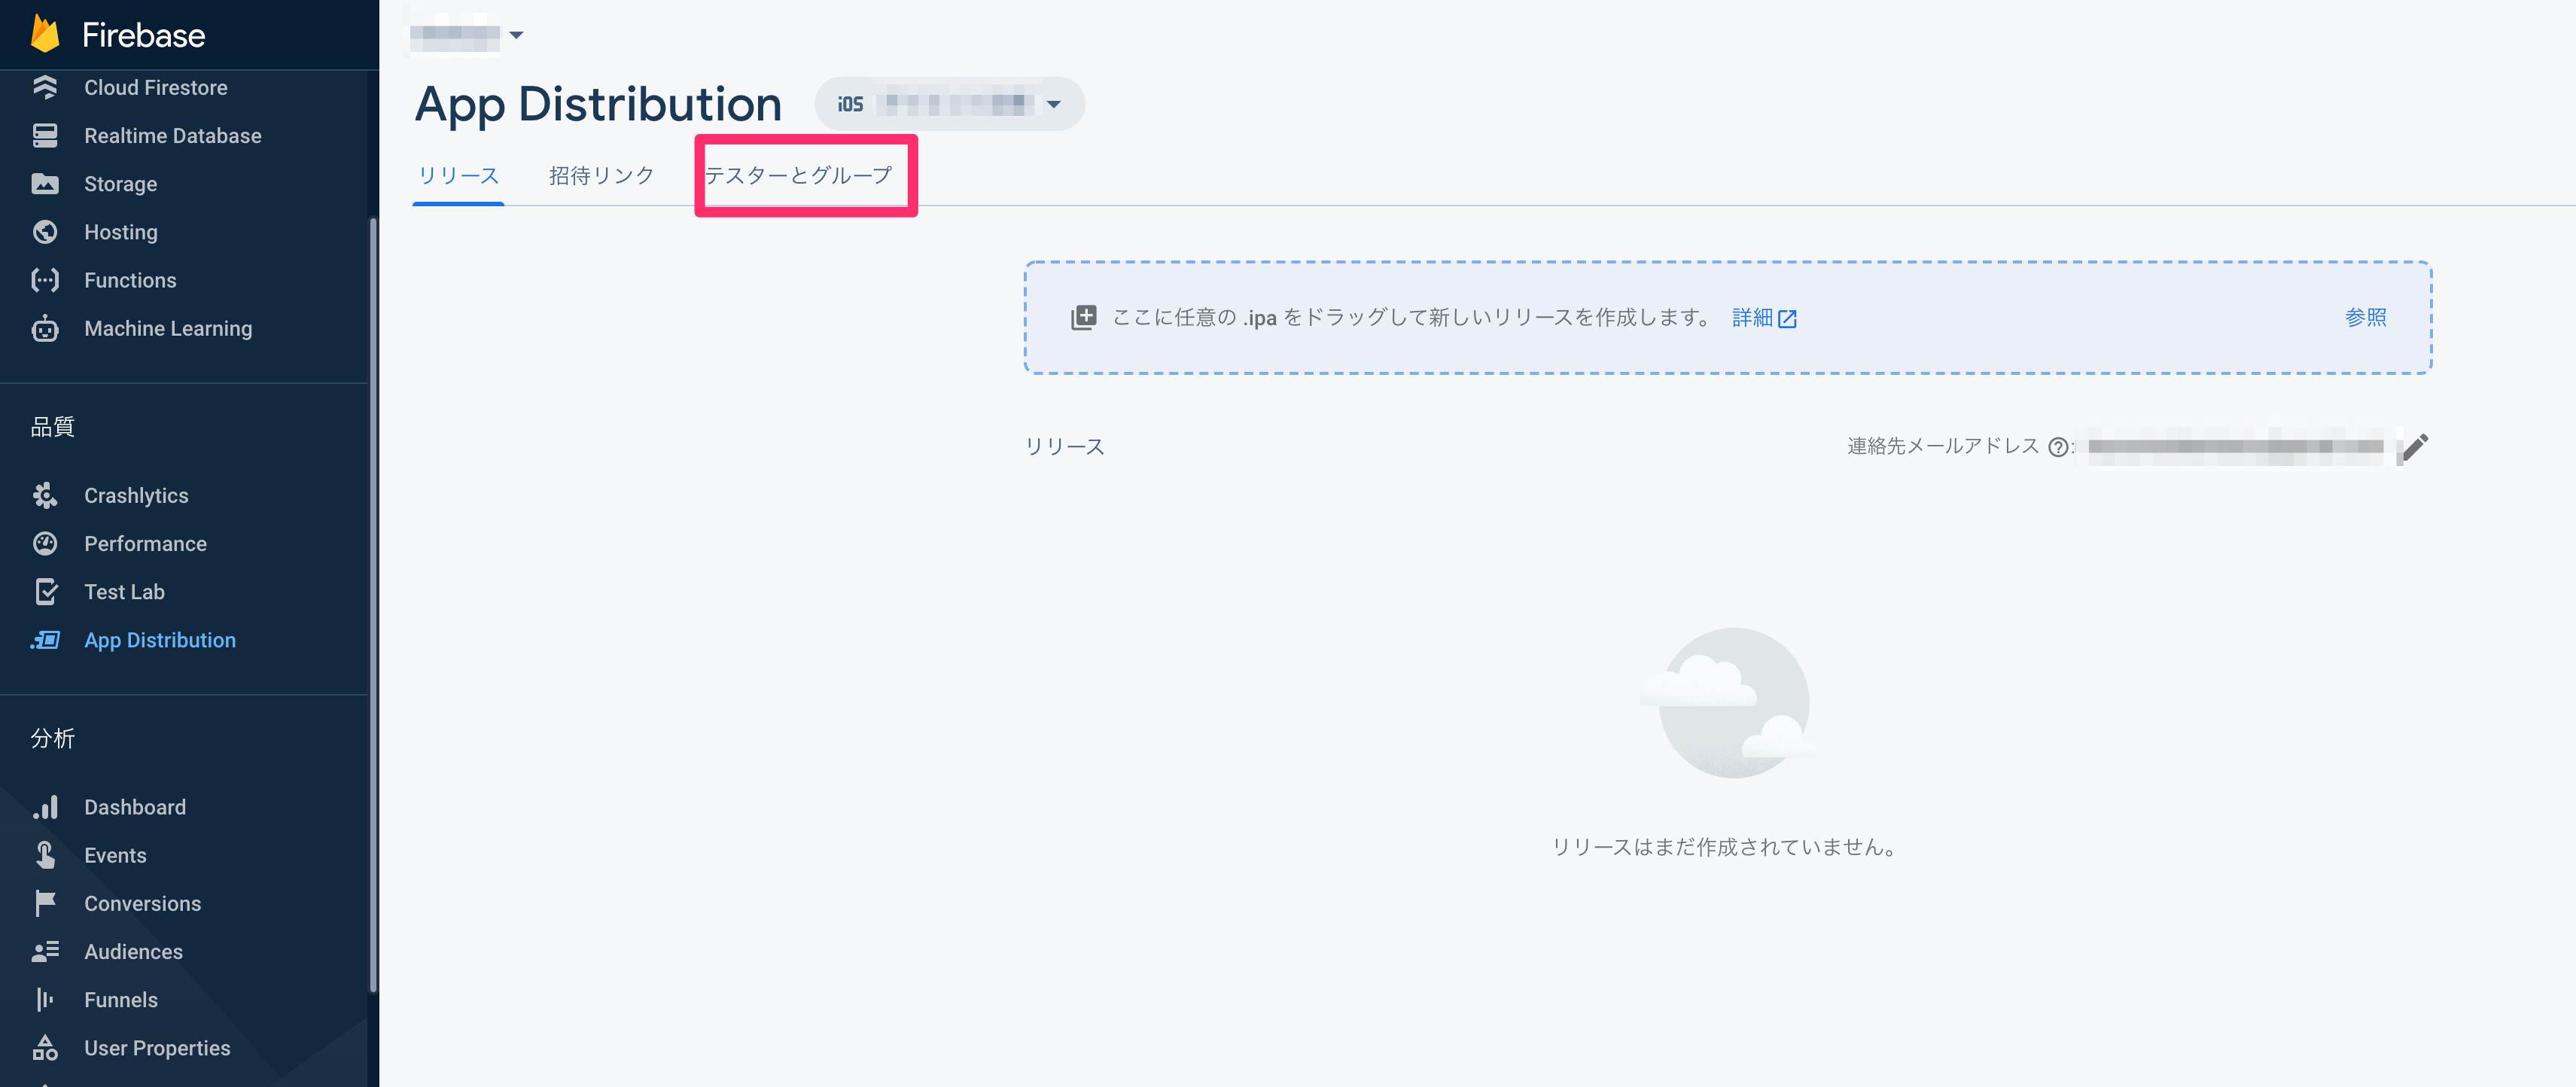
テスターとグループの画面が開いたら、グループを追加を選択し、任意のグループ名を入力し、保存ボタンを押します。
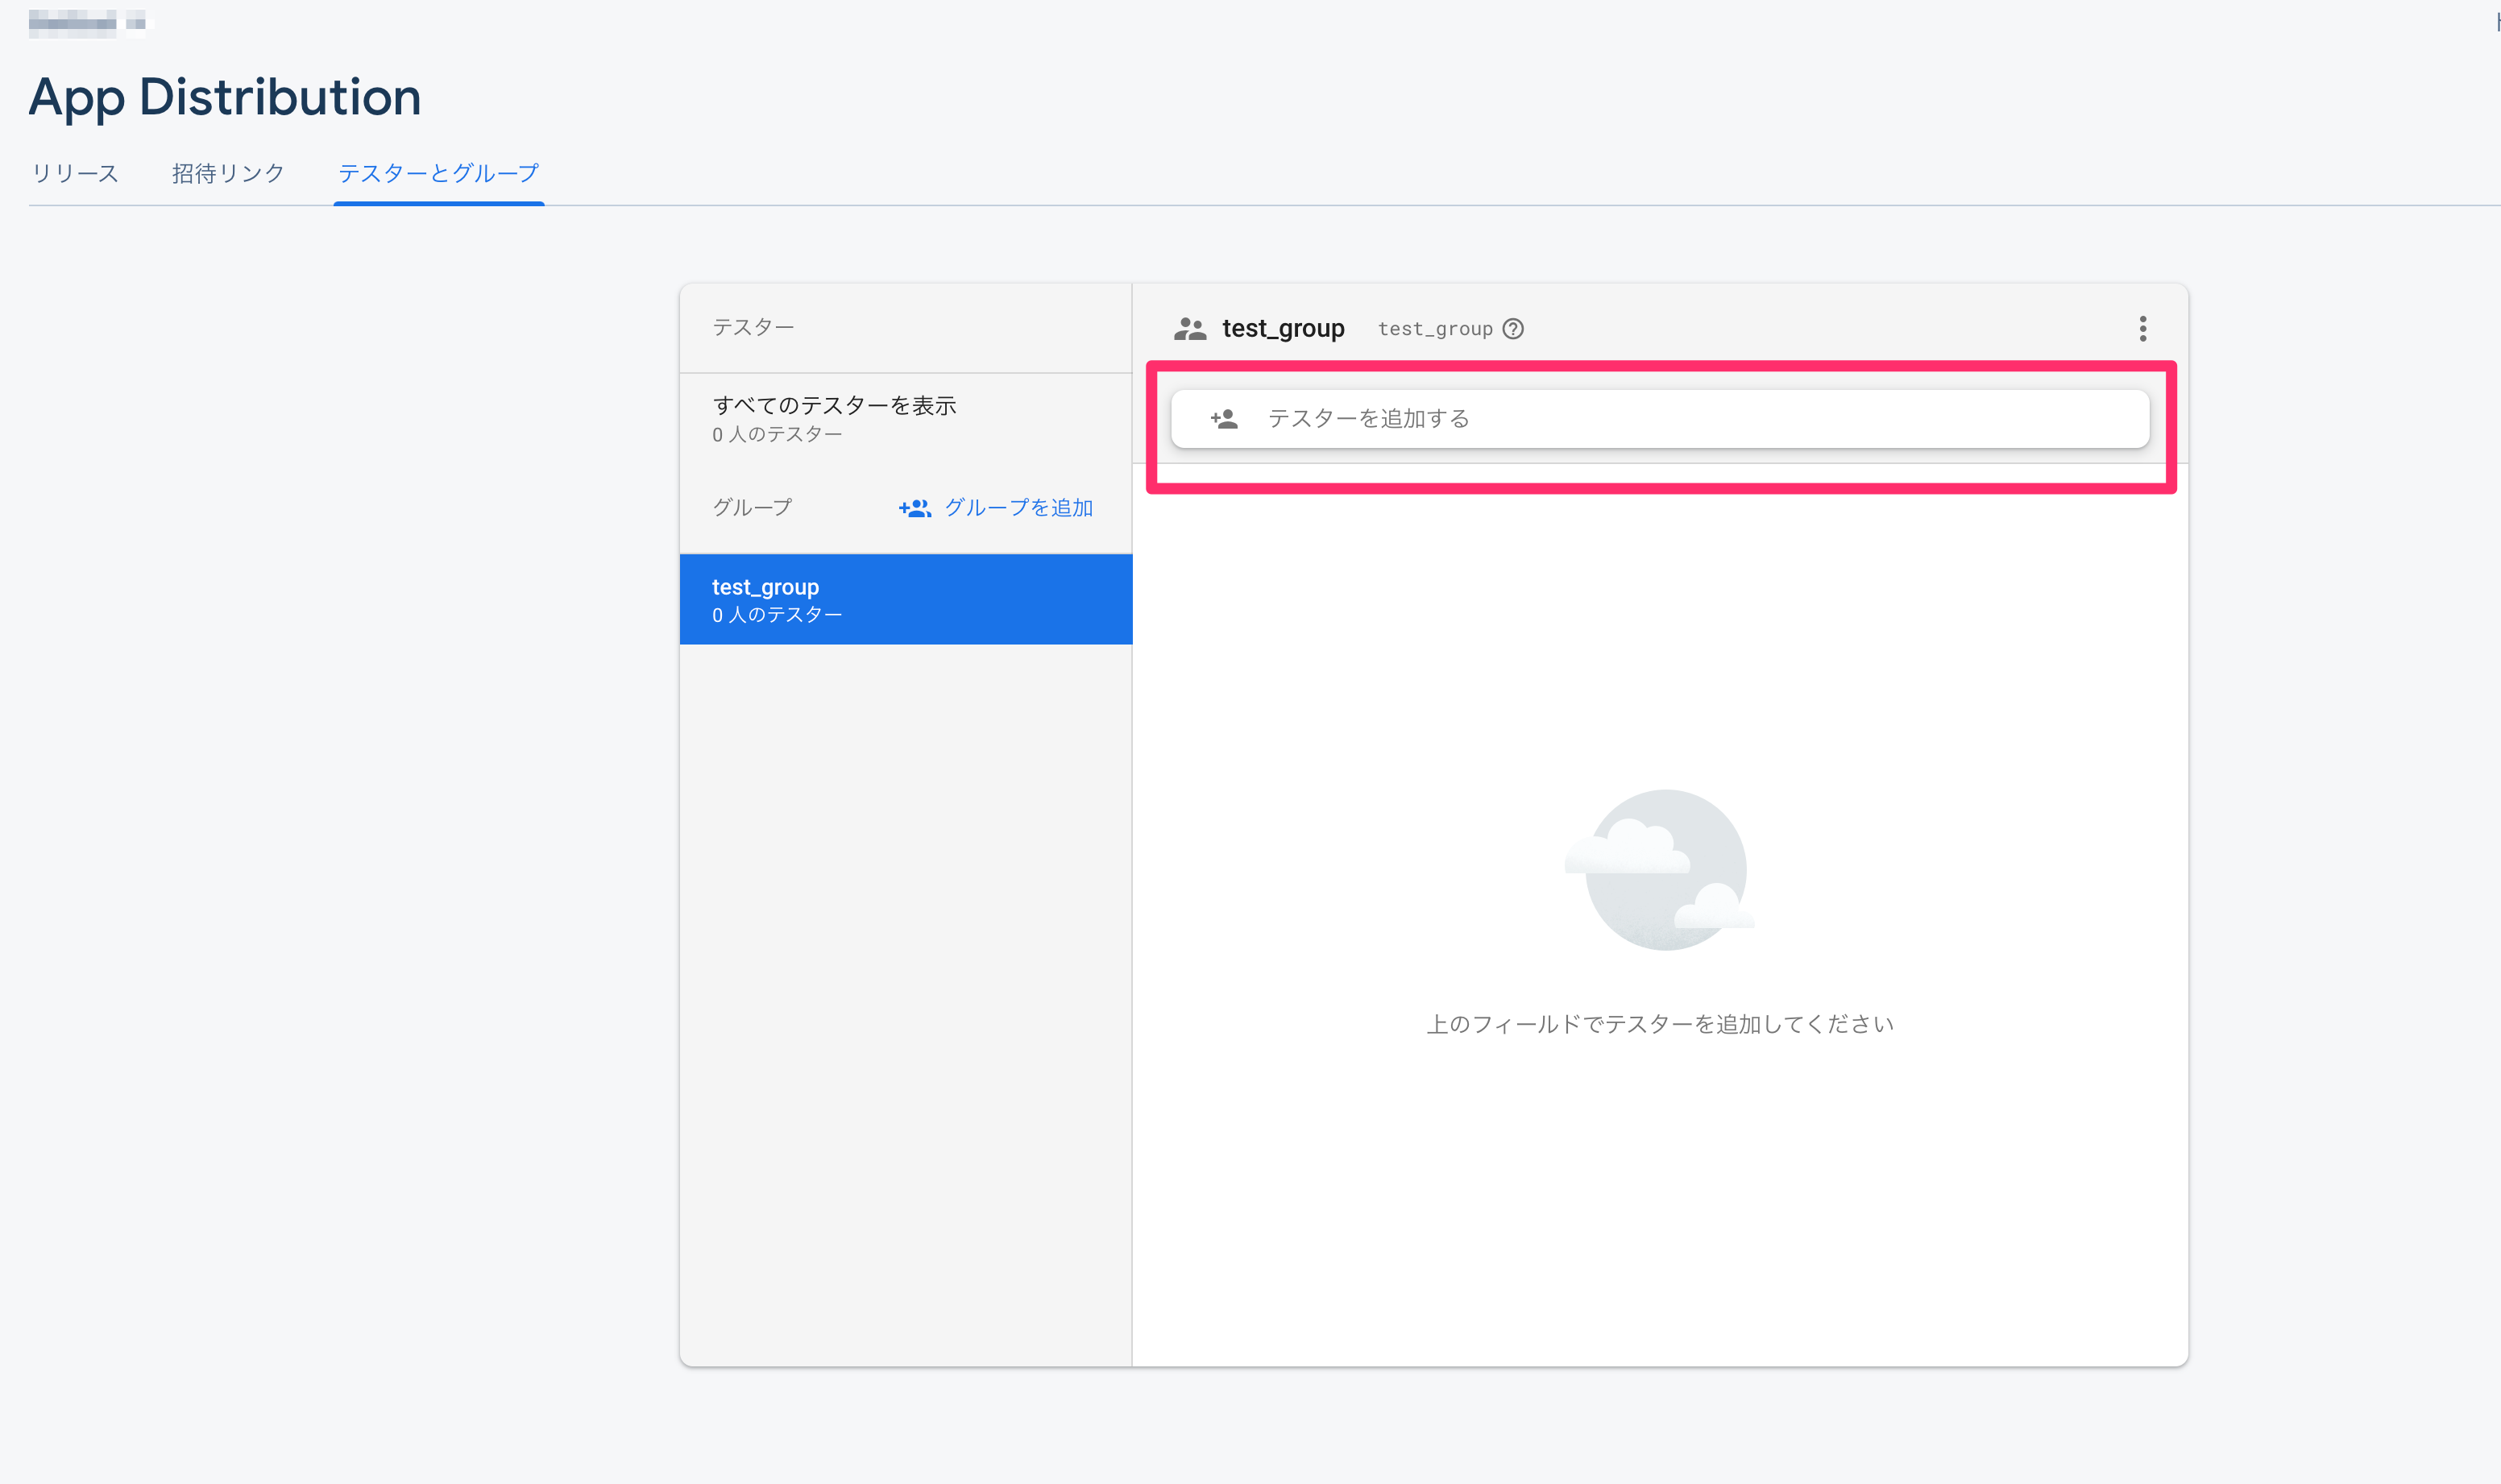
最後に、テスターのメールアドレスを入力し、作成したグループにテスターを追加します。
ipaをデプロイした時にテスターにメールが届き、メール内のリンクからipaをインストールできるようになります。
テスターの登録は以上です。
fastfileの実装
fastlaneを使ってビルドとデプロイをするために、Fastfileにタスクの定義を実装します。
Fastfileの雛形の作成
タスクの定義を書く前にFastlaneの雛形を作成します。fastlane/Fastfileをエディタで開き、下記のように記述します。
- Fastfileの雛形
default_platform(:ios)

platform :ios do
  desc "Deploy to Firebase App Distribution"  - ①
  lane :deploy do |options|                   - ②
    ## TODO: ビルドするタスクを定義する              - ③

    ## TODO: デプロイするタスクを定義する            - ④

  end
end
fastlaneでは実行したい一連のタスクをレーンとして定義します。
①の、descというキーワードの後の文字列は、このレーンで何をするのかの概要を書くことができます。
省略することもできますが、レーンの一覧を表示した際に出力されます。
②ではレーンの名前を定義しています。
後述しますが、実行したいレーンをfastlaneコマンドで実行する際に、ここで定義した名前を指定します。
optionsはfastlaneコマンドの引数です。
③と④の箇所にビルドとデプロイのタスクを定義します。
ビルドタスクの記述
Fastfileにビルドタスクを記述します。
- Fastfile(ビルドタスク記述版)
default_platform(:ios)

platform :ios do
  desc "Deploy to Firebase App Distribution"
  lane :deploy do |options|
    ## TODO: ビルドするタスクを定義する
    build_app(                                                                      - ①
      scheme: "{Xcodeのプロジェクトのスキーム名を書きます}",                                  - ②
      export_options: {
        method: "ad-hoc",                                                            - ③
        provisioningProfiles: {
          "{BundleIDを書きます}" => "{ビルドに使用するプロビジョニングプロファイルの名前を記述します}"  - ④
        }
      }
    )

    ## TODO: デプロイするタスクを定義する
  end
end
fastlaneではレーンの中のタスクを、アクションと呼びます。
①のbuild_appアクションは、fastlaneに用意されているビルドするためのアクションです。
build_appアクションにビルドに必要なパラメーターを記述していきます。
②のschemeのキーには、ビルドしたいスキーム名を書きます。
③のmethodのキーには、ad-hocかapp-storeを指定します。今回はadhocでビルドしたいのでad-hocを指定します。
④のprovisioningProfilesでは、BundleIDをキー名にしてプロビジョニングプロファイルの名前をvalueにします。
Xcodeの設定でAutomatically manage signingにチェックが入っている場合はprovisioningProfilesの指定は必要ありません。
build_appの詳細は公式ドキュメントを参照してください。
デプロイタスクの記述
次にデプロイタスクを記述します。
- Fastfile(デプロイタスク実装版)
default_platform(:ios)

platform :ios do
  desc "Deploy to Firebase App Distribution"
  lane :deploy do |options|
    ## ビルドタスク省略

    ## TODO: デプロイするタスクを定義する
    firebase_app_distribution(                                   - ①
        app: "{FirebaseプロジェクトのアプリIDを記述する}",               - ②
        groups: "test_group",                                    - ③
        release_notes: "xxxの機能を実装しました",                    - ④
    )
  end
end
①のfirebase_app_distributionアクションでデプロイをします。
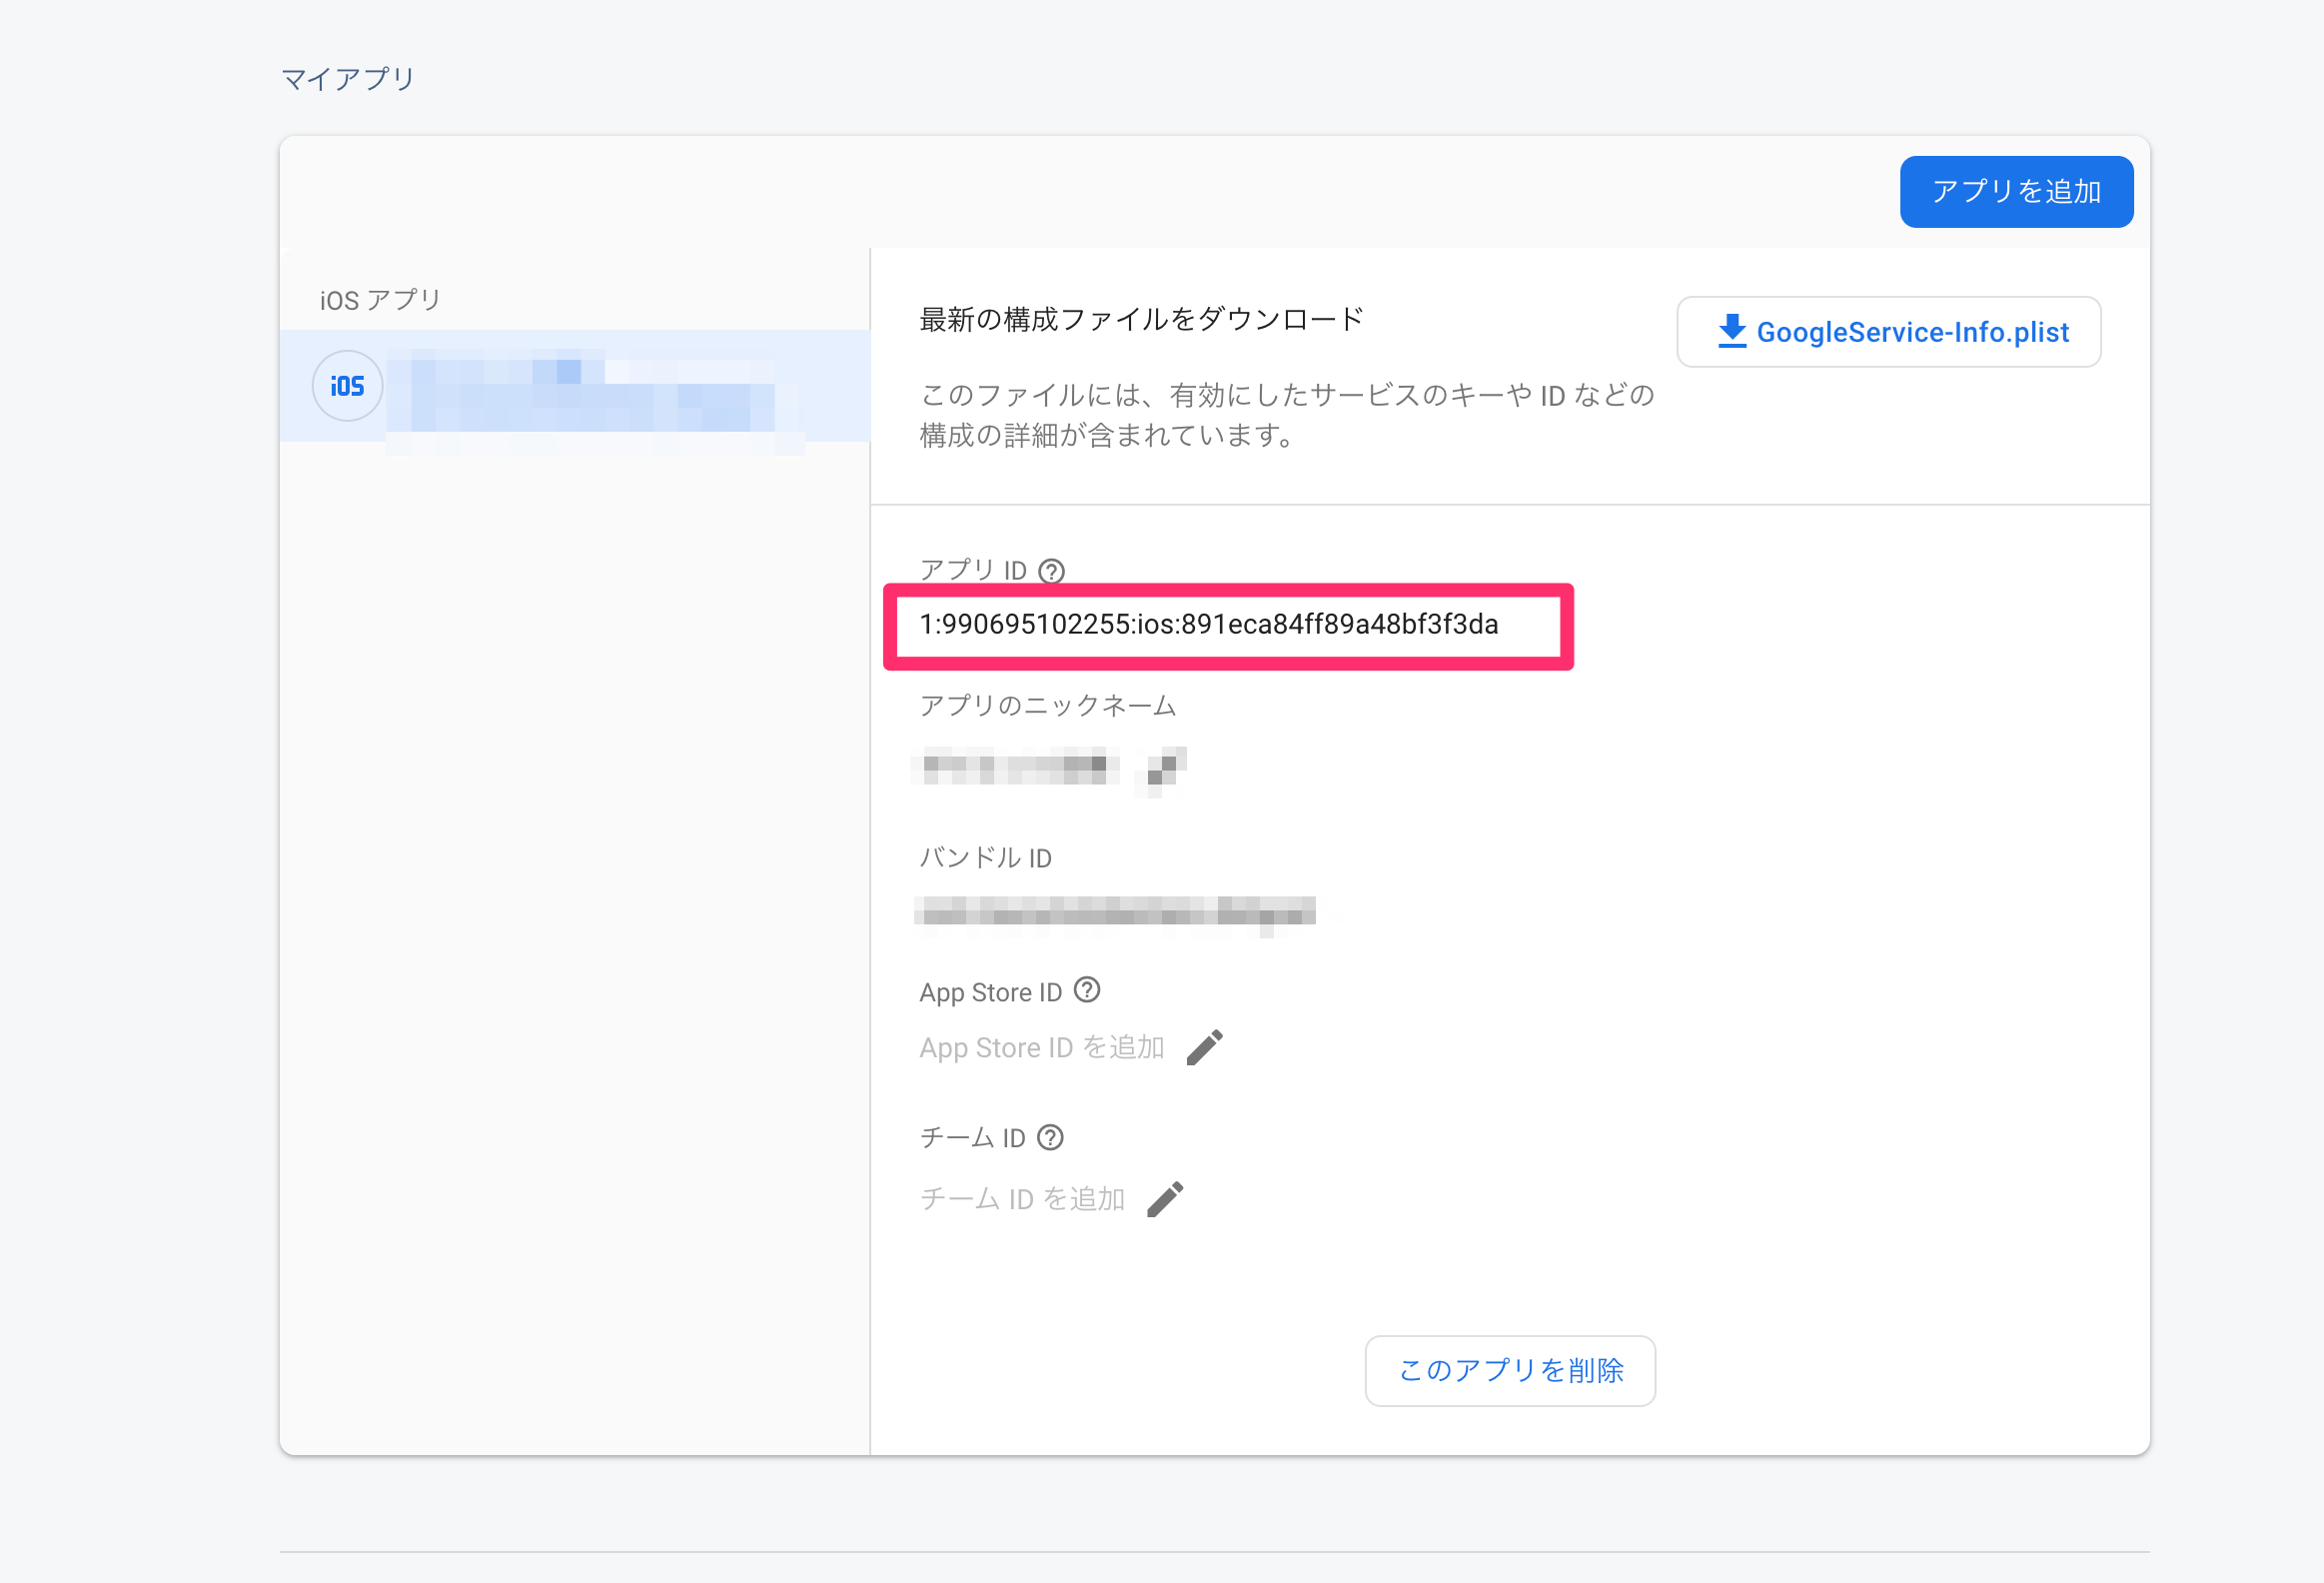
②のappではFirebaseプロジェクトのアプリIDを記述します。
Firebaseのコンソールの左側のメニュー上部に歯車マークがあるので、そこからプロジェクトを設定を選択します。
設定画面が開き下にスクロールすると、したの画像のようにマイアプリの欄があるので、そこのアプリIDを②に記述します。
③のgroupsではテスターのグループ名を記述します。
④のrelease_notesでは、リリースノートを記述します。実装した内容を記載すると良いでしょう。
最終的なFastfileは下記のようになります。
build_appアクションとfirebase_app_distributionアクションのパラメーターは適宜変更してください。
- Fastfile(完成版)
default_platform(:ios)

platform :ios do
  desc "Deploy to Firebase App Distribution"
  lane :deploy do |options|
    ## ビルドアクションの定義
    build_app(                                                                      - ①
      scheme: "{Xcodeのプロジェクトのスキーム名を書きます}",                                  - ②
      export_options: {
        method: "ad-hoc",                                                            - ③
        provisioningProfiles: {
          "{BundleIDを書きます}" => "{ビルドに使用するプロビジョニングプロファイルの名前を記述します}"  - ④
        }
      }
    )

    ## デプロイアクションの定義
    firebase_app_distribution(
        app: "{FirebaseプロジェクトのアプリIDを記述する}",
        groups: "test_group",
        release_notes: "xxxの機能を実装しました",
    )
  end
end
fastlaneコマンドでレーンを実行する
Xcodeのコマンドラインツールのバージョンの確認
レーンを実行する前に、現在のXcodeのコマンドラインツールのバージョンが、開発していたXcodeのバージョンと合っているか確認します。
Xcode12で開発していたのに、デプロイされたipaはXcode11でビルドされたものだった、、、みたいなことを防ぎます。
現在のXcodeのコマンドラインツールのバージョンを確認するには下記のコマンドを実行します。
xcodebuild -version
違っていた場合は、Xcodeの「Preferences」->「Locations」->「Command Line Tools」から変更できます。
レーンの実行
これでようやくApp Distributionにデプロイできます。
プロジェクト直下まで移動し、下記のコマンドを実行します。
bundle exec fastlane deploy
firebase_app_distributionアクションが実行され、Firebaseへの認証が成功すると下記のメッセージが出力されます。
[19:28:58]: ---------------------------------------
[19:28:58]: --- Step: firebase_app_distribution ---
[19:28:58]: ---------------------------------------
[19:28:58]: Authenticating with GOOGLE_APPLICATION_CREDENTIALS environment variable: {秘密鍵のjsonファイルの絶対パス}
デプロイが完了したら、テスターのメールアドレスにメールが届きますので、メール内のリンクからアプリをインストールできます。
以上です。