はじめに
久々のブログ更新です。
GAUSSのTsunakiです。
twitterやってます。フォローお願いします。
普段はAI競馬予想SIVAを作ってます。
いまさらですが、アプリ開発に手軽で簡単なReactNativeを始めよう!ということで簡素化して書けるようにフレームワーク化を検討してみたので、公開したいと思います!
今回のフレームワークの目的は「簡素化」です。プログラムを簡単にしてラーニングを容易にします。
複雑なことをやる前の前段ではおすすめできます。
今回のプログラム : https://github.com/tsunaki00/RN-todo
React-Reduxは仕組みの説明を読んで理解するよりはシンプルなプログラムしっかり覚えた方が早いです!
早くキャッチアップできます。
React-Reduxは以下のQiitaがわかりやすく説明しています。
https://qiita.com/mpyw/items/a816c6380219b1d5a3bf
開発の構成について
以下のパッケージを使って開発します。
[利用パッケージ]
react : 16.8.3
react-native : 0.59.9
redux : 4.0.1
react-redux : 7.1.0
redux-thunk : 2.3.0
react-navigation : 3.11.0
axios : 0.19.0
native-base : 2.12.1
Httpアクセス周りはaxios、ページ遷移はreact-navigationを使用。
デザイン周りはnative-baseで開発します。
また、React開発ではフォルダ構成には悩むことが多いかと思います。
今回はコンポーネントのパッケージが多いことやモバイルアプリケーションは全体が小さいのでドメイン指向にしようと思います。
ドメイン指向はコンポーネントの再利用などの汎化しにくいデメリットはありますが、Reduxで複雑になりやすい構成をシンプルにすることができます。
1.開発準備
1-1.開発全体像(Todoアプリ)
今回はTodo機能を使って説明します。
git : https://github.com/tsunaki00/RN-todo
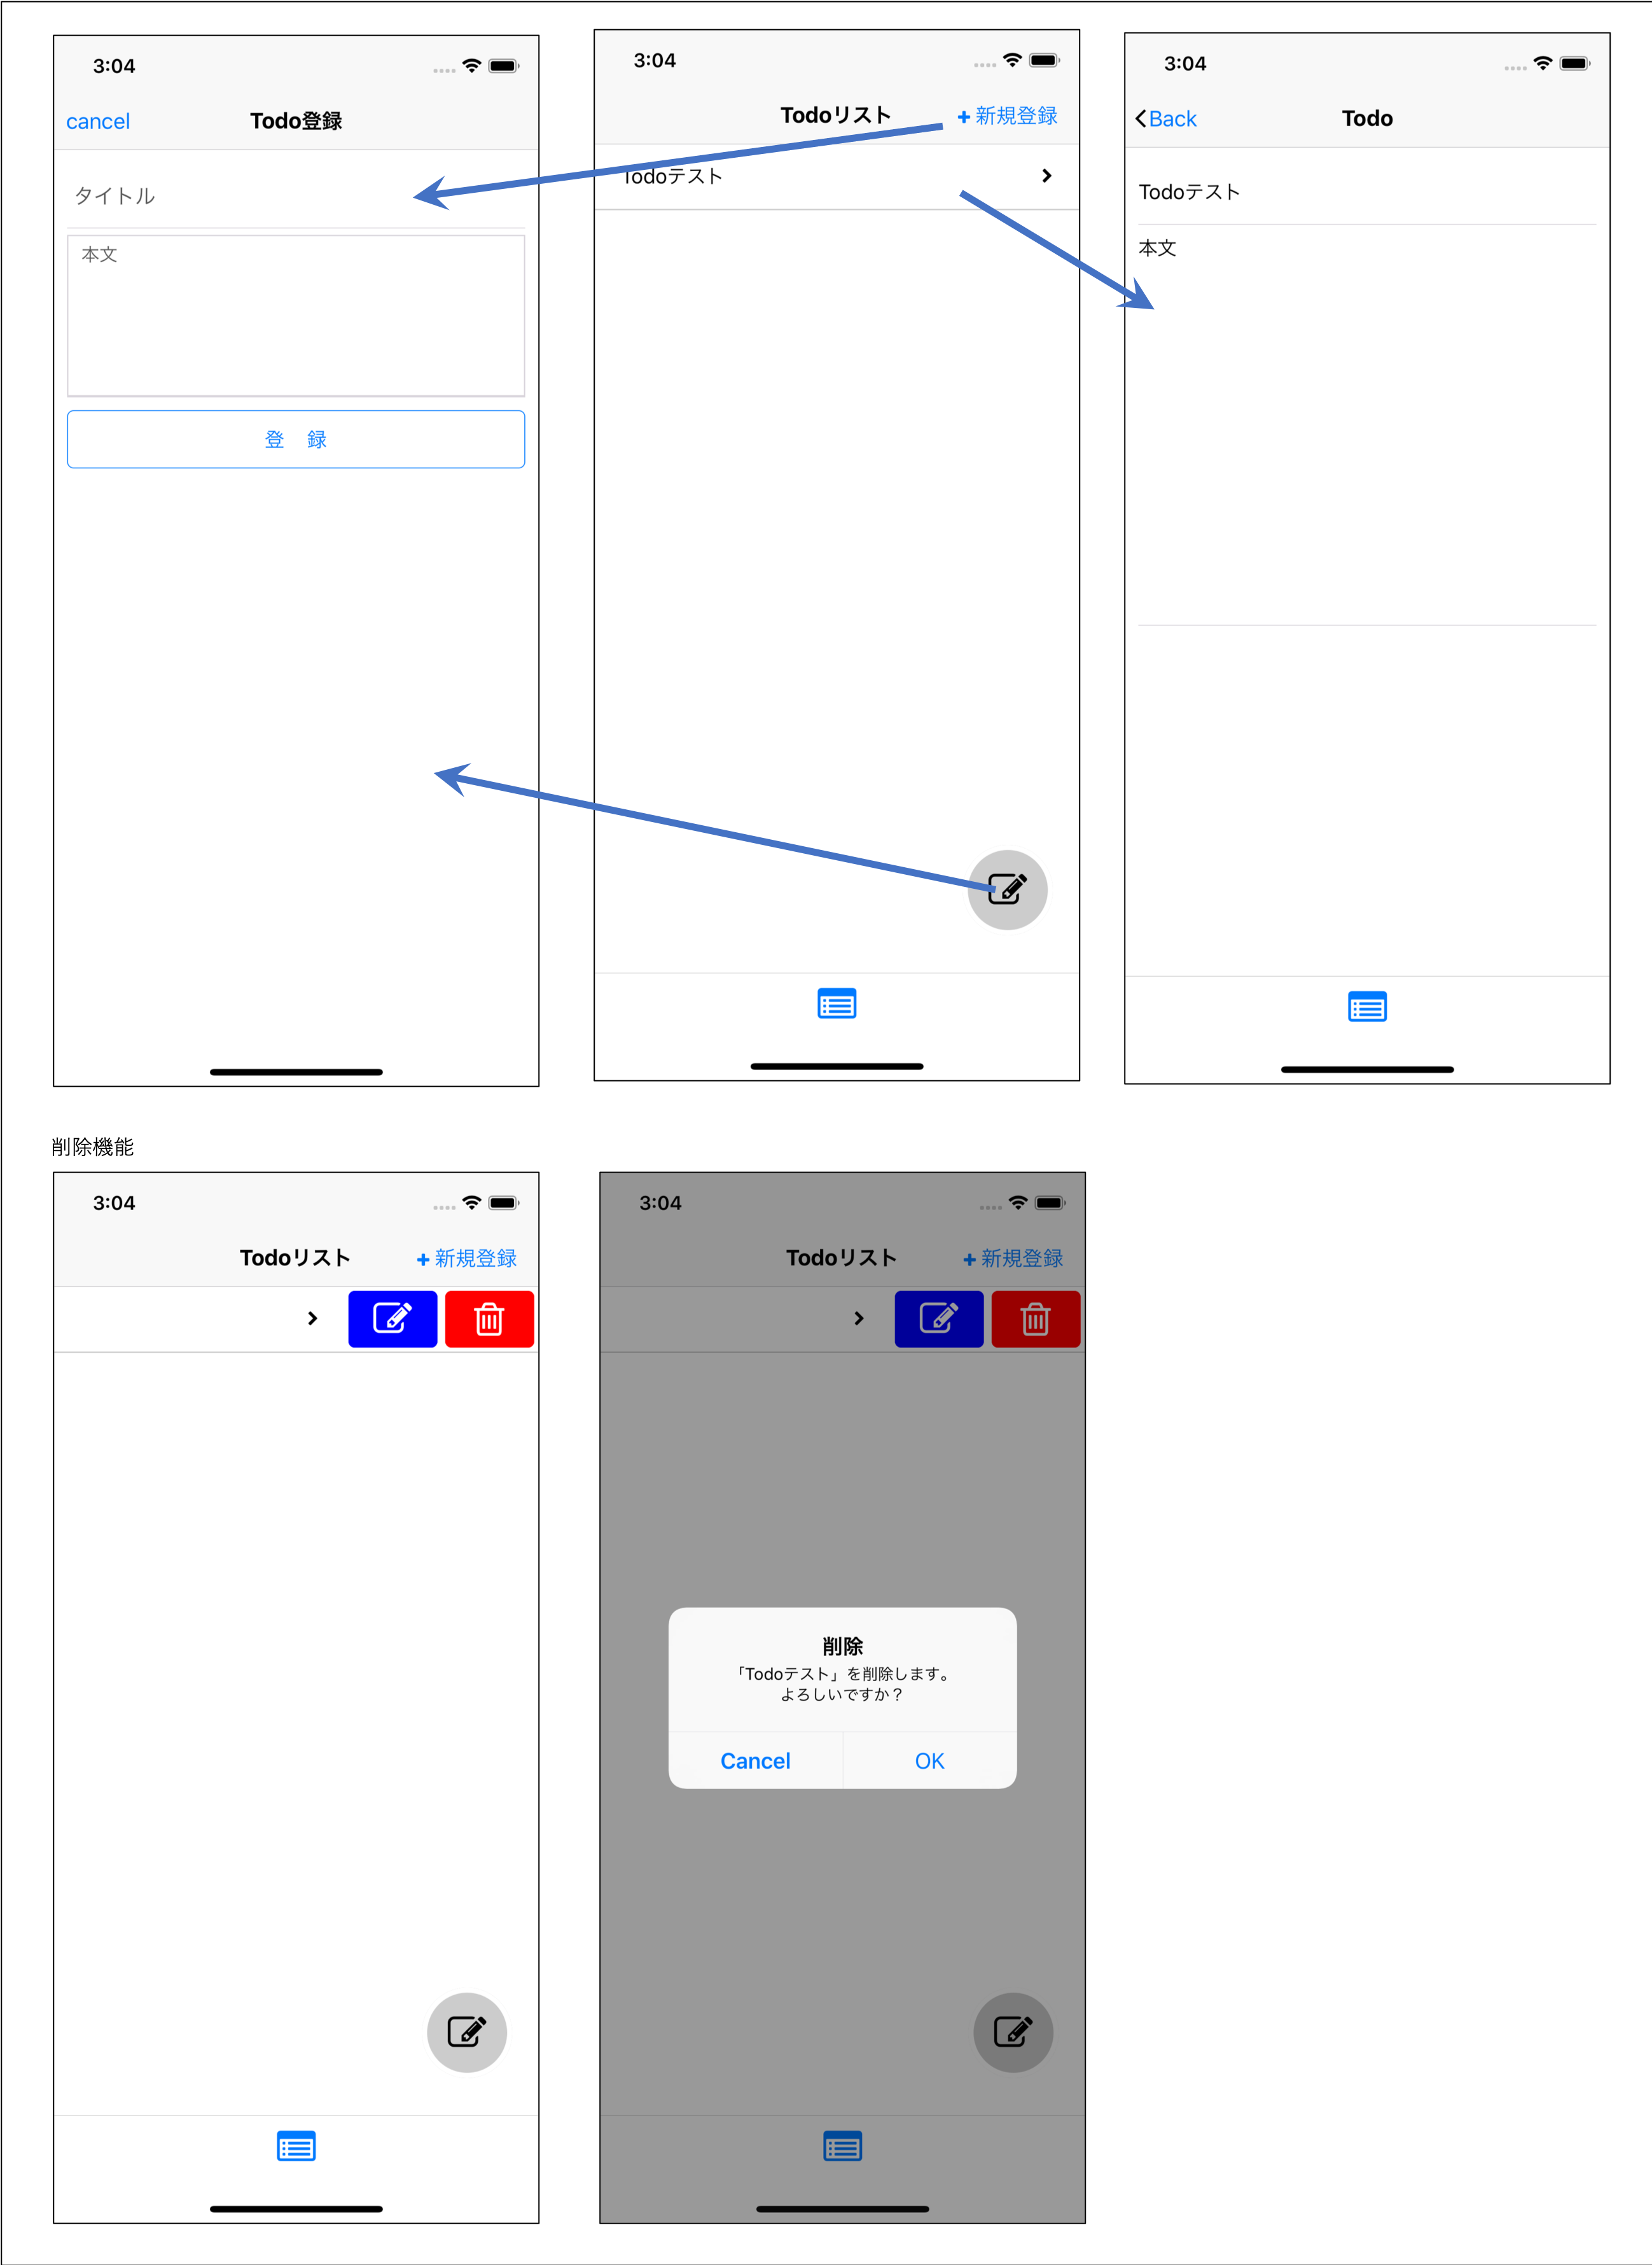
Todo機能
・一覧画面
・詳細画面
・登録画面
・削除機能
・更新機能(実装してみよう)
1-2.開発環境の準備
gitからプロジェクトをcloneします。
## プログラム取得
$ git clone https://github.com/tsunaki00/RN-todo
## バックエンドの起動
$ cd RN-todo/server
# dockerの準備(初回起動は時間がかかる)
$ docker-compose build
$ docker-compose up -d
# アプリケーションの起動
$ cd RN-todo/TodoApp
$ yarn install
$ yarn run ios
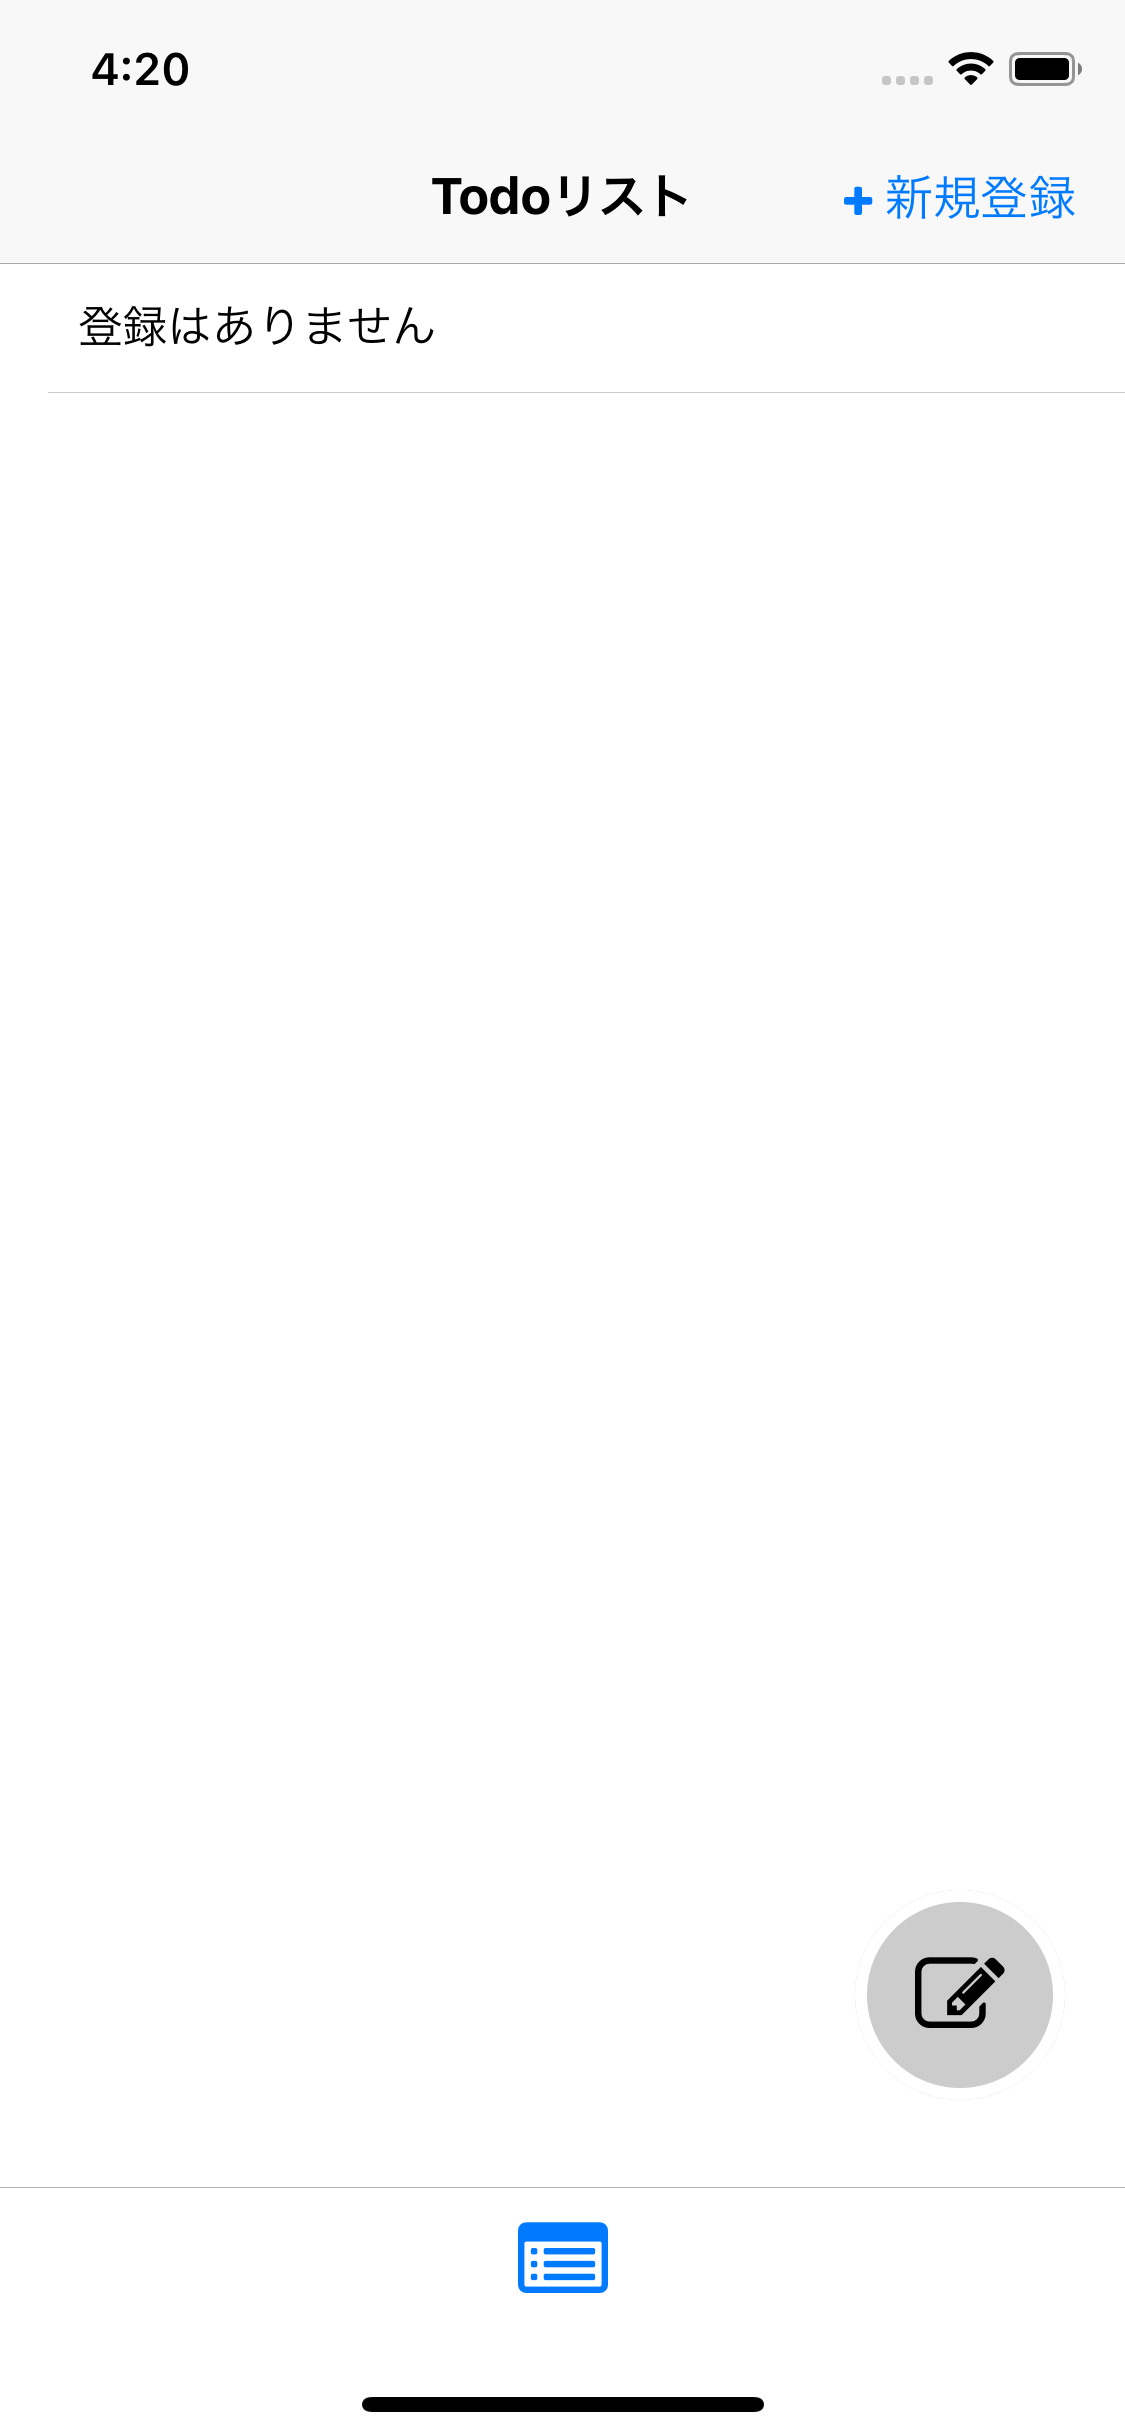
1-3.Todoアプリの準備
これで起動の確認ができます。
2.アプリケーションの説明
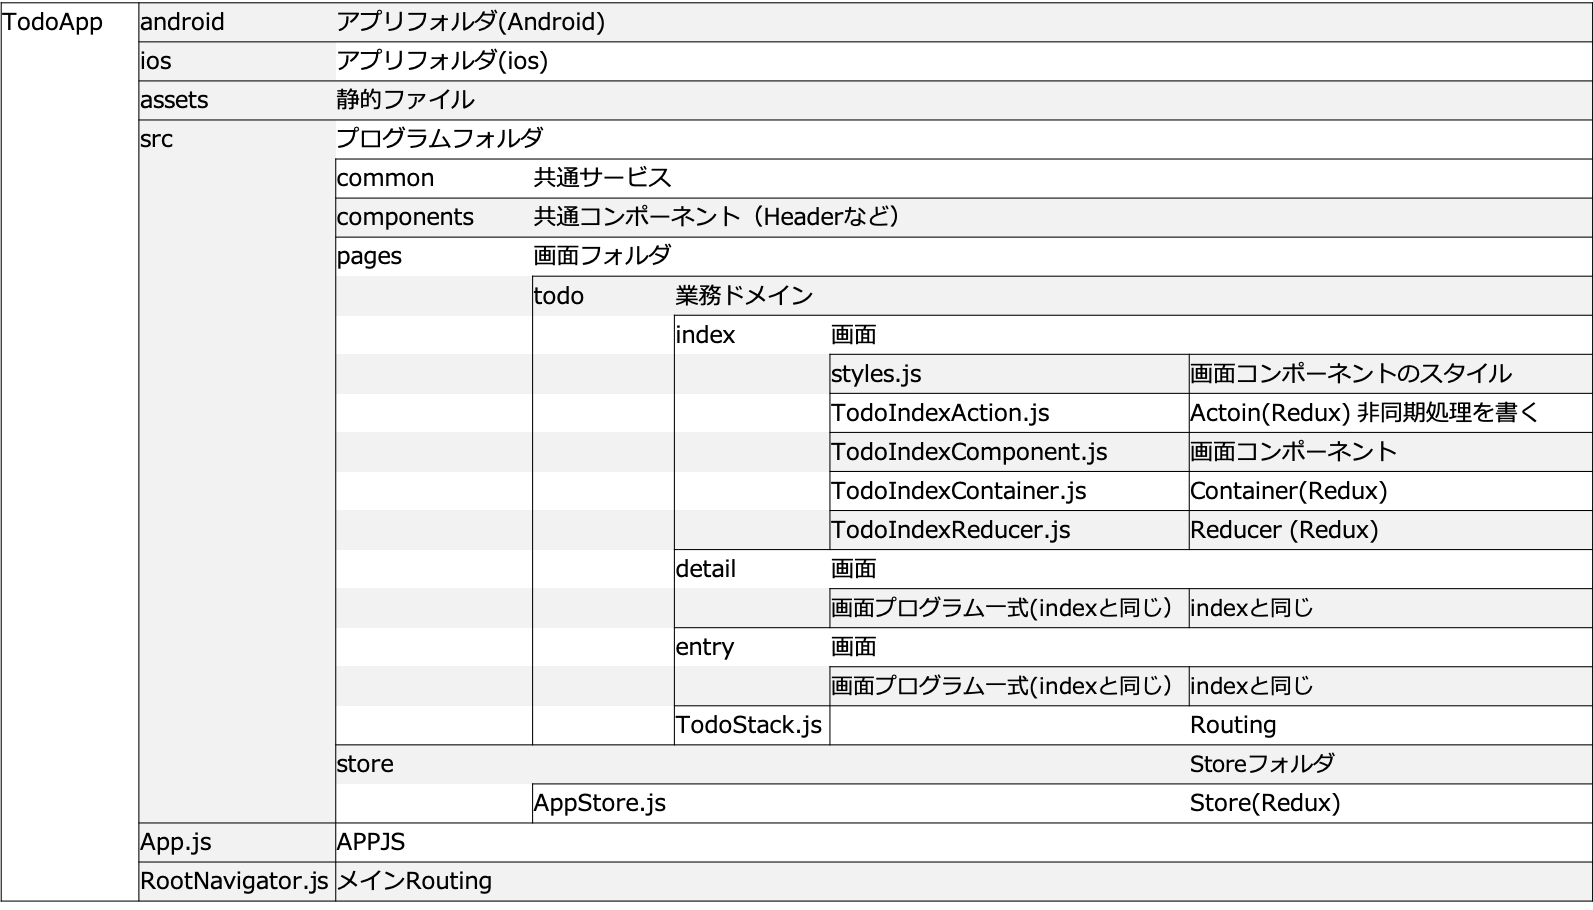
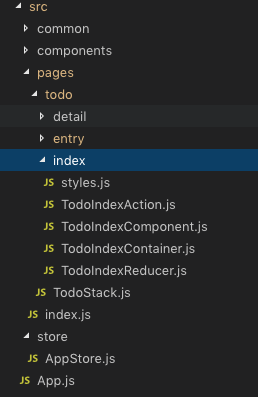
2-1.ディレクトリ構成
前述したようにシンプル構成にするためドメイン指向となっています。
下図の通り業務ドメインごとに画面のプログラム一式を入れてます。
2-2. プログラムの説明
以下の業務ロジック部の説明を行う。
・Action
・Component
・Container
・Reducer
なお、今回は簡素化するために、ContainerとReducerは開発を最小限にできるようにしてあります。
src/pages/todo/index/...
2-2-1. Container
ContainerはComponentとアクションやステートをコネクトする役割となっています。
省力化を図るためにここはテンプレートにしており、プログラムを組込必要はありません。
※ネーミングルールに合わせて配置だけしてください。
import { connect } from 'react-redux';
import Component from './TodoIndexComponent';     // 変更 : Componentの呼び出し
import * as Action from './TodoIndexAction'; // Actionの呼び出し


function mapStateToProps(state) {
  return Object.assign({} ,state.TodoIndex); // Storeの設定
}

function mapDispatchToProps(dispatch) {
  let actions = {};
  let keys = Object.keys(Action);
  for (let key of keys) {
    if(typeof Action[key] == 'function') {
      actions[key] = (...args) => dispatch(Action[key](...args))
    }
  }
  return actions;
}
export default connect(mapStateToProps, mapDispatchToProps)(Component);
2-2-2. Component
ComponentはViewの役割となっています。
こちらはUIに合わせてマークアップで開発します。
(非同期処理などはActionにDispatchします)
this.props.xxx
にActionで定義したメソッドが入ってきますので、処理に応じて実行してください。
※ Action経由でstate更新を行う度にrenderメソッドが呼ばれます。
なのでrender内でステート更新行う処理は気をつけてください。
import React from 'react';

import { Alert, FlatList, TouchableOpacity, RefreshControl  } from 'react-native';
import { Container, View ,Text, List, ListItem, Body, Button } from 'native-base';

import Swipeout from 'react-native-swipeout';
import FontAwesome from 'react-native-vector-icons/FontAwesome';

// Components
import Header from '../../../components/header/HeaderComponent'
import Content from '../../../components/content/ContentComponent';
import styles from './styles';

/**
 * ToDo
 */
export default class TodoIndexComponent extends React.Component {

  componentWillMount() {
    this.props.navigation.addListener('didFocus', () => this._onFocus())
  }

  _onFocus() {
    this.props.getList();
  }

  _delete(item) {
    Alert.alert(
      '削除',
      `「${ item.title}」を削除します。\nよろしいですか?`,
      [
        { text: 'Cancel', style: 'cancel' },
        { text: 'OK', onPress: () => this.props.remove(item.id) }
      ],
      {cancelable: false},
    );
  }

  render() {
    return (
      <Container style={styles.container}>
        <Header
          title={"Todoリスト"}
          isBack={false}
          navigation={this.props.navigation}
          rightRender={e =>
            <Button transparent onPress={e => {
              this.props.navigation.navigate('TodoEntry')
            }}>
              <Text><FontAwesome name="plus" /> 新規登録</Text>
            </Button>
          }
          />
        <Content wait={this.props.wait} refreshControl={
          <RefreshControl
            refreshing={false}
            onRefresh={() => {} }
          />
          }>
          <List>
          {this.props.results && this.props.results.length > 0 ?
            <FlatList
              data={this.props.results}
              renderItem={({ item }) => (
                <Swipeout style={ styles.listItem } right={[
                  {
                    backgroundColor: "#fff",
                    component : (
                      <TouchableOpacity onPress={e => {}}>
                        <View style={ styles.updateButton }>
                          <FontAwesome name="edit" style={ styles.updateButtonText } />
                        </View>
                      </TouchableOpacity>
                    )
                  } ,{
                  backgroundColor: "#fff",
                  component : (
                    <TouchableOpacity onPress={e => {
                      this._delete(item);
                    }}>
                      <View style={ styles.deleteButton }>
                        <FontAwesome name="trash-o" style={ styles.deleteButtonText } />
                      </View>
                    </TouchableOpacity>
                  )
                  }]}>
                  <TouchableOpacity onPress={e => { this.props.navigation.navigate('TodoDetail', { id : item.id }) } } style={styles.row}>
                    <View style={ styles.listView } >
                      <Text>{ item.title }</Text>
                    </View>
                    <View style={ styles.listViewIcon }>
                      <FontAwesome name={"chevron-right"} />
                    </View>
                  </TouchableOpacity>
                </Swipeout>
              )}
            /> :
              <ListItem>
                <Body>
                  <Text>登録はありません</Text>
                </Body>
              </ListItem>
            }
          </List>
        </Content>
        {/* 登録ボタン */}
        <TouchableOpacity
            onPress={e => { this.props.navigation.navigate('TodoEntry') } } style={ styles.entry }>
          <View>
            <FontAwesome name="edit" size={30} />
          </View>
        </TouchableOpacity>

      </Container>
    )
  }
}
2-2-3. Action
Actionは非同期処理の役割となっています。
単純化するためredux-thunkでActionに処理を記載するようにしてます。
※この辺はカルチャーの違いで気持ち悪く見えるかもしれません。。。)
前述に通り、Componentのthis.props.xxxにここのメソッドが入ってきます。
以下のプログラムの例
・this.props. getList()
・this.props. remove()
import axios from 'axios';
import config from '../../../../assets/config';
import {actionCreatorFactory} from '../../../common/ActionCreator';

const BASE_URL = `${config.apiServer.protocol}://${config.apiServer.host}:${config.apiServer.port}${config.apiServer.path}`;
export const ACTION_TYPE = {
  TODO_LIST : actionCreatorFactory("TODO_LIST"),
  TODO_DELETE : actionCreatorFactory("TODO_DELETE"),
};

/** ToDo List */
export const getList = () => (dispatch) => {
  dispatch({ type: ACTION_TYPE.TODO_LIST.start, payload: { wait : true  } });
  axios.get(`${BASE_URL}/todo`).then((res) => {
    dispatch({ type: ACTION_TYPE.TODO_LIST.success, payload: { wait : false,  results : res.data } });
  });
}

/**  ToDo削除 */
export const remove = (id) => (dispatch) => {
  dispatch({ type: ACTION_TYPE.TODO_DELETE.start, payload: { wait : true ,  results : []  } });
  axios.delete(`${BASE_URL}/todo/${id}`).then((res) => {
    dispatch({ type: ACTION_TYPE.TODO_DELETE.success, payload: { wait : false,  results : res.data } });
  });
}
2-2-4. Reducer
Reducerはstateを更新役割となっています。
省力化を図るためにここはテンプレートにしており、初期ステートの設定以外はプログラムの組込の必要はありません。
※ネーミングルールに合わせて配置だけしてください。
const initialState = {}
export default TodoIndexReducer = (state = initialState, action) => {
  switch (action.type) {
    default:
      return Object.assign({}, state , action.payload);
  }
}
2-3. プログラムの実行
$ yarn run ios

これで動きました!
2-4. その他のプログラムについて
react-navigationなどの説明を省略してしまってるので、画面遷移や起動から画面が呼ばれるまでの流れが抜けているので簡単にプログラムが実行されてる順序を書きます。
index.js -> src/App.js -> src/RootNavigator.js -> pages/todo/index.js -> pages/todo/index/TodoIndexContainer.js -> pages/todo/index/TodoIndexComponent.js
の順で動いてますので、細かく見たい場合は上記の順序でプログラムを追ってみてください。
3. さいごに
今回は簡単な動かし方の説明になってしまい概念的なことは飛ばしてしまいましたが、本件の簡素なReact NativeのBaseを使うことでエンジニアのラーニングコストを大幅に下げることができました!
詳細はまた書きます。
twitterやってます。フォローお願いします。