タイムトラッキングツールの Toggl Track のAPIを使って、トラッキングの開始と停止を試してみたのでメモとして投稿します。
(Android固有の話はほとんどありませんので、他のプラットフォームでも参考になるかもしれません。![]() )
)
APIのドキュメントにちゃんとまとまっていますが、トラッキングの開始と停止をする最低限の方法をご紹介します。
■ 開始のAPI
■ 停止のAPI
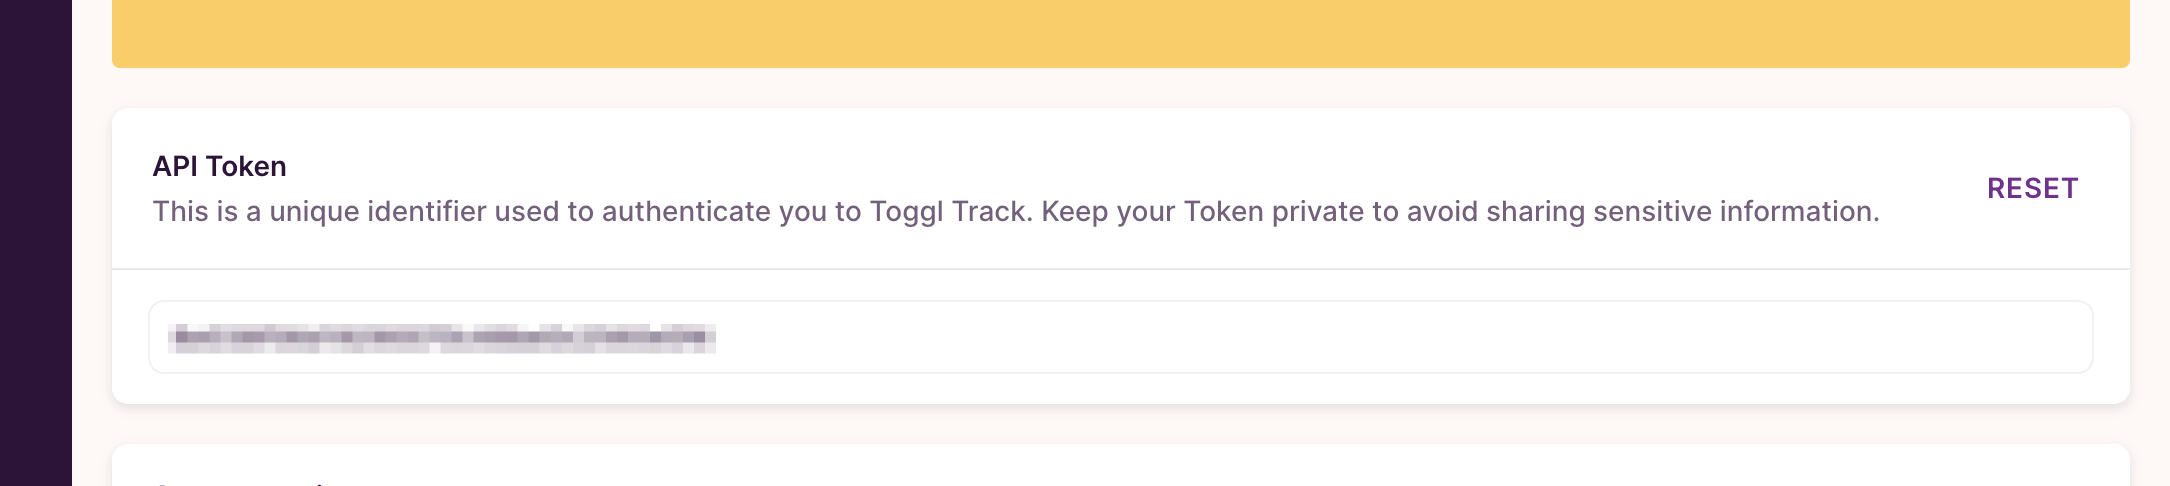
APIトークンを取得する 
APIを叩くにはメール・パスワードを指定する方法と、APIトークンを指定する方法の2パターンありますが、今回はAPIトークンを指定する方法を使用します。
APIトークンはToggl Trackのプロフィールページから取得できます。
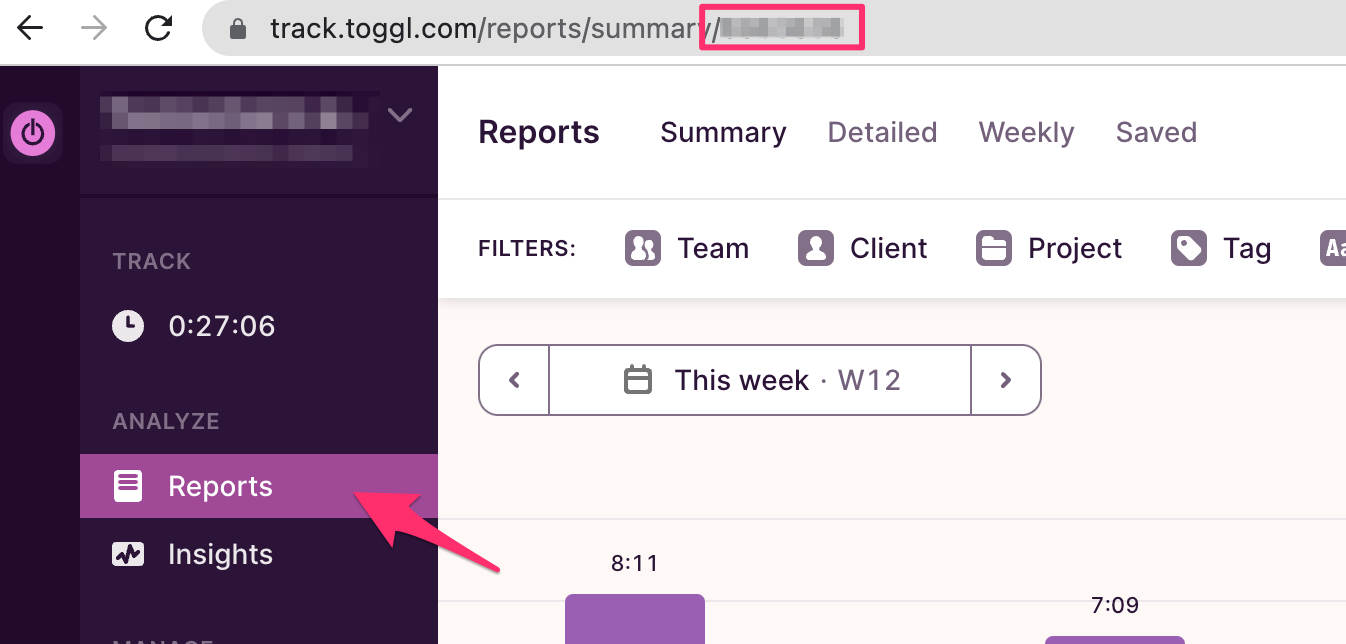
workspace_idを取得する
開始・停止のAPIには必須のパラメータとして workspace_id が必要になります。
自分のWorkspaceのIDですが、Toggl TrackのWeb版の「Reports」ページを選択した場合に表示されるパスが workspace_id のようでした。
通信周り定義 
Retrofitで定義しています。
interface TogglApiService {

    // 開始
    @POST("workspaces/{workspace_id}/time_entries")
    suspend fun workspacesTimeEntries(
        @Path("workspace_id") workspaceId: Int,
        @Body workspacesTimeEntriesRequest: WorkspacesTimeEntriesRequest,
    ) : WorkspacesTimeEntriesResponse

    // 停止
    @PATCH("workspaces/{workspace_id}/time_entries/{time_entry_id}/stop")
    suspend fun workspacesTimeEntriesStop(
        @Path("workspace_id") workspaceId: Int,
        @Path("time_entry_id") timeEntryId: Long,
    )
}
開始のリクエストで使うモデルです。
data class WorkspacesTimeEntriesRequest(
    val created_with: String = "From API",
    val workspace_id: Int,
    val start: String,
    val duration: Long,
    val description: String,
)
開始時のリクエストパラメータは↓にまとまっていますが、最低限のものを定義しています。
created_with はトラッキングの作成に使用したサービス/アプリケーションを特定するために必要な指定。
start は開始時刻のUTCの文字列。
duration はトラッキングの存続期間。一番ハマりましたが、 ![]() 現在時刻から開始する場合は -1 * UNIX時刻(秒)を指定 する必要があります。
現在時刻から開始する場合は -1 * UNIX時刻(秒)を指定 する必要があります。
description は開始したトラッキングのタイトルに当たる文字列。必須ではないです。
開始のレスポンスで使うモデルです。
data class WorkspacesTimeEntriesResponse(
    val id: Long,
)
開始したトラッキングのidだけを定義しています。
実行 
OkHttp、Retrofit、Moshiを使ってAPIクライアントを雑に作成します。
val apiToken = "xxxx" // APIトークン
val workspaceId = 000000 // workspace_id

val apiClient: TogglApiService by lazy {
    val credential = Credentials.basic(apiToken, "api_token")
    val client = OkHttpClient.Builder().addInterceptor { chain ->
        val newRequest = chain.request().newBuilder()
            .header("Authorization", credential)
            .build()
        chain.proceed(newRequest)
    }.build()

    Retrofit.Builder().client(client)
        .baseUrl("https://api.track.toggl.com/api/v9/")
        .addConverterFactory(MoshiConverterFactory.create()).build()
        .create(TogglApiService::class.java)
}
開始処理 
suspend fun start() {
    val zdt = ZonedDateTime.now()
    val workspacesTimeEntriesRequest = WorkspacesTimeEntriesRequest(
        workspace_id = workspaceId,
        start = zdt.format(DateTimeFormatter.ISO_INSTANT),
        duration = -1 * zdt.toEpochSecond(),
        description = "test",
    )

    val response = apiClient.workspacesTimeEntries(
        workspaceId = workspaceId,
        workspacesTimeEntriesRequest = workspacesTimeEntriesRequest,
    )

    Log.d("LOG", response.toString())
}
ZonedDateTime.now() で現在時刻を取得し、
-
startにDateTimeFormatter.ISO_INSTANTというフォーマットを指定。 -
durationに -1 * UNIX時刻(秒) を指定。 -
duration(トラッキングの名前)は「test」を指定。
を行います。
成功すれば「test」とい名前でトラッキングが開始されます。 ![]()
停止処理 
suspend fun stop(id: Long) {
    apiClient.workspacesTimeEntriesStop(
        workspaceId = workspaceId,
        timeEntryId = id,
    )
}
開始のレスポンスに含まれる id を指定してあげるだけです。
成功すればトラッキングが停止されます。 ![]()
まとめ
雑ですが、Toggl Track APIを使ってトラッキングの開始と停止をする方法をご紹介しました。
Toggl TrackはAPIが充実しているので、他にも色々と試してみたいところです。