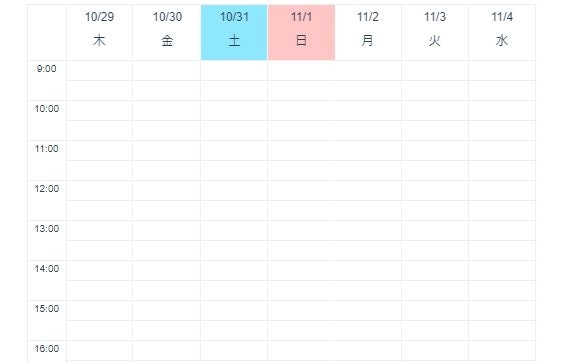
つくったもの
バーチカルカレンダーやウィークリーカレンダーと呼ばれる、1週間分の予定が一覧できるタイプのカレンダーをVue.jsで作りました。
日にちを移動させるのにボタンを配置してクリックで移動させるものはいろいろ簡単にできるのですが、タッチパネルでスライドして日にちを変更できるものを見かけなかったので、Vue.jsの学習を兼ねて作ってみることにしました。
説明するよりも見ていただいた方がわかりやすいので、以下にリンクを張っておきます。
使っているもの
- vue.js
- moment.js(日付データの管理に使っています)
ソースコード
カレンダーのスライド部分の動きはカルーセルを自作するで紹介されているカルーセル機構を用いて実装しました。
カルーセルについての詳細は参照元をご覧ください。
今回はカルセールを応用して以下のように作製しました。
#carousel内に横一列に並べた<column>をスライドで動かしていきます。
carousel.vue
<template>
  <div id="carousel"
    @mousedown="onTouchStart" @touchstart="onTouchStart"
    @mousemove="onTouchMove" @touchmove="onTouchMove"
    @mouseup="onTouchEnd" @touchend="onTouchEnd"
    @mouseleave="onTouchEnd" @touchleave="onTouchEnd"
    @transitionend="onTransitionEnd"
    >
    <column
      v-for="date in dateList"
      :key="date.format('YYYY-MM-DD')"
      :date="date"
      :style="[columnStyle, isTransition]"
    />
  </div>
</template>

<script>
import column from './column.vue';
export default {
  name: 'carousel',
  components: {
    column
  },
  data: function () {
    return {
      startX: null,
      diffX: 0,
      currentNum: 0,
      isAnimating: true,
    }
  },
  computed: {
    displayDays () {
      return this.$store.state.displayDays;
    },
    currentDate () {
      return this.$store.state.currentDate;
    },
    dateList () {
      let i = -this.displayDays;
      let result = [];
      while (i < this.displayDays * 2) {
        result.push(this.currentDate.clone().add(i, 'days'));
        i++;
      }
      return result;
    },
    columnStyle () {
      return {
        width: 100 / this.displayDays + '%',
        transform: `
          translate3d(${this.diffX}px, 0, 0)
          translate3d(${this.currentNum * (-100)}%, 0, 0)`
      };
    },
    isTransition () {
      if (this.isAnimating) {
        return {transition: 'all 0.2s ease-out'};
      } else {
        return {transition: 'none'};
      }
    }
  },
  created () {
    // 前後に用意してある分ずらす
    this.currentNum = this.displayDays;
  },
  methods: {
    getClientX (e) {
      // タッチデバイスとマウスデバイスの差分吸収
      if ('ontouchstart' in window) {
        // タッチデバイスのとき
        return e.touches[0].clientX;
      } else {
        // マウスデバイスのとき
        return e.clientX;
      }
    },
    onTouchStart (e) {
      this.isAnimating = false;
      this.startX = this.getClientX(e);
    },
    onTouchMove (e) {
      if (this.startX == null) {
        return;
      }
      this.diffX = this.getClientX(e) - this.startX;
    },
    onTouchEnd () {
      this.isAnimating = true;
      this.startX = null;
      const columnwidth = this.$el.clientWidth / this.displayDays;
      const diffDays = -1 * Math.round(this.diffX / columnwidth);
      this.currentNum += diffDays;
      this.diffX = 0;
    },
    onTransitionEnd () {
      this.isAnimating = false;
      const diffDays = this.currentNum - this.displayDays;
      const newDate = this.currentDate.clone().add(diffDays, 'days');
      this.$store.commit('updateDate', newDate);
      this.currentNum = this.displayDays;
    },
  }
}
</script>

<style scoped>
# carousel{
  white-space: nowrap;
  overflow: hidden;
  box-sizing: border-box;
  font-size: 0;/* inline-blockのとき隙間が空くので指定 */
}
# carousel .column{
  display: inline-block;
  margin: 0;
  padding: 0;
  font-size: 16px;/* 親要素に0をしていしたので戻す */
  border-right: 1px solid #eee;
}
column.vue
<template>
  <div class="column">
    <div class="date" :class="{'sunday': isSunday, 'saturday': isSaturday}">
      {{date.format('M/D')}}
      <br>
      {{date.format('ddd')}}
    </div>
    <template v-for="h in timeRange">
      <div class="time" :key="h+'00'"></div>
      <div class="time" :key="h+'30'"></div>
    </template>
  </div>
</template>

<script>
import moment from "moment";
moment.locale('ja', {
  weekdays: ["日曜日", "月曜日", "火曜日", "水曜日", "木曜日", "金曜日", "土曜日"],
  weekdaysShort: ["日", "月", "火", "水", "木", "金", "土"],
});
export default {
  name: 'column',
  props: {
    date: {required: true, type: Object}
    // date -> moment object
  },
  computed: {
    timeRange () {
      return this.$store.getters.timeRange;
    },
    isSaturday () {
      return this.date.day() == 6;
    },
    isSunday () {
      return this.date.day() == 0;
    },
  }
}
</script>

<style scoped>
@import "../assets/table-cell.css";
.column{
  display: flex;
  flex-direction: row;
  text-align: center;
}
.date.sunday{
  background-color: #ffc6c6;
}
.date.saturday{
  background-color: #8fe7fd;
}
</style>
解説
carousel.vueについて
横にスライドさせる機構はカルーセルを自作するで紹介されているものなので、こちらを見ていただいた方がわかりやすいと思います。
また、自分はVuexを使ったので、currentDate(一番左端に表示する日付のmoment()型)とdisplayDays(表示する日数、integer)をVuexで管理しています。
参考元と大きく違うのはtouchendとtransitionendかと思います。
touchend
    onTouchEnd () {
      this.isAnimating = true;
      this.startX = null;
      const columnwidth = this.$el.clientWidth / this.displayDays;
      const diffDays = -1 * Math.round(this.diffX / columnwidth);
      this.currentNum += diffDays;
      this.diffX = 0;
    },
const diffDaysにて、移動ピクセル数から表示されている日数が何日動いたか算出します。
this.currentNumだけを動かし、この値に向けてアニメーションさせます。
transitionend
    onTransitionEnd () {
      this.isAnimating = false;
      const diffDays = this.currentNum - this.displayDays;
      const newDate = this.currentDate.clone().add(diffDays, 'days');
      this.$store.commit('updateDate', newDate);
      this.currentNum = this.displayDays;
    },
アニメーションが終わってから、もう一度何日動いたかdiffDaysを計算し直し、アニメーションを切った状態で再描画します。
新しい日付であるnewDateを作り直し、これでstore.currentDateをupdateします。
最後にthis.currentNum = this.displayDays;の処理(createdと同じものです)で日付が変わった状態が完成します。
自分がすこしハマった点
-
.columnのwidth
this.columnStyleにて、translateだけでなくwidthも一緒に指定しています。
コードを書いてる途中の中途半端な状態でこれが抜けてると(どこかでwidthを指定していないと)きちんと表示されません。
-
inline-blockのときのfont-size
#carouselにfont-size:0を指定しています。この指定が無いと、中の要素(.column)の間にスキマが開いてしまいます。
なので親要素でfont-size:0を指定した後、子要素の.columnにてfont-sizeを指定し直しています。
column.vueについて
propsから渡されたdateの情報に基づいて、縦一列の1日分を構成しています。
styleの@import "../assets/table-cell.css"の部分で、表1セル分の高さとborderの設定を一括でしています。
別ファイルに分けているのは、表の左端にある時間目盛りの部分(leftside.vue、後述)とそろえるためです。
/* 表内セルの高さ・ボーダー指定 */
.date, .time{
    border-top: 1px solid #eee;
}
.time:last-child{
  border-bottom: 1px solid #eee;
}
.date{
  height: 3.5rem;
  text-align: center;
  line-height: 1.5rem;
  font-size: 12px;
  padding: 0.25rem auto;
}
.time{
  height: 20px;
}
そのほか
leftsideコンポーネントは、表示する時間(9:00~26:00など)を取得し、目盛りを表示させています。
時間(hour)はdatetimeを用いておらず、単にintで表現しているので、25時以降の深夜帯も扱えるようにしてあります。
<template>
  <div id="leftside">
    <div class="date"></div>
    <template v-for="h in timeRange">
      <div class="time" :class="h+'00'" :key="h+'00'">
        {{h}}:00
      </div>
      <div class="time" :class="h+'30'" :key="h+'30'"></div>
    </template>
  </div>
</template>

<script>
export default {
  name: 'leftside',
  computed: {
    timeRange () {
      return this.$store.getters.timeRange;
      // => [9,10,11,12,13,14,15,16,17]
    }
  }
}
</script>

<style scoped>
@import "../assets/table-cell.css";
# leftside{
  border-left: 1px solid #eee;
  border-right: 1px solid #eee;
}
.time{
  font-size: 10px;
  padding: 0 5px;
}
.time:nth-child(2n+1){
  border-top: none;
}
</style>
また、controllerコンポーネントもボタンを並べてbootstrapで色を付けています。
簡単なものなので省略します。
全体像
<template>
    <div>
        <controller />
        <div id="table">
            <leftside />
            <carousel />
        </div>
    </div>
</template>
コード全体はソースコード(GitHub)をご覧ください。
おわりに
今回作ったようなバーチカルなカレンダーは、テーブルを作ってボタンクリックで移動するものはよく見られたのですが、
タッチパネルでスライドさせて移動するようなものがなかなか見つからなかったため自作してみました。
参考にさせていただいたカルーセルを自作するがとてもシンプルだったため、今回のように簡単に応用することができました。
自分の用途ではこのあと、APIから持ってきた予定データを用いてセルごとに着色をし、
簡単なシフト管理に使っていました。(白=シフトなし、赤=シフトあり、みたいな)
スライドさせる機構を作ってしまえば、<column>コンポーネントを変えるだけでいろいろ作れると思います。
皆様の参考になれば幸いです。
最後に、この記事は自分の初投稿になります。
QiitaもVue.jsもまだまだ勉強中で、至らない点や、よりよい書き方があればぜひ教えていただきたいです。
