概要
Timeline のアニメーション出力ウェイトを設定して、アニメーターとブレンドする方法を紹介します。
すぐに使えるスクリプトも Github に置いてあります。
この記事の結果:
解説
解説の流れ:
-
AnimationPlayableOutput.SetWeight()で出力ウェイトが設定できる - しかし、
Timelineのほうで毎フレーム weight を設定している - → 毎フレーム再設定するための PlayableBehaviour を作成する
AnimationPlayableOutput.SetWeight でウェイトを設定
Timeline の根底にある技術は Animator と同じもので、Playable を使用しています。
例えばアニメーショントラックの場合、トラック上にあるアニメーションクリップを再生時間に合わせて weight を調整し、AnimationPlayableOutput に出力して、最終的に Animator のほうでアニメーションさせています。
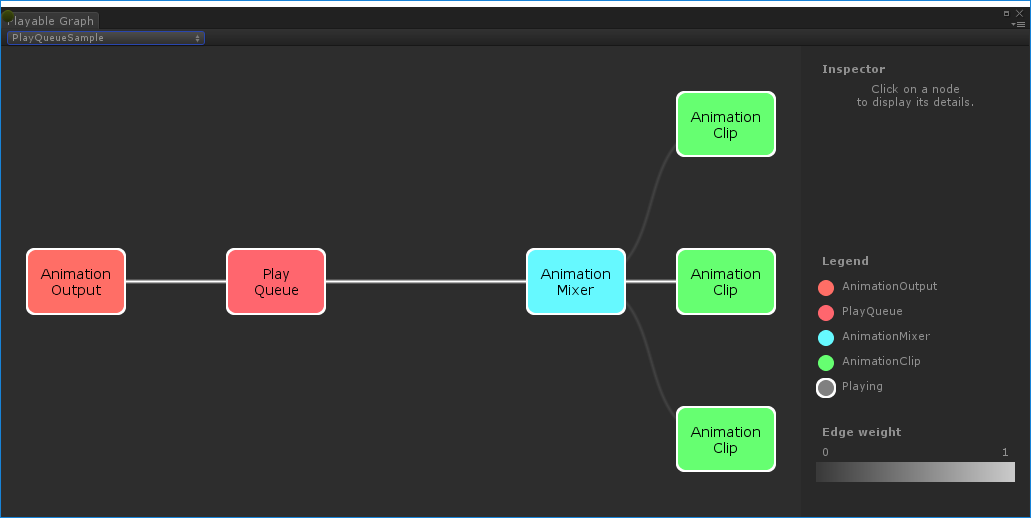
図:PlayableGraph の例
また、AnimationPlayableOutput が複数ある場合、それぞれの weight を見て、ブレンドします。
Animator の出力も、Timeline の出力も、AnimationPlayableOutput ですので、ウェイト機能を利用すれば、Timeline のアニメーショントラックの出力を好きなようにアニメーターとブレンドさせることができます:
private PlayableGraph graph;

public void SetWeight(float weight)
{
    var output = (AnimationPlayableOutput) graph.GetOutput(0);
    output.SetWeight(weight);
}
このように、weight を設定すれば、Timeline のアニメーションをアニメーターのアニメーションとブレンドすることできます。
しかし、ここで問題が発生します。なんと、Timeline ではこの weight を毎フレーム設定しているため、通常では任意で設定することはできません。
再設定しているところ:
TimelinePlayable.AnimationOutputWeightProcessor
TimelinePlayable.AnimationOutputWeightProcessor class AnimationOutputWeightProcessor : ITimelineEvaluateCallback
{
// ...
public void Evaluate()
{
float weight = 1;
m_Output.SetWeight(1);
for (int i = 0; i < m_Mixers.Count; i++)
{
var mixInfo = m_Mixers[i];
weight = WeightUtility.NormalizeMixer(mixInfo.mixer);
mixInfo.parentMixer.SetInputWeight(mixInfo.port, weight);
}
// only write the final weight in player/playmode. In editor, we are blending to the appropriate defaults
// the last mixer in the list is the final blend, since the list is composed post-order.
if (Application.isPlaying)
m_Output.SetWeight(weight);
}
}
これを解決するために、Timeline が設定した後、自分の weight を更に設定必要があります。
ウェイトを再設定する PlayableBehaviour
残念ながら、Timeline の weight 設定処理は PlayableGraph の中で行われているので、同じく Playable からしか間に合う方法はありません。(Update() も LateUpdate() も不可)
そのため、下記のような PlayableBehaviour を追加する必要があります:
    public class SetAnimationOutputWeightBehaviour : PlayableBehaviour
    {
        public float weight;
        public List<AnimationPlayableOutput> outputList = new();

        public override void ProcessFrame(Playable playable, FrameData info, object playerData)
        {
            // weight を設定
            // set weight
            foreach (var output in outputList) {
                output.SetWeight(weight * output.GetWeight());
            }
        }
    }

    // あとは再生開始のタイミングで追加するだけ
    // var playable = ScriptPlayable<SetAnimationOutputWeightBehaviour>.Create(graph);
    // ... ...
この PlayableBehaviour を同じ graph に追加すれば、Timeline 側が weight を設定した後、設定したいウェイトを更に上書き設定できるようになります。
実際のスクリプト (Github)
上記 Playable を作成・適用する処理を書くと長くなりますので、Gihtub に最終的なスクリプトを載せました。
上記スクリプトを PlayableDirector と同じ GameObject にアタッチすれば、任意の割合でアニメーター、あるいは別の Timeline アニメーション出力とブレンドすることができます:
応用例
応用例として、Timelineの開始と終了で weight を 0→1, 1→0 でイージングして、きれいなアニメーション遷移をさせることができます。
一応、Timeline クリップ側の Extraporlation を設定すれば同じことが達成できますが、各 Timeline 毎回一々設定するのは面倒くさいので、システムとして作るのが良いと思います
結
この記事で Timeline のアニメーション出力をアニメーターのアニメーションとブレンドする方法を紹介しました。Playable や SetWeight() を紹介して、PlayableBehaviour を作成して Timeline 側の既存処理を上書きする方法を紹介しました。
Timeline と Playable に対する理解や、カスタマイズ方法を少しでもご理解いただけたら幸いです。