前回で、コンテナを使ってアプリケーションを実行するキホンは伝わったと信じてます。
コンテナの通信
アプリケーションを実行できるようになってくると、自然と別のコンテナと通信したいケースに出くわします。
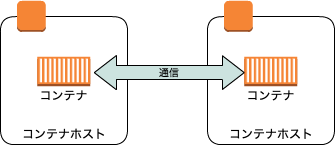
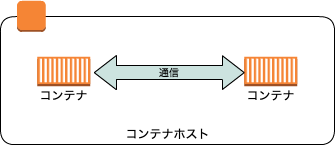
コンテナ間の通信には大きく別けて2種類存在しています。
異なるホストで動くコンテナ間の通信

こちらの場合、接続元コンテナは接続先コンテナが動くコンテナホストのIPアドレスに向かって通信すれば良いだけです。
サービスディスカバリを理由にコンテナホストを意識したくない場合は後述するoverlayネットワークを使用することになりますが、当記事では詳しく扱いません。
同一ホスト内で動く異なるコンテナ間の通信
Dockerのネットワーク
Dockerはコンテナ間の通信をサポートしており、デフォルトでDocker Engine内に3つのネットワークを作成します。
$ docker network ls
NETWORK ID          NAME                         DRIVER              SCOPE
fea25e294b20        bridge                       bridge              local
3762bcd6bffb        host                         host                local
f21c4ff0a40e        none                         null                local
DRIVERという項目があるのでまずはその説明をします。
| DRIVER名 | 説明 |
|---|---|
| bridge | コンテナ内にループバックインターフェースloと、仮想インターフェースeth0を作ります。eth0には同一bridgeネットワーク内で一意のIPアドレスが割り当てられます。eth0はホスト上の仮想インターフェースにパイプされ、ポートマッピングをすることで公開することができます。bridgeネットワークは単一のホスト内で完結します。 |
| host | ホスト上のインターフェースがそのまま利用されます。 |
| none | インターフェースを作りません。 |
| overlay | 複数ホストにまたがったbridgeネットワークを作成できます。 overlayネットワークは管理のためにKVSを必要とし、現在サポートされているのはConsul、Etcd、Zookeeperです。 |
特別な理由がない限りbridgeネットワークを選択すればよいです。
なにも指定せずにdocker runした場合、デフォルトのbridgeネットワークに参加します。
ただし、デフォルトのbridgeネットワークはサービスディスカバリをサポートしていない(名前解決してくれない)ため、このネットワークを使ってコンテナ同士を通信する場合は自力でIPアドレスを探し出して通信先に指定する必要がありますが、それは現実的ではありません。
ユーザ定義bridgeネットワーク
自分で個別にbridgeネットワークを作成することも可能です。
ユーザが定義したbridgeネットワークについてはサービスディスカバリがサポートされています。
ユーザ定義bridgeネットワークの作成
特に意味のあるシステム構成ではないですが、違いがお手軽にわかりやすいので以下のような構成を作りたいと思います。
環境はDocker for Macでやってますが他の環境でも基本的には変わりません。

$ docker network create --driver bridge web
3bc07243ffaeec96d384b7310bee747cba5b3afa5971ed30ae8eb08e3cae4176
$ docker network ls
NETWORK ID          NAME                         DRIVER              SCOPE
fea25e294b20        bridge                       bridge              local
3762bcd6bffb        host                         host                local
f21c4ff0a40e        none                         null                local
3bc07243ffae        web                          bridge              local
$ docker network inspect web
[
    {
        "Name": "web",
        "Id": "3bc07243ffaeec96d384b7310bee747cba5b3afa5971ed30ae8eb08e3cae4176",
        "Created": "2017-05-18T12:39:05.685712535Z",
        "Scope": "local",
        "Driver": "bridge",
        "EnableIPv6": false,
        "IPAM": {
            "Driver": "default",
            "Options": {},
            "Config": [
                {
                    "Subnet": "172.19.0.0/16",
                    "Gateway": "172.19.0.1"
                }
            ]
        },
        "Internal": false,
        "Attachable": false,
        "Containers": {},
        "Options": {},
        "Labels": {}
    }
]
Apacheコンテナの起動
$ docker pull httpd
Using default tag: latest
latest: Pulling from library/httpd
10a267c67f42: Already exists
0782edf7745a: Pull complete
f3a72c4d9d02: Pull complete
dd6ec65d8a55: Pull complete
1b7920e1c0df: Pull complete
5b99e4053015: Pull complete
e720548ad189: Pull complete
Digest: sha256:72b55a7c15a4ee3d56ff19f83b57b82287714f91070b1f556a54e90da5eee3fa
Status: Downloaded newer image for httpd:latest
$ docker run -d -p 8080:80 --name=apache --net=web httpd
a274776cd3cc274e4ab72d7a2964532fd0b6de0620f5d2235c3b0cab927d5f14
$ curl -v localhost:8080
* Rebuilt URL to: localhost:8080/
*   Trying 127.0.0.1...
* Connected to localhost (127.0.0.1) port 8080 (#0)
> GET / HTTP/1.1
> Host: localhost:8080
> User-Agent: curl/7.43.0
> Accept: */*
>
< HTTP/1.1 200 OK
< Date: Thu, 18 May 2017 12:48:59 GMT
< Server: Apache/2.4.25 (Unix)
< Last-Modified: Mon, 11 Jun 2007 18:53:14 GMT
< ETag: "2d-432a5e4a73a80"
< Accept-Ranges: bytes
< Content-Length: 45
< Content-Type: text/html
<
<html><body><h1>It works!</h1></body></html>
* Connection #0 to host localhost left intact
起動してホストOS側にApacheがポートを公開できていることが確認できました。
nginxコンテナの起動
$ docker pull nginx
Using default tag: latest
latest: Pulling from library/nginx
ff3d52d8f55f: Pull complete
b05436c68d6a: Pull complete
961dd3f5d836: Pull complete
Digest: sha256:12d30ce421ad530494d588f87b2328ddc3cae666e77ea1ae5ac3a6661e52cde6
Status: Downloaded newer image for nginx:latest
$ docker run -d -p 8090:80 --name=nginx --net=web nginx
40839a2909d25769f3a2b3a40d51fd348ffd8b24d5005612d146217a08e02270
$ curl -v localhost:8090
* Rebuilt URL to: localhost:8090/
*   Trying 127.0.0.1...
* Connected to localhost (127.0.0.1) port 8090 (#0)
> GET / HTTP/1.1
> Host: localhost:8090
> User-Agent: curl/7.43.0
> Accept: */*
>
< HTTP/1.1 200 OK
< Server: nginx/1.13.0
< Date: Thu, 18 May 2017 12:52:08 GMT
< Content-Type: text/html
< Content-Length: 612
< Last-Modified: Tue, 25 Apr 2017 11:30:31 GMT
< Connection: keep-alive
< ETag: "58ff3357-264"
< Accept-Ranges: bytes
<
<!DOCTYPE html>
<html>
<head>
<title>Welcome to nginx!</title>
<style>
    body {
        width: 35em;
        margin: 0 auto;
        font-family: Tahoma, Verdana, Arial, sans-serif;
    }
</style>
</head>
<body>
<h1>Welcome to nginx!</h1>
<p>If you see this page, the nginx web server is successfully installed and
working. Further configuration is required.</p>

<p>For online documentation and support please refer to
<a href="http://nginx.org/">nginx.org</a>.<br/>
Commercial support is available at
<a href="http://nginx.com/">nginx.com</a>.</p>

<p><em>Thank you for using nginx.</em></p>
</body>
</html>
* Connection #0 to host localhost left intact
こちらも起動してホストOS側にnginxがポートを公開できていることが確認できました。
Webクライアントコンテナの起動
$ docker pull centos
Using default tag: latest
latest: Pulling from library/centos
343b09361036: Pull complete
Digest: sha256:bba1de7c9d900a898e3cadbae040dfe8a633c06bc104a0df76ae24483e03c077
Status: Downloaded newer image for centos:latest
$ docker run -it --rm --name=client --net=web centos bash
[root@e95e6b29aed4 /]#
Webクライアントコンテナから他のコンテナにhttpリクエストをしてみる
まずはApache
[root@e95e6b29aed4 /]# curl -v apache
* About to connect() to apache port 80 (#0)
*   Trying 172.19.0.2...
* Connected to apache (172.19.0.2) port 80 (#0)
> GET / HTTP/1.1
> User-Agent: curl/7.29.0
> Host: apache
> Accept: */*
>
< HTTP/1.1 200 OK
< Date: Thu, 18 May 2017 12:57:03 GMT
< Server: Apache/2.4.25 (Unix)
< Last-Modified: Mon, 11 Jun 2007 18:53:14 GMT
< ETag: "2d-432a5e4a73a80"
< Accept-Ranges: bytes
< Content-Length: 45
< Content-Type: text/html
<
<html><body><h1>It works!</h1></body></html>
* Connection #0 to host apache left intact
コンテナ名で通信できました。
続いてnginx
[root@e95e6b29aed4 /]# curl -v nginx
* About to connect() to nginx port 80 (#0)
*   Trying 172.19.0.3...
* Connected to nginx (172.19.0.3) port 80 (#0)
> GET / HTTP/1.1
> User-Agent: curl/7.29.0
> Host: nginx
> Accept: */*
>
< HTTP/1.1 200 OK
< Server: nginx/1.13.0
< Date: Thu, 18 May 2017 12:59:15 GMT
< Content-Type: text/html
< Content-Length: 612
< Last-Modified: Tue, 25 Apr 2017 11:30:31 GMT
< Connection: keep-alive
< ETag: "58ff3357-264"
< Accept-Ranges: bytes
<
<!DOCTYPE html>
<html>
<head>
<title>Welcome to nginx!</title>
<style>
    body {
        width: 35em;
        margin: 0 auto;
        font-family: Tahoma, Verdana, Arial, sans-serif;
    }
</style>
</head>
<body>
<h1>Welcome to nginx!</h1>
<p>If you see this page, the nginx web server is successfully installed and
working. Further configuration is required.</p>

<p>For online documentation and support please refer to
<a href="http://nginx.org/">nginx.org</a>.<br/>
Commercial support is available at
<a href="http://nginx.com/">nginx.com</a>.</p>

<p><em>Thank you for using nginx.</em></p>
</body>
</html>
* Connection #0 to host nginx left intact
こちらもコンテナ名で通信できました。
以上でコンテナ同士の通信に関しては終わりです。
最後に補足ですが、
Bridgeネットワーク内の通信なので、それぞれホスト側で公開したport(8080や8090)ではなく、
元々コンテナ自身がListenしているポート(80)でアクセスできていることにも注目してもらえると良いと思います。
おかしなところなどありましたらご指摘頂ければ修正します。
