Power Automate Desktopで画面の解像度と向きの両方を変更する方法を探していて見つけたコマンドラインツールのメモ。
Display Changer 2
こちらのコマンドラインツール dc2.exe (Display Changer II)が便利そう。
ライセンス
ライセンスは教育目的での利用と非営利の個人利用は無償。営利組織での利用などは有償。
Display Changer II is free for educational or non-profit personal use. (U.S. 501(c) organizations are one example.) If you’d like to use it in a commercial environment (e.g., to manage your organization’s computers or to include with a product you use internally), you must purchase a commercial license based on your current corporate headcount. A commercial license entitles your company to unlimited use of Display Changer II within your company.
(Display Changer II | 12noon)
インストール
-
上記ページ内の「Download」をクリック

- ダウンロードされた
dc2.xipを展開 - 展開された
dc2フォルダ内のdc2.exeをパスの通ったディレクトリに配置(またはdc2フォルダにパスを通す)
実行
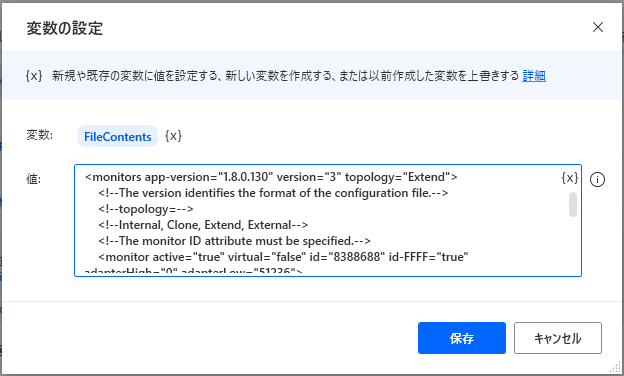
dc2.exe はXML形式の構成ファイルを読み込んで動作する。まず現在のディスプレイ情報から、構成ファイルを生成する。
dc2.exe -create=".\dc2-conf.xml"
生成されたファイル(上の場合 .\dc2-conf.xml を編集)。上記ページ内の「Configuration File Format」部に説明がありますが、XMLファイルの中身はこんな感じで、size が画面解像度かなとか rotation 変更したら画面の向きが変わるのかなとか、見ればなんとなく見当がつくかもしれない。
<monitors app-version="1.8.0.130" version="3" topology="Extend">
<!--The version identifies the format of the configuration file.-->
<!--topology=-->
<!--Internal, Clone, Extend, External-->
<!--The monitor ID attribute must be specified.-->
<monitor active="true" virtual="false" id="24644" adapterHigh="0" adapterLow="51236">
<name>32inch LG FHD</name>
<!--source: the origin of the video signal-->
<source id="1">
<name>\\.\DISPLAY2</name>
<path>\\?\PCI#VEN_8086&DEV_9A40&SUBSYS_22128086&REV_01#3&11583659&0&10#{5b45201d-f2f2-4f3b-85bb-30ff1f953599}</path>
</source>
<size width="1920" height="1080"/>
<position left="0" top="0"/>
<!--8bpp, 16bpp, 24bpp, 32bpp, Non-GDI-->
<color value="32bpp"/>
<!--Identity, 90-degreesCW, 180-degreesCW, 270-degreesCW-->
<rotation value="Identity"/>
<!--Identity, Centered, Stretched, Aspect Ratio Centered Max, Custom, Preferred-->
<scaling value="Aspect Ratio Centered Max"/>
<!--A value of 0/0 represents the optimal refresh rate. Scan-line-order must be Unspecified.-->
<refresh numerator="148500000" denominator="2475000"/>
<!--Unspecified, Progressive, Interlaced (upper field first), Interlaced (lower field first)-->
<scanlineorder value="Progressive"/>
</monitor>
</monitors>
修正できたら、このファイルパスを -configure の引数にして実行。
dc2.exe -configure=".\dc2-conf.txt"
生成された構成ファイルを残して(修正後のものは別名で保存して)おけば、変更と復旧を簡単にできます。
Power Automate Desktopからの実行
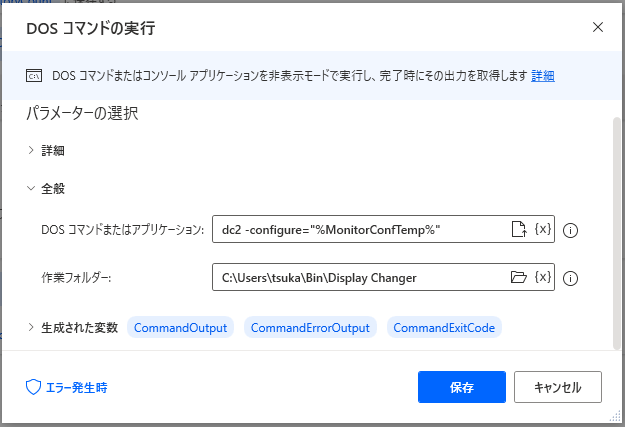
「DOSコマンドの実行 - スクリプト - Power Automate | Microsoft Docs」で dc2 を実行できます。
現在のディスプレイ構成ファイルの出力
出力する構成ファイルを -create オプションで指定して実行。作業ディレクトリは dc2.exe の配置先を指定します。
出力したファイルは、次項のディスプレイ構成変更時の構成情報テキストのひな型としても、構成変更後に元の構成に戻す際の構成情報ファイルとしても使えます。
ディスプレイ構成の変更
まず構成ファイルを生成。構成情報のテキストをいったん変数に格納し、これをUTF-8(バイトオーダーマークなし)でファイルに書き込みます。
使用する構成ファイルを -configure オプションで指定して実行。作業ディレクトリは dc2.exe の配置先を指定します。
同様に前項で -create で生成した構成ファイルを指定して実行すれば、ディスプレイ構成をもとに戻せます。
参考
本ページ内容は、以下を主な情報源として作成しました。
Display Changer IIについては、以下のページで紹介されていたDisplay Changerを調べようとしてサイトを訪問した際に、類似名のツールがあると気づいて知りました。Display Changerは構成ファイルを使わずコマンドの引数ですべてを指定すること、Windows 8.1に対応していることなどが違うようです。
他に情報の多かったものとして QRes.exe を使う方法がありました。プロジェクト公式でのWindows 10対応状況にちょっと不安を覚えたので、今回は dc2.exe を選択しました。
- Windows 10のデスクトップ解像度をコマンドラインで変更するには | 日記というほどでも
- QRes - Windows screen mode changer download | SourceForge.net
- 3 Ways To Change Screen Resolution In Windows 10
PowerShellで「マイクロソフトスクリプトセンターのサイトにある Set-ScreenResolution 」を使うという情報もいくつか見つかりましたが、この Set-ScreenResolution 自体が見つけられませんでした(し画面の向きの変更に対応しているかもわかりませんでした)。もしかするとこれかなという感じですが、情報をたどり切れなかったのでこちらも見送り。


