Google App Engineを開発するために最低限必要な環境をMacBookProに構築します。
SDKなどをインストールし、GAE開発用のランチャーが起動するまでを目標にします
GAEの開発SDKは使用する言語ごとに異なります。
Java、PHP、Python、Goから、今回は【Python】を選択しました。
インストールはMacOS Sierra 64bit
なおGitのインストールが必要です
作業一覧
下記から必要なものをダウンロード&インストールする。
[公式チュートリアル]https://cloud.google.com/appengine/docs/standard/python/download
- Python2.7のインストール
- Google Cloud SDKのインストール
- PythonのApp Engine拡張機能を含むgcloudコンポーネントのインストール
- PythonのExtra Librariesコンポーネントのインストール
- App Engine SDK for Pythonのインストール (これがGAE開発用のランチャ)
※最後にアンインストールの方法を記載しました
1. Python2.7のインストール
(1)公式チュートリアルから下記の「DOWNLOAD AND INSTALL」をクリック
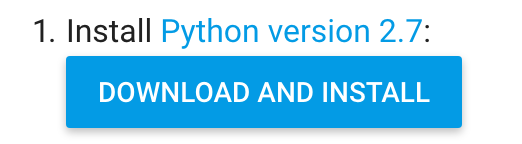
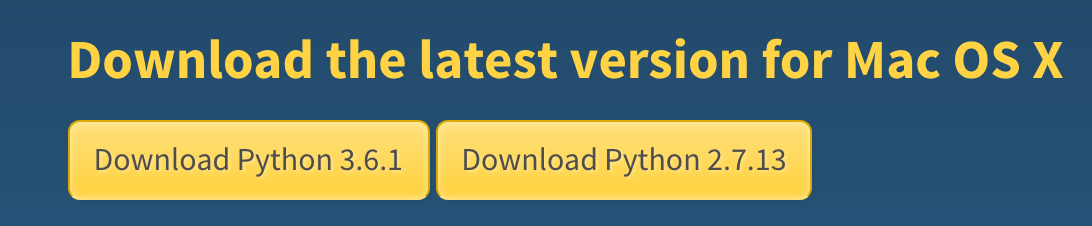
(2)Pythonページの下記「Download Python 2.7.13」をクリック
Googleチュートリアルで使用しているwebapp2がPython2系のframeworkなので。
(3)ダウンロードされた「python-2.7.13-macosx10.6.pkg」 ファイルをダブルクリックでインストール
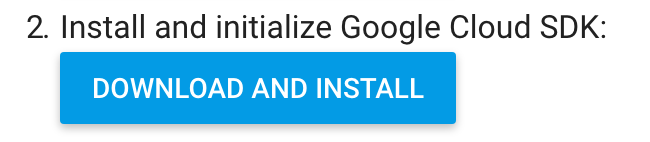
2. Google Cloud SDKのインストール
2.1 公式チュートリアルから下記の「DOWNLOAD AND INSTALL」をクリック
2.2 下記パッケージをダウンロードして解凍する(解凍先はお任せ)

2.3 解凍後のフォルダにある下記コマンドを実行する
SDK ツールをパスに追加します。
bash シェルでコマンドの補完を有効にしたり、使用状況レポートを有効にしたりすることもできます。
./google-cloud-sdk/install.sh
2.4 gcloud init を実行して SDK を初期化します。
./google-cloud-sdk/bin/gcloud init
下記のように表示されるので、適当に入力します
   You must log in to continue. Would you like to log in (Y/n)? Y ←認証するためにブラウザが起動される
   Pick cloud project to use:
 [1] AAAAA-164602
 [2] BBBBB-book
 [3] CCCCC-146901
Please enter numeric choice or text value (must exactly match list
item):  1 ←デフォルトのプロジェクトを選択

 Your current project has been set to: [AAAAA-164602].

Do you want to configure Google Compute Engine
(https://cloud.google.com/compute) settings (Y/n)?  n
3. PythonのApp Engine拡張機能を含むgcloudコンポーネントのインストール
下記のコマンドを実行する。(gcloudはパスが通っているはず)
$ gcloud components install app-engine-python
4. PythonのExtra Librariesコンポーネントのインストール
下記のコマンドを実行する。
$ gcloud components install app-engine-python-extras
5. Optional: Download and install the original App Engine SDK for Python
開発用のランチャー(webサーバも兼ねる)
下記をクリックして App Engine SDK for Pythonをインストールする

5.1 下記のダウンロードをクリック

5.2 5.1でアウンロードした「GoogleAppEngineLauncher-1.9.54.dmg」をFinderでダブルクリックする
5.3 「GoogleAppEngineLauncher」を「Applications」フォルダに入れる
ここまででインストールは完了
5.4 「Application Folder」の「GoogleAppEngineLauncher」をcontrolを押しながら開く
下記が起動されればOK

ここまででインストールは完了 次に開発用のEclipseを用意します。それは別
最後に
アンインストールの方法はこちらを参考にしてください