はじめに
なんらかの安価なマイコン搭載のデバイスからAWSのFreeRTOSへ接続してみよう、という動機からデバイスを購入してAWSへ接続してみたので、そこでの方法を記事としてまとめます
デバイスの選定
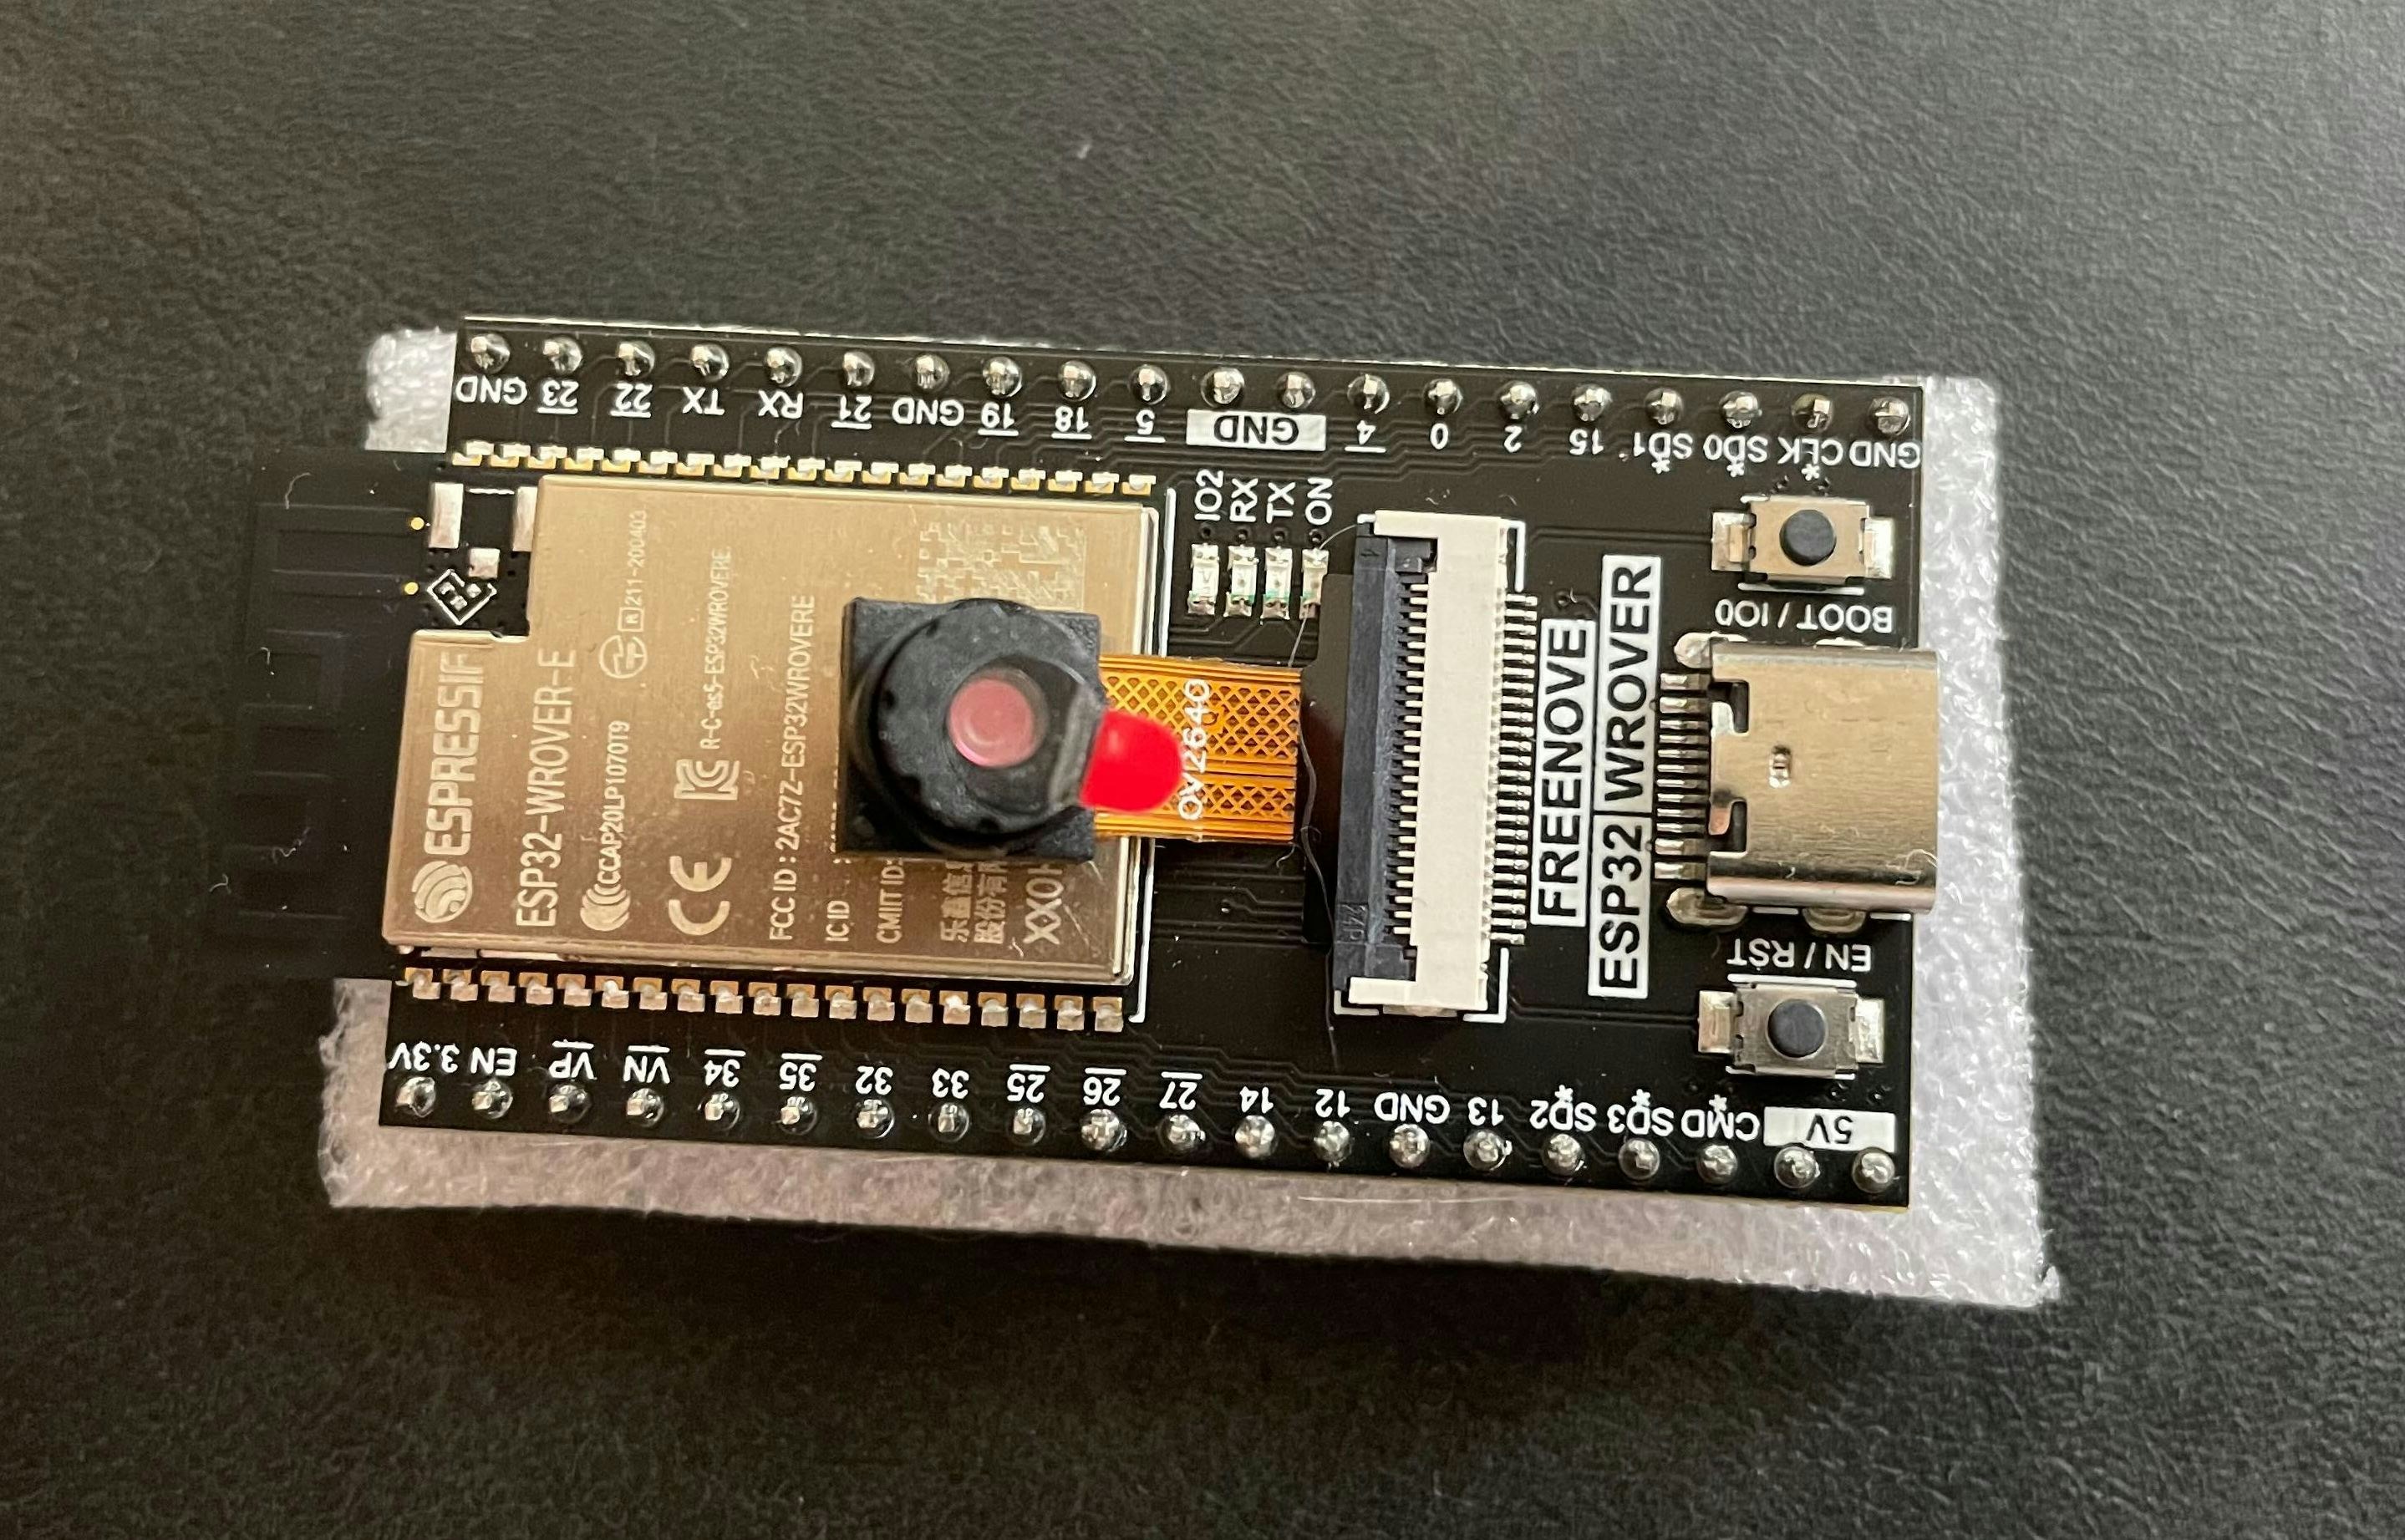
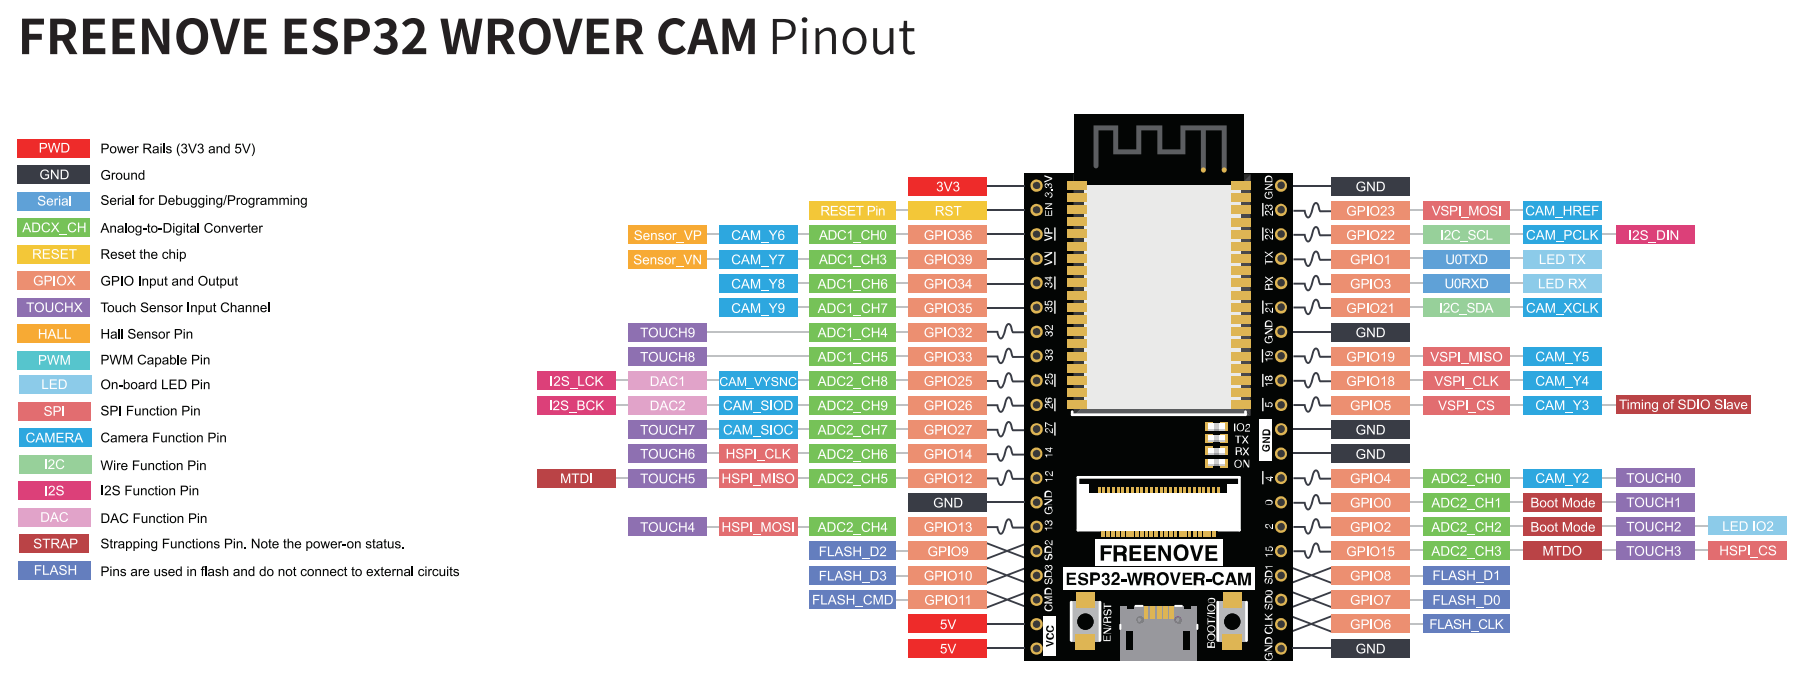
今回は AWS のFreeRTOSを試してみたかったので、なるべくあまり処理能力の高くない、安価なデバイスで、なおかつ一般的に入手可能なデバイスを選択しようと思いました。色々記事など調べたところ、 M5StickC Plusと呼ばれているデバイスや、Raspberry Pi Picoと呼ばれるデバイスがあったのですが、ESP32と呼ばれる、WifiとBluetooth機能を内蔵している安価なデバイスがあるようだったので、今回はこちらを購入して試してみることにしました。ESP32は上海に本社を置く、Espressifという会社が提供しているデバイスで、Toolchain等もこちらの会社が提供しています。Espressif社が提供している純正のボードや、その互換ボードが数多く売られています。今回はこちらのビデオカメラもついた Freenove ESP32-WROVER CAM boardを約2000円で購入し、試してみることにしました。安いですし、サンプルプログラム等も付属しているのでわかりやすいかなと。以下が購入した基板の写真です。USB-CでPCと接続して使用します。
付属のサンプルプログラム
上記のボードのサンプルプログラムはこちらからダウンロード可能です。CとPythonのサンプルプログラムが入っていて、Arduinoを開発環境として使用するTutorialになっています。基本、指示のとおりに実行することで、LEDを光らせたり、WiFiに接続したり、Camera映像をWebServerとして供給したりできるようになっています。こちらは一通り試して確認しました。ああ、なるほど、という感じですね。
FreeRTOSとしてAWSへ接続
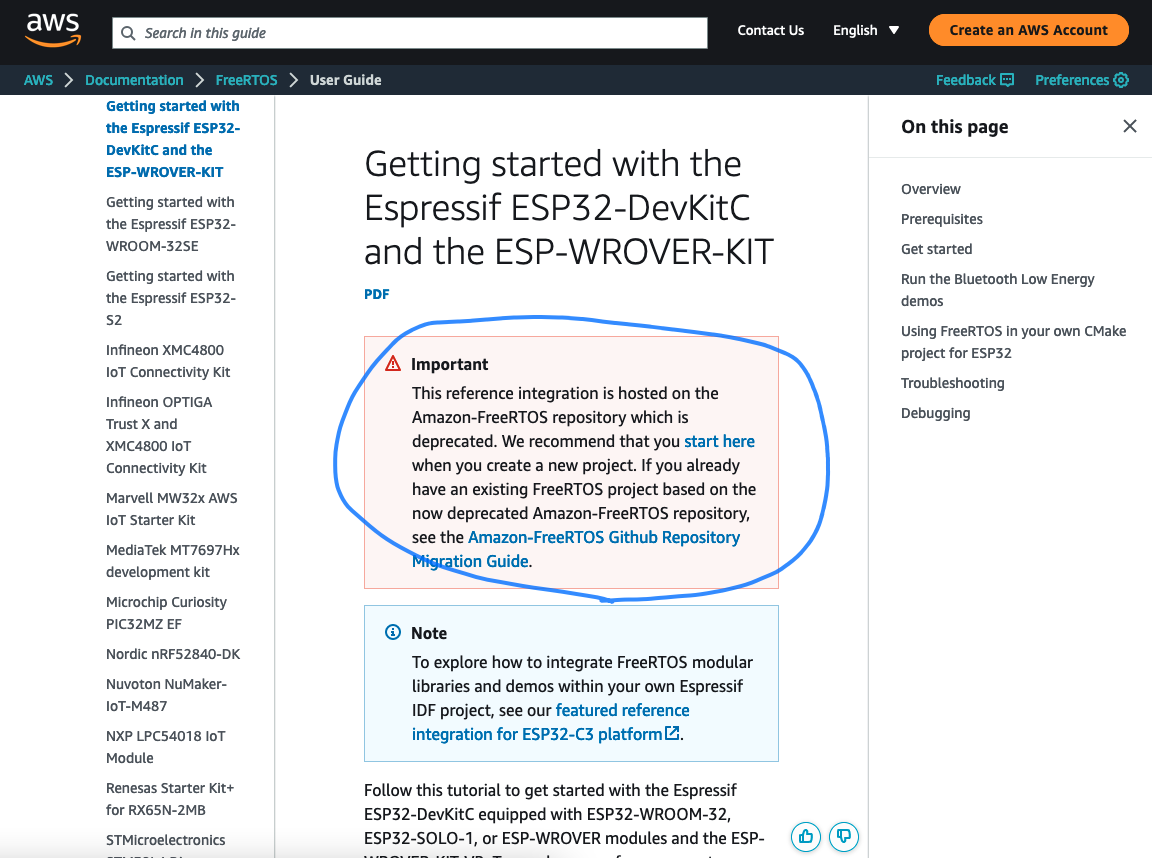
このあたりのブログを参考にしてやってみようかなと思っていたのですが Amazon FreeRTOS は Deprecatedになってしまったとのことのようで、2023/5/22 現在ですと、AWSコンソールから FreeRTOSデバイスソフトウエアのダウンロードを行うことができなくなっていました。AWSのDocumentにもESP32用の開始方法のページがありましたが、この方法はDeprecateされたので使うな、というようなことが書いてありました。(この方法だと、ESP-IDFの開発環境を入れて、FreeRTOSだけAmazonのGithubのものと置き換えるやり方のようでしたが、現在では使用できないようです。Github上のAmazon-FreeRTOSにはDocument中で解説されているinstall.sh の Scriptが含まれていませんでした)
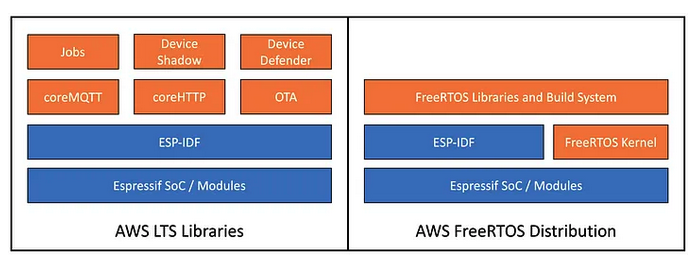
最新版ではどのような形で実施するのが良いのか検索したところ、こちらのページがありました。LTSになったFreeRTOSでは、Espressifのデバイスは esp-aws-iot を使って接続せよ、とあります。以下の図にあるように、これまではFreeRTOSの上に各種Libraryがあったものから、ESP-IDFの上で直接、CoreMQTTやOTAなどのライブラリが動作するようになったようです。
今回はこの仕組みをつかって試してみることにします。
ESP-IDFのツールチェーンのインストール
ESP32のデバイスはArduinoを開発環境としてもビルドすることができますが、Espressif 社が提供している ESP-IDF という開発環境ああるので、これをインストールしていきます。esp-aws-iotのページを見ると、 v4.3とv4.4で動作実績があるようなので、今回は v4.4をインストールしました。こちらの手順をもとにして手元のMacにインストールしました。
前提条件のインストール
brew install cmake ninja dfu-util
brew install python3
ESP-IDFのインストール
mkdir -p ~/Work/esp32/v44
cd ~/Work/esp32/v44
git clone -b release/v4.4 --recursive https://github.com/espressif/esp-idf.git
cd esp-idf
./install.sh esp32
. ~/Work/esp32/v44/esp-idf/export.sh
bashを使用している場合には、.bashrcに以下を追加しておきます。
export PATH=$HOME/Work/esp32/v44/esp-idf/tools:$PATH
export IDF_PATH=$HOME/Work/esp32/v44/esp-idf
alias get_idf='. $HOME/Work/esp32/v44/esp-idf/export.sh'
サンプルプログラムの実行
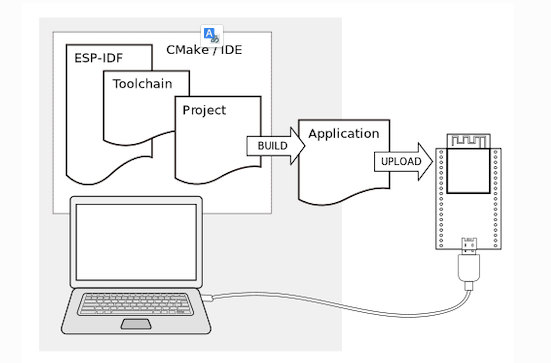
ESP-IDFは以下の図のように、アプリケーションをビルドして、ボードに焼き込んで実行します。ESP-IDFに含めれているExampleをビルドして実行してみます。
cd ~/Work/esp32/v44/esp-idf/examples/get-started/hello_world
idf.py set-target esp32 (はじめの一回だけ実施)
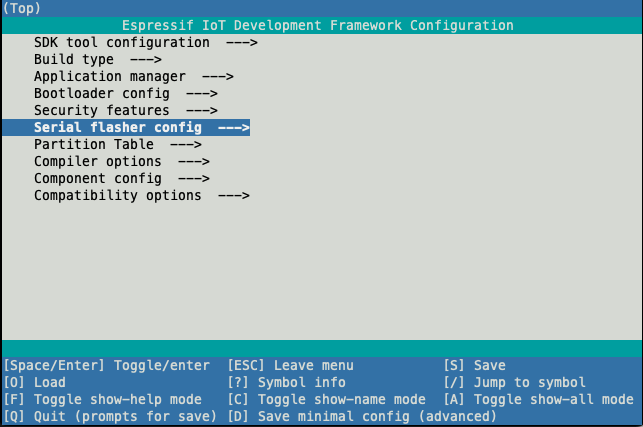
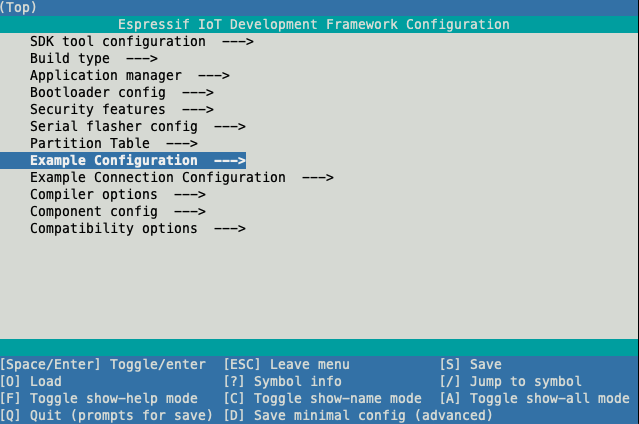
idf.py menuconfig
以下のような画面が立ち上がり、各種設定が行えるようになります。ここで行われた設定値はカレントディレクトリのsdkconfigというファイルに書き込まれ、プログラム上から参照することができます。
ビルドを行い、デバイスに焼き込みます。書き込むためのシリアルポートはMacの場合、/dev/cu.usbserial-xxxxという名前になるのでどのような名前のデバイスファイルがあるか確認して指定します。
idf.py build
ls /dev/cu.*
/dev/cu.Bluetooth-Incoming-Port	/dev/cu.URT0
/dev/cu.usbserial-14240
idf.py -p /dev/cu.usbserial-14240 flash monitor
サンプルプログラムが焼き込まれ、以下のように表示されます。
Serial port /dev/cu.usbserial-14240
Connecting......
Chip is ESP32-D0WD-V3 (revision v3.0)
Features: WiFi, BT, Dual Core, 240MHz, VRef calibration in efuse, Coding Scheme None
Crystal is 40MHz
MAC: 8c:4b:14:39:e3:f8
Uploading stub...
Running stub...
Stub running...
Changing baud rate to 460800
Changed.
Configuring flash size...
Flash will be erased from 0x00001000 to 0x00007fff...
Flash will be erased from 0x00010000 to 0x0003afff...
Flash will be erased from 0x00008000 to 0x00008fff...
Compressed 25584 bytes to 16084...
Writing at 0x00001000... (100 %)
Wrote 25584 bytes (16084 compressed) at 0x00001000 in 0.7 seconds (effective 273.3 kbit/s)...
Hash of data verified.
Compressed 174720 bytes to 92190...
Writing at 0x00010000... (16 %)
Writing at 0x0001b657... (33 %)
Writing at 0x00020e8e... (50 %)
Writing at 0x000265e0... (66 %)
Writing at 0x0002eb68... (83 %)
Writing at 0x00036dfd... (100 %)
Wrote 174720 bytes (92190 compressed) at 0x00010000 in 2.7 seconds (effective 518.8 kbit/s)...
Hash of data verified.
Compressed 3072 bytes to 103...
Writing at 0x00008000... (100 %)
Wrote 3072 bytes (103 compressed) at 0x00008000 in 0.1 seconds (effective 490.2 kbit/s)...
Hash of data verified.

Leaving...
Hard resetting via RTS pin...
Executing action: monitor
Running idf_monitor in directory /Users/tsugunao/Work/esp32/v44/esp-idf/examples/get-started/hello_world
Executing "/Users/tsugunao/.espressif/python_env/idf4.4_py3.10_env/bin/python /Users/tsugunao/Work/esp32/v44/esp-idf/tools/idf_monitor.py -p /dev/cu.usbserial-14240 -b 115200 --toolchain-prefix xtensa-esp32-elf- --target esp32 --revision 0 /Users/tsugunao/Work/esp32/v44/esp-idf/examples/get-started/hello_world/build/hello_world.elf -m '/Users/tsugunao/.espressif/python_env/idf4.4_py3.10_env/bin/python' '/Users/tsugunao/Work/esp32/v44/esp-idf/tools/idf.py' '-p' '/dev/cu.usbserial-14240'"...
--- idf_monitor on /dev/cu.usbserial-14240 115200 ---
--- Quit: Ctrl+] | Menu: Ctrl+T | Help: Ctrl+T followed by Ctrl+H ---
arting scheduler on PRO CP�ets Jul 29 2019 12:21:46

rst:0x1 (POWERON_RESET),boot:0x13 (SPI_FAST_FLASH_BOOT)
configsip: 0, SPIWP:0xee
clk_drv:0x00,q_drv:0x00,d_drv:0x00,cs0_drv:0x00,hd_drv:0x00,wp_drv:0x00
mode:DIO, clock div:2
load:0x3fff0030,len:6624
load:0x40078000,len:15060
ho 0 tail 12 room 4
load:0x40080400,len:3816
0x40080400: _init at ??:?

entry 0x40080698
I (29) boot: ESP-IDF v4.4.4-435-g7641c8ef4f 2nd stage bootloader
I (29) boot: compile time 16:10:44
I (29) boot: chip revision: v3.0
I (34) boot.esp32: SPI Speed      : 40MHz
I (38) boot.esp32: SPI Mode       : DIO
I (43) boot.esp32: SPI Flash Size : 2MB
I (47) boot: Enabling RNG early entropy source...
I (53) boot: Partition Table:
I (56) boot: ## Label            Usage          Type ST Offset   Length
I (64) boot:  0 nvs              WiFi data        01 02 00009000 00006000
I (71) boot:  1 phy_init         RF data          01 01 0000f000 00001000
I (79) boot:  2 factory          factory app      00 00 00010000 00100000
I (86) boot: End of partition table
I (90) esp_image: segment 0: paddr=00010020 vaddr=3f400020 size=088b4h ( 34996) map
I (111) esp_image: segment 1: paddr=000188dc vaddr=3ffb0000 size=01b78h (  7032) load
I (114) esp_image: segment 2: paddr=0001a45c vaddr=40080000 size=05bbch ( 23484) load
I (127) esp_image: segment 3: paddr=00020020 vaddr=400d0020 size=150f4h ( 86260) map
I (159) esp_image: segment 4: paddr=0003511c vaddr=40085bbc size=0593ch ( 22844) load
I (174) boot: Loaded app from partition at offset 0x10000
I (174) boot: Disabling RNG early entropy source...
I (186) cpu_start: Pro cpu up.
I (186) cpu_start: Starting app cpu, entry point is 0x40080fe8
0x40080fe8: call_start_cpu1 at /Users/tsugunao/Work/esp32/v44/esp-idf/components/esp_system/port/cpu_start.c:147

I (0) cpu_start: App cpu up.
I (200) cpu_start: Pro cpu start user code
I (200) cpu_start: cpu freq: 160000000
I (200) cpu_start: Application information:
I (205) cpu_start: Project name:     hello_world
I (210) cpu_start: App version:      v4.4.4-435-g7641c8ef4f
I (216) cpu_start: Compile time:     May 22 2023 16:10:13
I (222) cpu_start: ELF file SHA256:  dab168d8d931b743...
I (228) cpu_start: ESP-IDF:          v4.4.4-435-g7641c8ef4f
I (234) cpu_start: Min chip rev:     v0.0
I (239) cpu_start: Max chip rev:     v3.99
I (244) cpu_start: Chip rev:         v3.0
I (249) heap_init: Initializing. RAM available for dynamic allocation:
I (256) heap_init: At 3FFAE6E0 len 00001920 (6 KiB): DRAM
I (262) heap_init: At 3FFB2460 len 0002DBA0 (182 KiB): DRAM
I (268) heap_init: At 3FFE0440 len 00003AE0 (14 KiB): D/IRAM
I (275) heap_init: At 3FFE4350 len 0001BCB0 (111 KiB): D/IRAM
I (281) heap_init: At 4008B4F8 len 00014B08 (82 KiB): IRAM
I (289) spi_flash: detected chip: generic
I (292) spi_flash: flash io: dio
W (296) spi_flash: Detected size(4096k) larger than the size in the binary image header(2048k). Using the size in the binary image header.
I (310) cpu_start: Starting scheduler on PRO CPU.
I (0) cpu_start: Starting scheduler on APP CPU.
Hello world!
This is esp32 chip with 2 CPU core(s), WiFi/BT/BLE, silicon revision v3.0, 2MB external flash
Minimum free heap size: 300936 bytes
Restarting in 10 seconds...
Restarting in 9 seconds...
Restarting in 8 seconds...
Restarting in 7 seconds...
Restarting in 6 seconds...
Restarting in 5 seconds...
Restarting in 4 seconds...
Restarting in 3 seconds...
Restarting in 2 seconds...
Restarting in 1 seconds...
Restarting in 0 seconds...
Restarting now.
ets Jul 29 2019 12:21:46
Hello World! と表示されているので無事にプログラムが焼き込まれて実行することができました。Ctrl+]でモニターから抜けます。
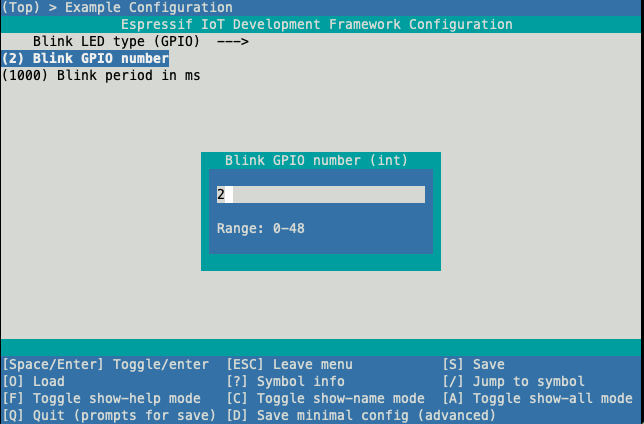
Exampleとして hello world の隣の Directory にblinkというサンプルプログラムがあり、こちらを同様の手段で実施すると、基板上のLEDを点滅することができます。基板のPinoutの図から見ると、LEDが接続されているのはGPIO2だとわかるので、idf menuconfigでGPIOの設定を行います。
Example Configrationで Blink GPIO numberを2に設定します。
idf.py -p /dev/cu.usbserial-14240 build flash monitor
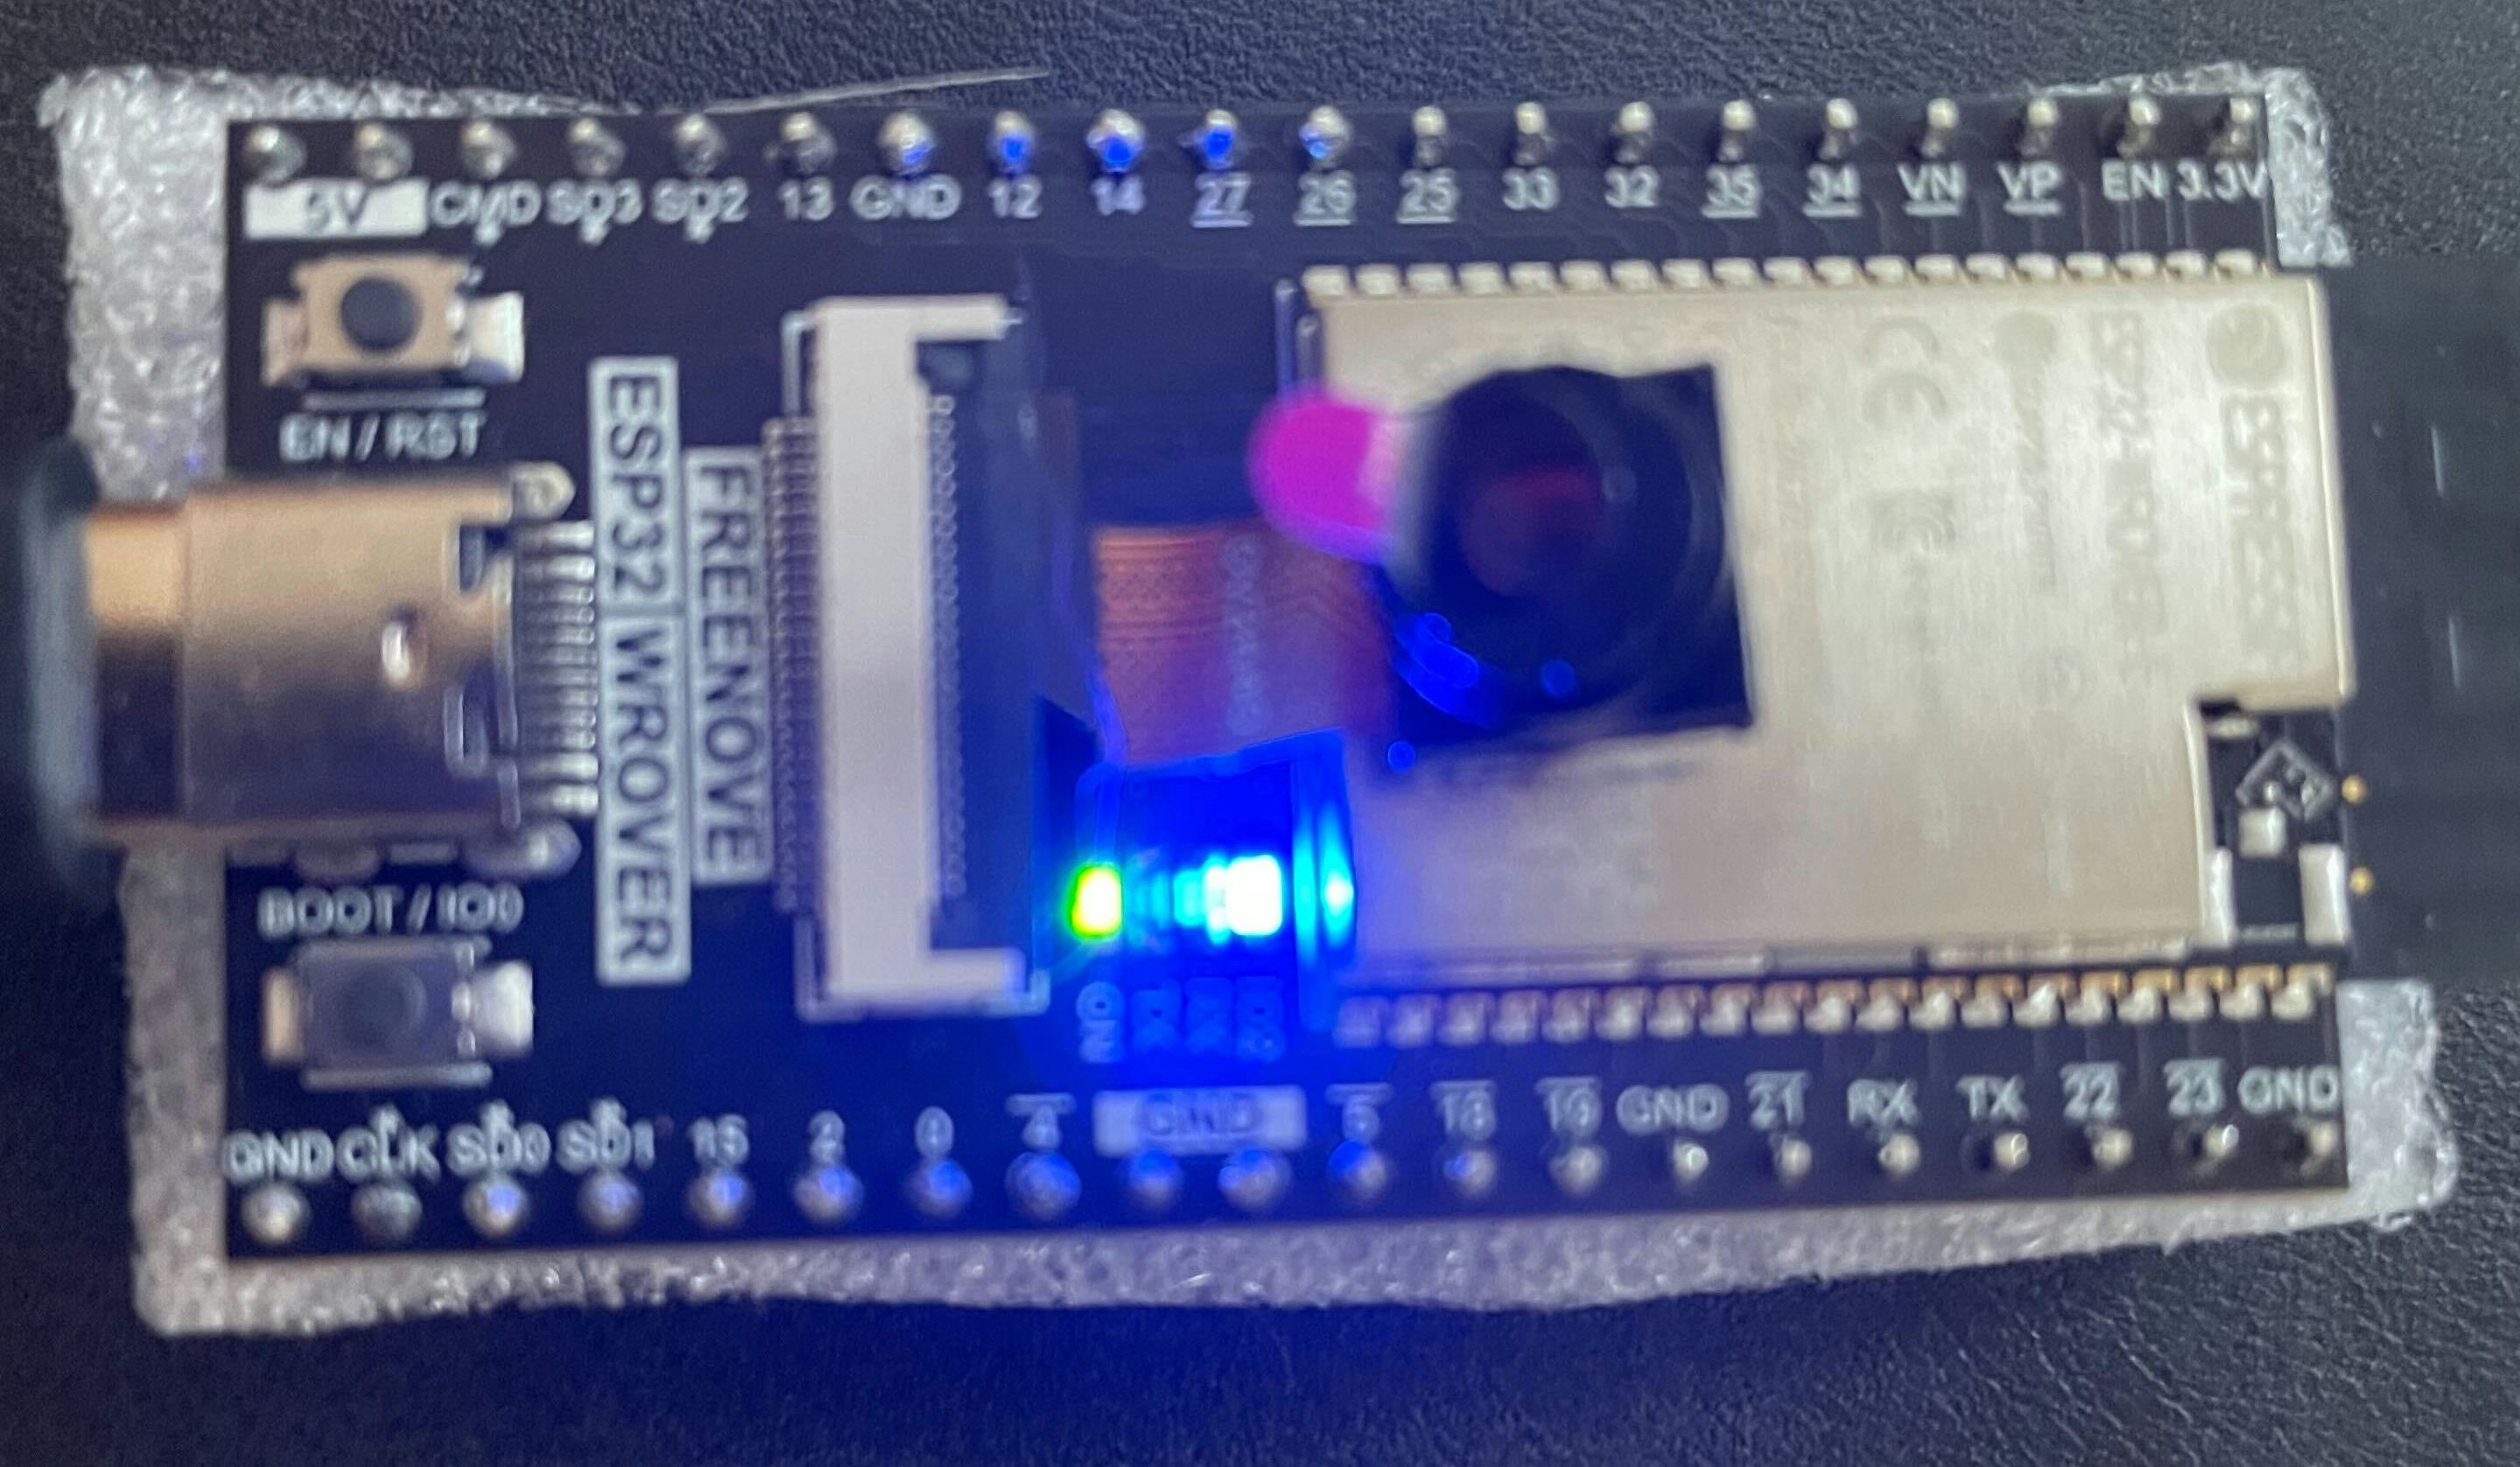
以下のようにLEDが点滅します。
AWS IoTとの接続
ESP-IDF上のサンプルプログラム
ESP-IDFの開発環境が整ったので、次にAWS IoTと接続します。AWS IoTとの接続には、esp-aws-iotを使用します。
先程作成した esp32 のディレクトリに戻り、esp-aws-iotをCloneします。MQTTでAWS IoT Coreに接続するサンプルプログラムがあるので、これをビルドします。
cd ~/Work/esp32
git clone -b "release/202210.01-LTS" --recursive https://github.com/espressif/esp-aws-iot
cd esp-aws-iot/examples/mqtt/tls_mutual_auth
idf.py build
examples/mqtt/tls_mutual_auth/main/mqtt_demo_mutual_auth.c にサンプルプログラムの実装がありますが、その中では、subscribePublishLoopという関数の中で、Topicに対してPublishを行っています。
static int subscribePublishLoop( MQTTContext_t * pMqttContext )
{
    int returnStatus = EXIT_SUCCESS;
    MQTTStatus_t mqttStatus = MQTTSuccess;
    uint32_t publishCount = 0;
    const uint32_t maxPublishCount = MQTT_PUBLISH_COUNT_PER_LOOP;
 (中略)
    if( returnStatus == EXIT_SUCCESS )
    {
        /* Publish messages with QOS1, receive incoming messages and
         * send keep alive messages. */
        for( publishCount = 0; publishCount < maxPublishCount; publishCount++ )
        {
            LogInfo( ( "Sending Publish to the MQTT topic %.*s.",
                       MQTT_EXAMPLE_TOPIC_LENGTH,
                       MQTT_EXAMPLE_TOPIC ) );
            returnStatus = publishToTopic( pMqttContext );
  (中略)
publishToTopicの関数の中では、Payloadに"Hello World"の文字列を設定して、MQTT_Publishを呼んでいます。
static int publishToTopic( MQTTContext_t * pMqttContext )
{
    int returnStatus = EXIT_SUCCESS;
    MQTTStatus_t mqttStatus = MQTTSuccess;
    uint8_t publishIndex = MAX_OUTGOING_PUBLISHES;

    assert( pMqttContext != NULL );

 (中略)
    else
    {
        /* This example publishes to only one topic and uses QOS1. */
        outgoingPublishPackets[ publishIndex ].pubInfo.qos = MQTTQoS1;
        outgoingPublishPackets[ publishIndex ].pubInfo.pTopicName = MQTT_EXAMPLE_TOPIC;
        outgoingPublishPackets[ publishIndex ].pubInfo.topicNameLength = MQTT_EXAMPLE_TOPIC_LENGTH;
        outgoingPublishPackets[ publishIndex ].pubInfo.pPayload = MQTT_EXAMPLE_MESSAGE;  //この中に'Hello World'の文字列が設定されている
        outgoingPublishPackets[ publishIndex ].pubInfo.payloadLength = MQTT_EXAMPLE_MESSAGE_LENGTH;

        /* Get a new packet id. */
        outgoingPublishPackets[ publishIndex ].packetId = MQTT_GetPacketId( pMqttContext );

        /* Send PUBLISH packet. */
        mqttStatus = MQTT_Publish( pMqttContext,
                                   &outgoingPublishPackets[ publishIndex ].pubInfo,
                                   outgoingPublishPackets[ publishIndex ].packetId );
AWS側の設定
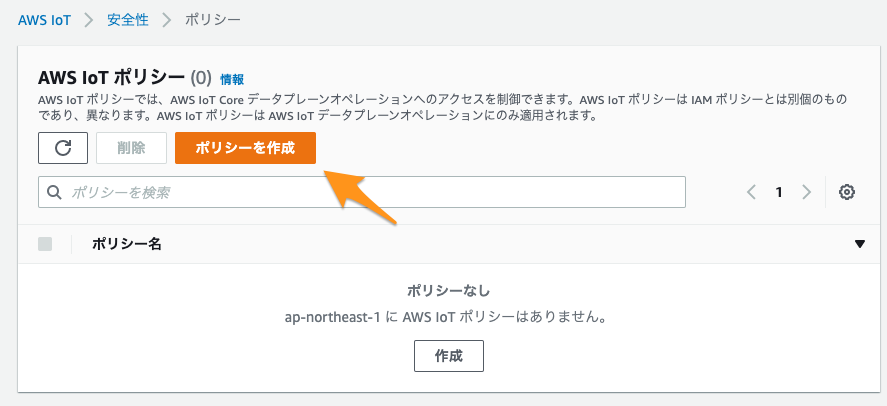
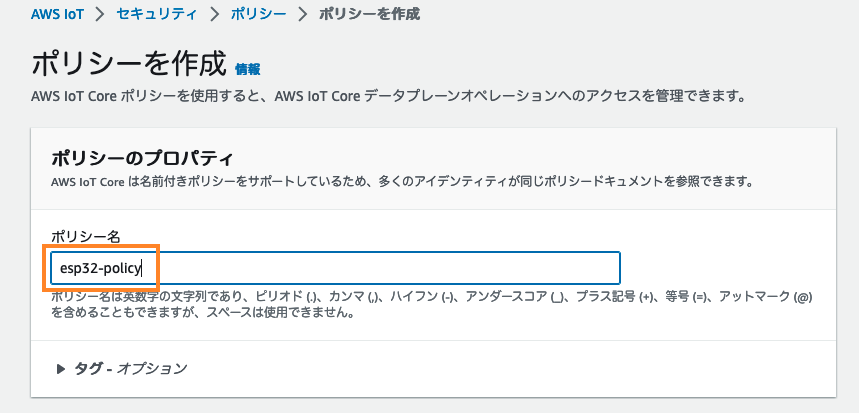
次に AWSにログインし、AWS IoT Coreを開きます。左のサイドメニューからセキュリティ>ポリシーをクリックし、ポリシーの作成をクリックします。
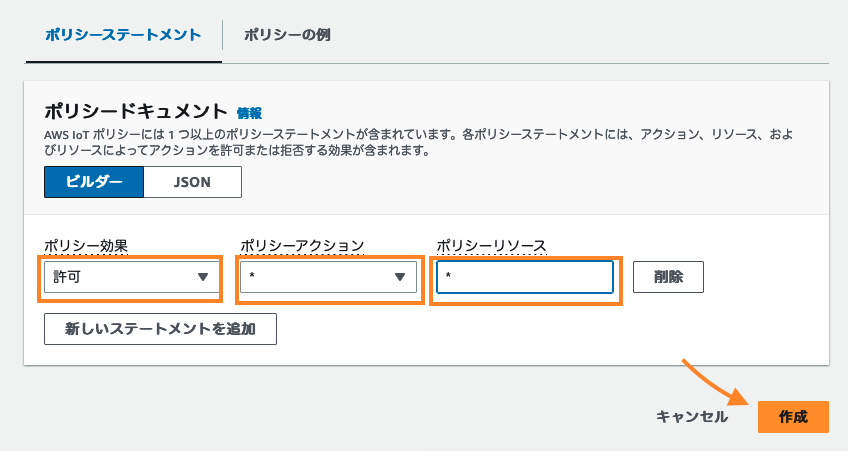
Policy効果で許可を選択し、ポリシーアクションにすべての AWS IoT アクション > *を選択し、ポリシーリソースに*を入力し、作成ボタンをクリックします。(ここでは簡単のため、権限の広いPolicyを作成しました)
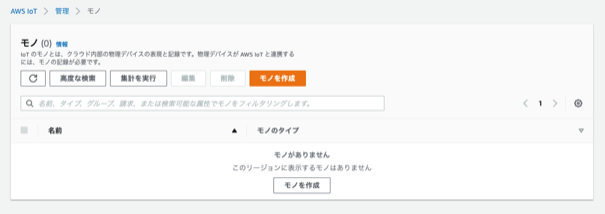
次に、左のサイドメニューより、すべてのデバイス> モノをクリックし、モノの作成をクリックします。
1つのモノを作成を選択し、次へをクリック

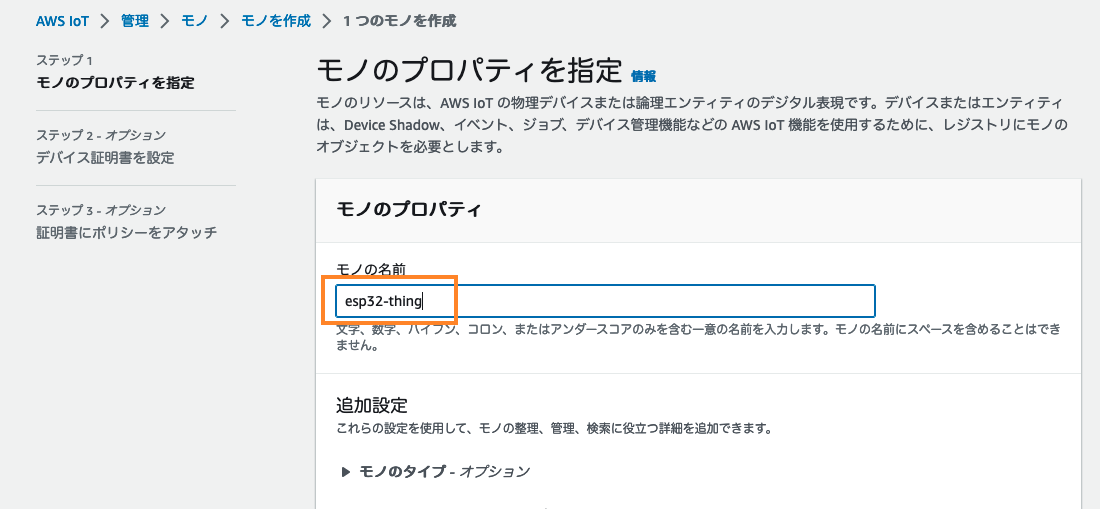
モノの名前にesp32-thingなどと入力し、名前のないシャドウ(クラシック)を選択し、次へ
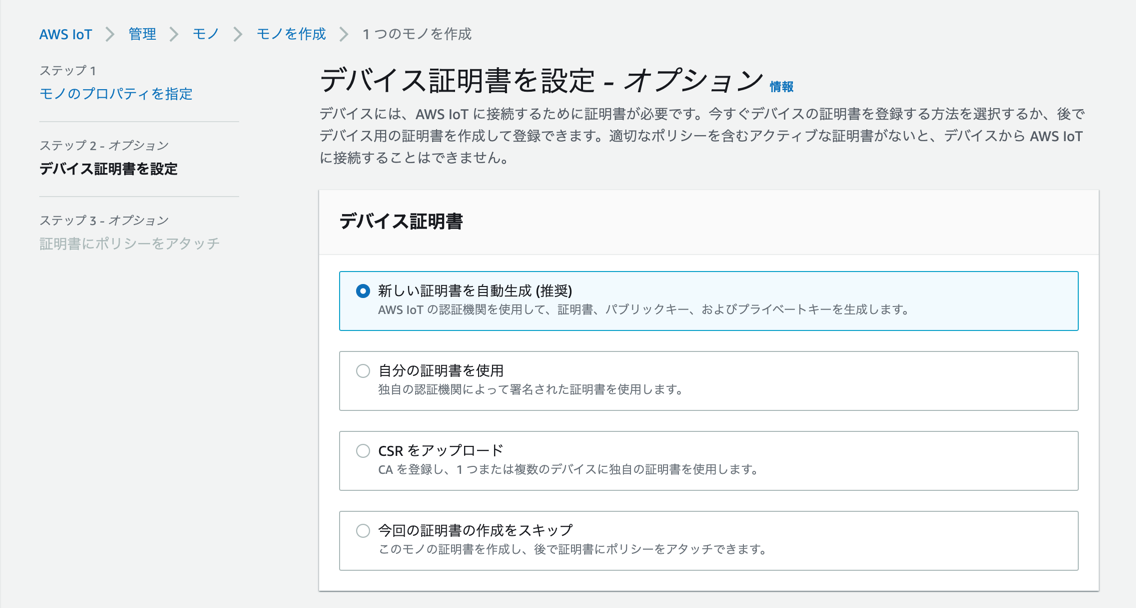
既に選択されている 新しい証明書を自動生成 (推奨) を選択し、次へ
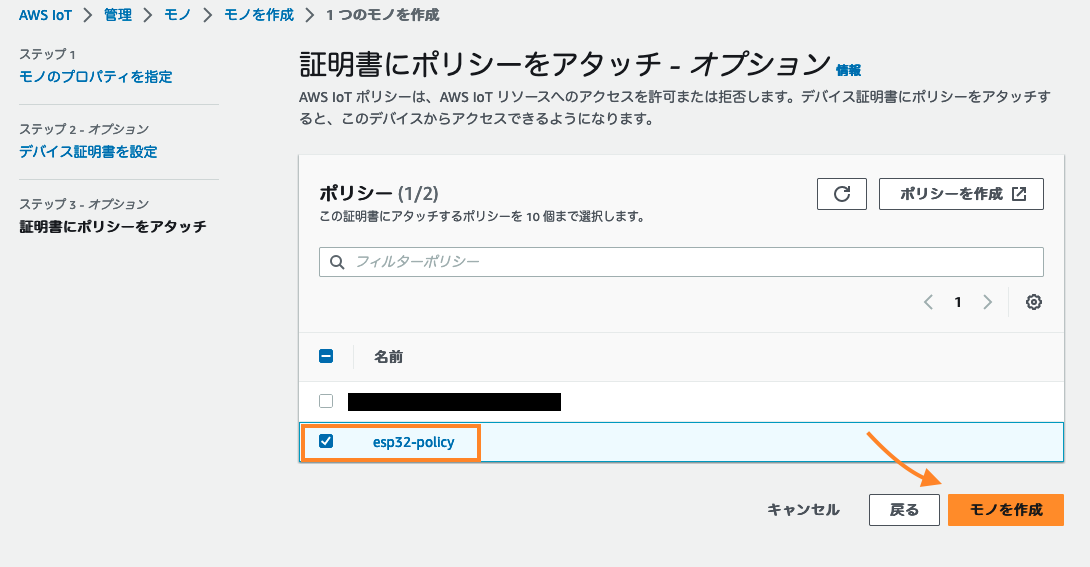
先ほど作成したポリシーを証明書にアタッチし、モノを作成をクリック
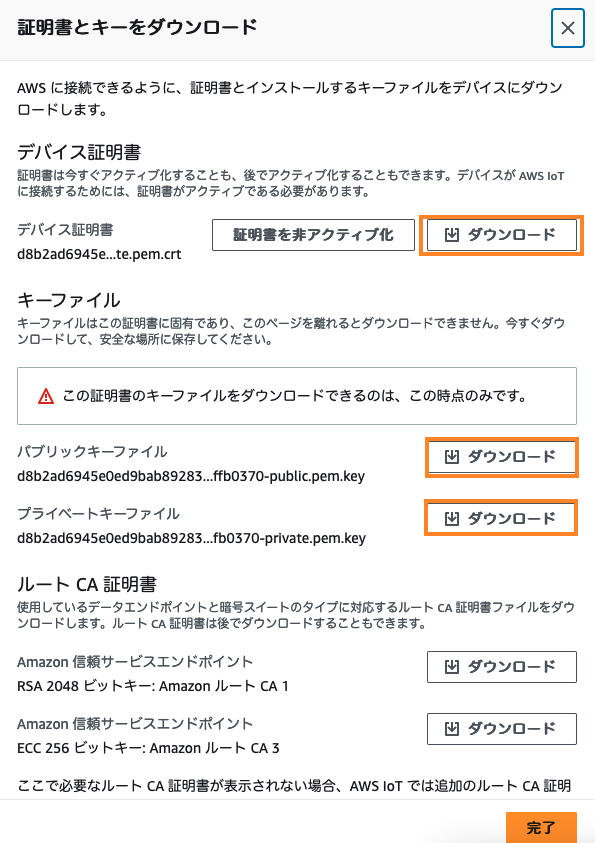
ポップアップが表示されるので、デバイス証明書、パブリックキーファイル、プライベートキーファイルをダウンロードして、完了をクリック
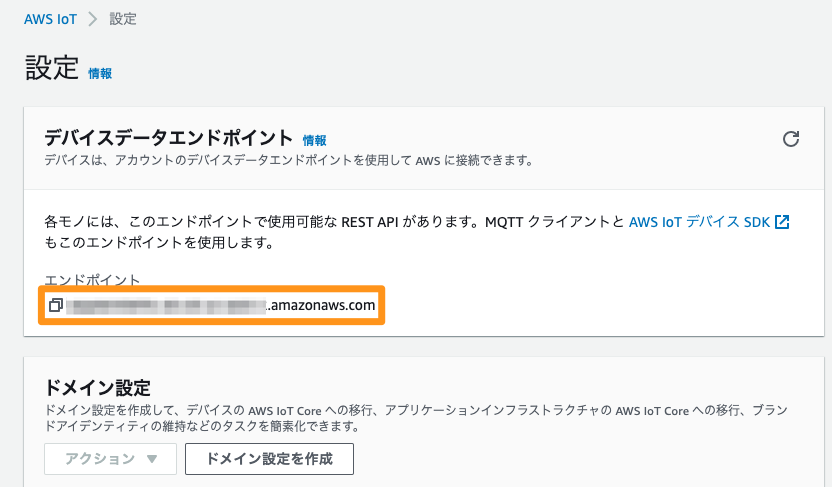
これでAWS IoT Core上にモノが作成されました。左のサイドメニューの設定からAWS IoTのエンドポイントの値をメモしておく。
esp-aws-iot/examples/mqtt の設定
ダウンロードした Private Key (xxx-private.pem.key) と Certificate file (xxx-certificate.pem.crt)の名前をそれぞれ、esp-aws-iot/examples/mqtt/tls_mutual_auth/main/certs 以下に、client.key, client.crtというファイル名で保存します。
cp xxx-certificate.pem.crt esp-aws-iot/examples/mqtt/tls_mutual_auth/main/certs/client.crt
cp xxx-private.pem.key esp-aws-iot/examples/mqtt/tls_mutual_auth/main/certs/client.key
また、AmazonRoot CAを取得して、esp-aws-iot/examples/mqtt/tls_mutual_auth/main/certs/root_cert_auth.crt として保存します。
wget https://www.amazontrust.com/repository/AmazonRootCA1.pem -O certs/root_cert_auth.crt
idf menuconfigを行い、各種設定を行います。
cd ~/Work/esp32/esp-aws-iot/examples/mqtt/tls_mutual_auth
idf.py menuconfig
Example Configurationの中で、MQTTのClient IDをユニークになるように設定(ここではThing名と同じ esp32-thingと設定しました)し、先程メモしておいた MQTTのEndpointを設定します。また、Example Connection Configurationから使用するWifiのSSIDとPasswordを設定します。設定をした後、デバイスを USB-Cに接続して、以下のように実行します。
idf.py -p /dev/cu.usbserial-14240 build flash monitor
焼きこまれたあと実行され、以下のようなログが表示されます。
I (12035) coreMQTT: Delay before continuing to next iteration.


I (13035) coreMQTT: Sending Publish to the MQTT topic esp32-thing01/example/topic.
I (13035) coreMQTT: PUBLISH sent for topic esp32-thing01/example/topic to broker with packet ID 3.


I (13075) coreMQTT: Ack packet deserialized with result: MQTTSuccess.
I (13075) coreMQTT: State record updated. New state=MQTTPublishDone.
I (13075) coreMQTT: PUBACK received for packet id 3.


I (13085) coreMQTT: Cleaned up outgoing publish packet with packet id 3.


I (13095) coreMQTT: De-serialized incoming PUBLISH packet: DeserializerResult=MQTTSuccess.
I (13095) coreMQTT: State record updated. New state=MQTTPubAckSend.
I (13105) coreMQTT: Incoming QOS : 1.
I (13105) coreMQTT: Incoming Publish Topic Name: esp32-thing01/example/topic matches subscribed topic.
Incoming Publish message Packet Id is 1.
Incoming Publish Message : Hello World!.


I (18135) coreMQTT: Delay before continuing to next iteration.


I (19135) coreMQTT: Sending Publish to the MQTT topic esp32-thing01/example/topic.
I (19135) coreMQTT: PUBLISH sent for topic esp32-thing01/example/topic to broker with packet ID 4.


I (19175) coreMQTT: Ack packet deserialized with result: MQTTSuccess.
I (19175) coreMQTT: State record updated. New state=MQTTPublishDone.
I (19175) coreMQTT: PUBACK received for packet id 4.


I (19175) coreMQTT: Cleaned up outgoing publish packet with packet id 4.
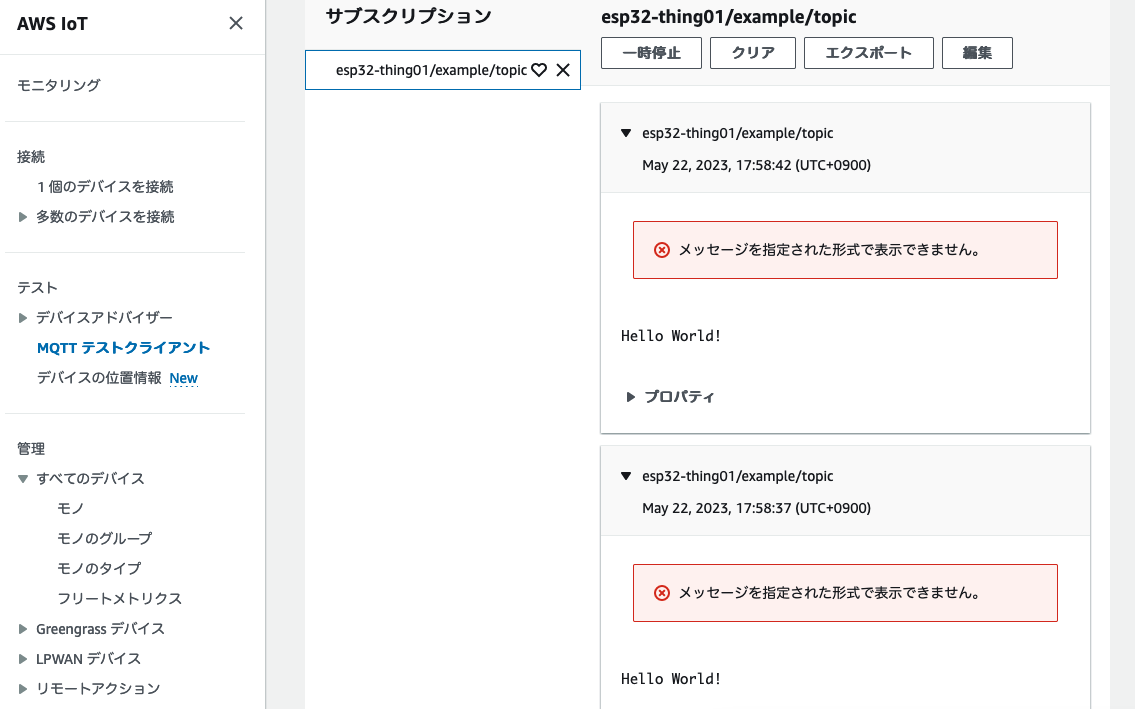
IoT Coreのコンソール上、左側のサイドメニューのテスト>MQTT テストクライアントから、先程のログの中で表示されているTopic名(thing名/example/topic)を入力すると、定期的に「Hello World!」という文字列が送信されていることが確認できます。
まとめ
ESP32のデバイスを使ってサンプルプログラムでAWS IoT Coreに接続してみました。意外と簡単に接続できることがわかりましたので、いろいろ試してみたいと思います。