はじめに
前回の記事で、工場などのOPC_UAサーバーからAWS IoT SiteWiseにデータをあげて、クラウド側でダッシュボードを作成して可視化するデモを作成しました。この例のように現在のSiteWiseでは、データの流れは、工場側からクラウド側への流れの場合のみをサポートしており、クラウド側から工場側の制御をおこなう、といったようなことはできません。今回は、GreengrassV2のコンポーネントとして、IoT CoreからのMQTT通信を受けて、それをOPC-UAサーバーに伝達するOPC-UAクライアントを作成して、クラウド側からOPC-UAサーバーの値を書き換えられるようにしてみたいと思います。
今回の構成
今回は以下のような構成のシステムを考えます。上部にある、前回実現したOPC-UAサーバーからAWS IoT SiteWiseへの流れに加えて、MQTT Topicに入力したデータをGreengrassのコンポーネントで受け取り、それをOPC-UAサーバーに通信します。具体的にはOPC-UAサーバーのObject Node上にあるVariableの値を書き換えられるようにします。

Greengrassのコンポーネント作成
AWS IoT GreengrassはV1とV2で内容が大きく変更になっていて、V2ではコンポーネントというものをインストールできるようになりました。コンポーネントは例えばSiteWiseのコネクタのようなよく使用されるような機能はパブリックコンポーネントとしてAWSが用意してくれていますが、自分で任意のコンポーネントを追加することもできます。今回は、本家のカスタムコンポーネントを作成する手順にのっとってカスタムコンポーネントを作成します。
コンポーネントを作成するにはレシピとアーティファクトを用意する必要があります。レシピはコンポーネントのメタデータ、パラメータ、依存関係、ライフサイクルなどをまとめたものです。アーティファクトはCodeそのものです。レシピとアーティファクトは以下のようなフォルダ構成で用意します。
├── artifacts
│   └── com.example.OpcuaClient
│       └── 1.0.0
│           └── OpcuaClient.py
└── recipes
    └── com.example.OpcuaClient-1.0.0.yaml
今回用意したレシピとアーティファクトは以下です。IoT CoreへのSubscribeを許可しています。また、使用するawsiotsdkやasyncuaのパッケージをインストールするように設定しています。
com.example.OpcuaClient-1.0.0.yaml
RecipeFormatVersion: '2020-01-25'
ComponentName: com.example.OpcuaClient
ComponentVersion: '1.0.0'
ComponentConfiguration:
  DefaultConfiguration:
    accessControl:
      aws.greengrass.ipc.mqttproxy:
        com.example.OpcuaClient:mqtt:1:
          operations:
          - "aws.greengrass#SubscribeToIoTCore"
          resources:
          - "control/#"
Manifests:
  - Platform:
      os: linux
    Lifecycle:
      Install: pip3 install awsiotsdk asyncua
      Run: python3 -u {artifacts:path}/OpcuaClient.py
OpcuaClient.py MQTTの自分のコアデバイス名のTopicをサブスクライブして、メッセージ受信時にコマンドの内容に応じてOPC-UAのサーバーの設定値を変更しています。
import time
import os
import json
import asyncio
import subprocess
import awsiot.greengrasscoreipc
import awsiot.greengrasscoreipc.client as client
from awsiot.greengrasscoreipc.model import (
  IoTCoreMessage,
  QOS,
  SubscribeToIoTCoreRequest
)
import sys
import random
import logging
from asyncua import Client, Node, ua

logging.basicConfig(level=logging.INFO)
_logger = logging.getLogger('asyncua')

# MQTT送受信クラス
class Mqtt():
  def __init__(self) -> None:
    self.ipc_client = awsiot.greengrasscoreipc.connect()
    self.timeout = 10

  class StreamHandler(client.SubscribeToIoTCoreStreamHandler):
    def __init__(self, on_recv):
      super().__init__()
      self.__on_recv = on_recv

    def on_stream_event(self, event: IoTCoreMessage) -> None:
      message = str(event.message.payload, "utf-8")
      print("Stream.Recv payload:{}".format(message))
      self.__on_recv(json.loads(message))

    def on_stream_error(self, error: Exception) -> bool:
      print("Stream.Error: {}".format(error))
      return True

    def on_stream_closed(self) -> None:
      print("Stream.Close")
      pass

  def subscribe(self, topic, on_recv):
    print("Subscribe: {}".format(topic))
    qos = QOS.AT_LEAST_ONCE
    request = SubscribeToIoTCoreRequest()
    request.topic_name = topic
    request.qos = qos
    handler = self.StreamHandler(on_recv)
    operation = self.ipc_client.new_subscribe_to_iot_core(handler)
    future = operation.activate(request)
    future.result(self.timeout)

def on_recv(message):
  if("cmd" in message) and ("param" in message):
    asyncio.run(OpcuaClient(message["cmd"], message["param"]))

async def OpcuaClient(cmd, param):
    url = 'opc.tcp://localhost:4840/freeopcua/server/'
    async with Client(url=url) as client:
        # Client has a few methods to get proxy to UA nodes that should always be in address space such as Root or Objects
        # Node objects have methods to read and write node attributes as well as browse or populate address space
        _logger.info('Children of root are: %r', await client.nodes.root.get_children())

        uri = 'http://examples.amazon.co.jp'
        idx = await client.get_namespace_index(uri)

        obj = await client.nodes.root.get_child(["0:Objects", f"{idx}:MyObject"])
        var = await client.nodes.root.get_child(["0:Objects", f"{idx}:MyObject", f"{idx}:MyVariable"])
        cont1 = await client.nodes.root.get_child(["0:Objects", f"{idx}:MyObject", f"{idx}:Controller1"])
        cont2 = await client.nodes.root.get_child(["0:Objects", f"{idx}:MyObject", f"{idx}:Controller2"])

        print("My variable", var, await var.read_value())

        # controll value from client
        print("Controller1", cont1, await cont1.read_value())
        print("Controller2", cont2, await cont2.read_value())

        _logger.info('Get value of MyVariable: %.1f', await var.read_value())

        if 'control1' in cmd:
          if len(param) != 0:
            await cont1.write_value(param)
            print("control1 write")
          else:
            print("Please set param")
        elif 'control2' in cmd:
          if len(param) != 0:
            await cont2.write_value(param)
          else:
            print("Please set param")
        elif 'square' in cmd:
          if param.isdecimal():
            res = await obj.call_method(f'{idx}:square', float(param))
            print(f'method square {param} ^ 2 = {res}')
          else:
            print("Please set numerical parameters")
        else:
          print('Please set the valid command')

# 自分のコアデバイス名だけサブスクライブする
thing_name = os.environ['AWS_IOT_THING_NAME']
topic = "control/{}".format(thing_name)
mqtt = Mqtt()
mqtt.subscribe(topic, on_recv)

while True:
  time.sleep(1)
MQTTのメッセージは以下のようなフォーマットで送信することを想定しています。
{
  "cmd": "control1",
  "param": "on"
}
レシピとアーティファクトが用意できたら、greengrass-cliでコンポーネントをインストールします。Deployは deployment createコマンドを実行します。
$ sudo /greengrass/v2/bin/greengrass-cli deployment create \
  --recipeDir ./recipes \
  --artifactDir ./artifacts \
  --merge "com.example.OpcuaClient=1.0.0"

INFO: Socket connection /greengrass/v2/ipc.socket:8033 to server result [AWS_ERROR_SUCCESS]
Aug 10, 2021 11:55:56 PM software.amazon.awssdk.eventstreamrpc.EventStreamRPCConnection$1 onProtocolMessage
INFO: Connection established with event stream RPC server
Local deployment submitted! Deployment Id: c84f0f04-3b2e-4827-84cb-eaf333bf7e38
作成したコンポーネントのログは/greengrass/v2/logsの下に出力されます。今回のコンポーネントのログは以下のようになります。
$ sudo tail -f /greengrass/v2/logs/com.example.OpcuaClient.log

2022-01-21T00:32:50.429Z [WARN] (Copier) com.example.OpcuaClient: stderr. INFO:asyncua.client.client:get_namespace_index <class 'list'> ['http://opcfoundation.org/UA/', 'urn:freeopcua:python:server', 'http://examples.amazon.co.jp']. {scriptName=services.com.example.OpcuaClient.lifecycle.Run, serviceName=com.example.OpcuaClient, currentState=RUNNING}
2022-01-21T00:32:50.439Z [INFO] (Copier) com.example.OpcuaClient: stdout. My variable ns=2;i=2 200.1999999999929. {scriptName=services.com.example.OpcuaClient.lifecycle.Run, serviceName=com.example.OpcuaClient, currentState=RUNNING}
2022-01-21T00:32:50.442Z [INFO] (Copier) com.example.OpcuaClient: stdout. Controller1 ns=2;i=8 off. {scriptName=services.com.example.OpcuaClient.lifecycle.Run, serviceName=com.example.OpcuaClient, currentState=RUNNING}
2022-01-21T00:32:50.443Z [INFO] (Copier) com.example.OpcuaClient: stdout. Controller2 ns=2;i=9 off. {scriptName=services.com.example.OpcuaClient.lifecycle.Run, serviceName=com.example.OpcuaClient, currentState=RUNNING}
2022-01-21T00:32:50.445Z [WARN] (Copier) com.example.OpcuaClient: stderr. INFO:asyncua:Get value of MyVariable: 200.2. {scriptName=services.com.example.O
動作確認
まず、Cloud9上でOPC-UAサーバーを動作させます。
$ python3  opcua-server-example1.py

INFO:asyncua:Set value of ns=2;i=2 to 214.0
INFO:asyncua:Set value of ns=2;i=3 to 28.6
INFO:asyncua:Set value of ns=2;i=4 to 30.0
INFO:asyncua:Set value of ns=2;i=5 to 59.7
INFO:asyncua:Set value of ns=2;i=6 to 60.6
INFO:asyncua:value of ns=2;i=8: on
INFO:asyncua:value of ns=2;i=9: on
DEBUG:asyncua.server.binary_server_asyncio:_process_received_message 59 130
上記のようなログが表示され、OPC-UAサーバー上のns=2;i=8のVariable(Controller1の値)が「on」に設定されていることが分かります。
Iot Coreのテストクライアントから以下のようにTopicに対してMQTTメッセージを送付します。(control1のコマンドでoffに設定)
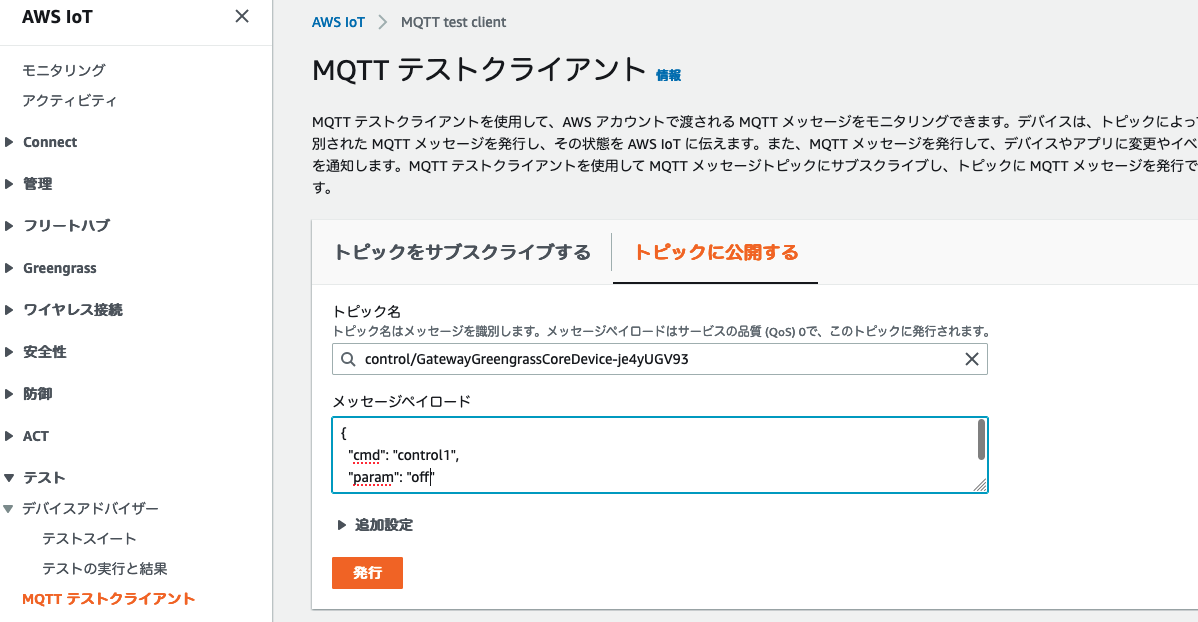
Greengrassのコンポーネントのログには以下のように表示されます。
2022-01-21T00:15:47.320Z [INFO] (Copier) com.example.OpcuaClient: stdout. Stream.Recv payload:{. {scriptName=services.com.example.OpcuaClient.lifecycle.Run, serviceName=com.example.OpcuaClient, currentState=RUNNING}
2022-01-21T00:15:47.320Z [INFO] (Copier) com.example.OpcuaClient: stdout. "cmd": "control1",. {scriptName=services.com.example.OpcuaClient.lifecycle.Run, serviceName=com.example.OpcuaClient, currentState=RUNNING}
2022-01-21T00:15:47.320Z [INFO] (Copier) com.example.OpcuaClient: stdout. "param": "off". {scriptName=services.com.example.OpcuaClient.lifecycle.Run, serviceName=com.example.OpcuaClient, currentState=RUNNING}
2022-01-21T00:15:47.320Z [INFO] (Copier) com.example.OpcuaClient: stdout. }. {scriptName=services.com.example.OpcuaClient.lifecycle.Run, serviceName=com.example.OpcuaClient, currentState=RUNNING}
OPC-UAサーバーを起動したTerminalで確認すると、OPC-UAサーバー上の値も更新されていることが確認できます。
INFO:asyncua:Set value of ns=2;i=2 to 214.0
INFO:asyncua:Set value of ns=2;i=3 to 28.6
INFO:asyncua:Set value of ns=2;i=4 to 30.0
INFO:asyncua:Set value of ns=2;i=5 to 59.7
INFO:asyncua:Set value of ns=2;i=6 to 60.6
INFO:asyncua:value of ns=2;i=8: off
INFO:asyncua:value of ns=2;i=9: on
まとめ
今回はGreengrassv2のコンポーネントを作成して、クラウド側からMQTT経由でOPC-UAサーバーに対して制御をおこなう実験を行いました。カスタムのコンポーネントとしてOPC-UAクライアントを実装し、OPC-UAサーバーに通信ができるようにしました。クラウド側からOPC-UAサーバーの制御ができるので手軽にOPC-UAサーバーのコントロールができるようになりました。