はじめに
AWS IoTにはいくつかの証明書の作成方法、登録方法があります。前回の記事では AmazonのCAを使用するFleet Provisioningについて試してみました。今回はAmazon以外のCAで発行した証明書を利用して、デバイスが初回接続時に証明証を発行する方法の1つであるJust in time provisioning (JITP)について試してみたいと思います。
証明書発行方法の分類
こちらにAWS IoTでの証明書発行の方法が分類されています。
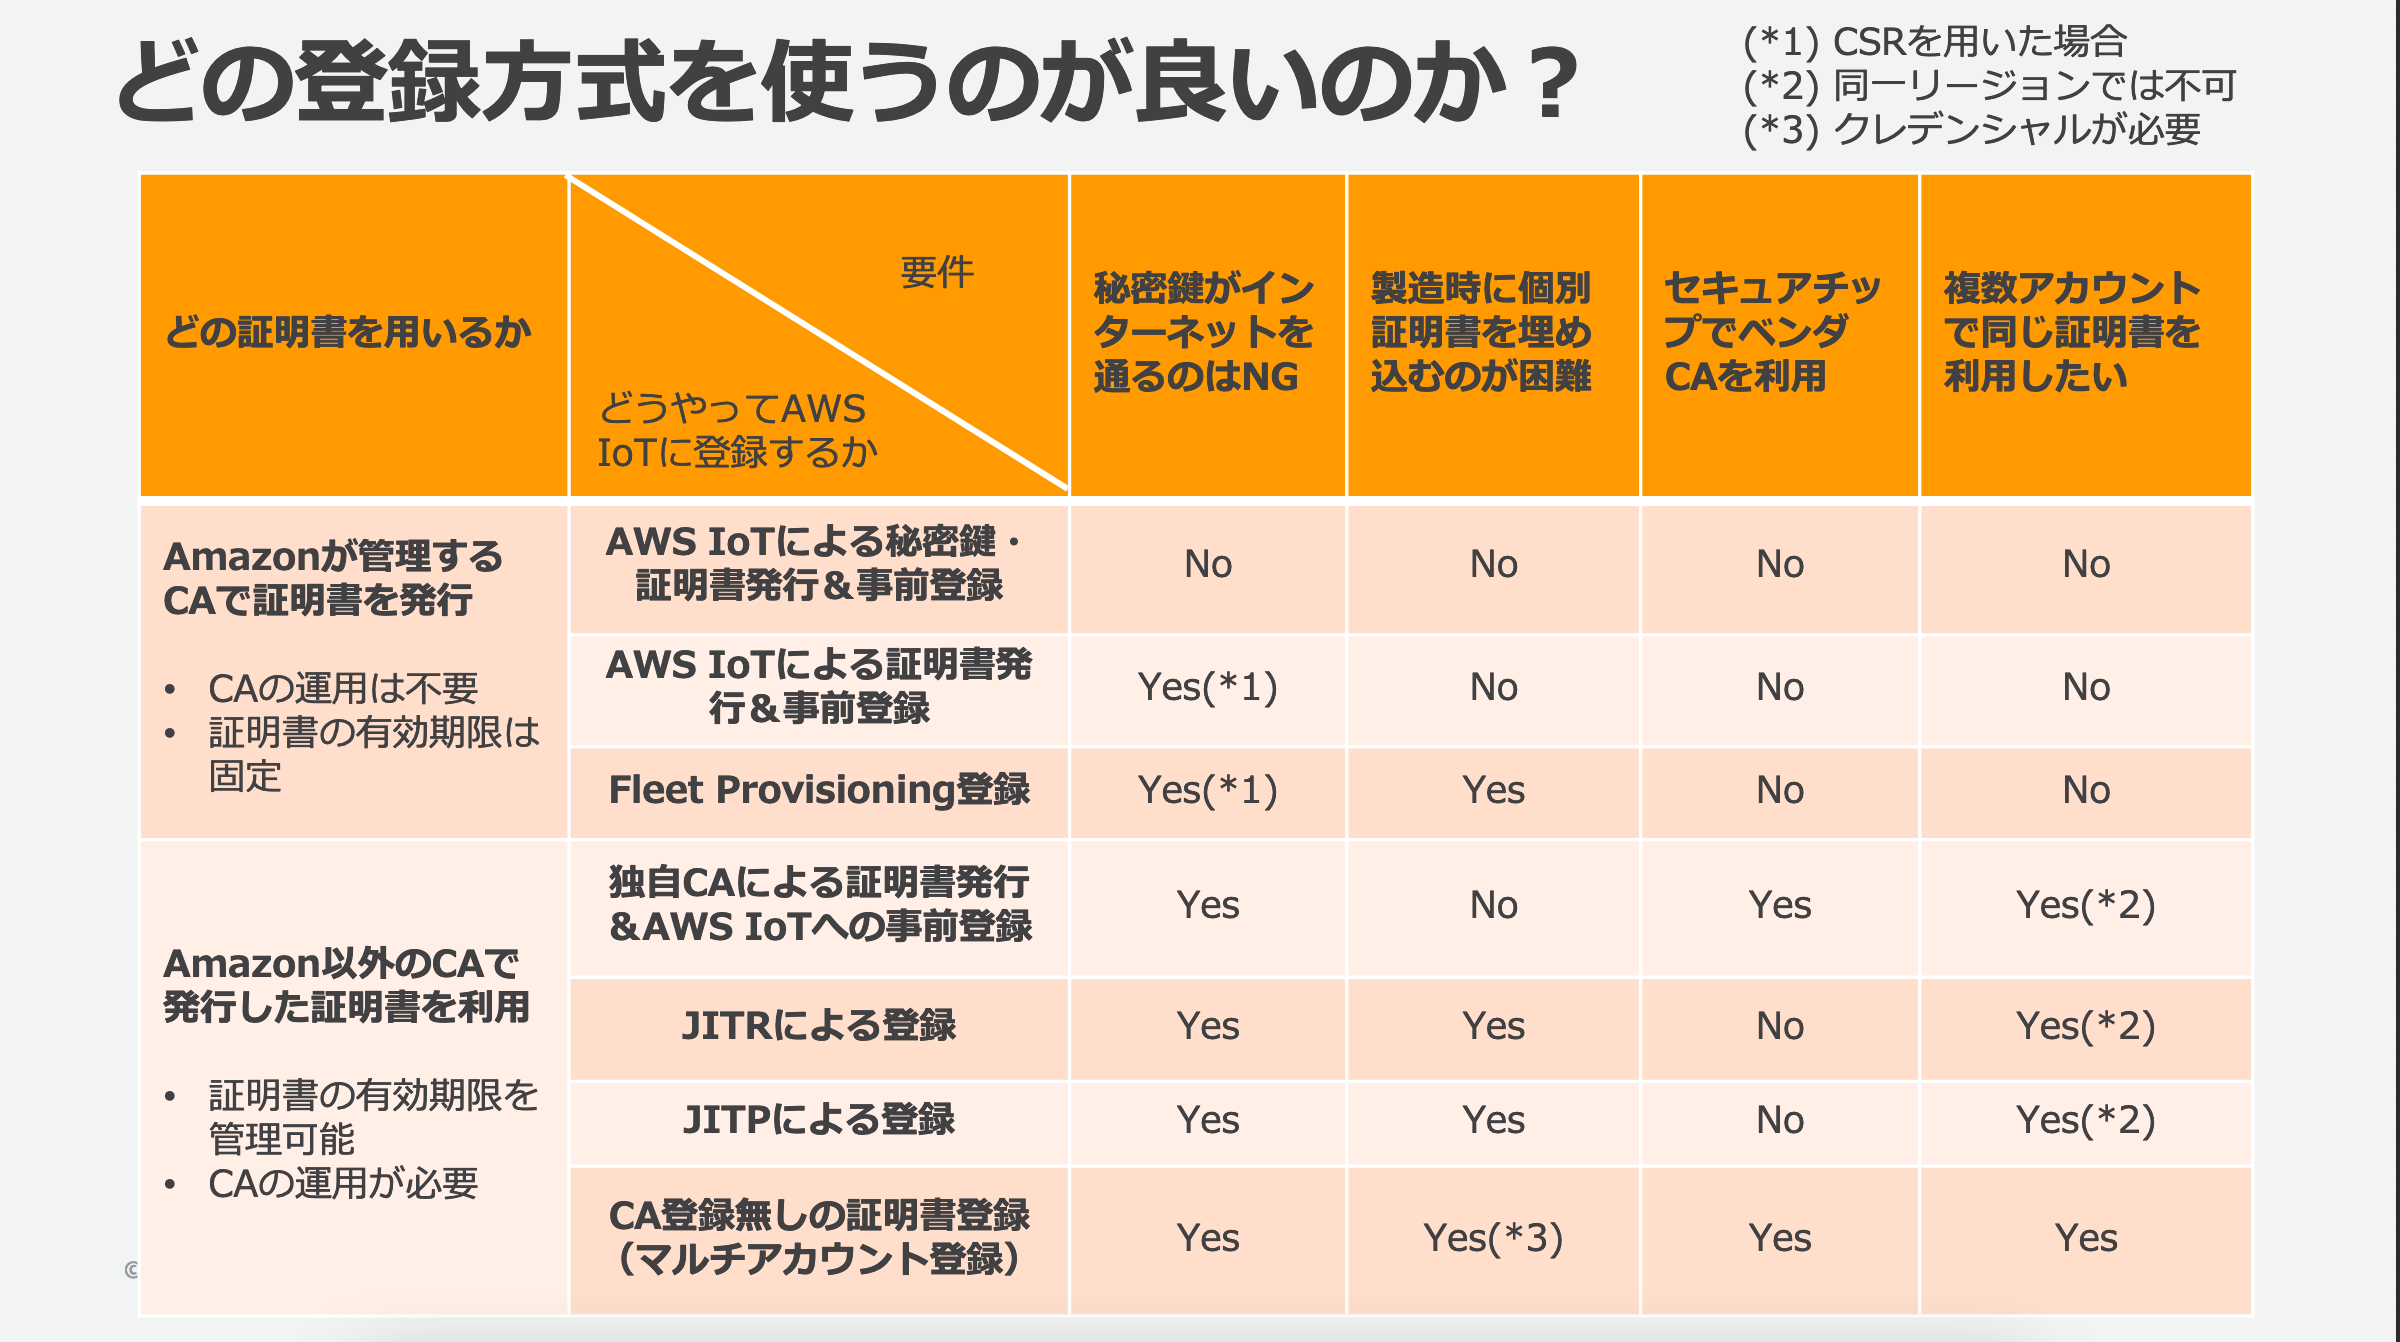
今回はこの中で、製造時にデバイスに証明書を埋め込む必要のない Just In Time Prvisioning(JITP)について試してみます。JITR( Just In Time Registration)については次回試してみますが、JITRとJITPの主な違いは、JITPは事前に作成したテンプレートをもとにしてプロビジョニングを行うのに対して、JITRはLambda関数を用意してプロビジョニングを行うので、JITRのほうがユーザーの方で自由にカスタマイズしやすいという違いがあります。
Just in time provisioning (JITP)
CA証明書と検証証明書の作成
まず、CA証明書と検証証明書をを作成する必要があります。CA証明書はOpenSSLのコマンドで作成することができます。
CA証明書を作成
$ openssl req -x509 -new -nodes -key rootCA.key -sha256 -days 1024 -out rootCA.pem
# 適宜入力
-----
Country Name (2 letter code) []:JP
State or Province Name (full name) []:Tokyo
Locality Name (eg, city) []:Tokyo
Organization Name (eg, company) []:MyOrg
Organizational Unit Name (eg, section) []:MyUnit
Common Name (eg, fully qualified host name) []:RootCA
Email Address []:hogehoge
AWS IoT registration code を取得
$ aws iot get-registration-code
{
    "registrationCode": "017102e221eb356519.....(中略)"
}
検証証明書のキーペアを作成
$ openssl genrsa -out verificationCert.key 2048
検証証明書のCSRを作成 (Common Nameに registration codeを入力)
$ openssl req -new -key verificationCert.key -out verificationCert.csr

Country Name (2 letter code) []:JP
State or Province Name (full name) []:JP
Locality Name (eg, city) []:Tokyo
Organization Name (eg, company) []:MyOrg
Organizational Unit Name (eg, section) []:MyOU
Common Name (eg, fully qualified host name) []:017102e221eb356519 ......(中略)
Email Address []:
CSRから検証証明書を作成
$ openssl x509 -req -in verificationCert.csr -CA rootCA.pem -CAkey rootCA.key -CAcreateserial -out verificationCert.crt -days 500 -sha256
AWS IoT CoreにCA証明書を登録
aws iot register-ca-certificate --ca-certificate rootCA.pem --verification-cert verificationCert.crt
私の環境ではここで、以下のようなエラーとなってしまいました。CA Certificateが正しくないと。
An error occurred (InvalidRequestException) when calling the RegisterCACertificate operation: Contents of the CA Certificate certificate are not correct
こちらの記事を見たところ、CAの設定でbasicConstraintsが設定されていないとダメなようで、opensslのConfig fileを作成してCA certificationのbasicConstraintsをTrueにしてCAを再作成したところうまく登録できました。
IoT Core側の設定
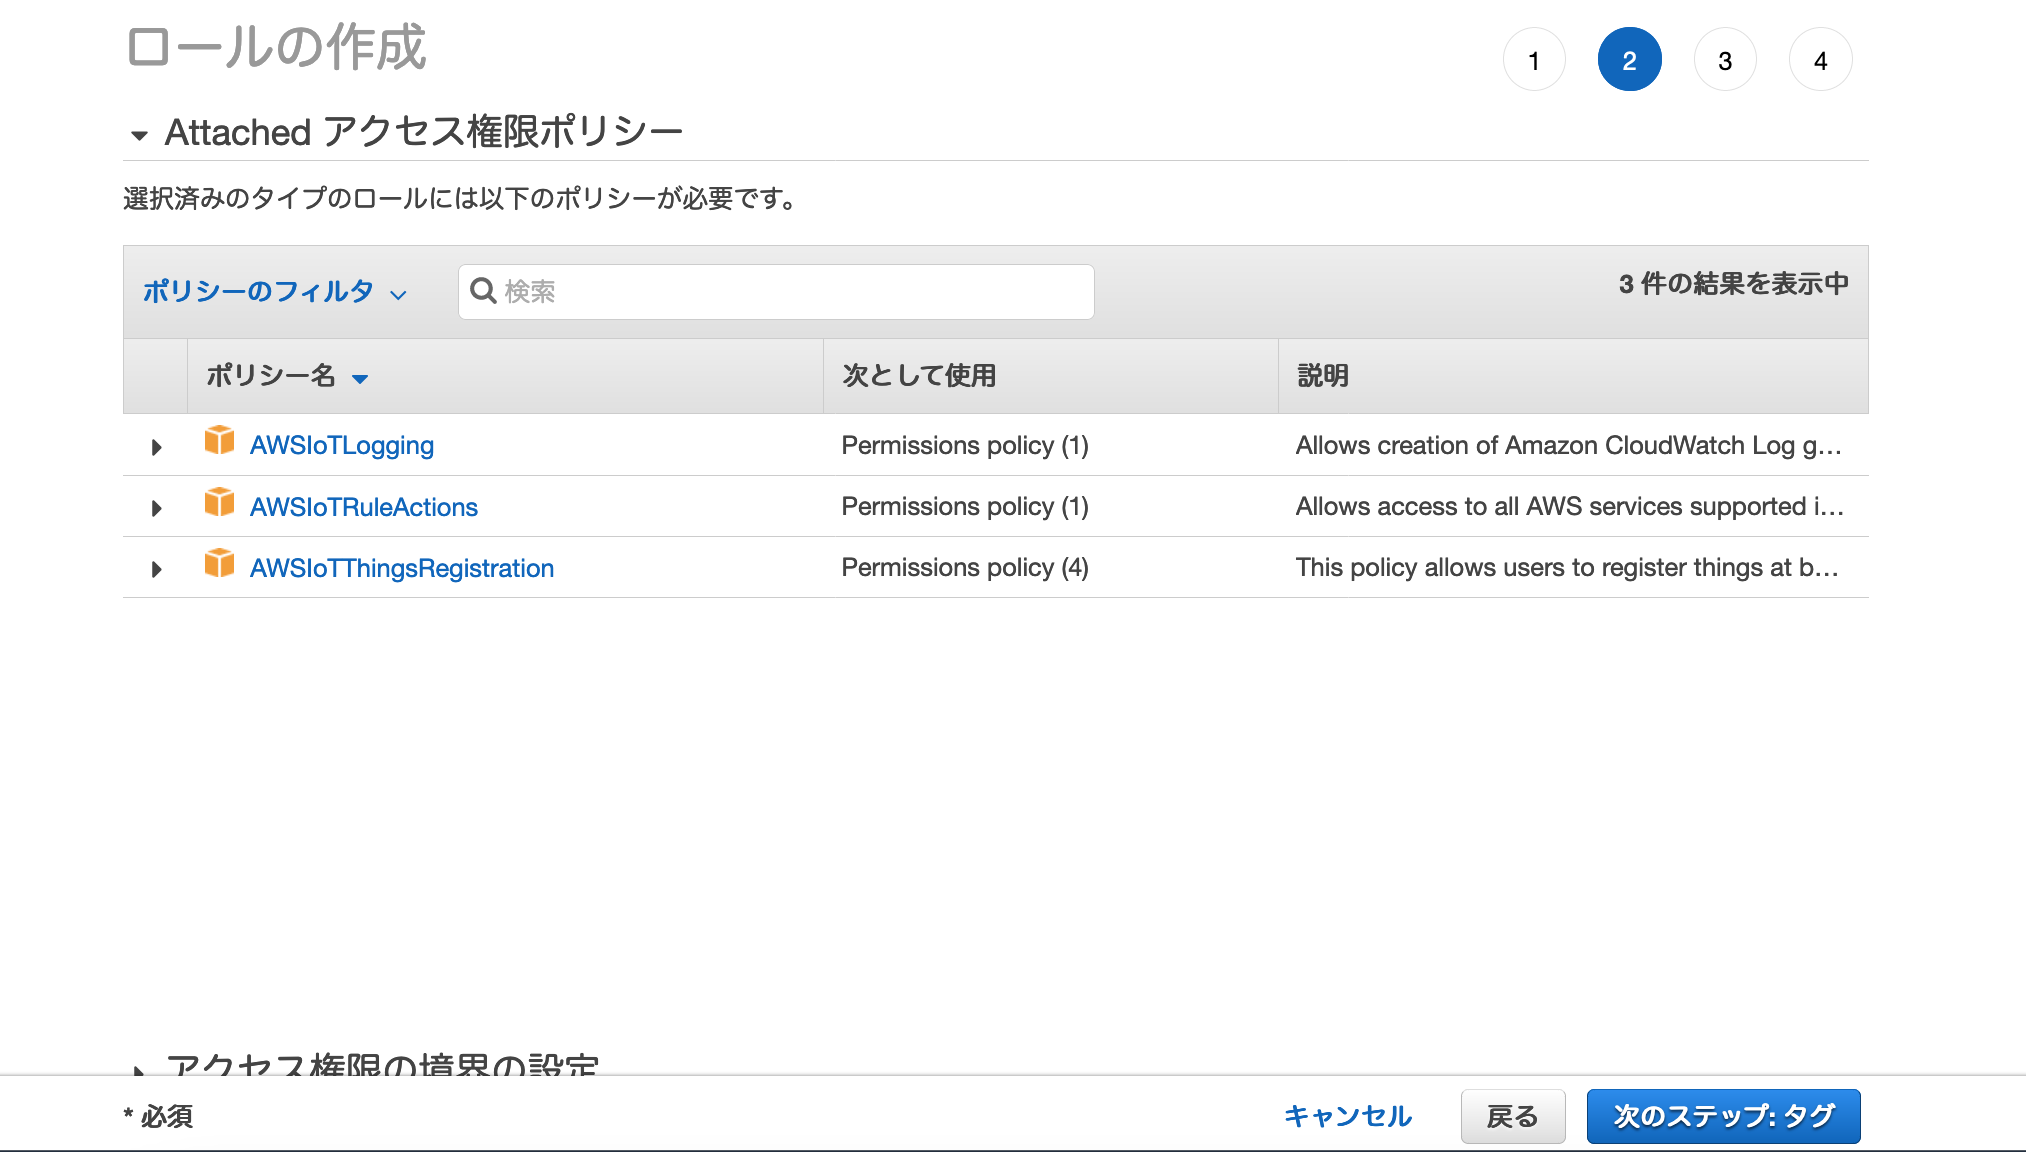
まず、IAMのロールからロールの作成を行い、IoTのThingの登録をできる権限を付与したRoleを作成します。
次に、デバイスにアタッチするPolicyを用意します。適宜デバイスに必要な権限を付与するようにします。すでに作成済みのPolicyがあればそれを使用しても構いません。ここではこちらで以前に作成したPolicyを使用しました。
次にプロビジョニングテンプレートを作成します。プロビジョニングテンプレートはこちらに解説があるように、入力するParameterと作成するResourceを定義したテンプレートです。前回のFleet Provisioningでも使用しましたが、JITPでの注意点は、ここで使用できるParameterが証明書の中に含まれる変数に限定されるということです。opensslのコマンドで証明書を作成する際にCountryNameやCommonNameを入力すると思いますが、これらの変数を使って必要な情報を渡してあげる必要があります。
ここでは以下のように、Parametersに"AWS::IoT::Certificate::CommonName": { "Type": "String" }や"AWS::IoT::Certificate::Country": { "Type": "String" }を入れて、CommonNameにThing名を入れています。
{
    "Parameters" : {
        "AWS::IoT::Certificate::CommonName": { "Type": "String" },
        "AWS::IoT::Certificate::Country": { "Type": "String" },
        "AWS::IoT::Certificate::Id": { "Type": "String" }
    },
    "Resources" : {
        "thing" : {
            "Type" : "AWS::IoT::Thing",
            "Properties" : {
            "ThingName" : {"Ref" : "AWS::IoT::Certificate::CommonName"},
            "AttributePayload" : { "version" : "v1", "Country" :  {"Ref" : "AWS::IoT::Certificate::Country"}}
            }
        },
        "certificate" : {
            "Type" : "AWS::IoT::Certificate",
            "Properties" : {
            "CertificateId": {"Ref" : "AWS::IoT::Certificate::Id"}
            }
        },
        "policy" : {
            "Type" : "AWS::IoT::Policy",
            "Properties" : {
                "PolicyName" : "My_IoT_Policy"
            }
        }
    }
}
実際にAWSにこのテンプレートを設定する際には、こちらに解説があるようにJSONを文字列変換し、”をエスケープしたあと、Roleと合わせて一つのファイルにする必要があります。私はPythonからjson.dumpsで整形し、以下のような形にしました。
{
    "templateBody": "{\"Parameters\": {\"AWS::IoT::Certificate::CommonName\": {\"Type\": \"String\"}, \"AWS::IoT::Certificate::Country\": {\"Type\": \"String\"}, \"AWS::IoT::Certificate::Id\": {\"Type\": \"String\"}}, \"Resources\": {\"thing\": {\"Type\": \"AWS::IoT::Thing\", \"Properties\": {\"ThingName\": {\"Ref\": \"AWS::IoT::Certificate::CommonName\"}, \"AttributePayload\": {\"version\": \"v1\", \"Country\": {\"Ref\": \"AWS::IoT::Certificate::Country\"}}}}, \"certificate\": {\"Type\": \"AWS::IoT::Certificate\", \"Properties\": {\"CertificateId\": {\"Ref\": \"AWS::IoT::Certificate::Id\"}}}, \"policy\": {\"Type\": \"AWS::IoT::Policy\", \"Properties\": {\"PolicyName\": \"My_IoT_Policy\"}}}}",
    "roleArn": "arn:aws:iam::${account ID}:role/JITP_Role"
}
このテンプレートを先程登録したCA証明書に紐付けます。
$ aws iot list-ca-certificates
として先程登録したCA証明書のCertificateIDを確認した後、以下で登録したCA証明書をACTIVEに設定します。
aws iot update-ca-certificate --certificate-id <CertificateID> --new-status ACTIVE
テンプレートを指定してCA証明書に紐付け。
aws iot update-ca-certificate --certificate-id <CertificateID> --new-auto-registration-status ENABLE --registration-config file://provisioning_template.json
デバイス側の設定
次にデバイス証明書を作成します。まず、キーを作成。
openssl genrsa -out deviceCert.key 2048
CSRを作成
openssl req -new -key deviceCert.key -out deviceCert.csr
プロンプトで以下のようにCommonNameにThing名を指定します。
-----
Country Name (2 letter code) []:JP
State or Province Name (full name) []:State
Locality Name (eg, city) []:Tokyo
Organization Name (eg, company) []:Org
Organizational Unit Name (eg, section) []:OU
Common Name (eg, fully qualified host name) []:TsugunaoThing1
Email Address []:
CSRからCAを使って証明書を作成
openssl x509 -req -in deviceCert.csr -CA rootCA.pem -CAkey rootCA.key -CAcreateserial -out deviceCert.crt -days 365 -sha256
JITPでは証明書とCAを連結して送信する必要があるので、連結します。
cat deviceCert.crt rootCA.pem > deviceCertAndCACert.crt
次に作成された証明書(deviceCertAndCACert.crt)、デバイスキー(deviceCert.key)を使ってアクセスしてみます。Amazonのサーバー認証用のCA証明書が必要となるのでこちらから事前にダウンロードしておきます。
今回はクライアントとしてmosquittoを使って接続してみました。
初回の接続。
$ ./mosquitto_pub --cafile jitp_cert/root.cert --cert jitp_cert/deviceCertAndCACert.crt --key jitp_cert/deviceCert.key -h "<host name>-ats.iot.ap-northeast-1.amazonaws.com" -p 8883 -q 1 -d -t topic/test -m "Hello World" -i id01 --tls-version tlsv1.2
接続エラーとなります。
Client id01 sending CONNECT
Error: The connection was lost.
2回目の接続
./mosquitto_pub --cafile jitp_cert/root.cert --cert jitp_cert/deviceCertAndCACert.crt --key jitp_cert/deviceCert.key -h "<host name>-ats.iot.ap-northeast-1.amazonaws.com" -p 8883 -q 1 -d -t topic/test -m "Hello World" -i id01 --tls-version tlsv1.2
1回目の失敗時にデバイス証明書が登録されているため正しく接続されます。
Client id01 sending CONNECT
Client id01 received CONNACK (0)
Client id01 sending PUBLISH (d0, q1, r0, m1, 'topic/test', ... (11 bytes))
Client id01 received PUBACK (Mid: 1, RC:0)
Client id01 sending DISCONNECT
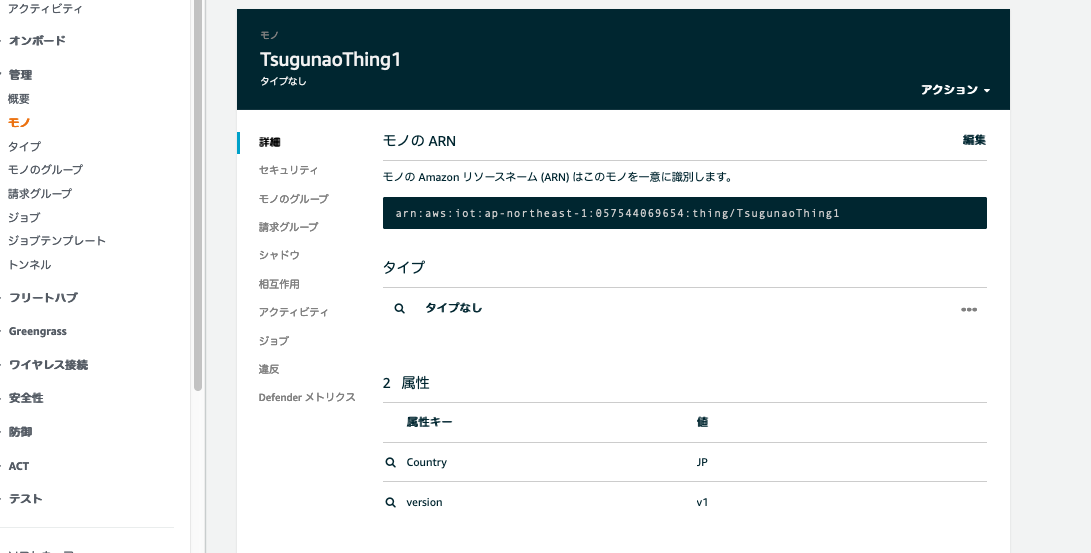
マネジメントコンソール上で確認すると、モノが作成されていることが確認できます。
まとめ
今回はJITPにてデバイスの初回アクセス時に証明書を作成して登録する方法を試してみました。次回はより柔軟に設定を行えるJITRについて試してみたいと思います。
参考にしたサイト