手順
API の有効化
手順1
Google Cloud に行き、左上のメニューから「API とサービス>ライブラリ」を選択する。
(事前に Google Cloud でプロジェクトを作成しておく必要がある)

手順2
使用したい API を探して「有効にする」を押す。

サービスアカウントの作成
手順3
左上のメニューから「IAM と管理>サービスアカウント>サービスアカウントを作成」を押す。

手順4
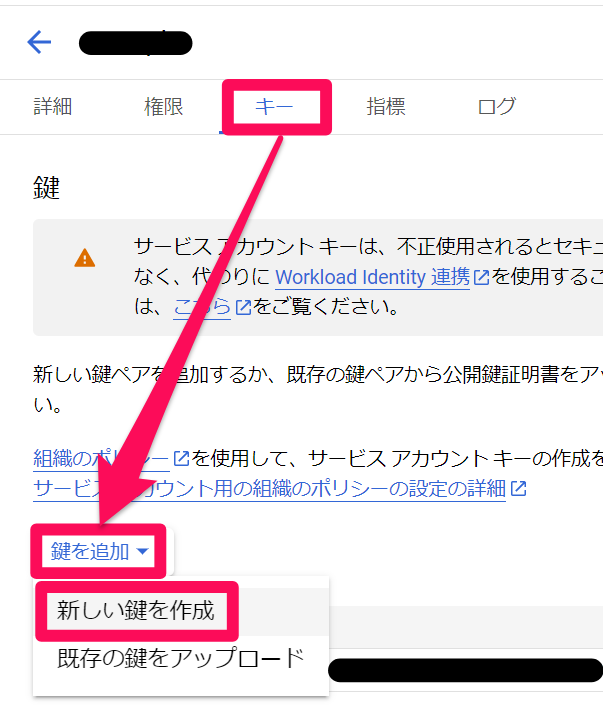
サービスアカウント名やサービスアカウントの説明、ロール、IAM の条件、サービスアカウントユーザーロール、サービスアカウント管理者ロール等を設定し終えたら、作成したサービスアカウントを選択して「キー>鍵を追加>新しい鍵を作成」を押す。
手順5
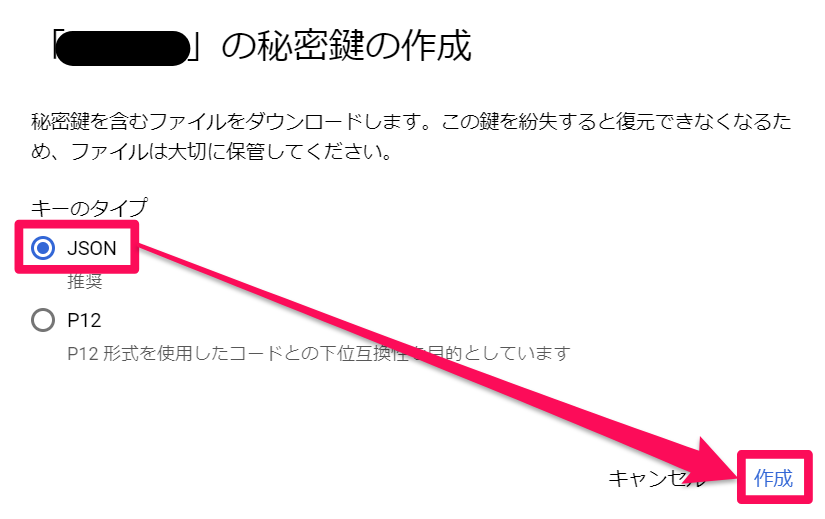
「キーのタイプ」が「JSON」になっている事を確認して右下の「作成」を押す。
コーディング
手順6
Google Apps Script を開き、下記のコードをコピペする。
function getGoogleCloudJwt()
{
  const PRIVATE_KEY = "プライベートキー";

  const SCOPES =
  [
    "必要なスコープの URL"
  ];

  const  HEADERS =
  {
    alg: "RS256",
    typ: "JWT"
  };

  const NOW = Math.floor(Date.now() / 1000);

  const CLAIM =
  {
    iss: "サービスアカウントのメールアドレス",
    scope: SCOPES.join(" "),
    aud: "https://oauth2.googleapis.com/token",
    exp: NOW + 3600,
    iat: NOW
  };

  const ENCODED_HEADERS = Utilities.base64EncodeWebSafe(JSON.stringify(HEADERS));

  const ENCODED_CLAIM = Utilities.base64EncodeWebSafe(JSON.stringify(CLAIM));

  const SIGNATURE = Utilities.computeRsaSha256Signature(ENCODED_HEADERS + "." + ENCODED_CLAIM, PRIVATE_KEY);

  const OPTIONS =
  {
    method: "post",
    contentType: "application/x-www-form-urlencoded",
    payload:
    {
      grant_type: "urn:ietf:params:oauth:grant-type:jwt-bearer",
      assertion: ENCODED_HEADERS + "." + ENCODED_CLAIM + "." + Utilities.base64EncodeWebSafe(SIGNATURE)
    }
  };

  const RESPONSE = JSON.parse(UrlFetchApp.fetch("https://oauth2.googleapis.com/token", OPTIONS).getContentText());

  return RESPONSE.access_token;
}
手順7
「手順6」で記述したコードのプライベートキーとサービスアカウントのメールアドレスをそれぞれ「手順5」で作成した JSON ファイル内の「private_key」と「client_email」の値に変更する。
(プライベートキーには「-----BEGIN」で始まり、 「END PRIVATE KEY-----\n」で終わる値をそのまま入れる)
{
  "type": "service_account",
  "project_id": "xxxx-xxxxxx",
  "private_key_id": "xxxxxxxxxxxxxxxxxxxxxxxxxxxxxxxxxx",
  "private_key": "-----BEGIN PRIVATE KEY-----\nxxxxxxxx\n-----END PRIVATE KEY-----\n",
  "client_email": "xxxx@-xxxxxx.iam.gserviceaccount.com",
  "client_id": "xxxxxxxxxxxxxxxxxxxxx",
  "auth_uri": "https://accounts.google.com/o/oauth2/auth",
  "token_uri": "https://oauth2.googleapis.com/token",
  "auth_provider_x509_cert_url": "https://www.googleapis.com/oauth2/v1/certs",
  "client_x509_cert_url": "https://www.googleapis.com/robot/v1/metadata/x509/xxxx%40xxxx-xxxxxx.iam.gserviceaccount.com",
  "universe_domain": "googleapis.com"
}
手順8
こちらを参考にして、「手順6」で記述したコードの「必要なスコープの URL」に使用する API に応じたスコープの URL を記述する。
function getGoogleCloudJwt()
{
  const PRIVATE_KEY = "-----BEGIN PRIVATE KEY-----\nxxxxxxxxx\n-----END PRIVATE KEY-----\n";

  const SCOPES =
  [
    "https://www.googleapis.com/auth/cloud-platform.read-only"//今回は Cloud Storage 上のオブジェクトを読み取る
  ];

  const  HEADERS =
  {
    alg: "RS256",
    typ: "JWT"
  };

  const NOW = Math.floor(Date.now() / 1000);

  const CLAIM =
  {
    iss: "xxxx@xxxx-xxxxxx.iam.gserviceaccount.com",
    scope: SCOPES.join(" "),
    aud: "https://oauth2.googleapis.com/token",
    exp: NOW + 3600,
    iat: NOW
  };

  const ENCODED_HEADERS = Utilities.base64EncodeWebSafe(JSON.stringify(HEADERS));

  const ENCODED_CLAIM = Utilities.base64EncodeWebSafe(JSON.stringify(CLAIM));

  const SIGNATURE = Utilities.computeRsaSha256Signature(ENCODED_HEADERS + "." + ENCODED_CLAIM, PRIVATE_KEY);

  const OPTIONS =
  {
    method: "post",
    contentType: "application/x-www-form-urlencoded",
    payload:
    {
      grant_type: "urn:ietf:params:oauth:grant-type:jwt-bearer",
      assertion: ENCODED_HEADERS + "." + ENCODED_CLAIM + "." + Utilities.base64EncodeWebSafe(SIGNATURE)
    }
  };

  const RESPONSE = JSON.parse(UrlFetchApp.fetch("https://oauth2.googleapis.com/token", OPTIONS).getContentText());

  return RESPONSE.access_token;
}
手順9
API を使用するコードのヘッダーの Authorization のトークンの部分をgetServiceAccountOAuthToken()に変更する。
function getCloudStorageObject()
{
  const HEADERS =
  {
    "Content-Type": "application/x-www-form-urlencoded",//使用する API に応じて変更
    "Authorization": "Bearer " + getGoogleCloudJwt()//「getGoogleCloudJwt()」に変更
  };

  const REQUEST =
  {
    method: "get",//使用する API に応じて変更
    muteHttpExceptions : true,
    headers: HEADERS
  };

  const API_URL = "https://storage.googleapis.com/storage/v1/b/bucket/o/object";//使用する API に応じて変更

  const RESPONSE = UrlFetchApp.fetch(API_URL, REQUEST);

  return RESPONSE.getBlob();//行いたい処理に応じて変更
}
デバッグ
手順10
「▷実行」を押して正常に処理が走る事を確認する。

その他
参考記事
最後に
株式会社ModelingXについて

富山県を拠点とするスタートアップ企業、ModelingXは、2022年4月に創業し、「テクノロジーで感動体験を提供する」というミッションを掲げています。当社が開発中の暮らし体験メタバース「MELIFE(ミライフ)」は、バーチャル住宅展示場や銀行相談、家具購入、婚活などができる「地域単位の新たな経済圏」を目指しています。
↓サービスサイトはこちらから↓
ModelingXはリモートワーク&フレックスタイム制を完備。
UnityやUEを共に探求する仲間を全国から募集しています。
↓企業詳細はこちら↓